

Conduct an Access Review
This guide outlines the steps to conduct an access review in Scrut.
Step 1: User Data Collection
Automated
If your application is of the types Integration, SSO, or Native, Scrut automatically fetches user names, emails, roles, and other details.
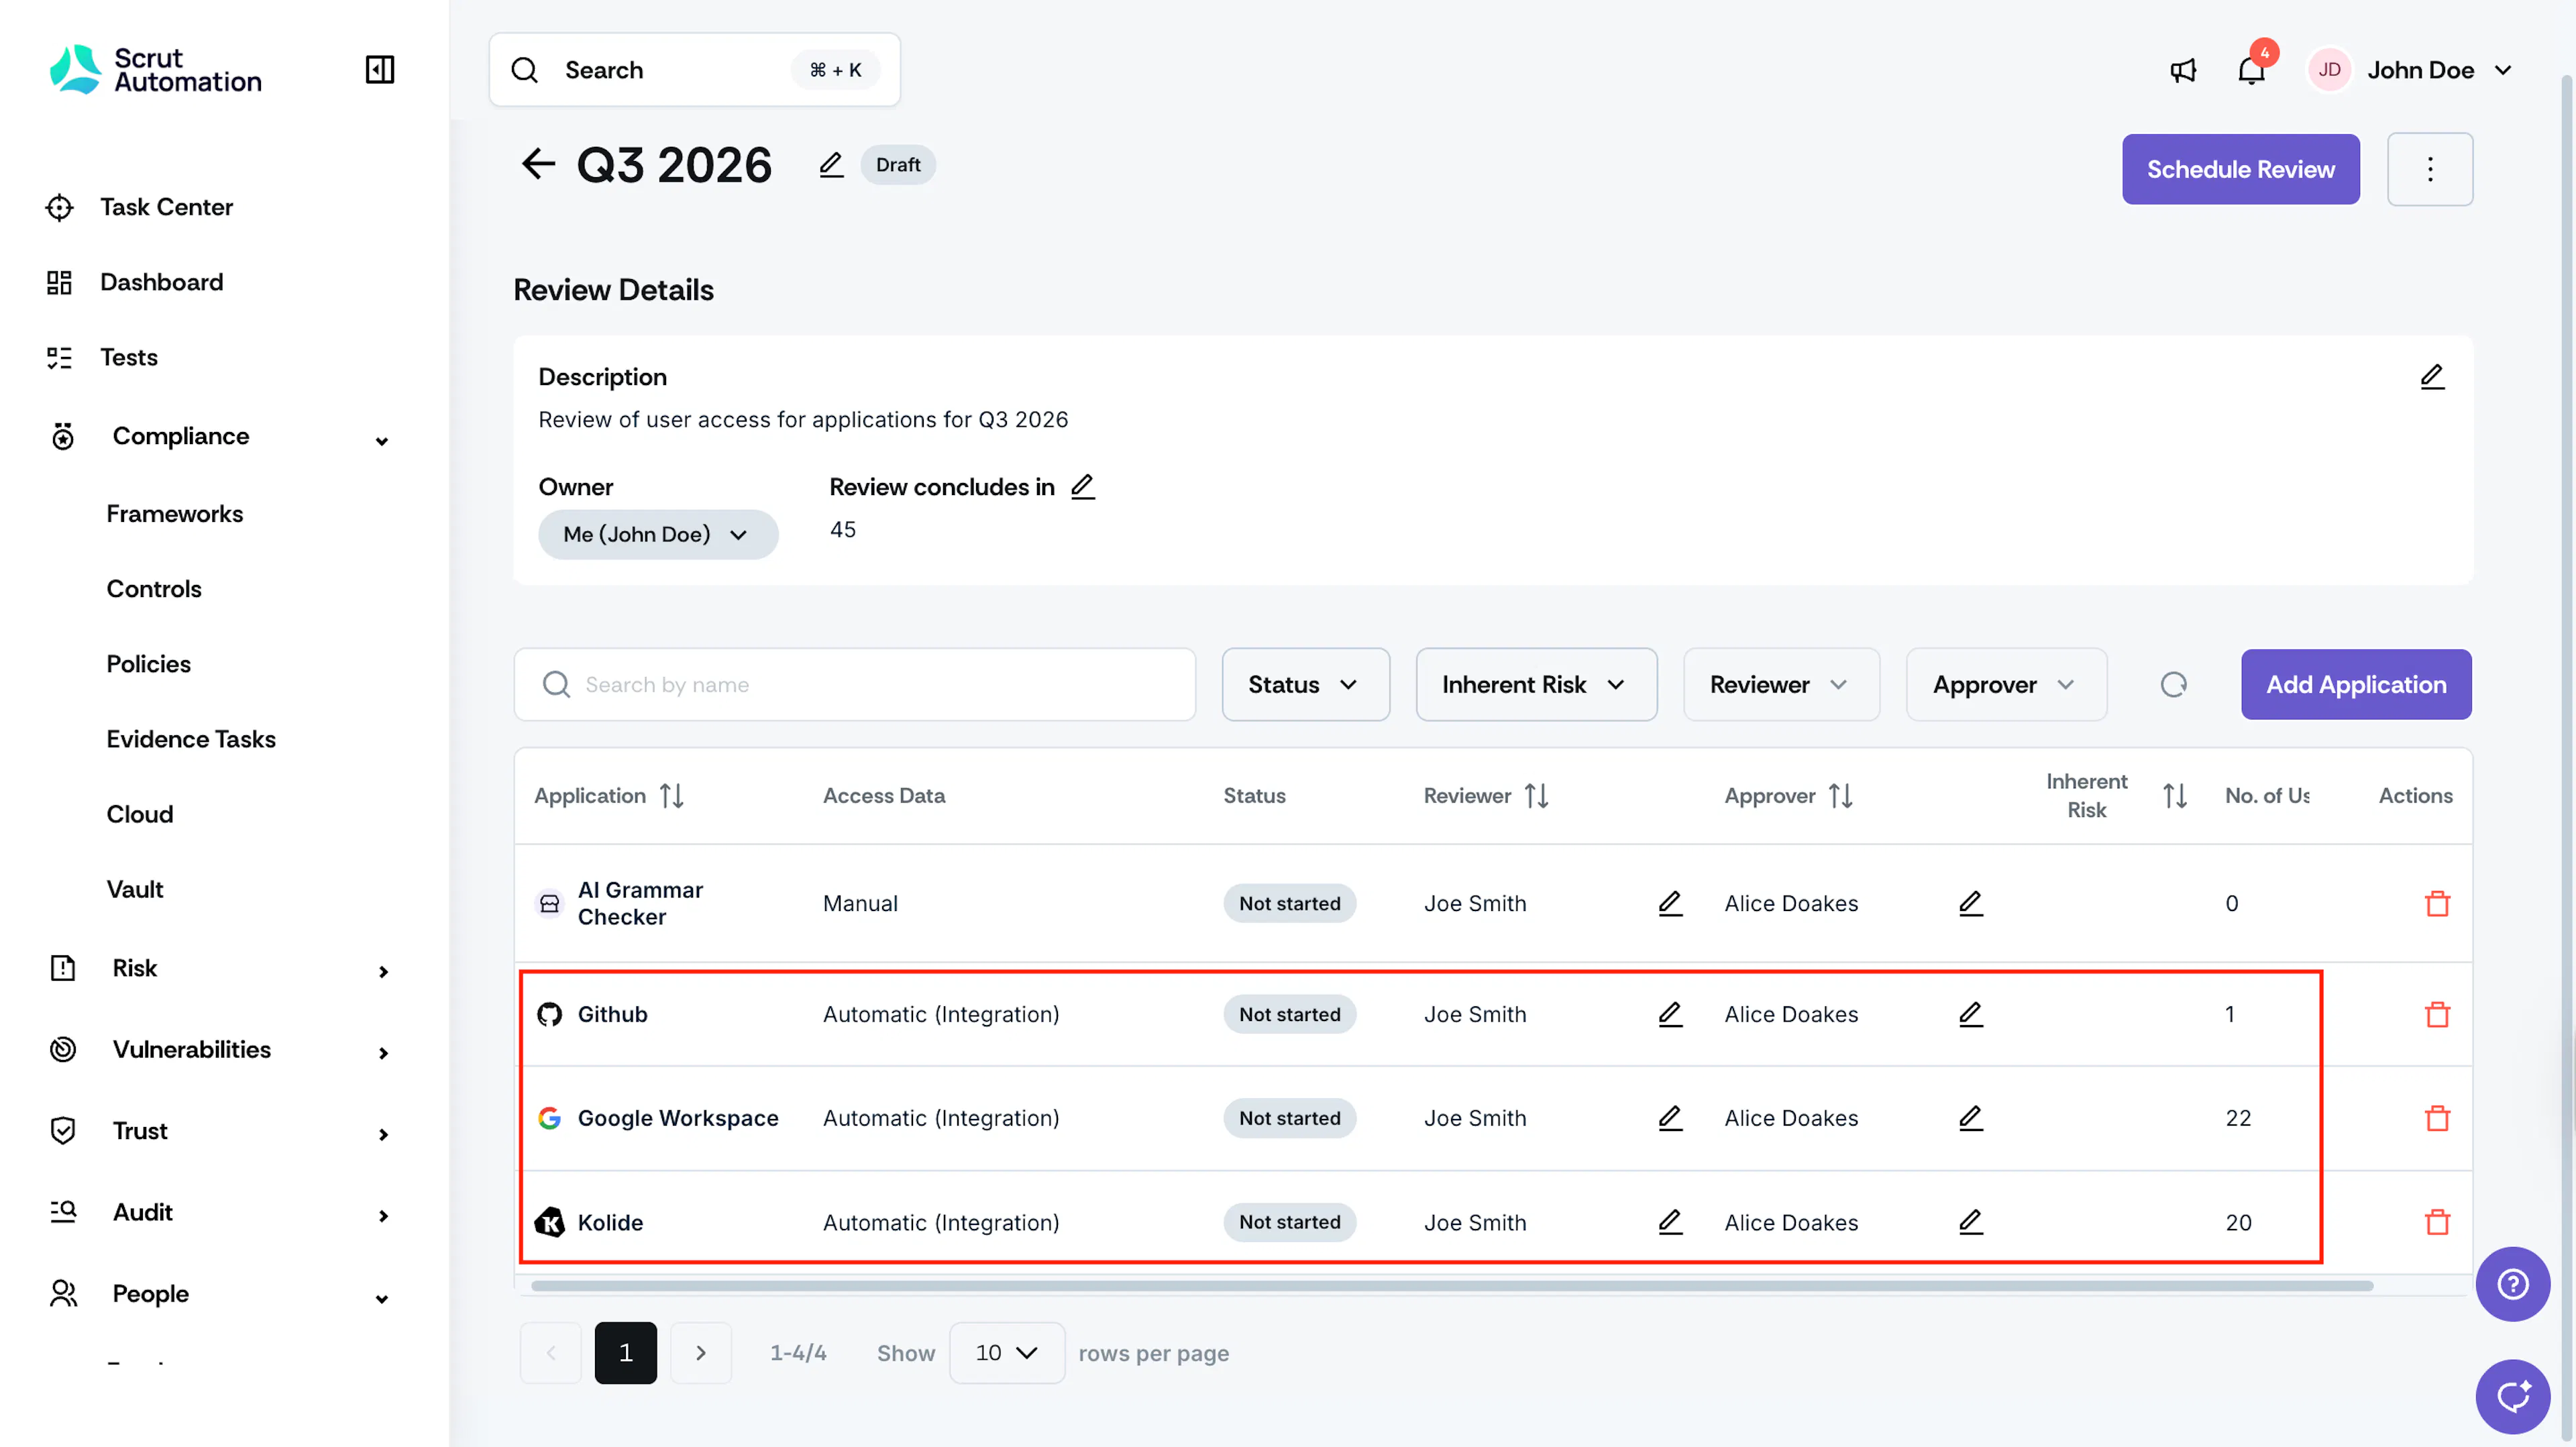
Manual
For vendors and manual apps, you must upload a file that contains a list of application users and their details.
-
Go to People → Access Reviews → Reviews and open your preferred review.
-
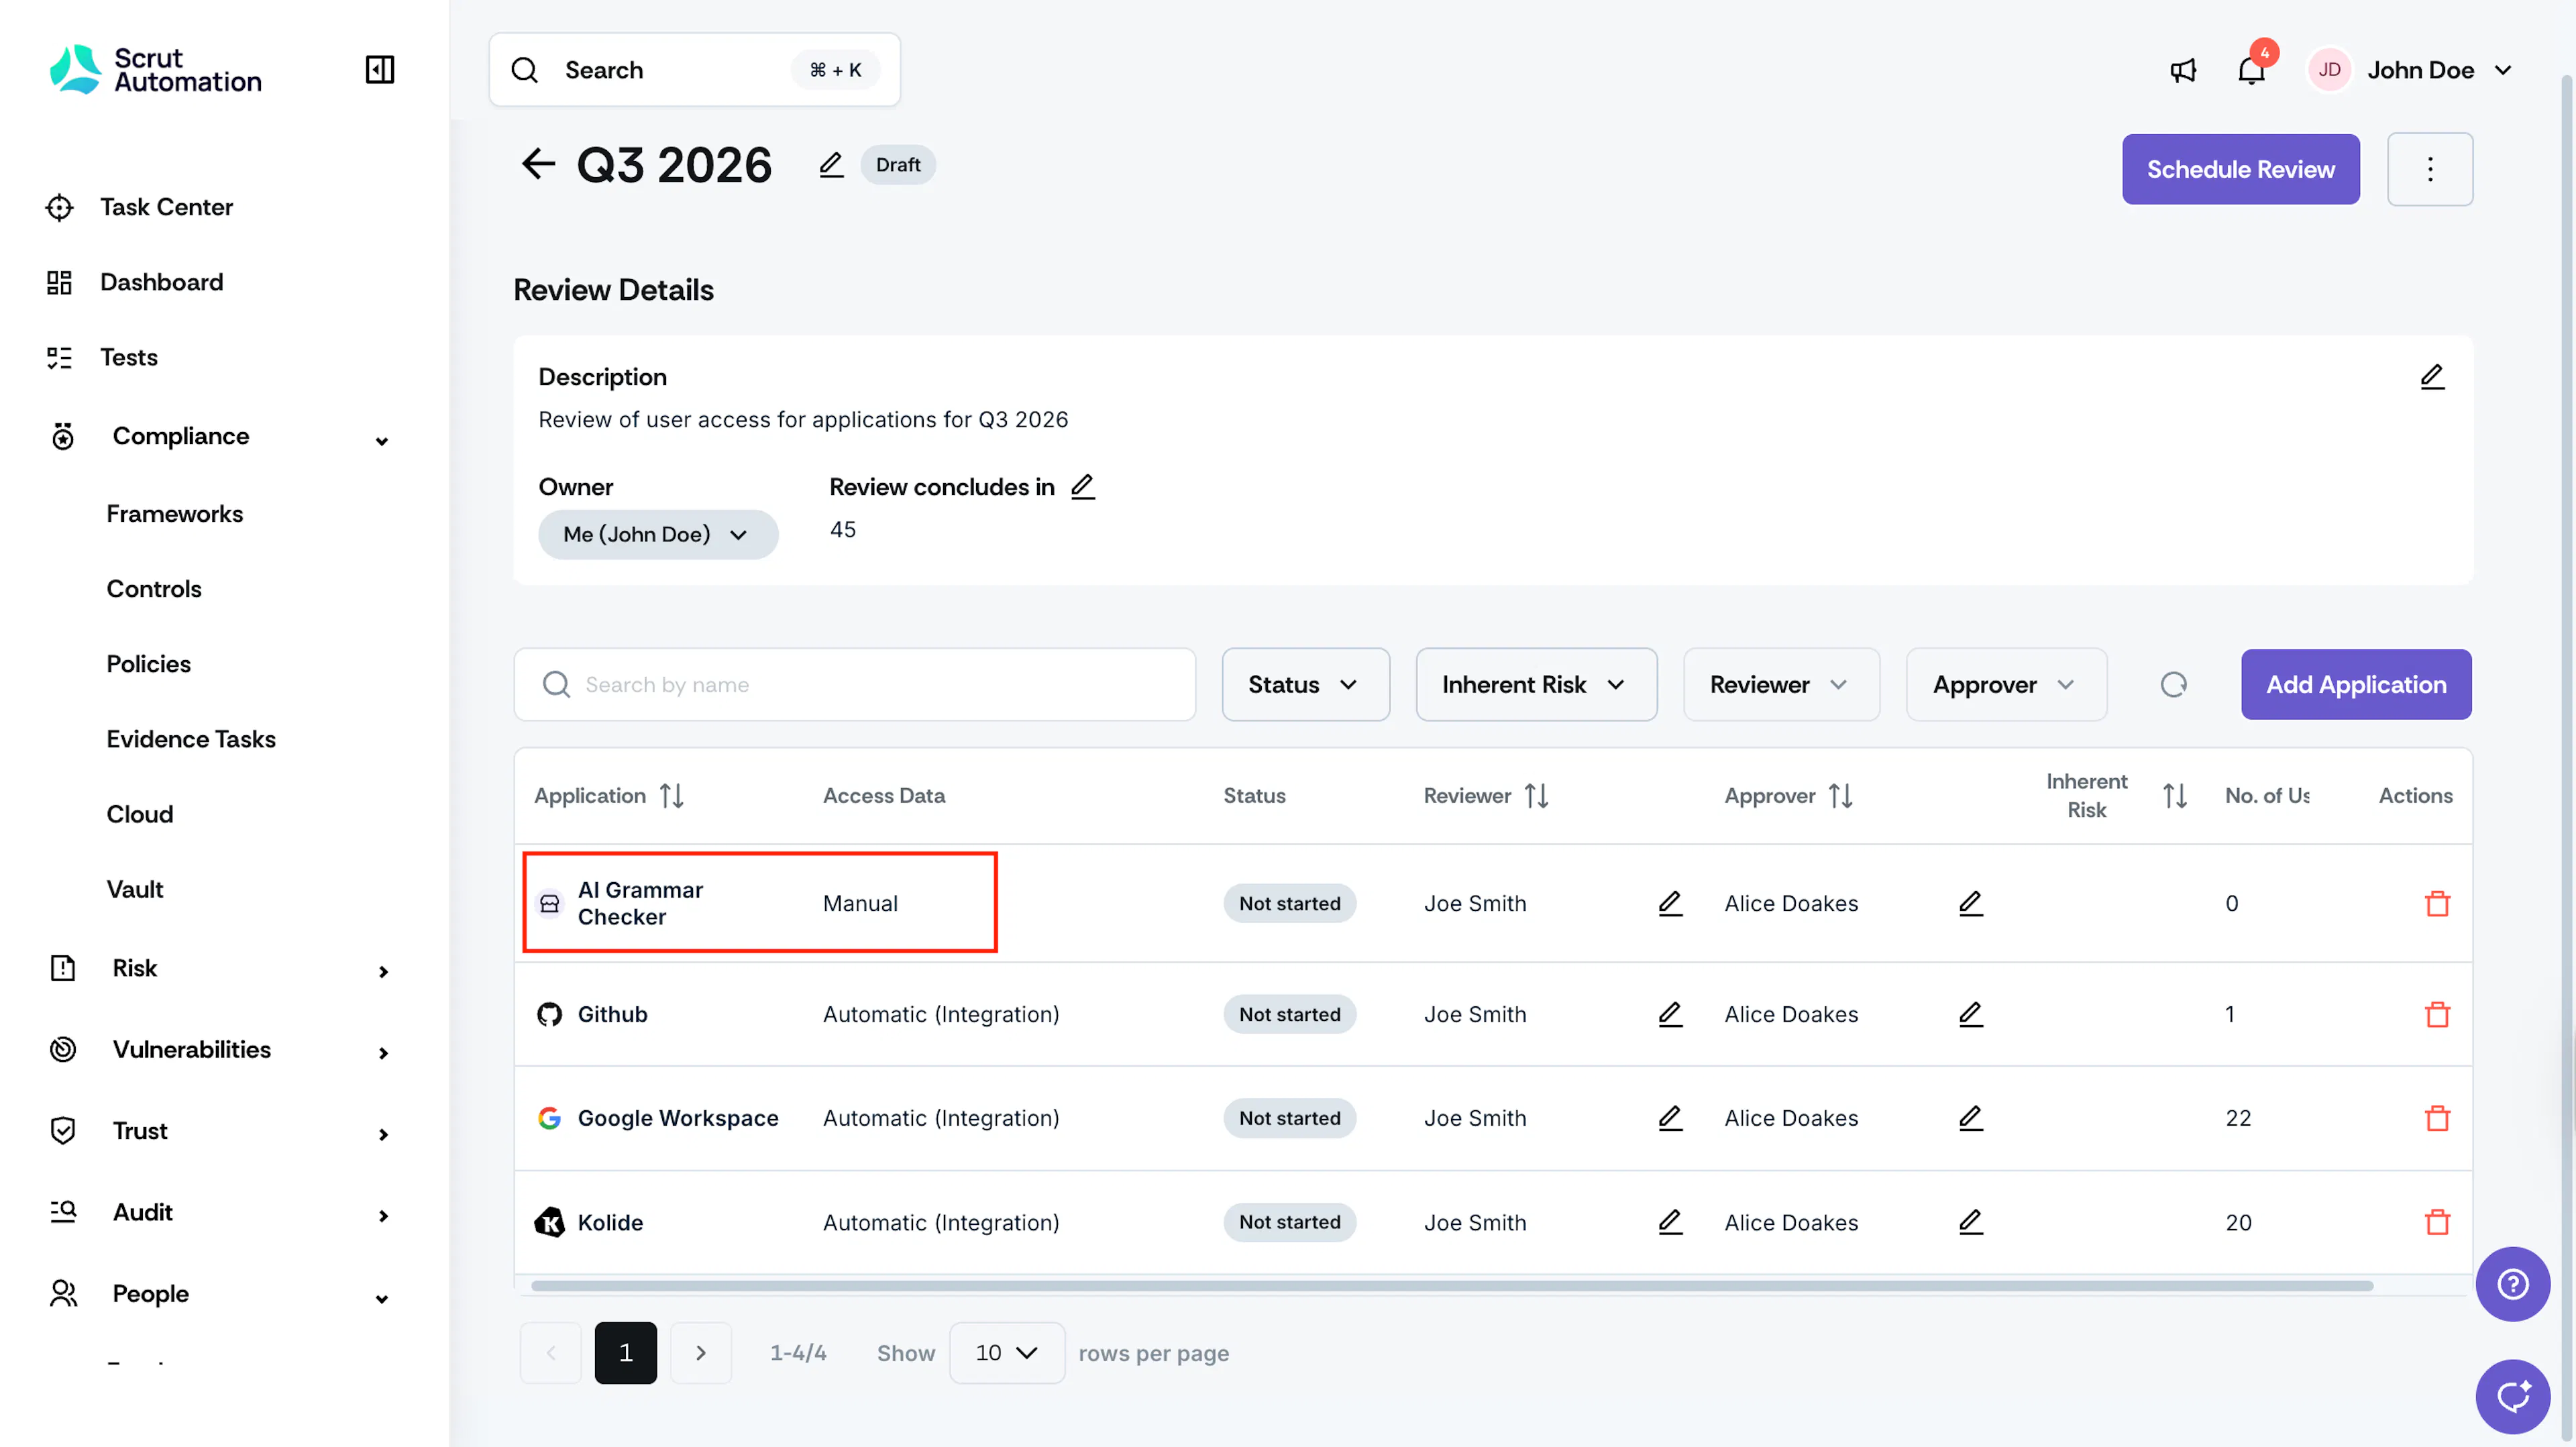
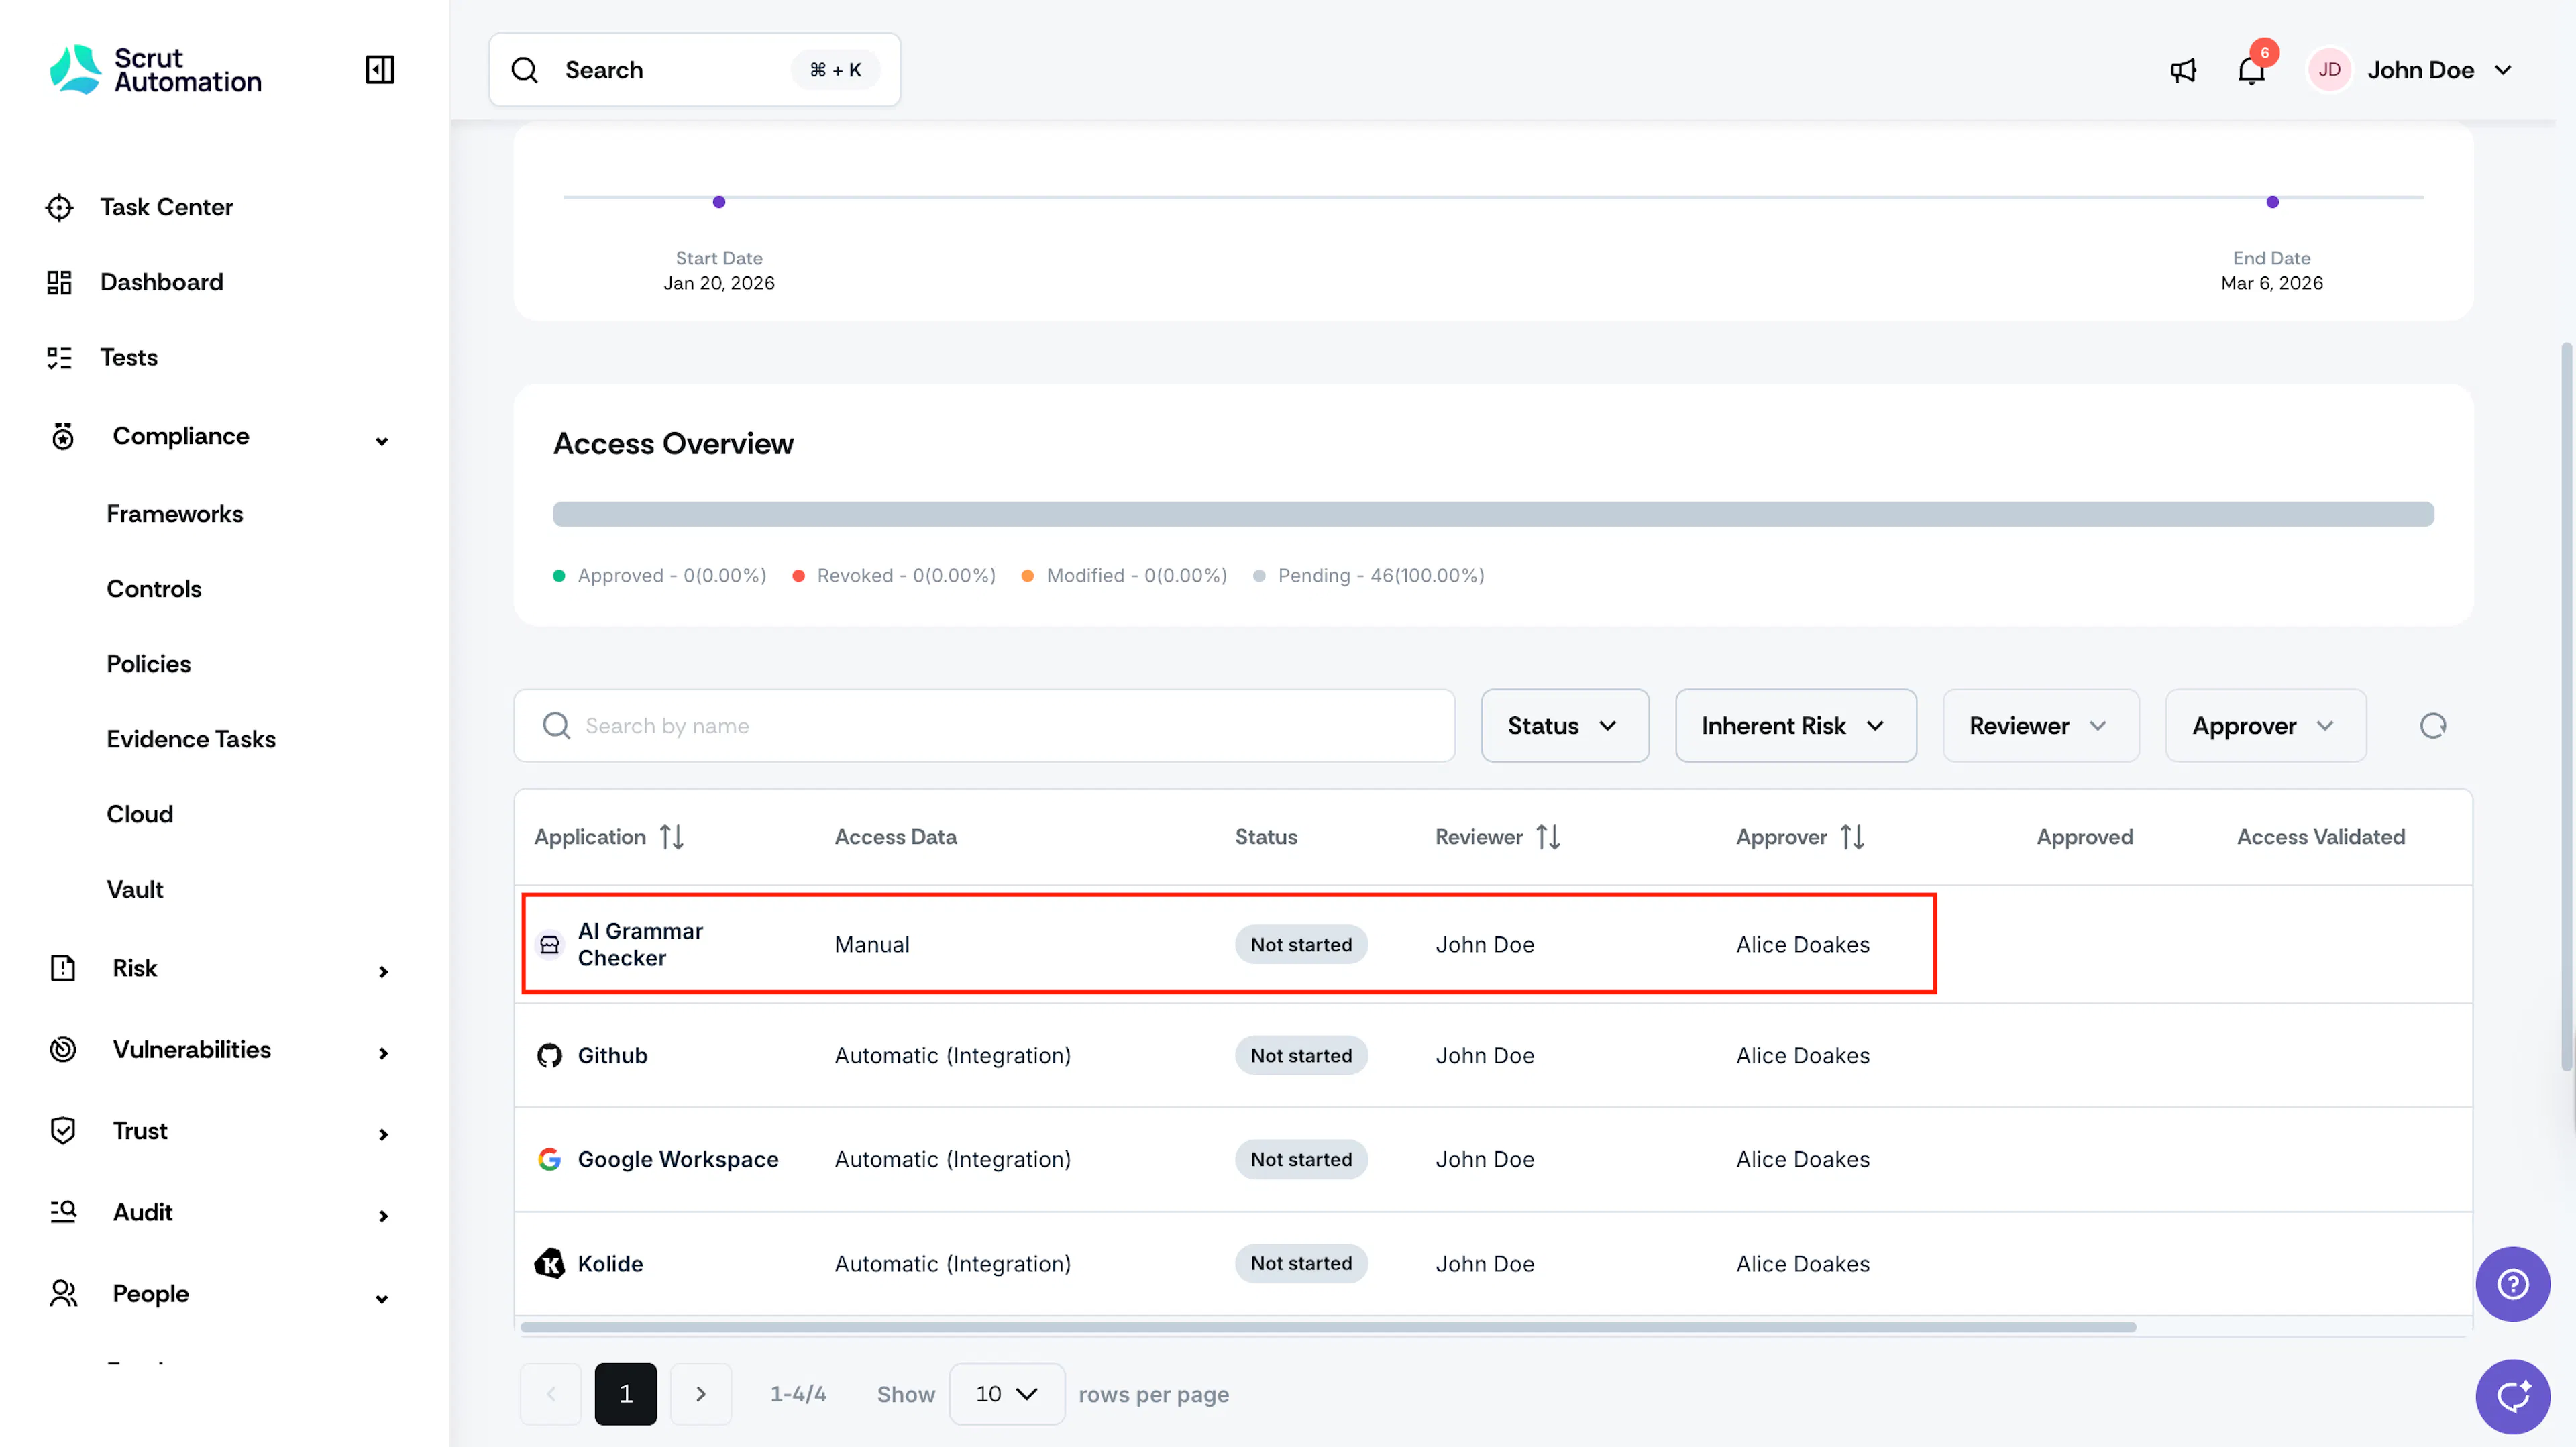
Click on the required application.
-
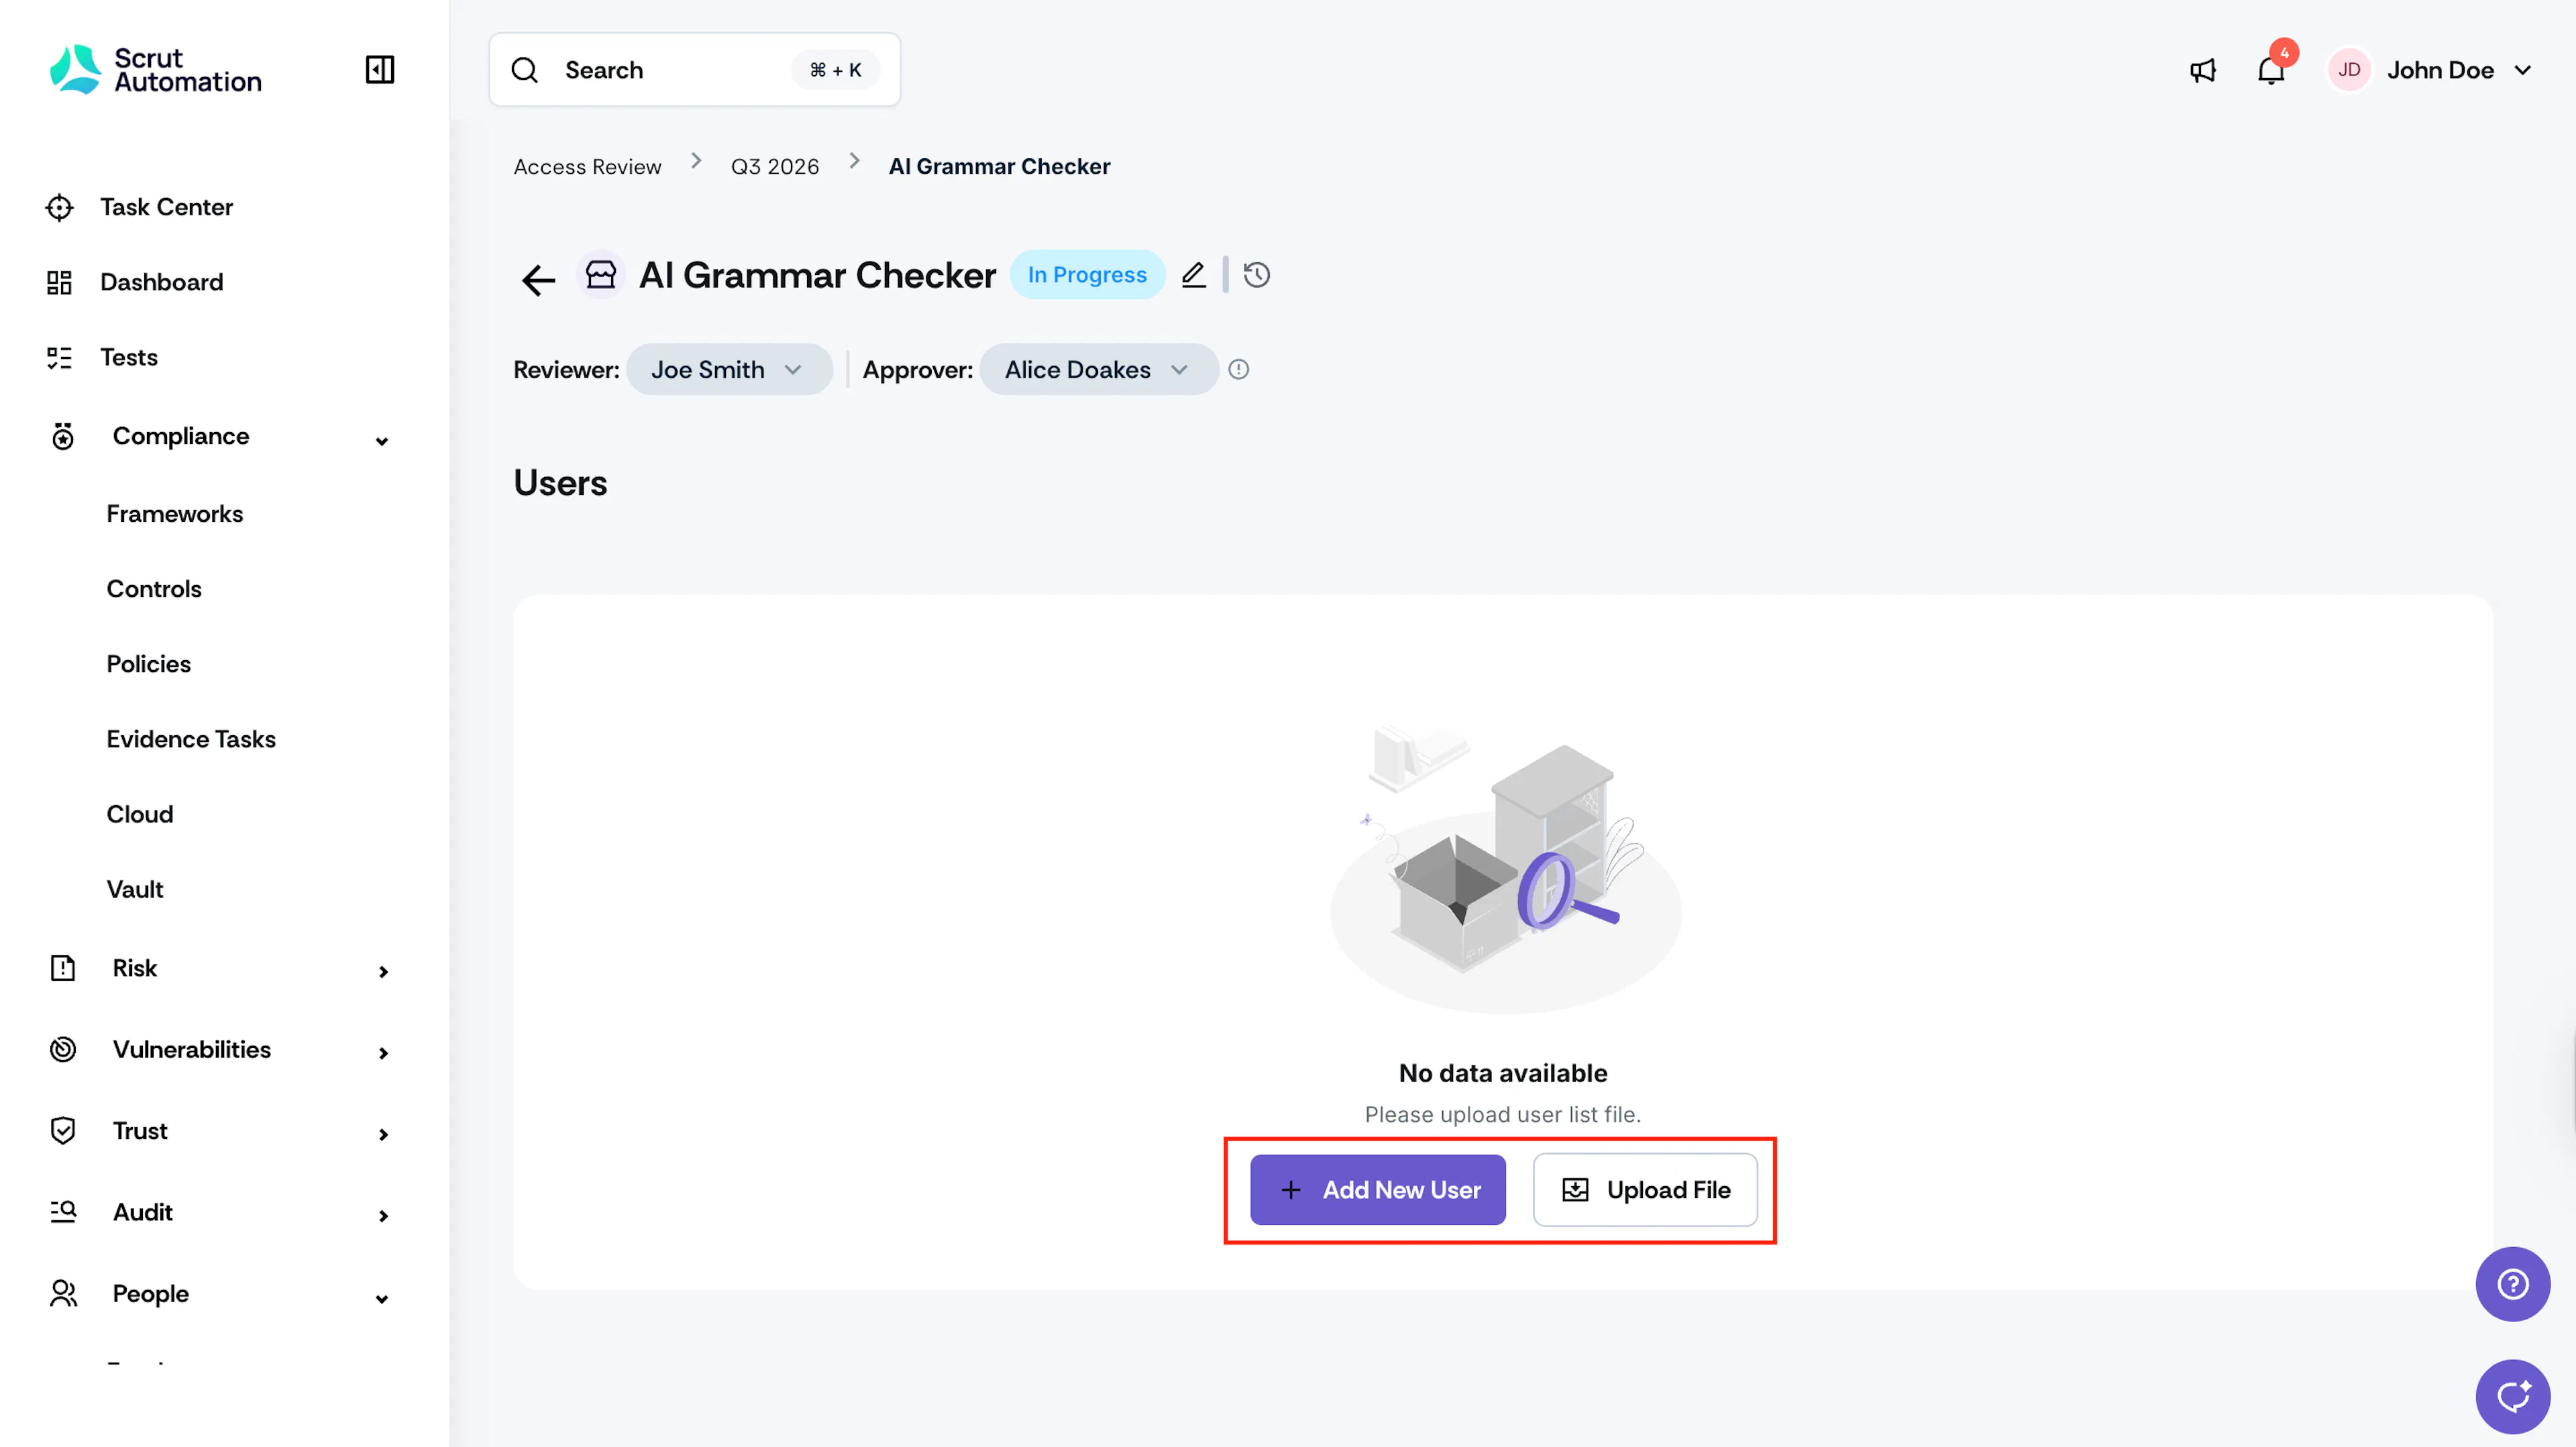
Click Upload File. Alternatively, click Add New User to add user details individually.
-
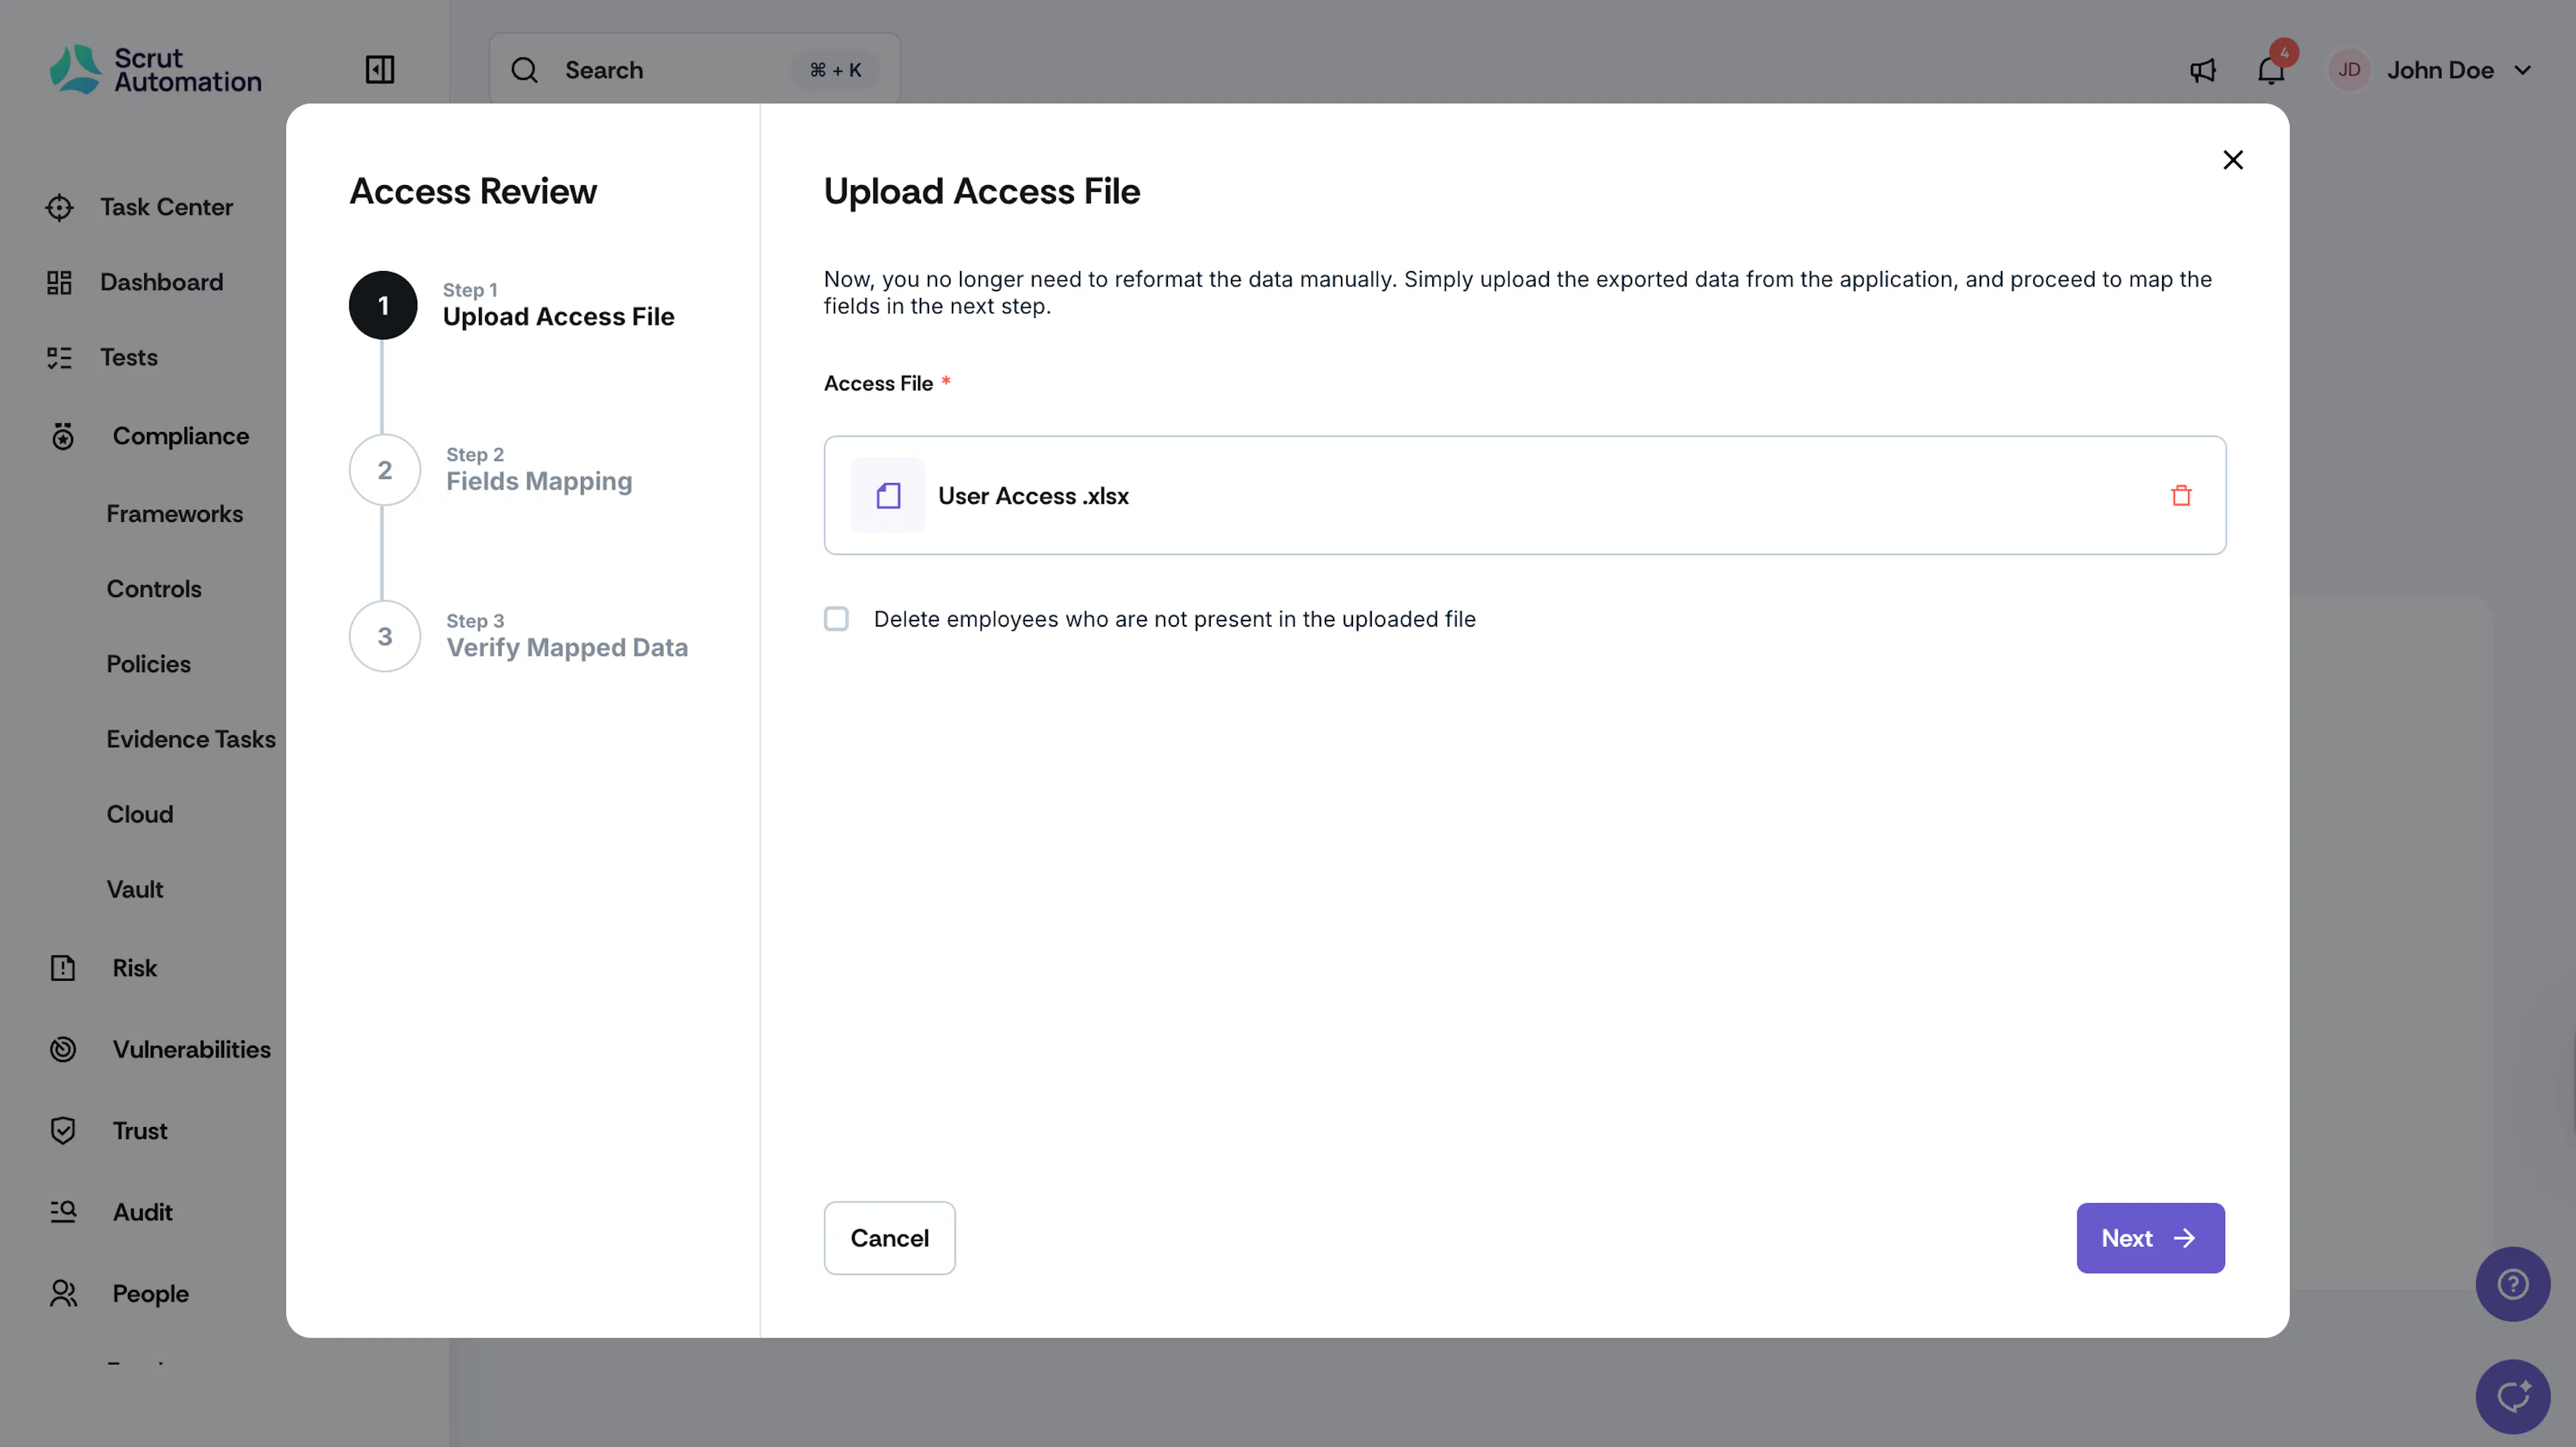
Export a file with user details from the application. Scrut can accurately scan it and add the user access details for you.
-
If the file is not readily available, you can prepare a file (XLSX/CSV) with the user list and ensure it includes the following details for each user:
- Name: The first and last name of the user.
- Account Identifier*: This field is mandatory and is usually the user’s email address.
- Role: Specify the role assigned to each user in the app.
- MFA (Multifactor Authentication): Yes or No. Indicate whether MFA is enabled for that user.
-
Map each column in your file to the corresponding field in Scrut.
-
Once you’ve mapped all fields in your file to corresponding fields in Scrut, click Confirm Mapping.
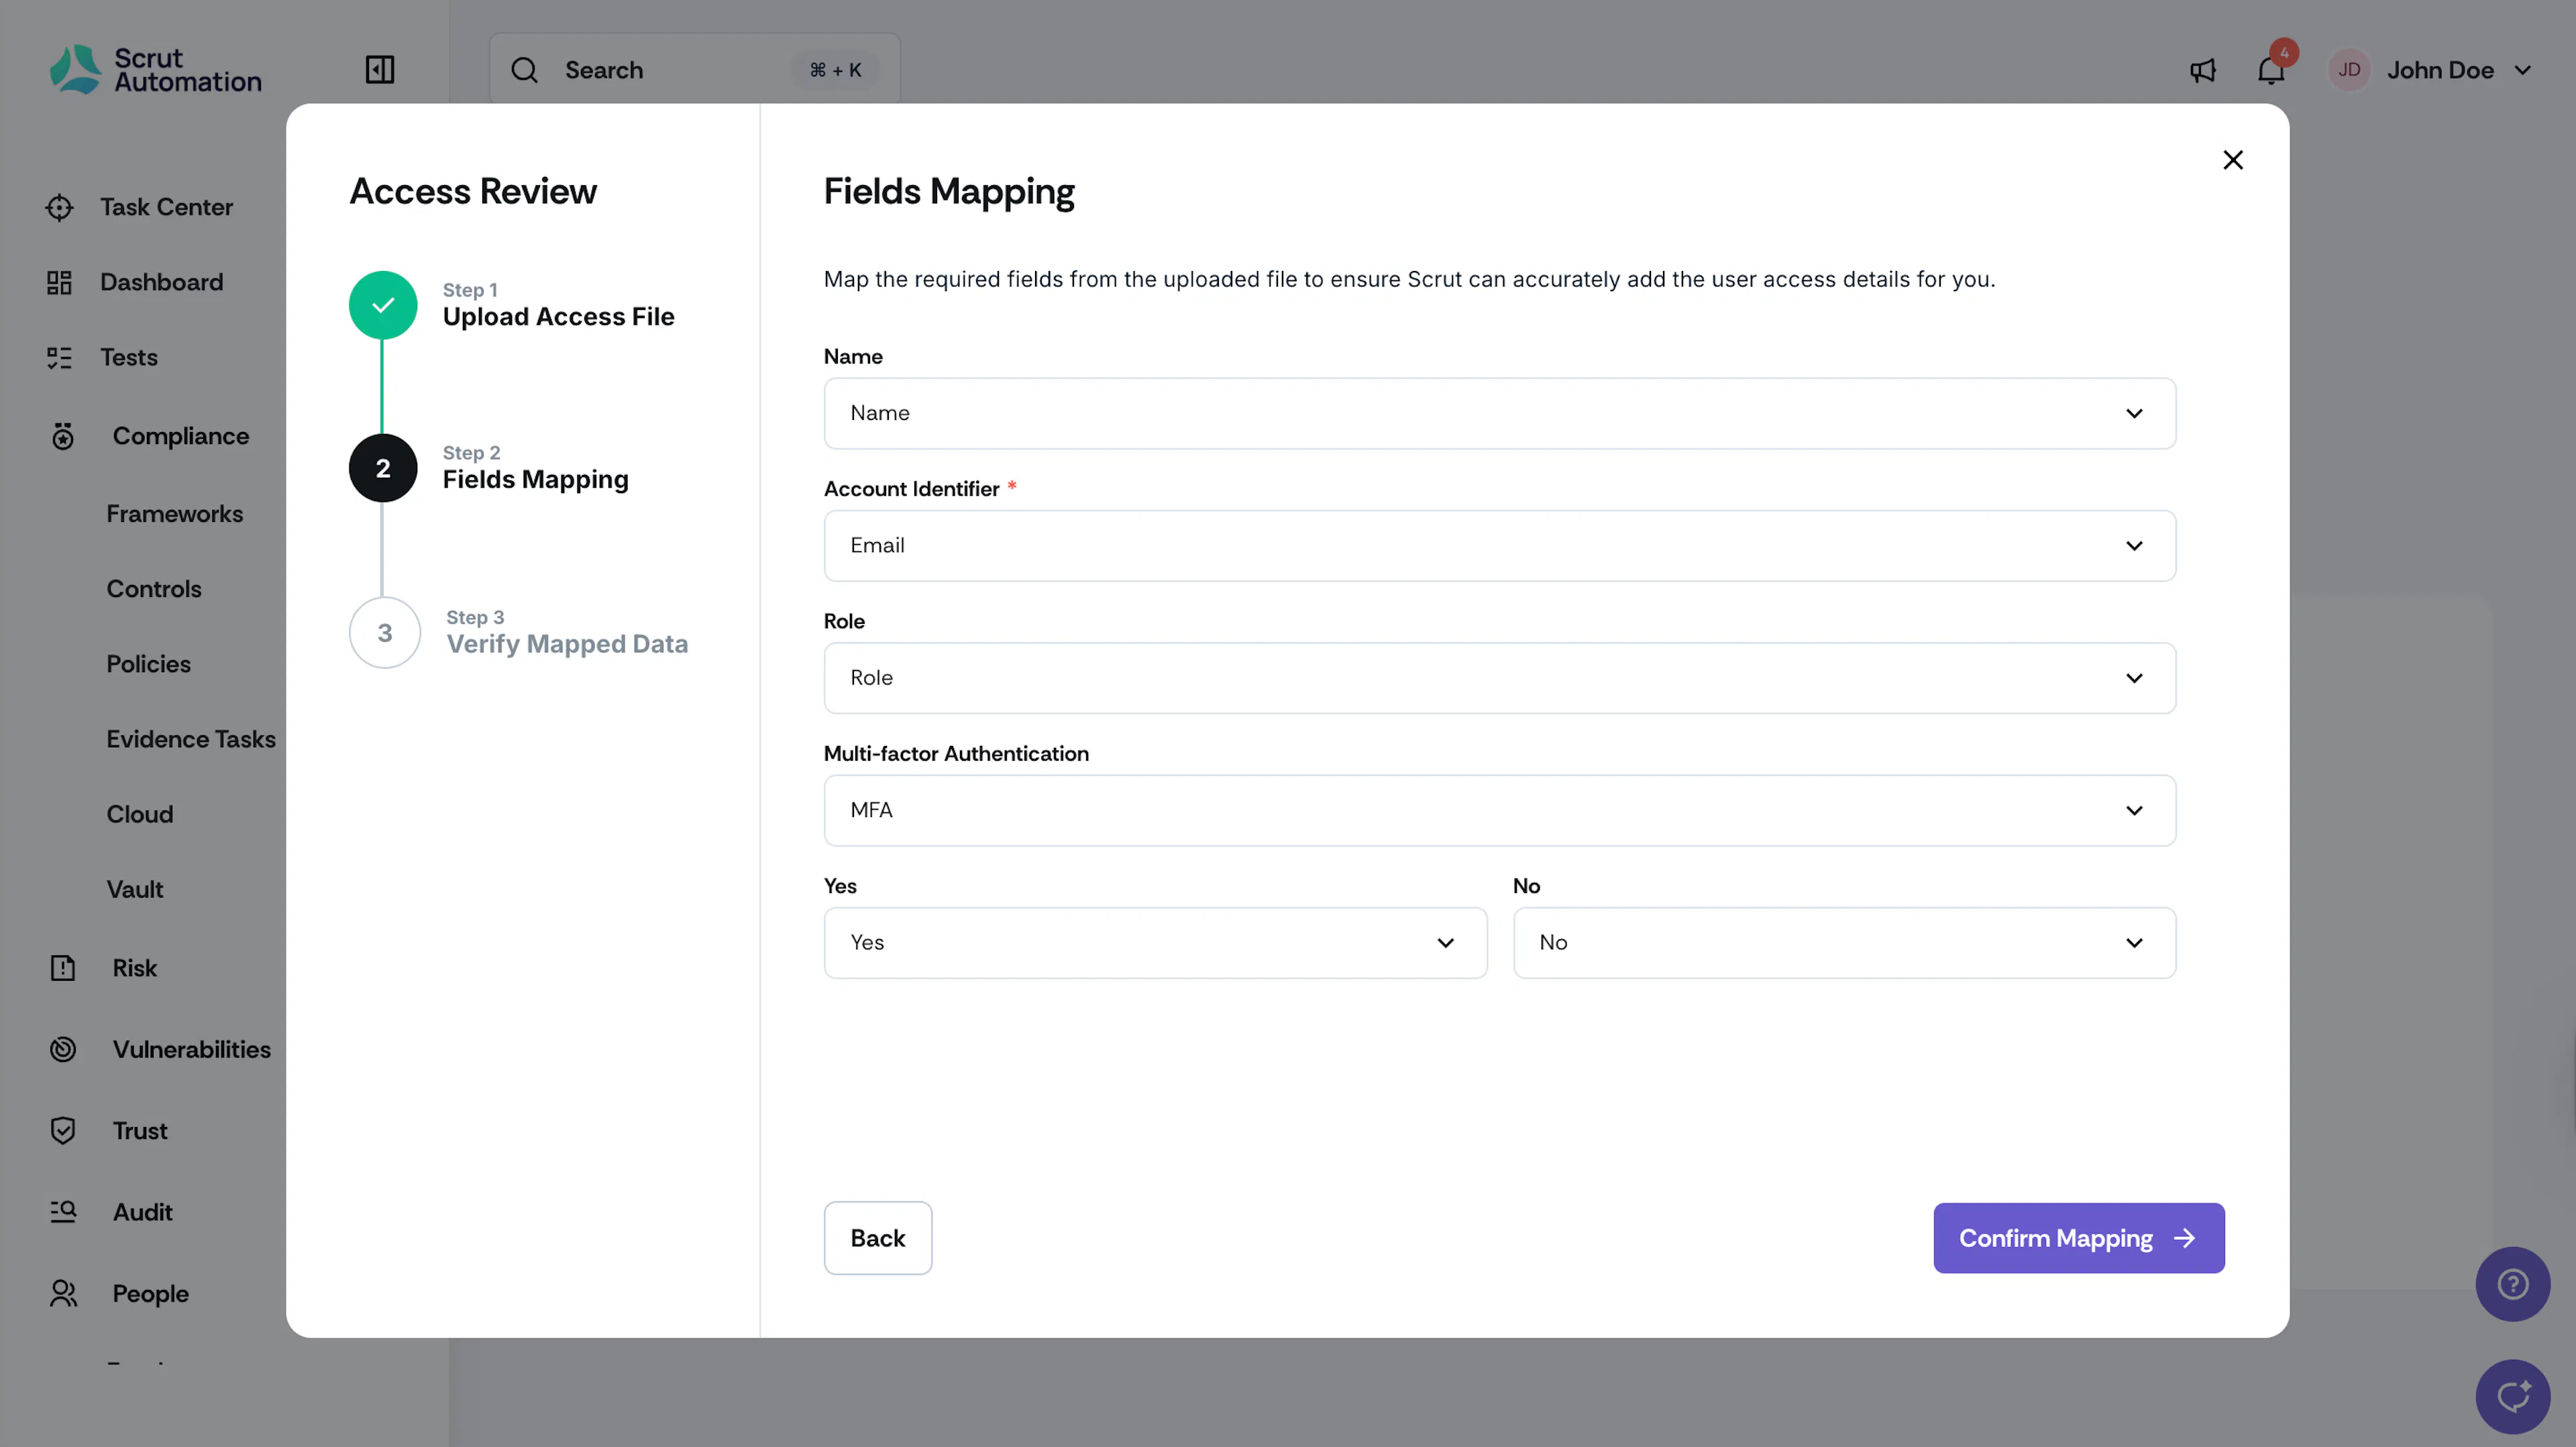
-
Review the mapped data and click Import User Access Data.
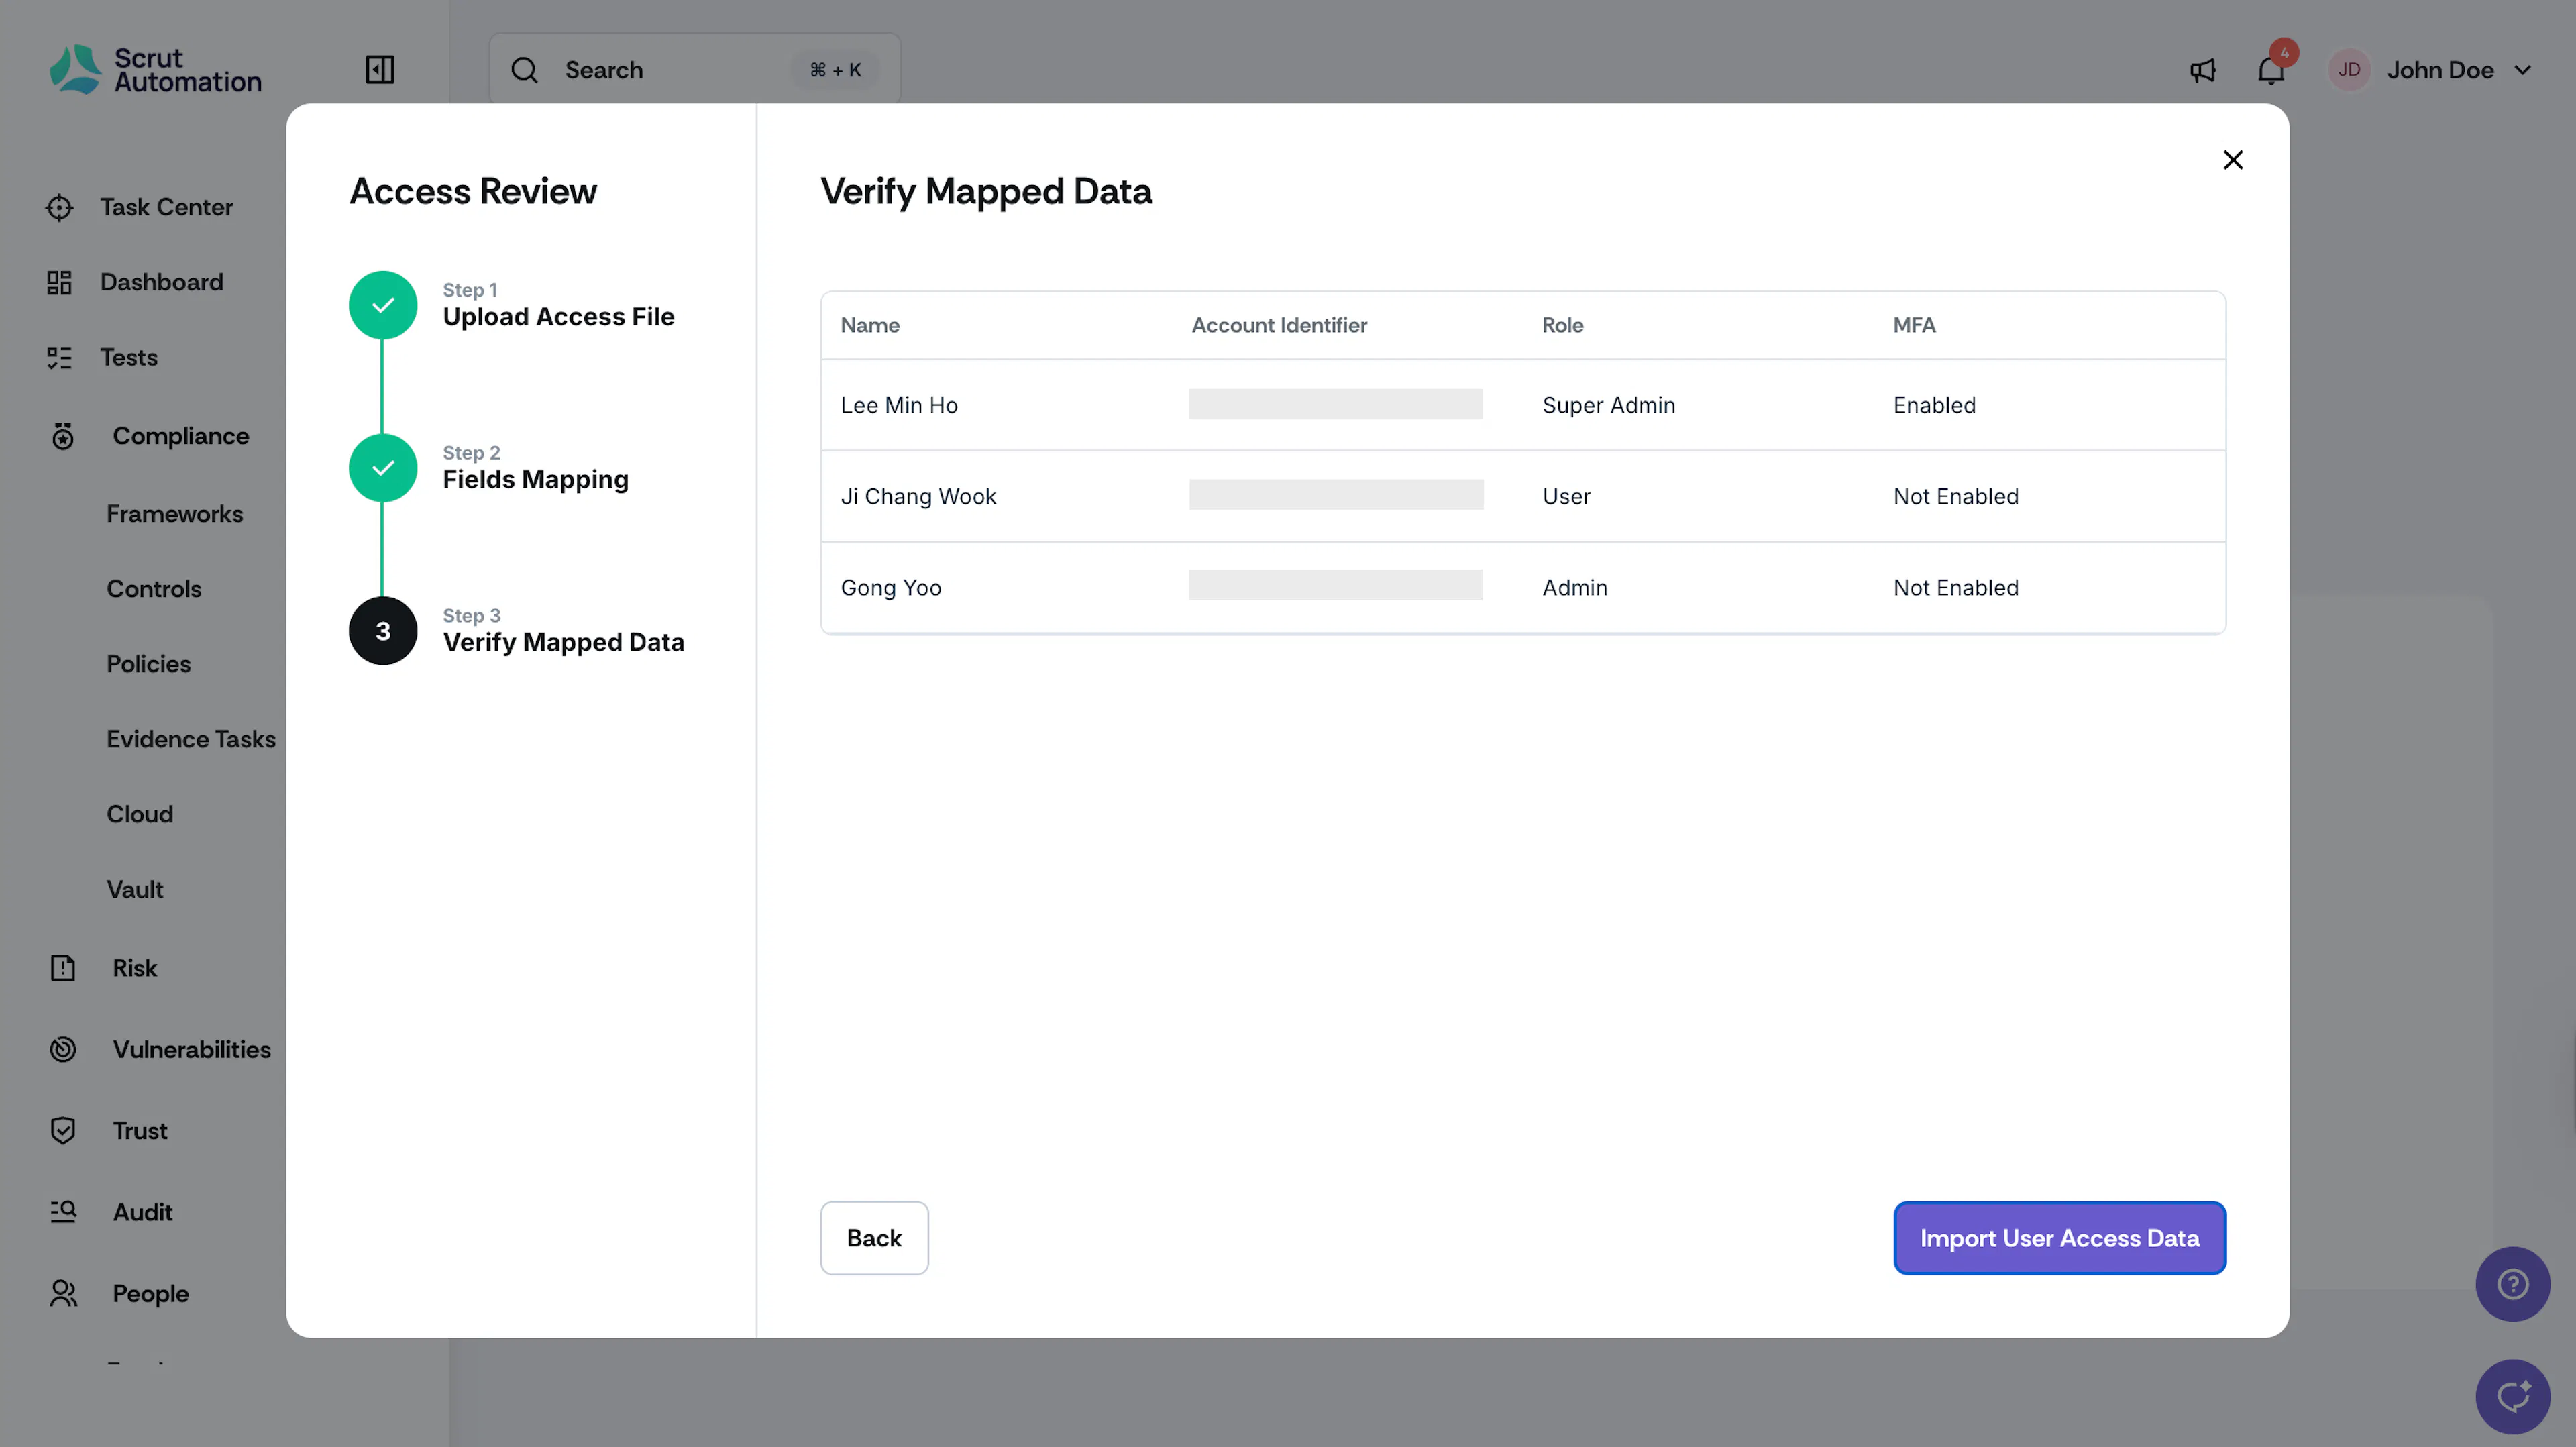
-
Scrut imports the application's user access data from your uploaded file.
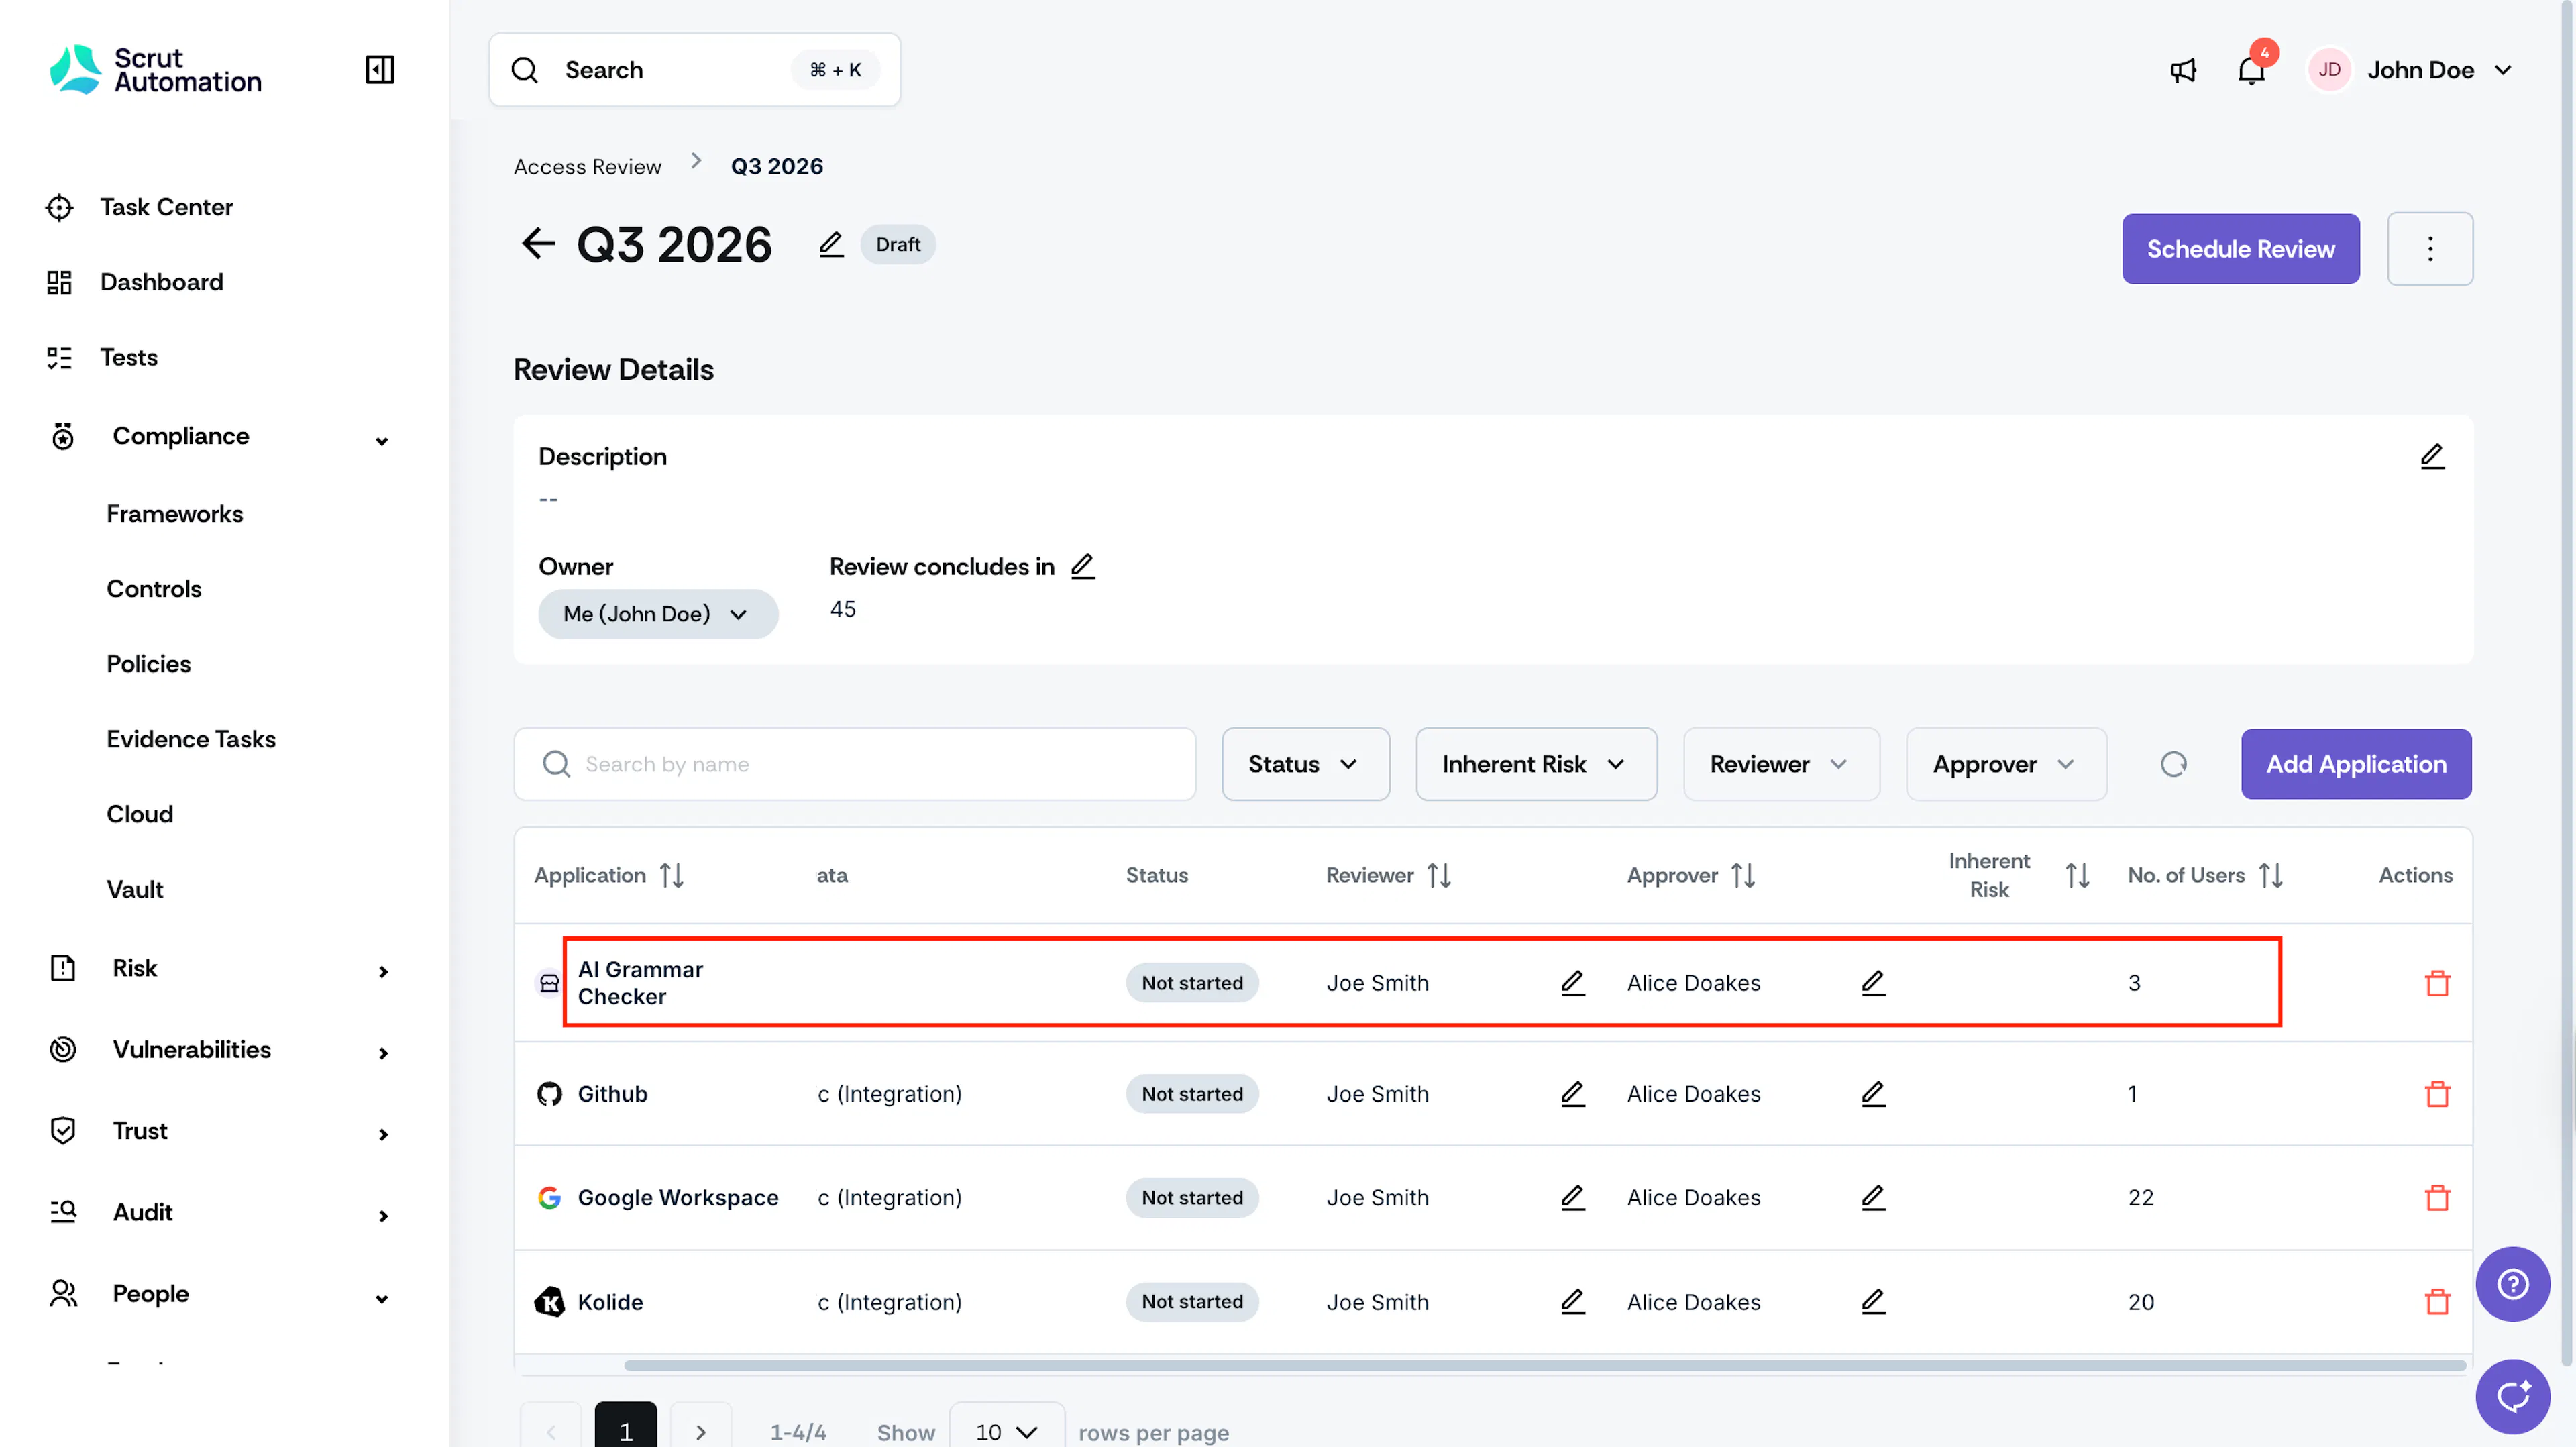
Note (For Review Owners):
Once a review goes into Active state, you can click the Send Reminder button at the top right of the page to send emails reminding reviewers and approvers to complete their pending tasks.
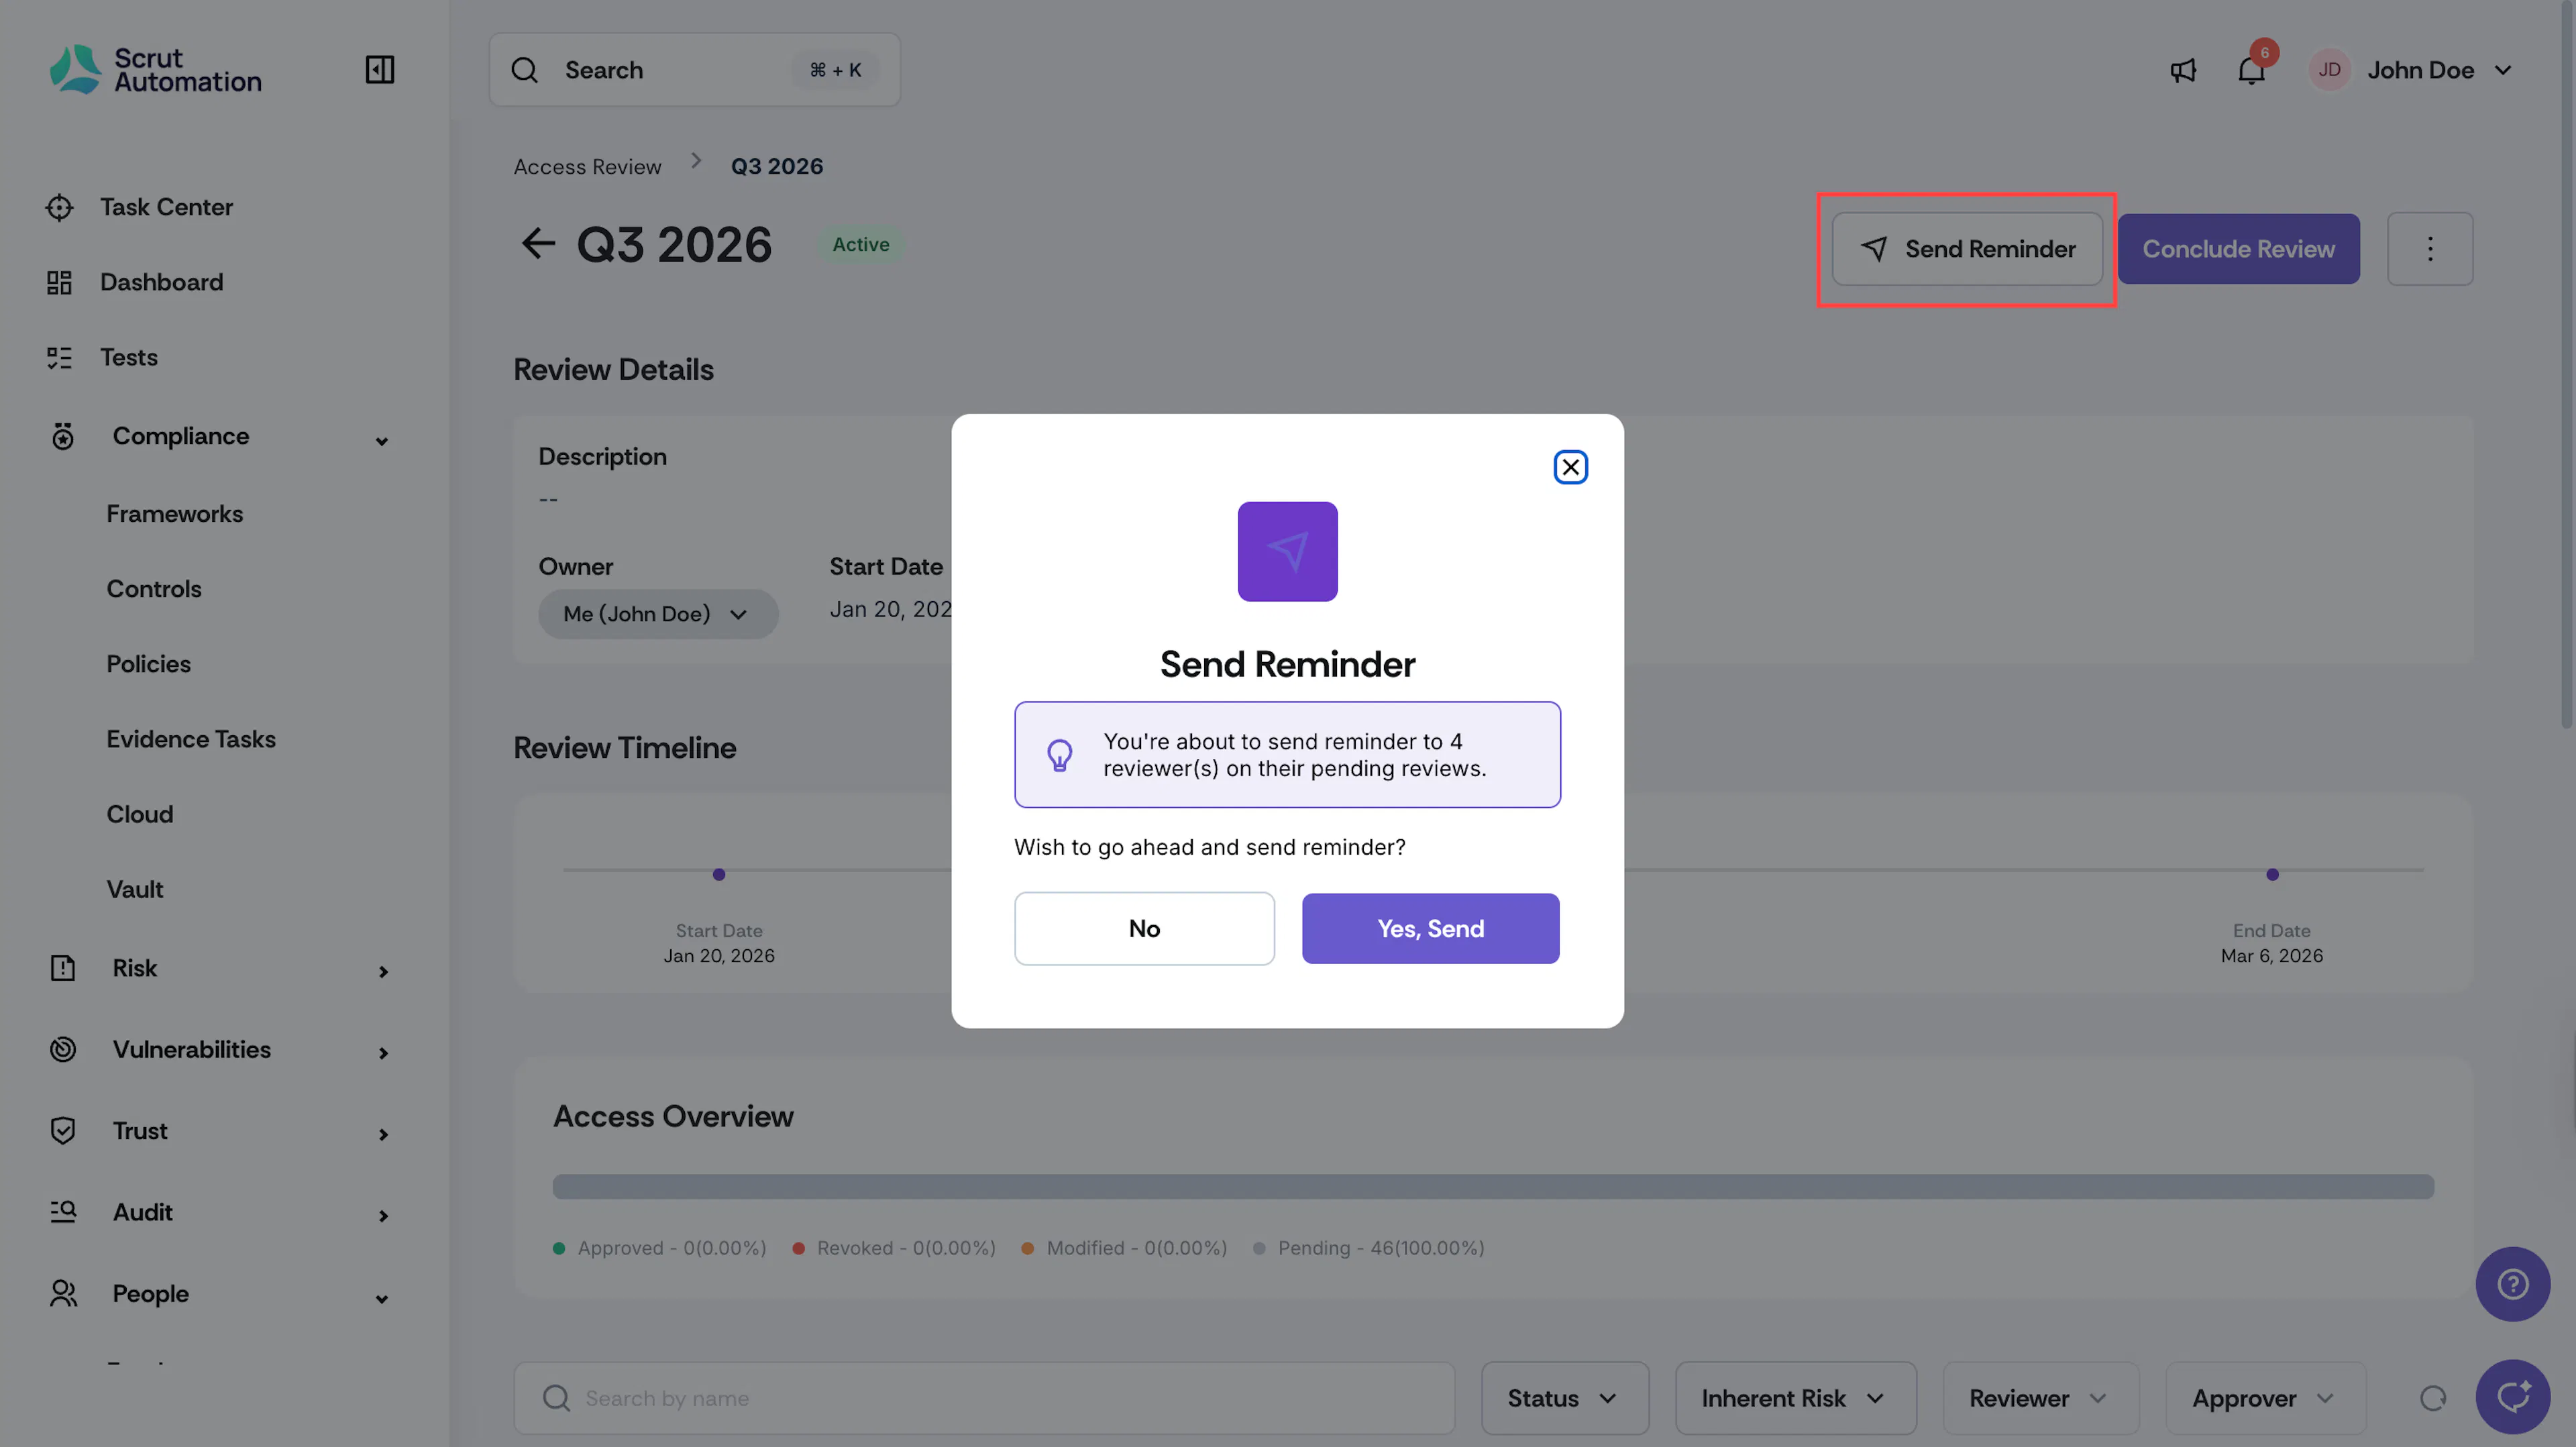
Step 2: (For Reviewers) Verify Users and Roles
In this step, the reviewer must systematically evaluate each user account within the application to make informed access decisions.
Once the Access Review is Active, go to People → Access → Reviews, and open the Access Review for which you’re assigned as a reviewer. Click the application you want to review user access for.
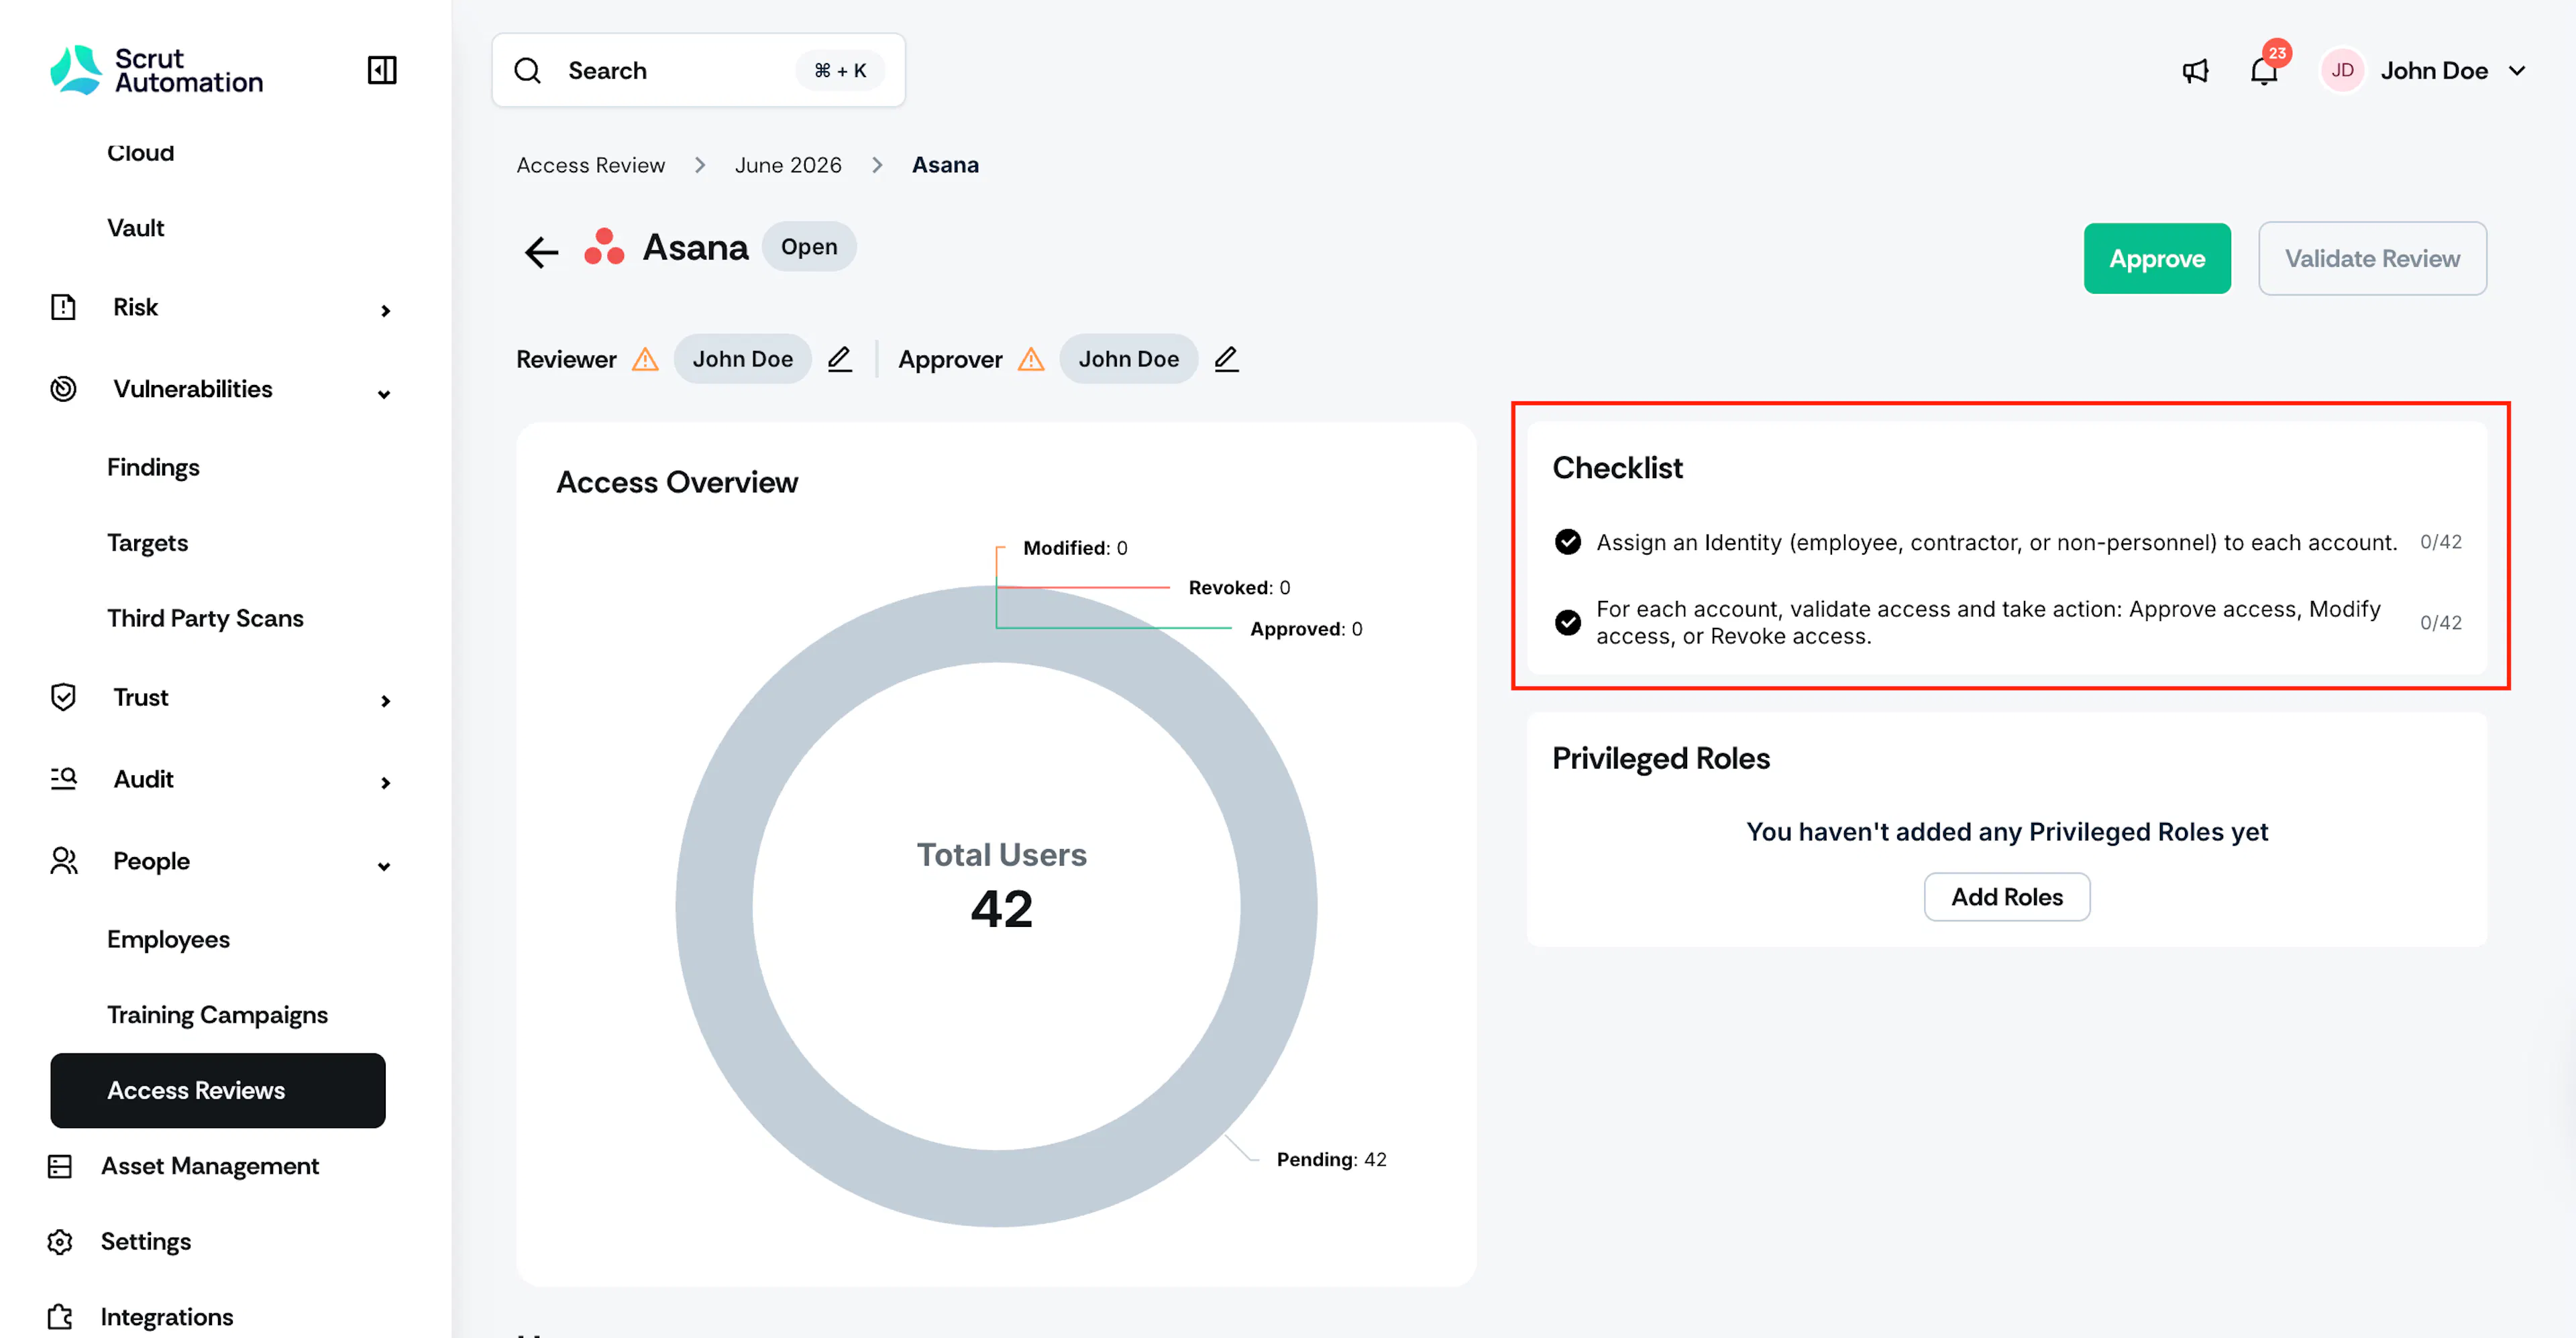
Pro Tip!
The Checklist provides the number of tasks you need to complete.
Assign Account Identity
Assigning an Account Identity to each application user is a key step in performing the access review. It links each user account to the corresponding employee record in Scrut, which is essential to pass associated automated tests and maintain your compliance posture.
How Account Identity Mapping Works
Scrut automatically maps users from connected applications to employee records using email-based matching:
-
Auto-mapped users: When a user's email in the external application exactly matches an email in Scrut's employee table, the Account Identity is automatically assigned.
-
Unmapped users: When no exact email match is found, the user remains unmapped and requires manual assignment.
Common reasons for unmapped users:
Common reasons for unmapped users:
- Email address discrepancies (e.g.,
john.doe@company.comin the app vs.jdoe@company.comin Scrut) - Non-employee accounts (contractors, service accounts, shared accounts)
- Employees not yet added to Scrut's employee records
Why Account Identity Mapping Matters
Unmapped users impact your compliance posture:
- User Accounts Associated test: This Automated Test fails if users are not properly mapped in Scrut.
- Eliminate Security Risks: Unmapped users can indicate malicious accounts in your application and pose a security risk.
- Audit readiness: Auditors require clear ownership attribution for all user accounts.
How to Assign Account Identity
You can assign an Account Identity to users one at a time, or update multiple users in bulk.
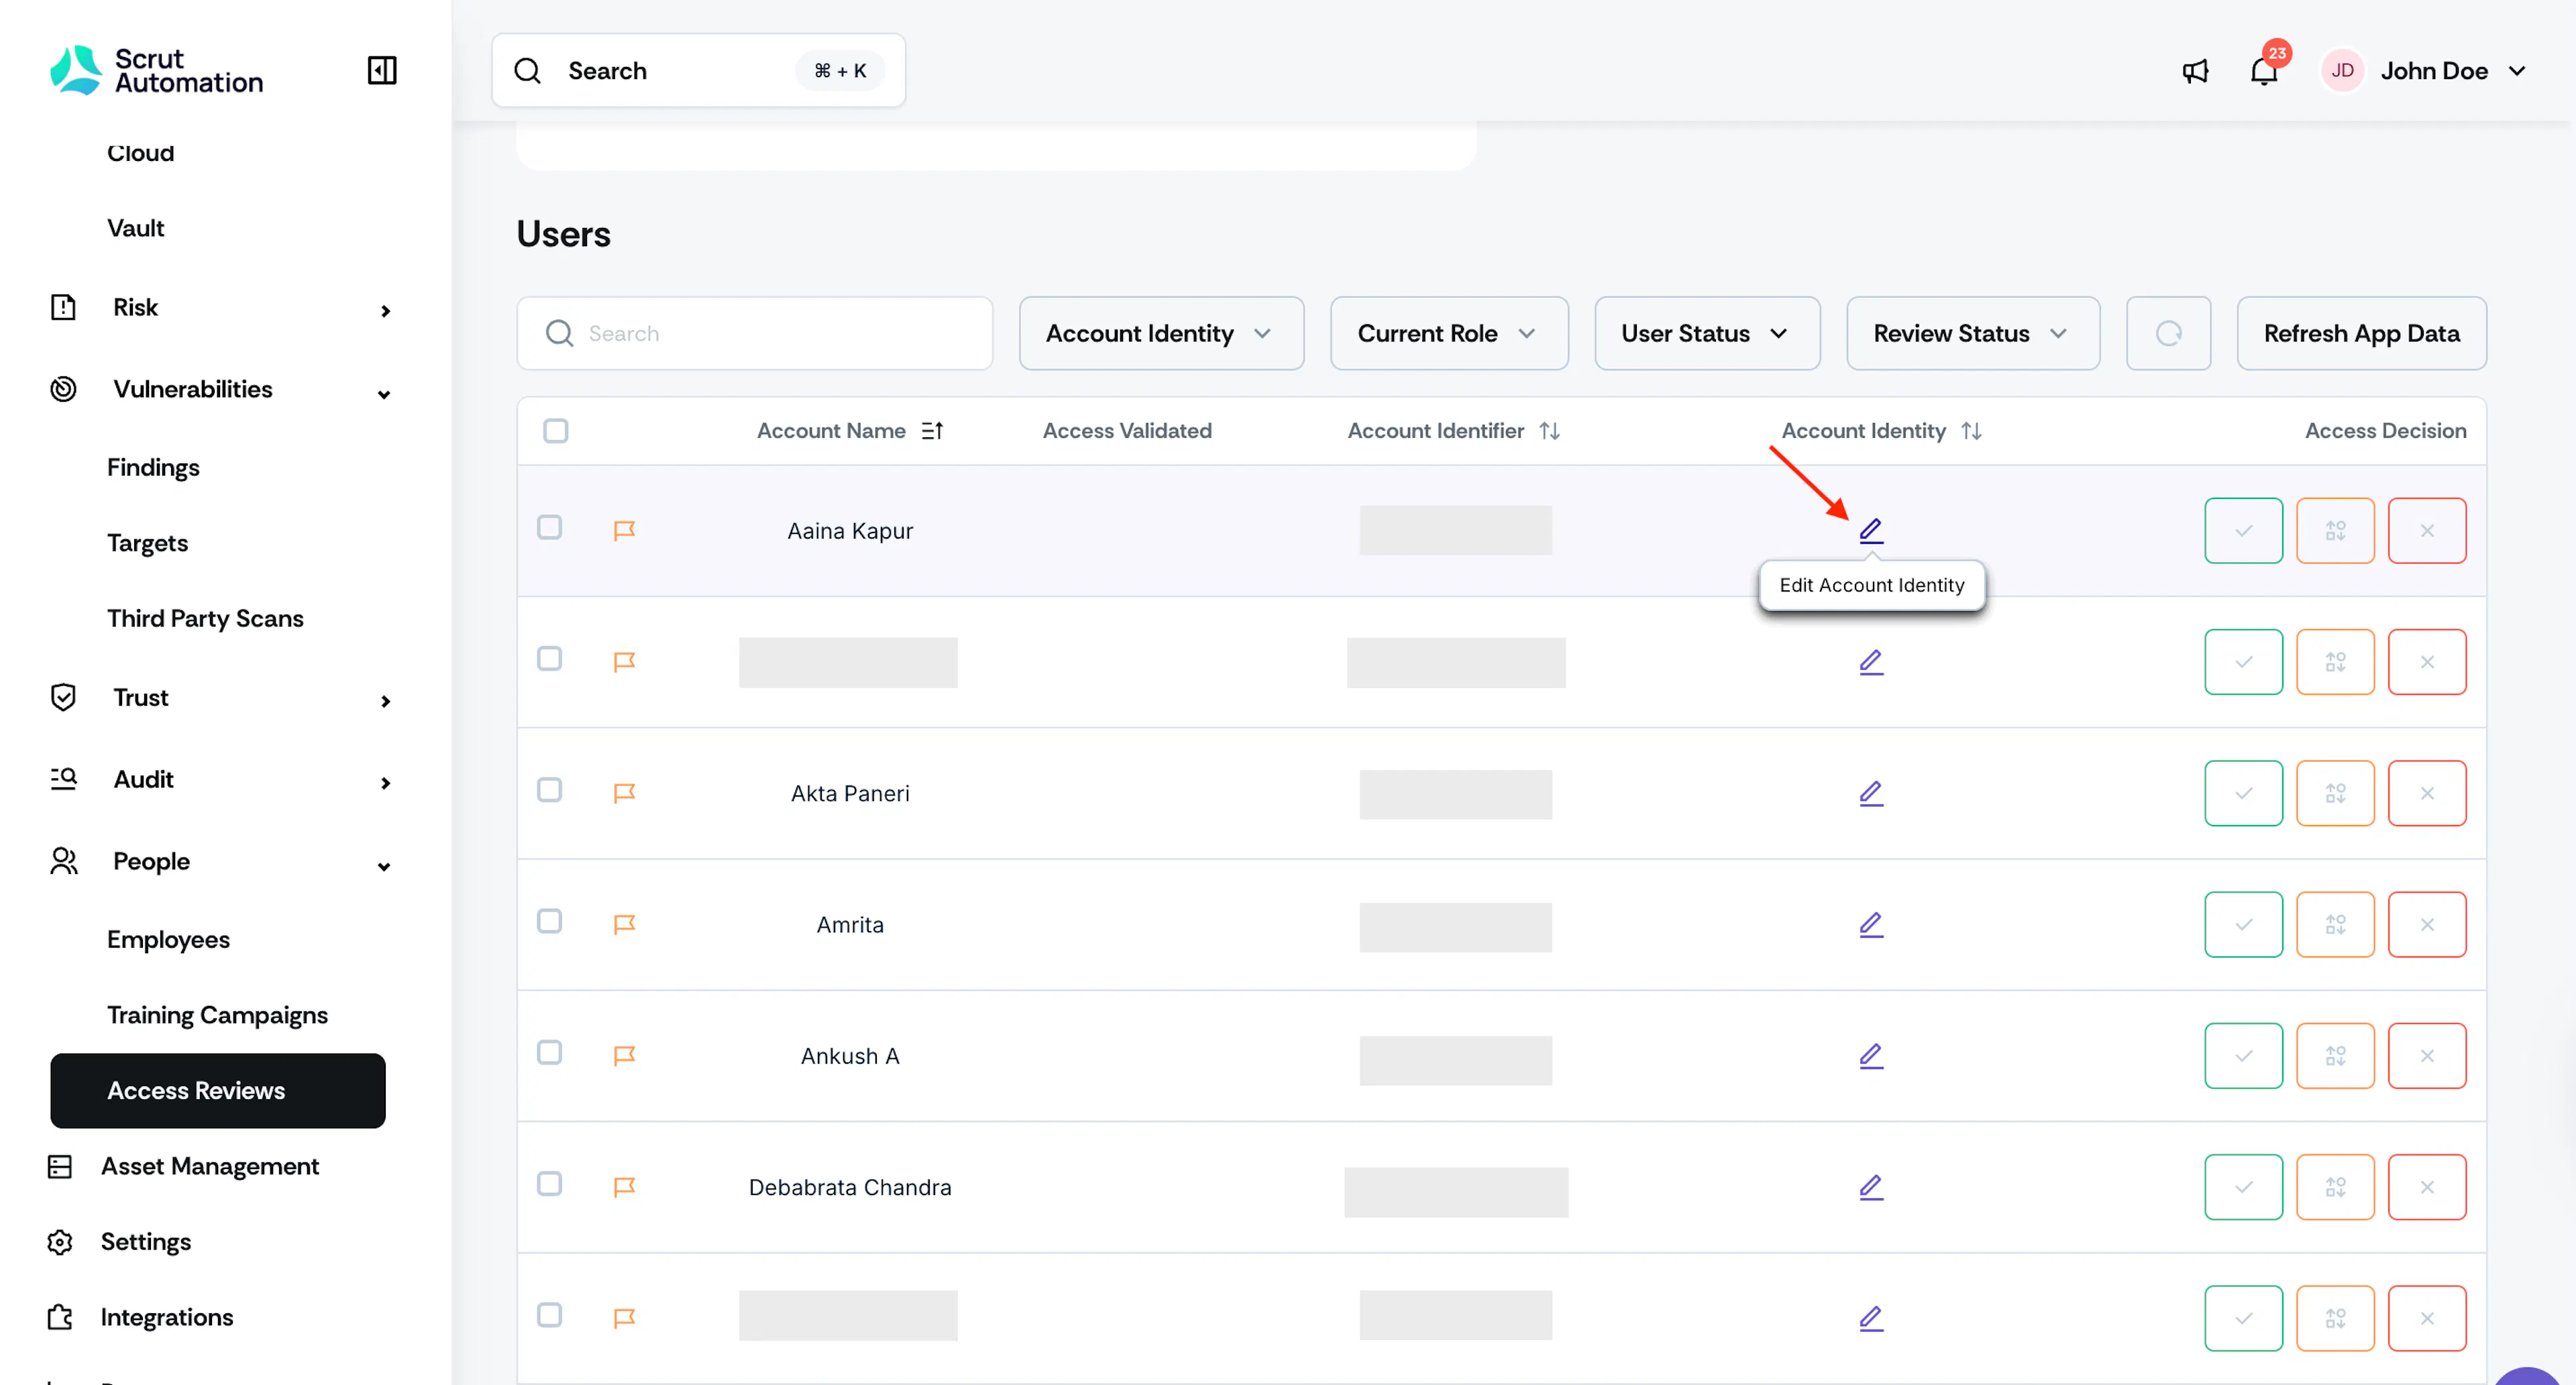
To assign Account Identity to a single user:
-
Click the edit icon for the unmapped user.
-
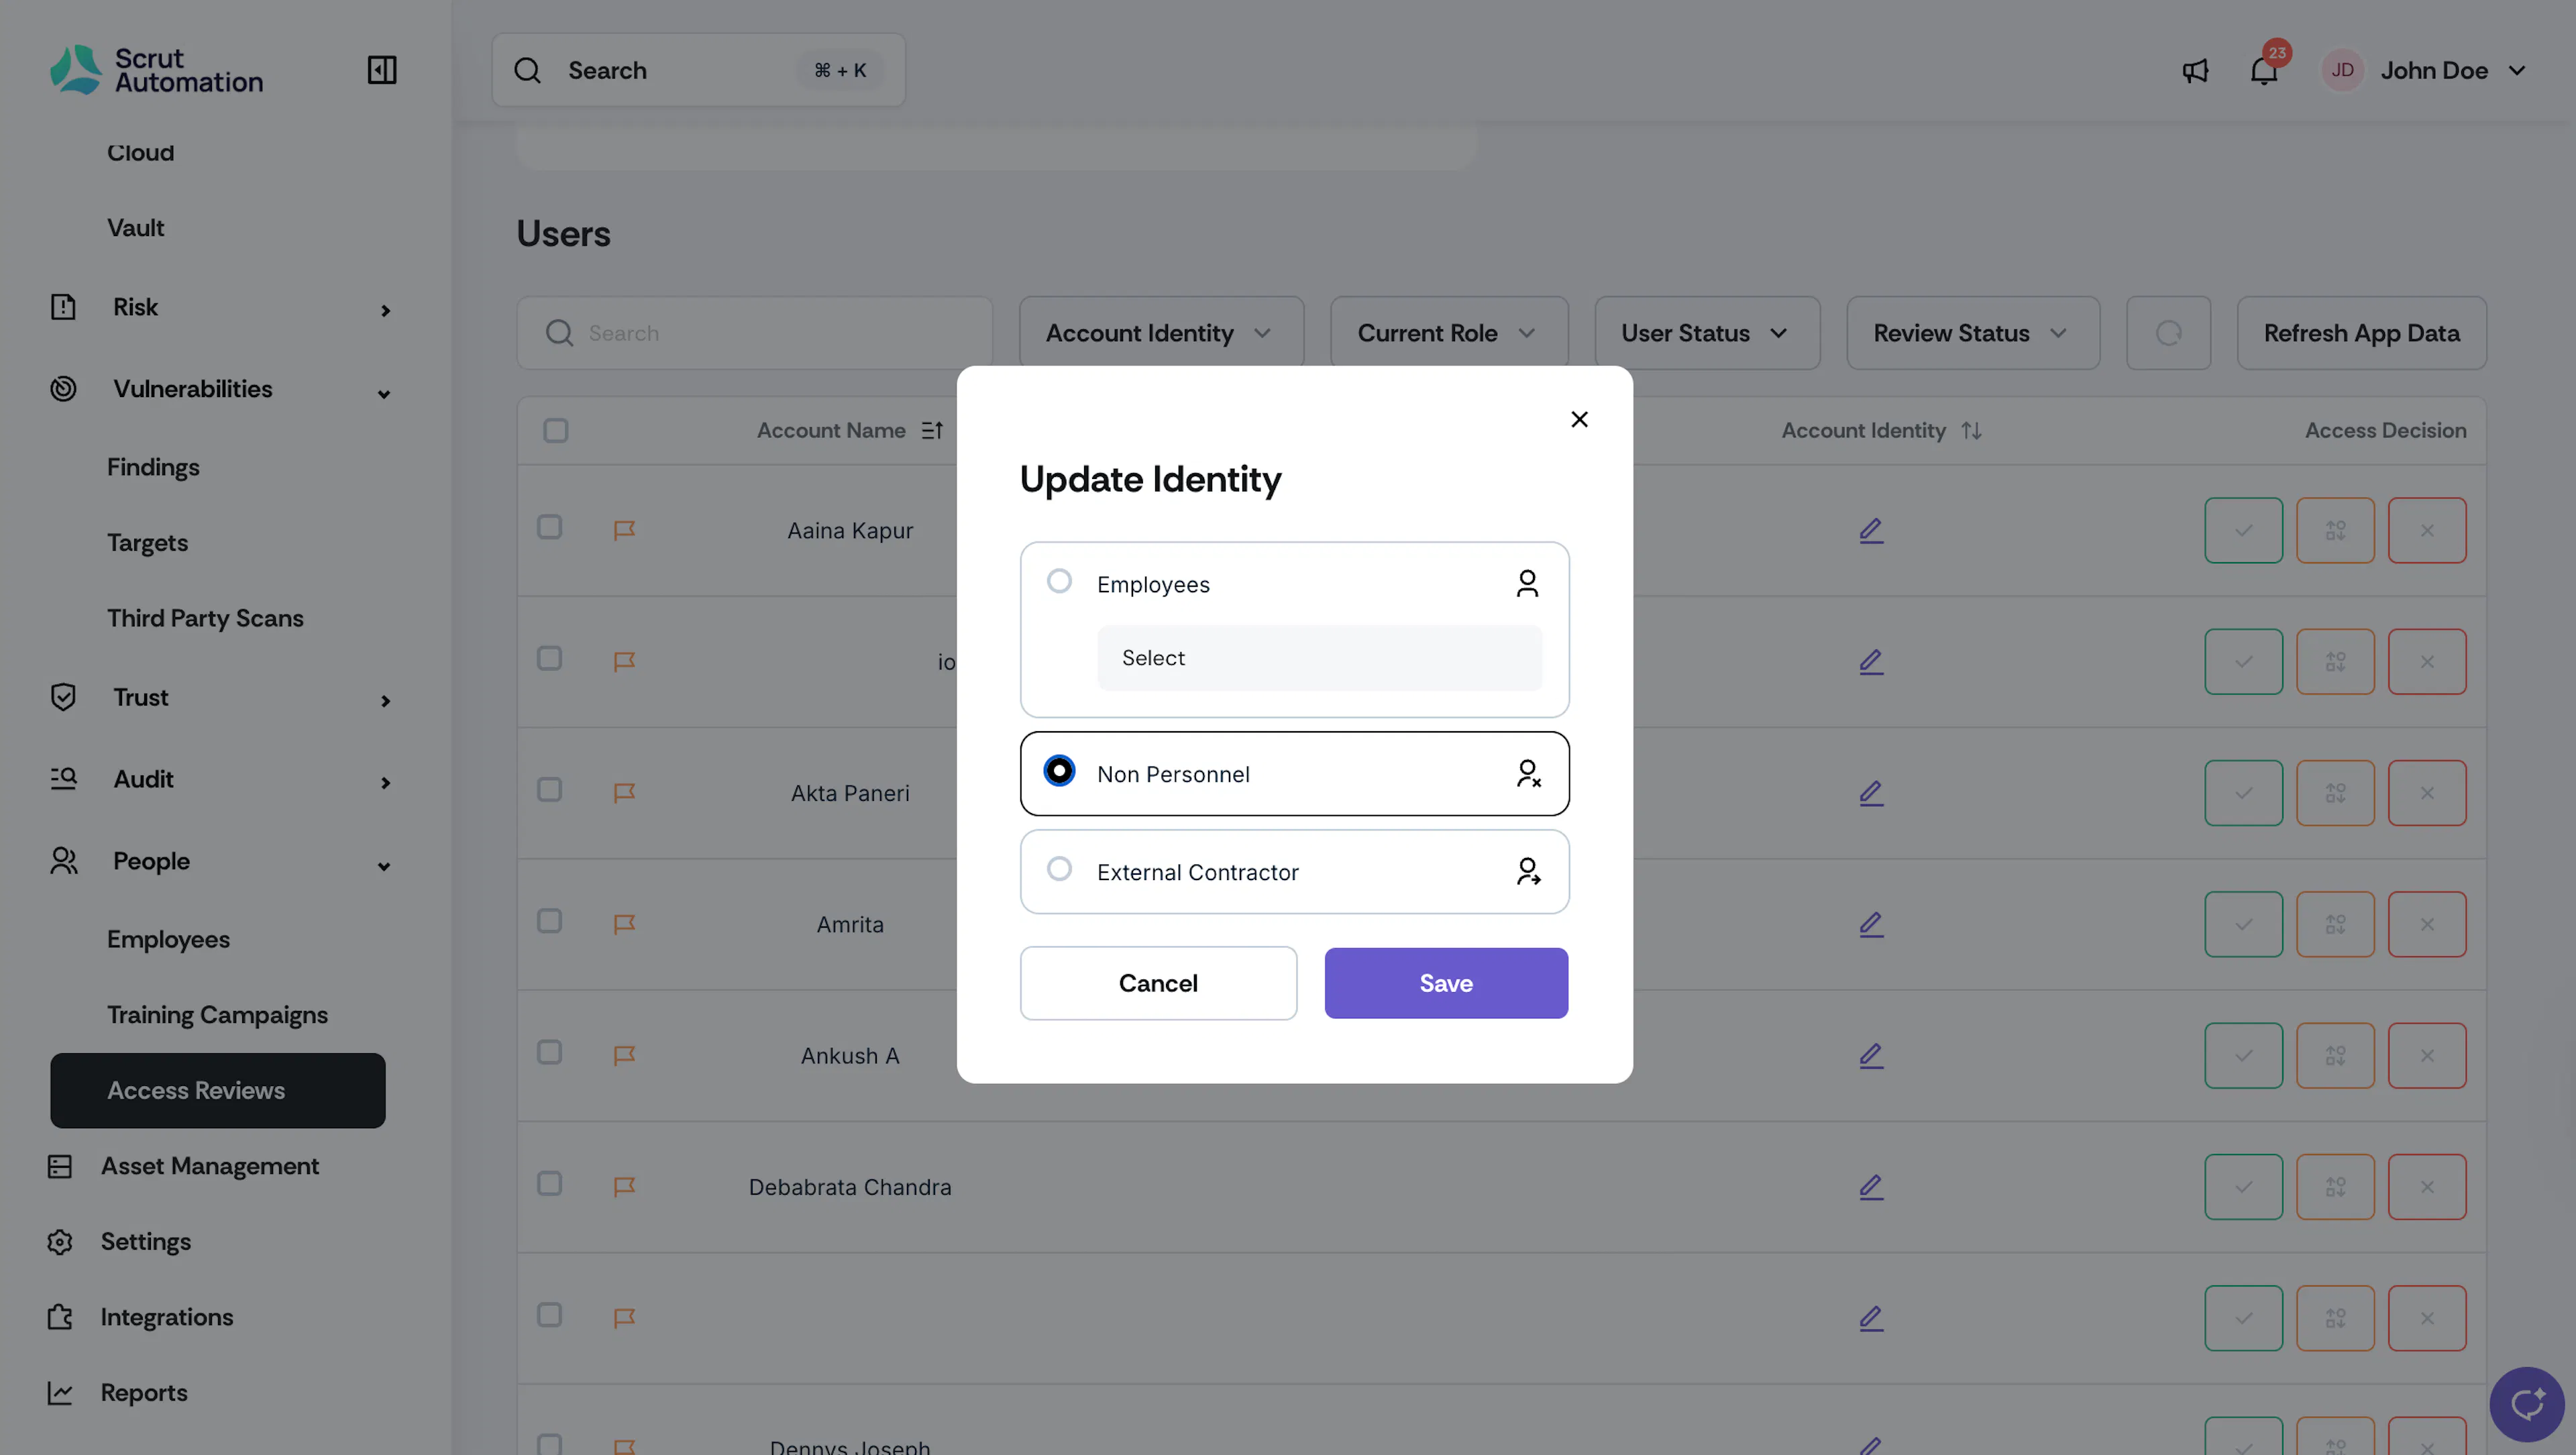
Choose the appropriate mapping:
- For Employee accounts: Select the corresponding employee from the Account Identity dropdown.
- For Non-Personnel accounts: Mark the account as "Non-Personnel" (e.g., service accounts, system accounts).
- For External Contractors: Mark the account as "External Contractor."
-
Save your changes.
-
Repeat for each remaining unmapped user.
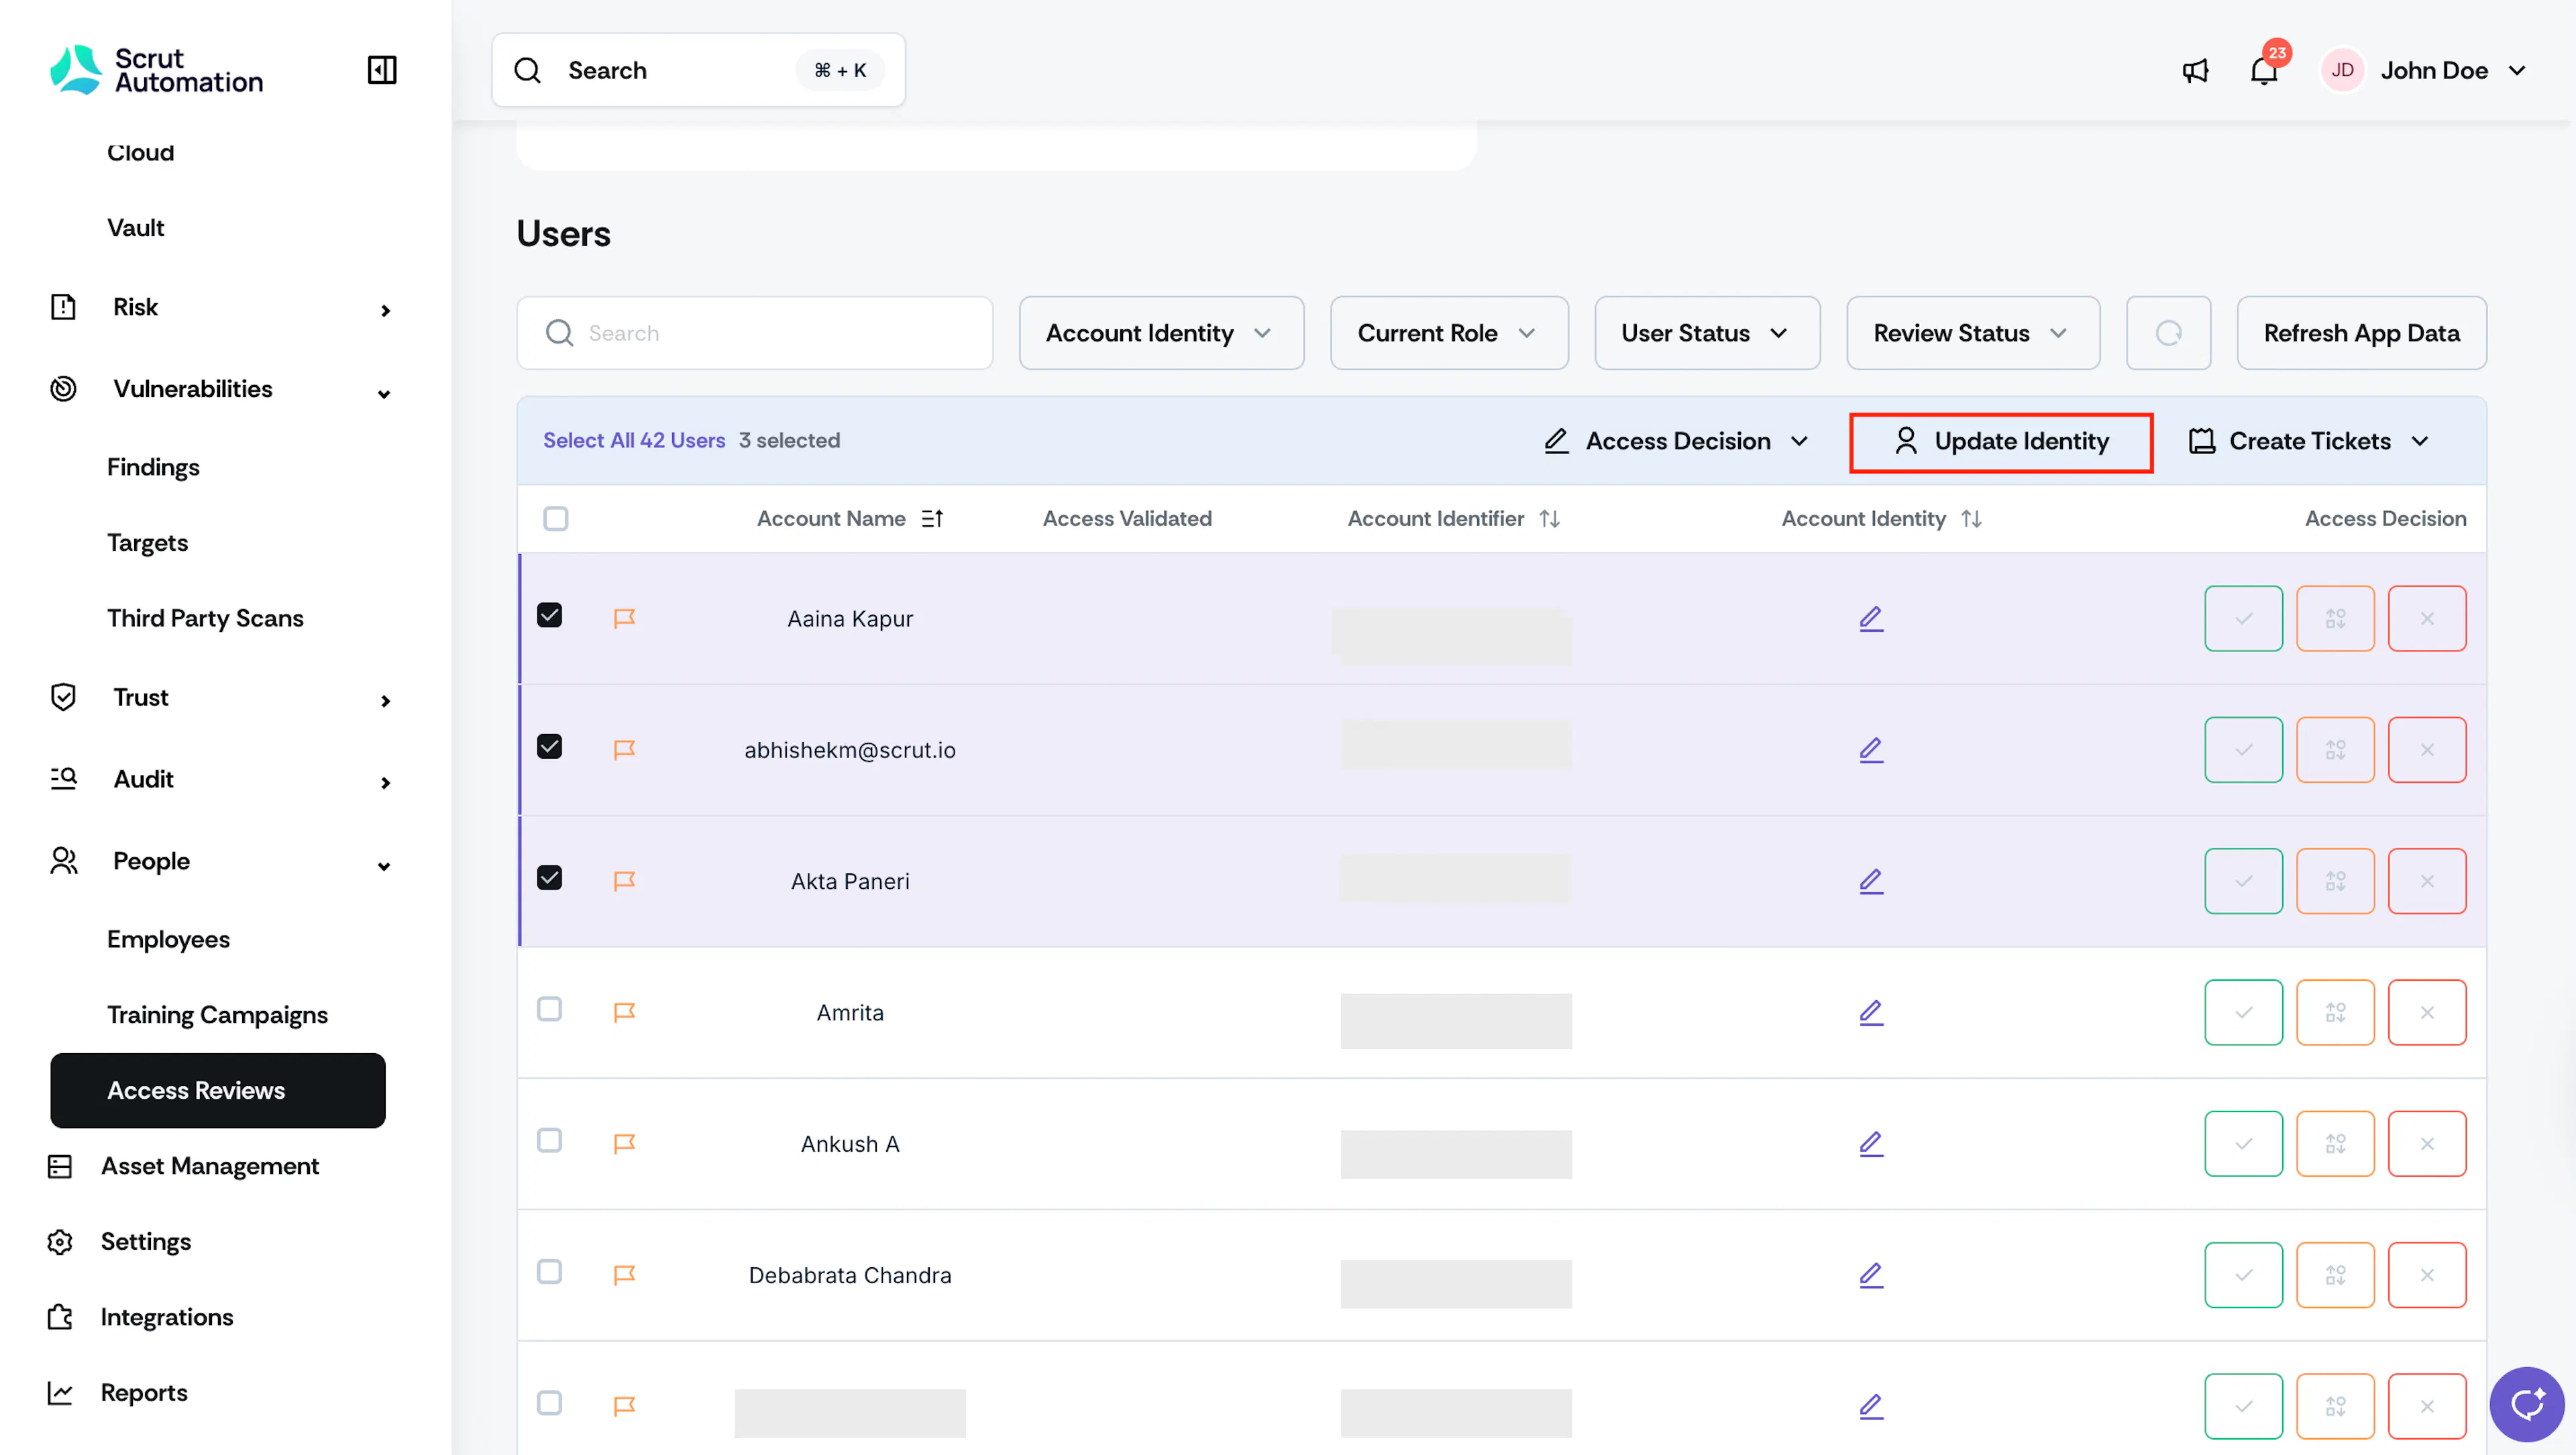
To assign Account Identity to multiple users at once:
-
Select the checkboxes next to the users you want to update.
-
Click Update Account Identity in the bulk action bar that appears.
-
Select the appropriate Account Identity from the dropdown, or mark the users as Non-Personnel or External Contractor.
-
Save your changes.
Pro Tip!
Regularly review Applications to identify and map new users as they're added to your connected applications. This helps maintain continuous compliance and prevents test failures during audits.
[Optional] Add Privileged Roles
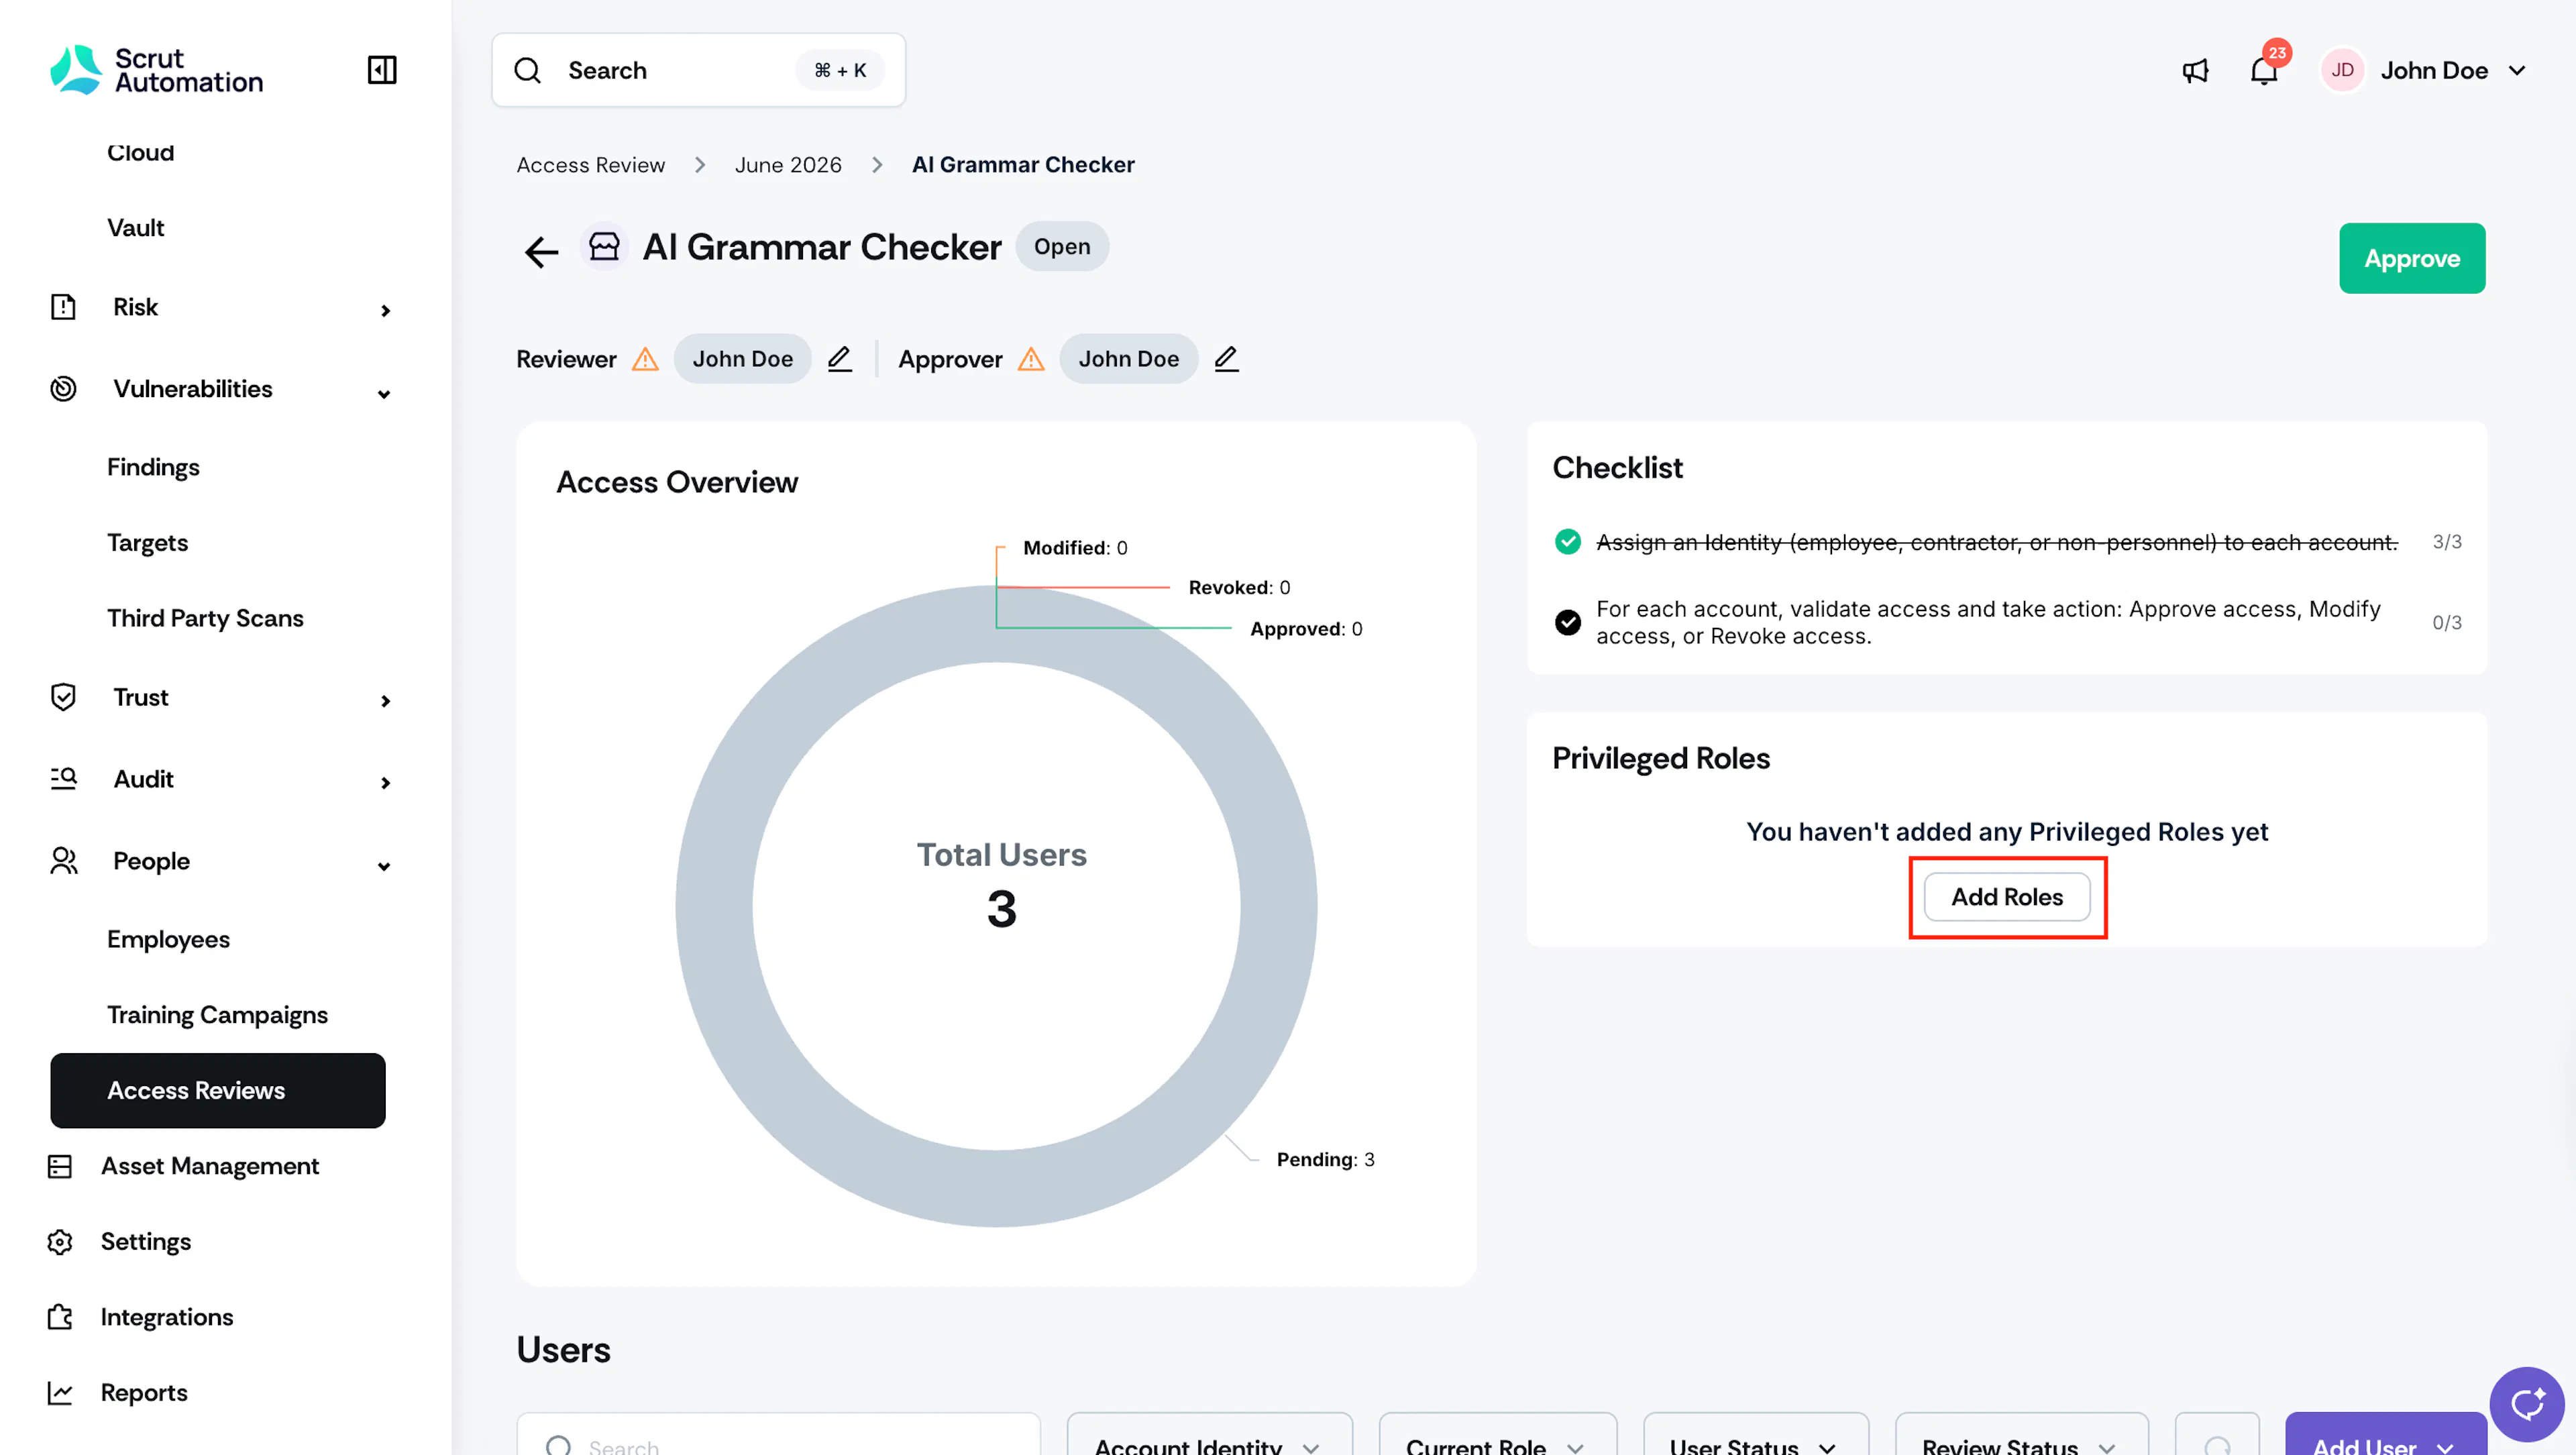
A privileged role is a special user role within an application that has been marked as having elevated or sensitive permissions. These roles typically have access to critical system functions, sensitive data, or administrative capabilities that require additional oversight and documentation.
Note:
Once you mark a role as privileged, Scrut will enforce additional compliance requirements. Any changes to user access for these roles will require you to provide mandatory justifications.
To mark a role as privileged, open an access review and click Add Roles.
Review Each User Account
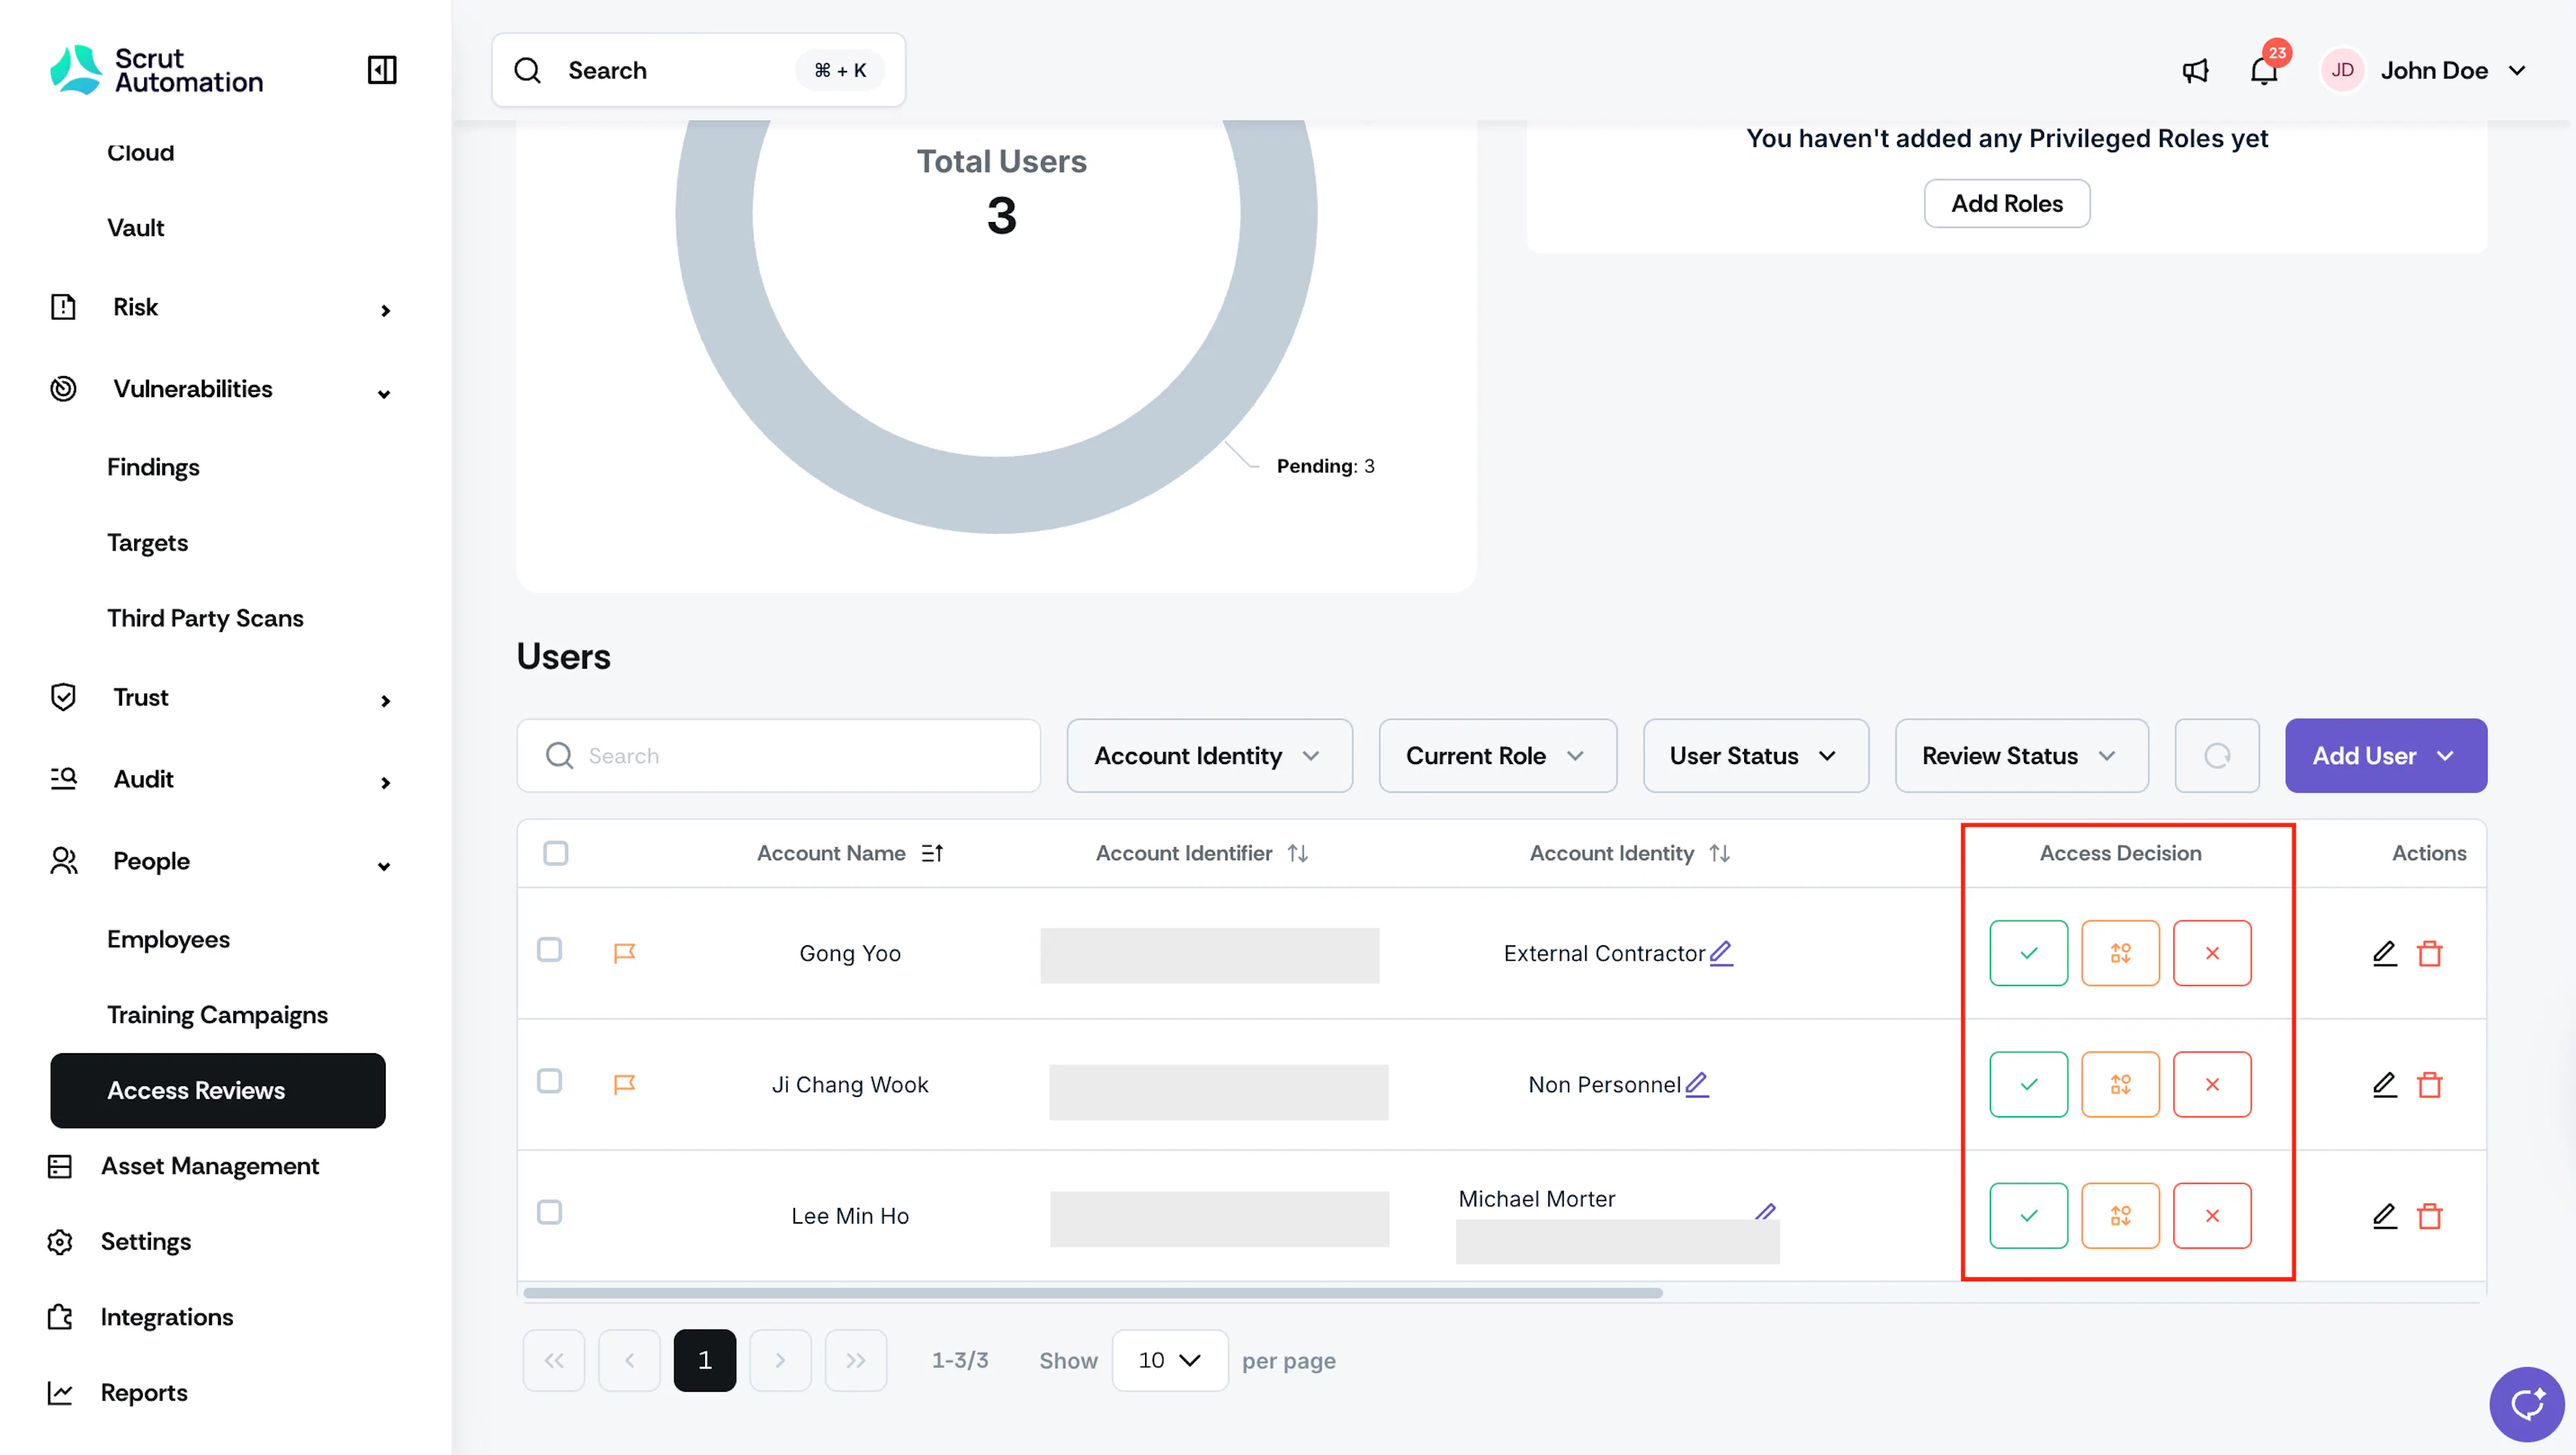
Once you’ve established ownership, proceed to review each user account individually. Examine their access permissions in relation to their job responsibilities. For each account, you can take one of the following decisions:
- Approve access: If a user’s permissions align with their role and demonstrate ongoing business need, maintain current access.
- Modify access: If a user requires elevated or reduced access based on their job responsibilities, adjust their access as necessary. You’ll need to provide a justification for modifying user access.
- Revoke access: If a user no longer requires access to the application due to role changes, departure, or other reasons, revoke their access. You’ll need to enter the justification for removing user access.
Use the Review Status filter to quickly filter users by review status.
Pro Tip!
Ensure all decisions follow the principle of least privilege (users only get the minimum access they need). Document each change with clear reasons, noting any risk factors or compliance considerations that influenced it.
Step 3: [Optional] Create Tickets for Access Changes
Follow these steps to create project management tickets to track access changes:
-
Go to People → Access Review → Reviews, and open your preferred review.
-
Click the application you want to create tickets for.
-
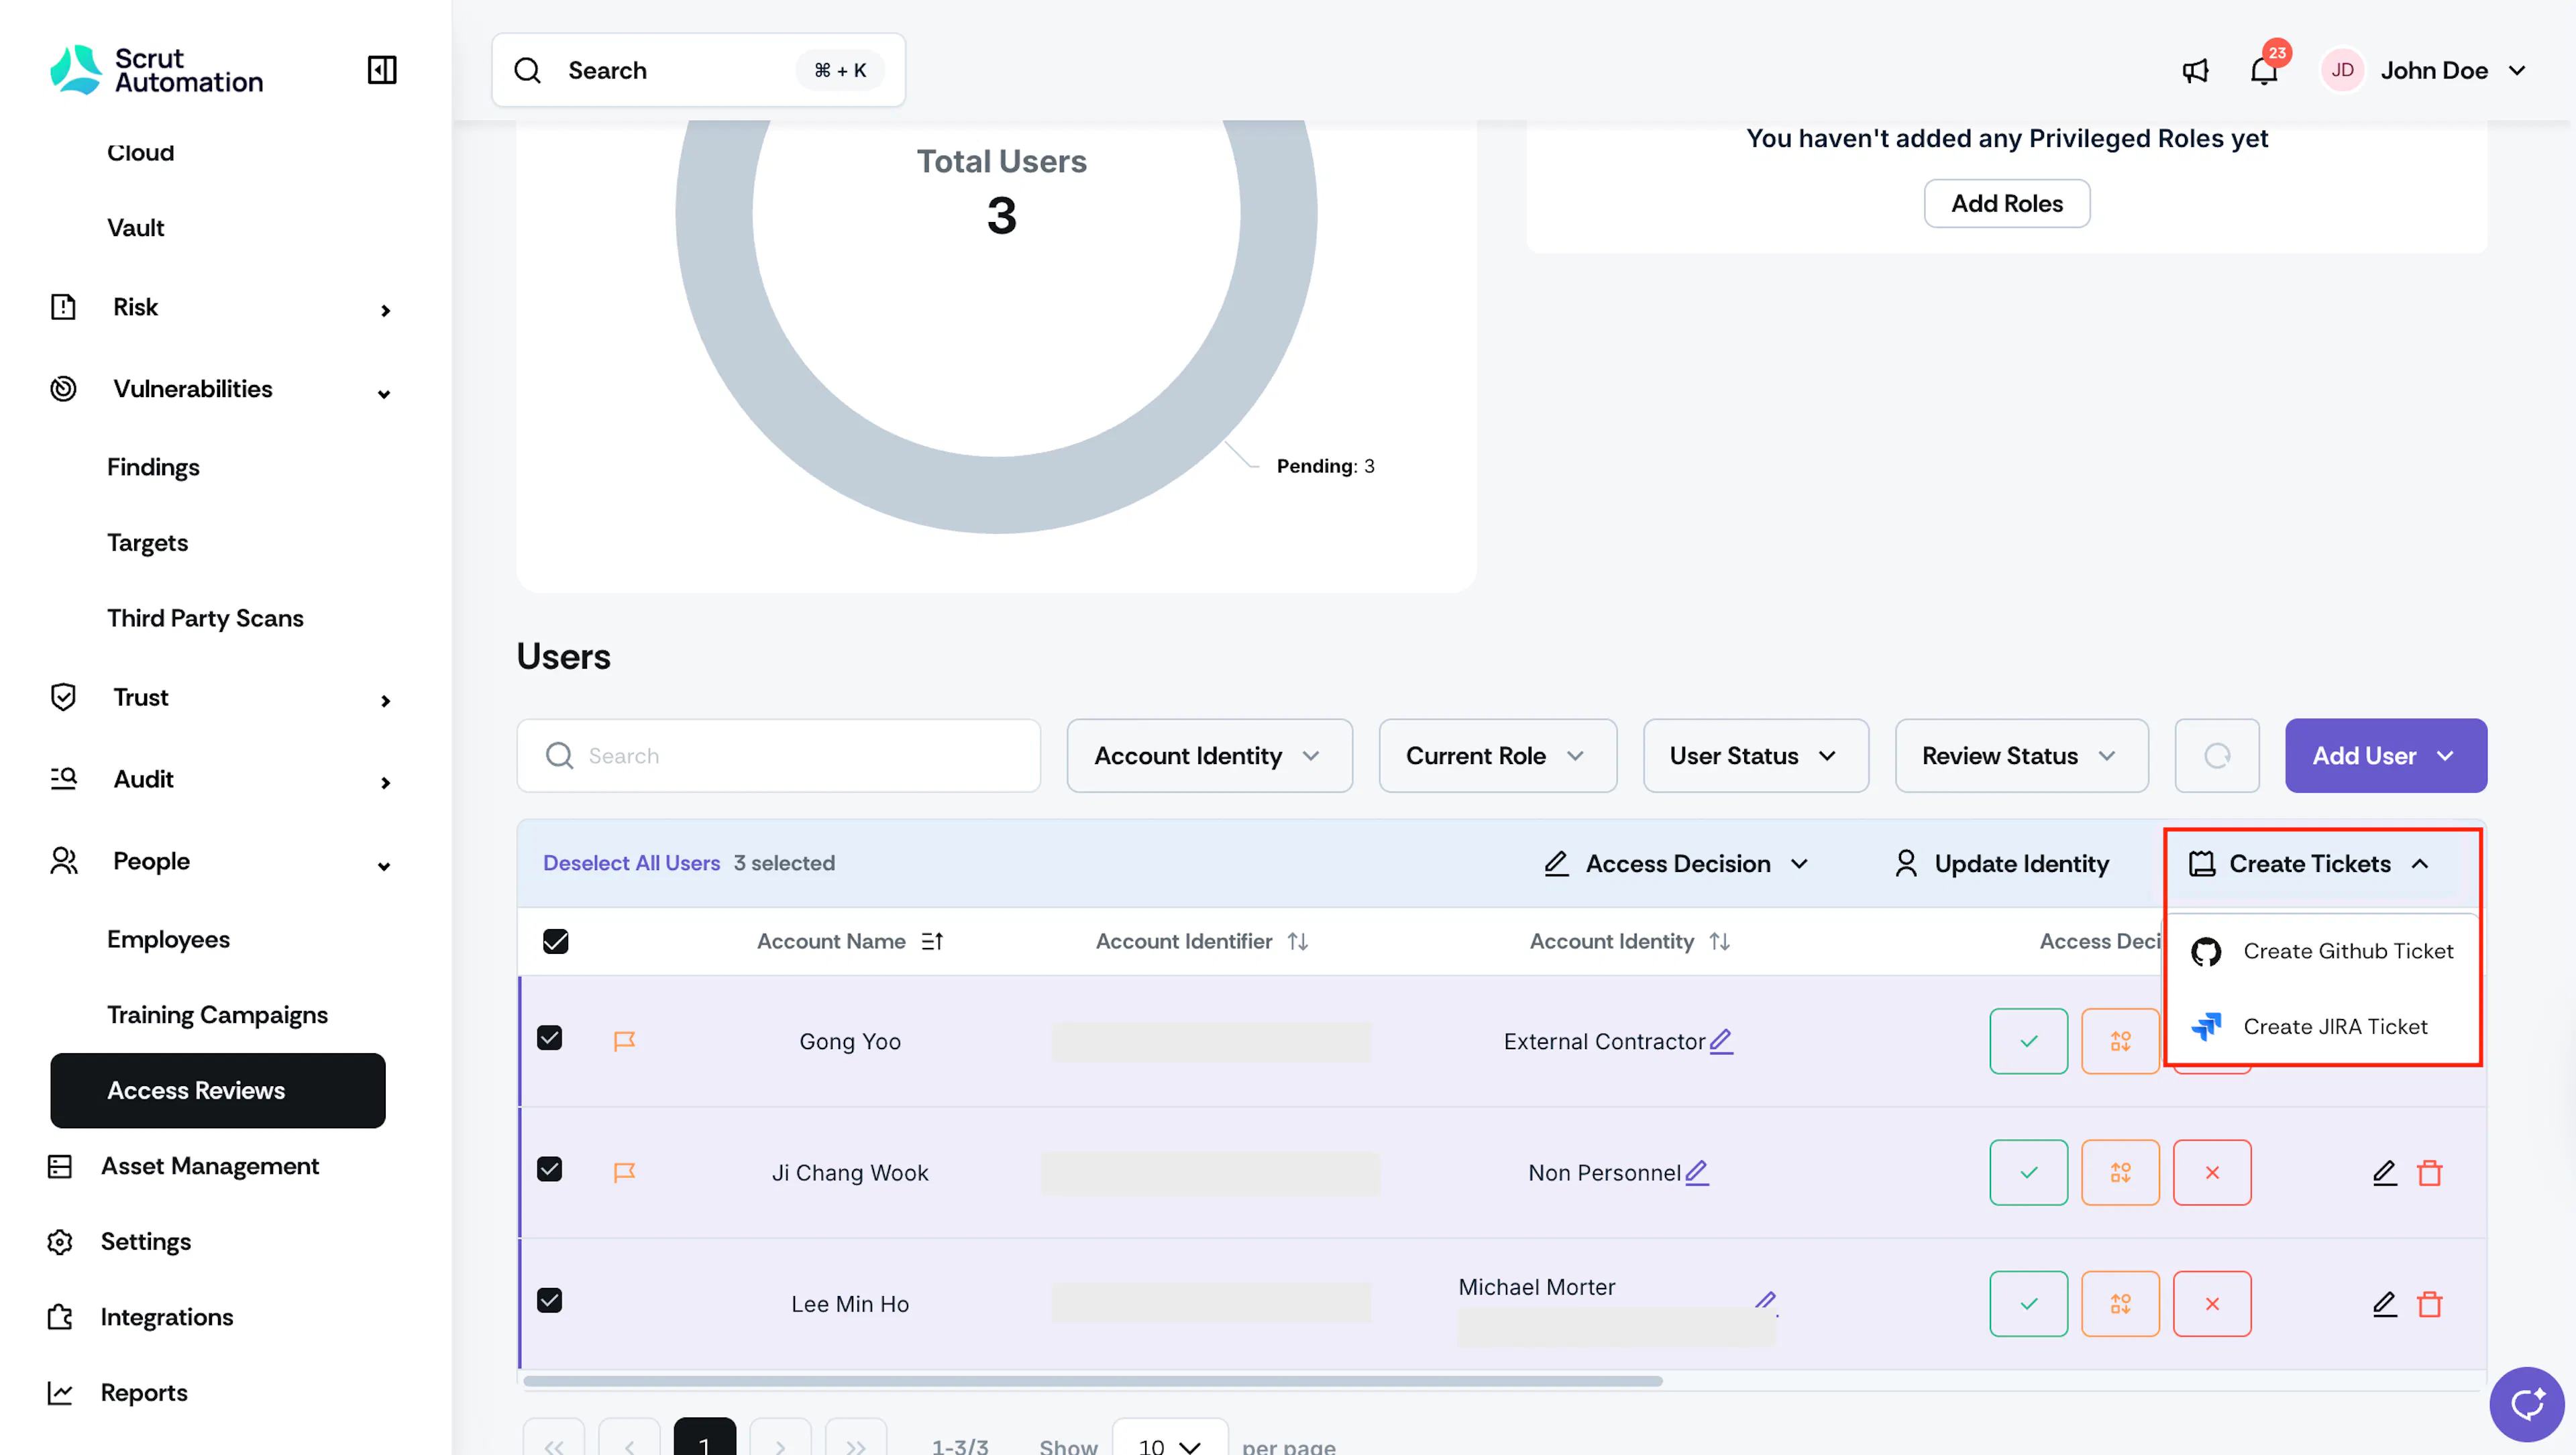
Select one or more users for whom you’ve modified the access.
-
Click Create Ticket and select your connected project management tool to track these tickets.
-
Select if you want to:
- Create multiple tickets (one for each user whose access was modified) or
- Create a consolidated ticket
-
Scrut fills in the ticket name automatically. Edit it if needed.
-
Fill in the other details, such as board, workspace, project, etc., depending on your project management tool.
-
Select ticket assignees, and optionally, include a description.
-
Enter the ticket due date in days (1, 3, 7, 15, or 30 days).
-
Click Create Ticket.
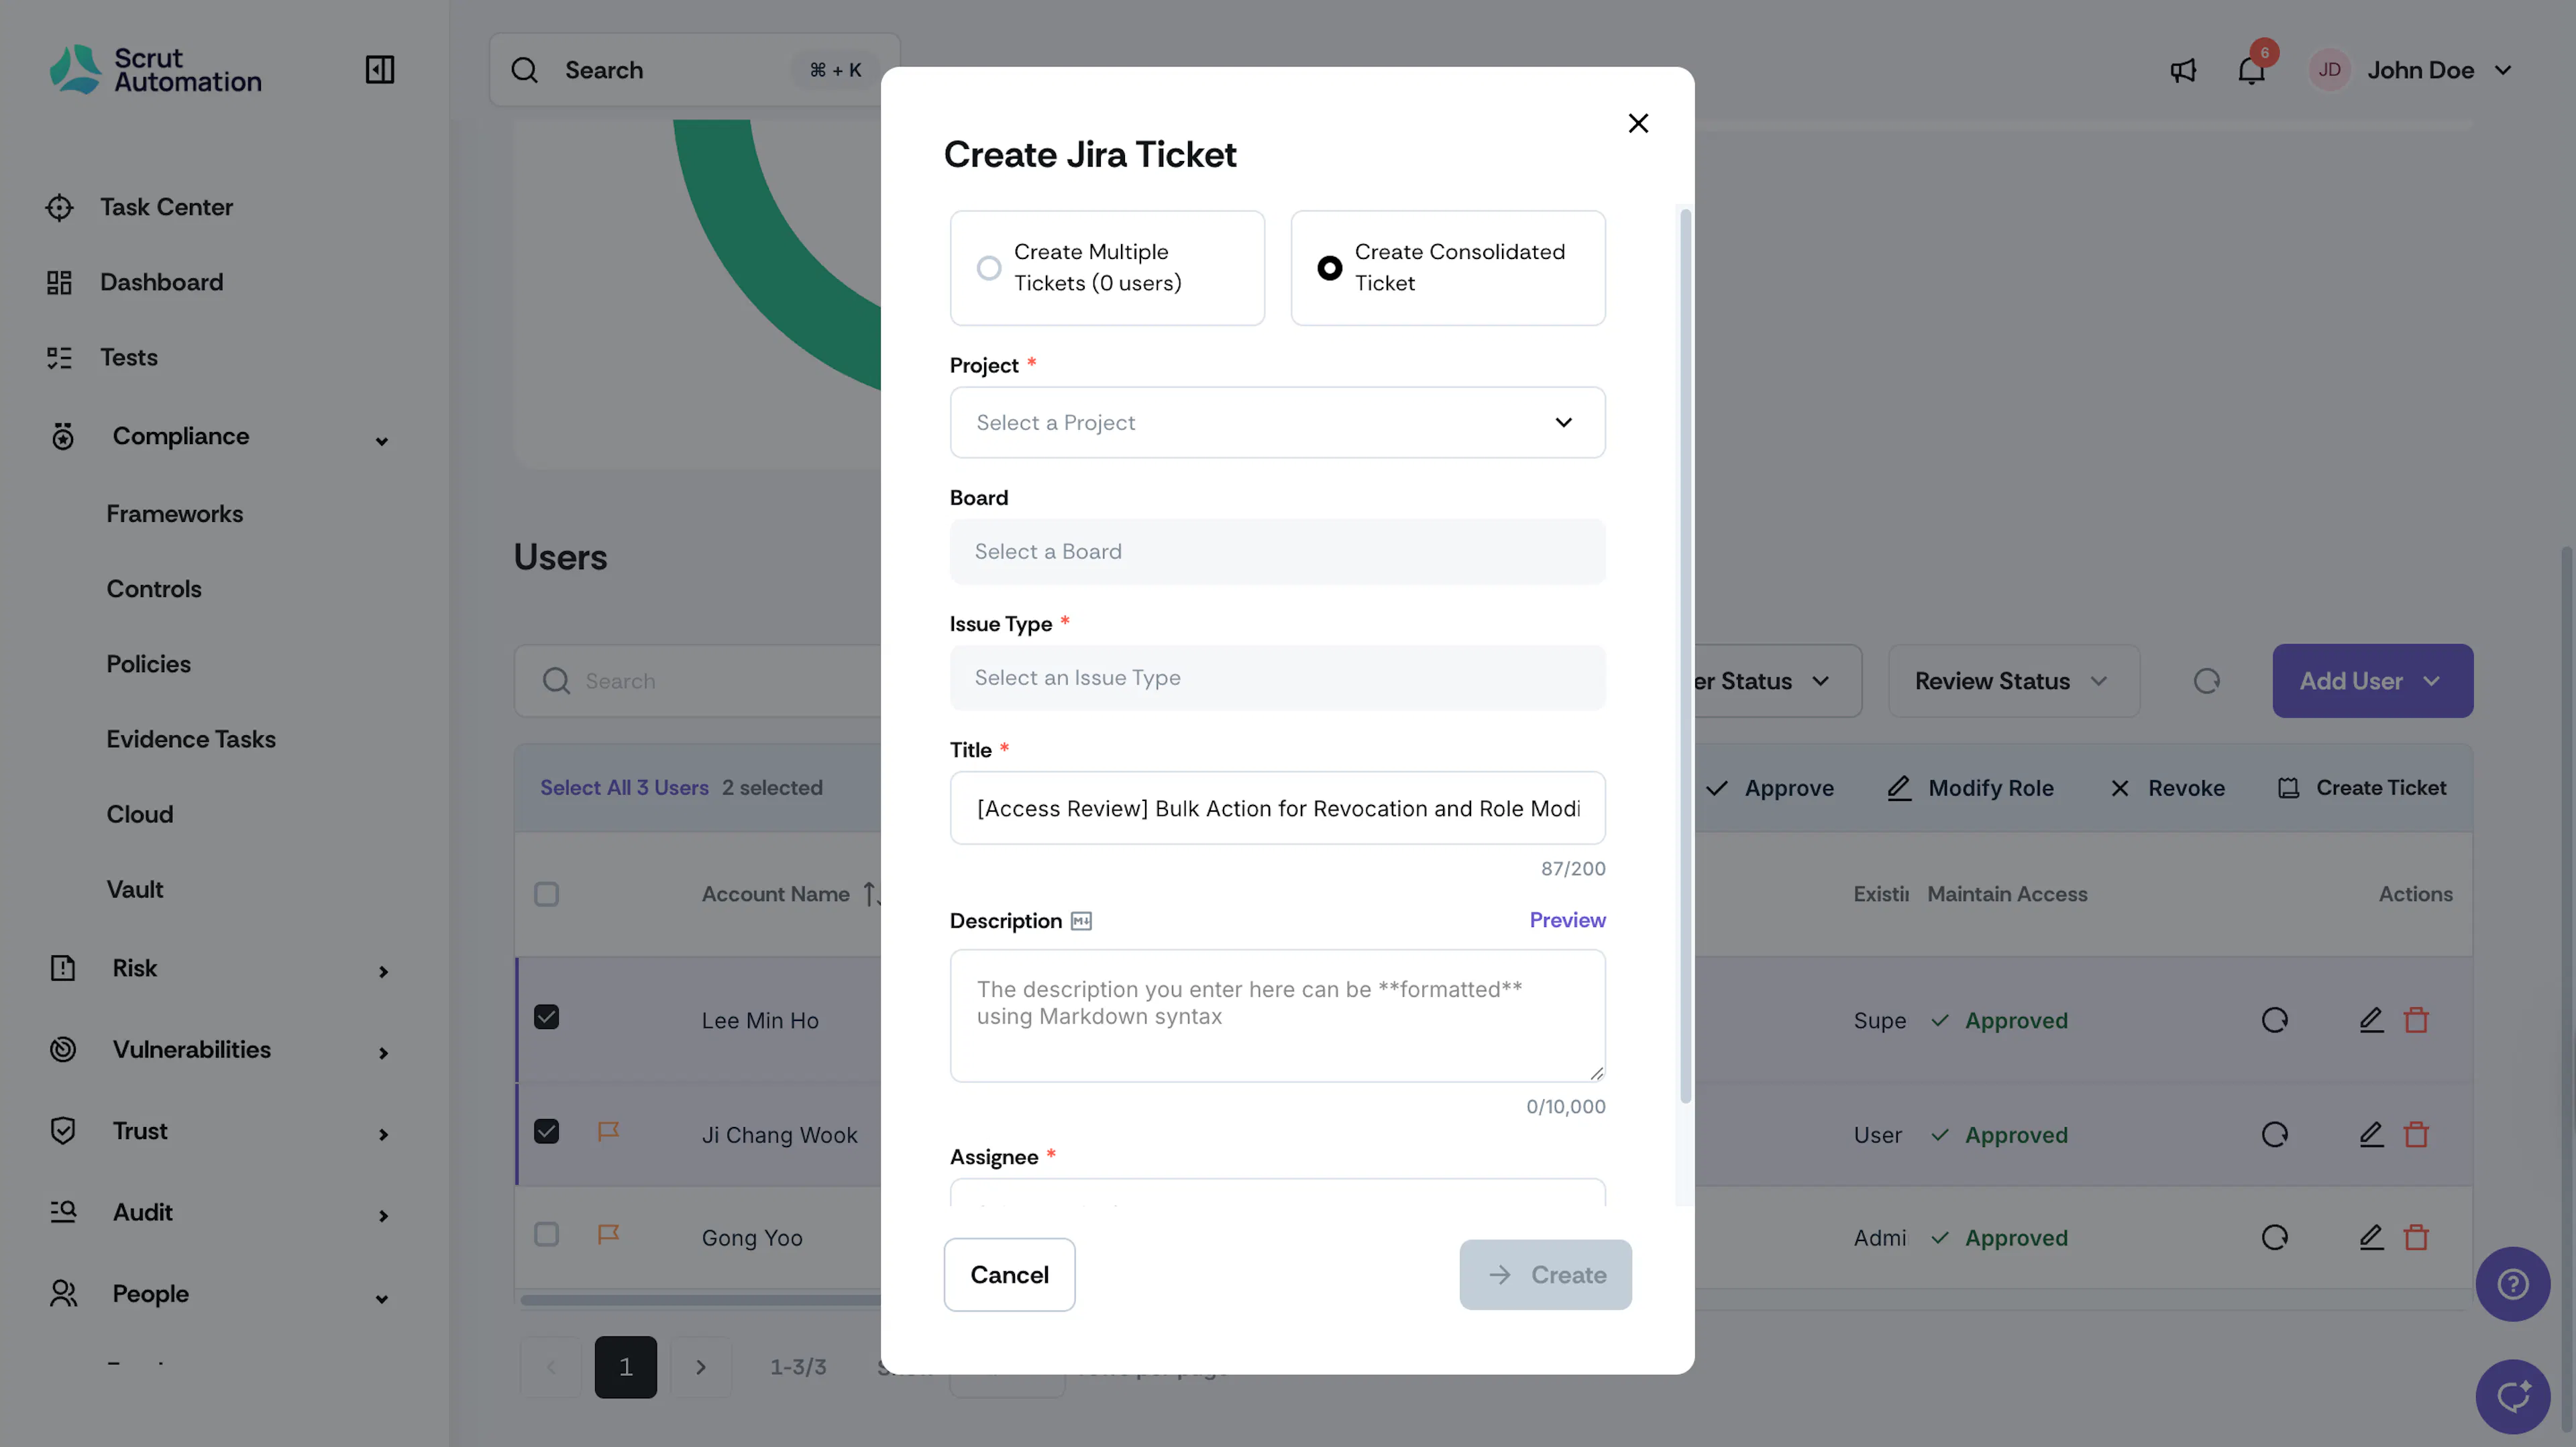
Scrut automatically creates the tickets in your connected project management platform.
Pro Tip!
Complete the required access changes in the respective applications.
Step 4: (For Reviewers) Send for Approval
The reviewer is responsible for completing the review of their application. Once the review is complete, the reviewer submits it to the approver, who will provide final approval for the application. This process ensures a clear distinction between the roles of reviewing and approving, promoting an organized approval workflow.
Heads Up!
- The Send for Approval is visible only when the reviewer and approver are different individuals.
- If you are both the reviewer and approver, you will see the Approve Review button instead.
- Additionally, the Send for Approval button is only visible if the reviewer has the Contributor role in Scrut. If the Reviewer is an admin, they won’t see this button.
How to Send for Approval
-
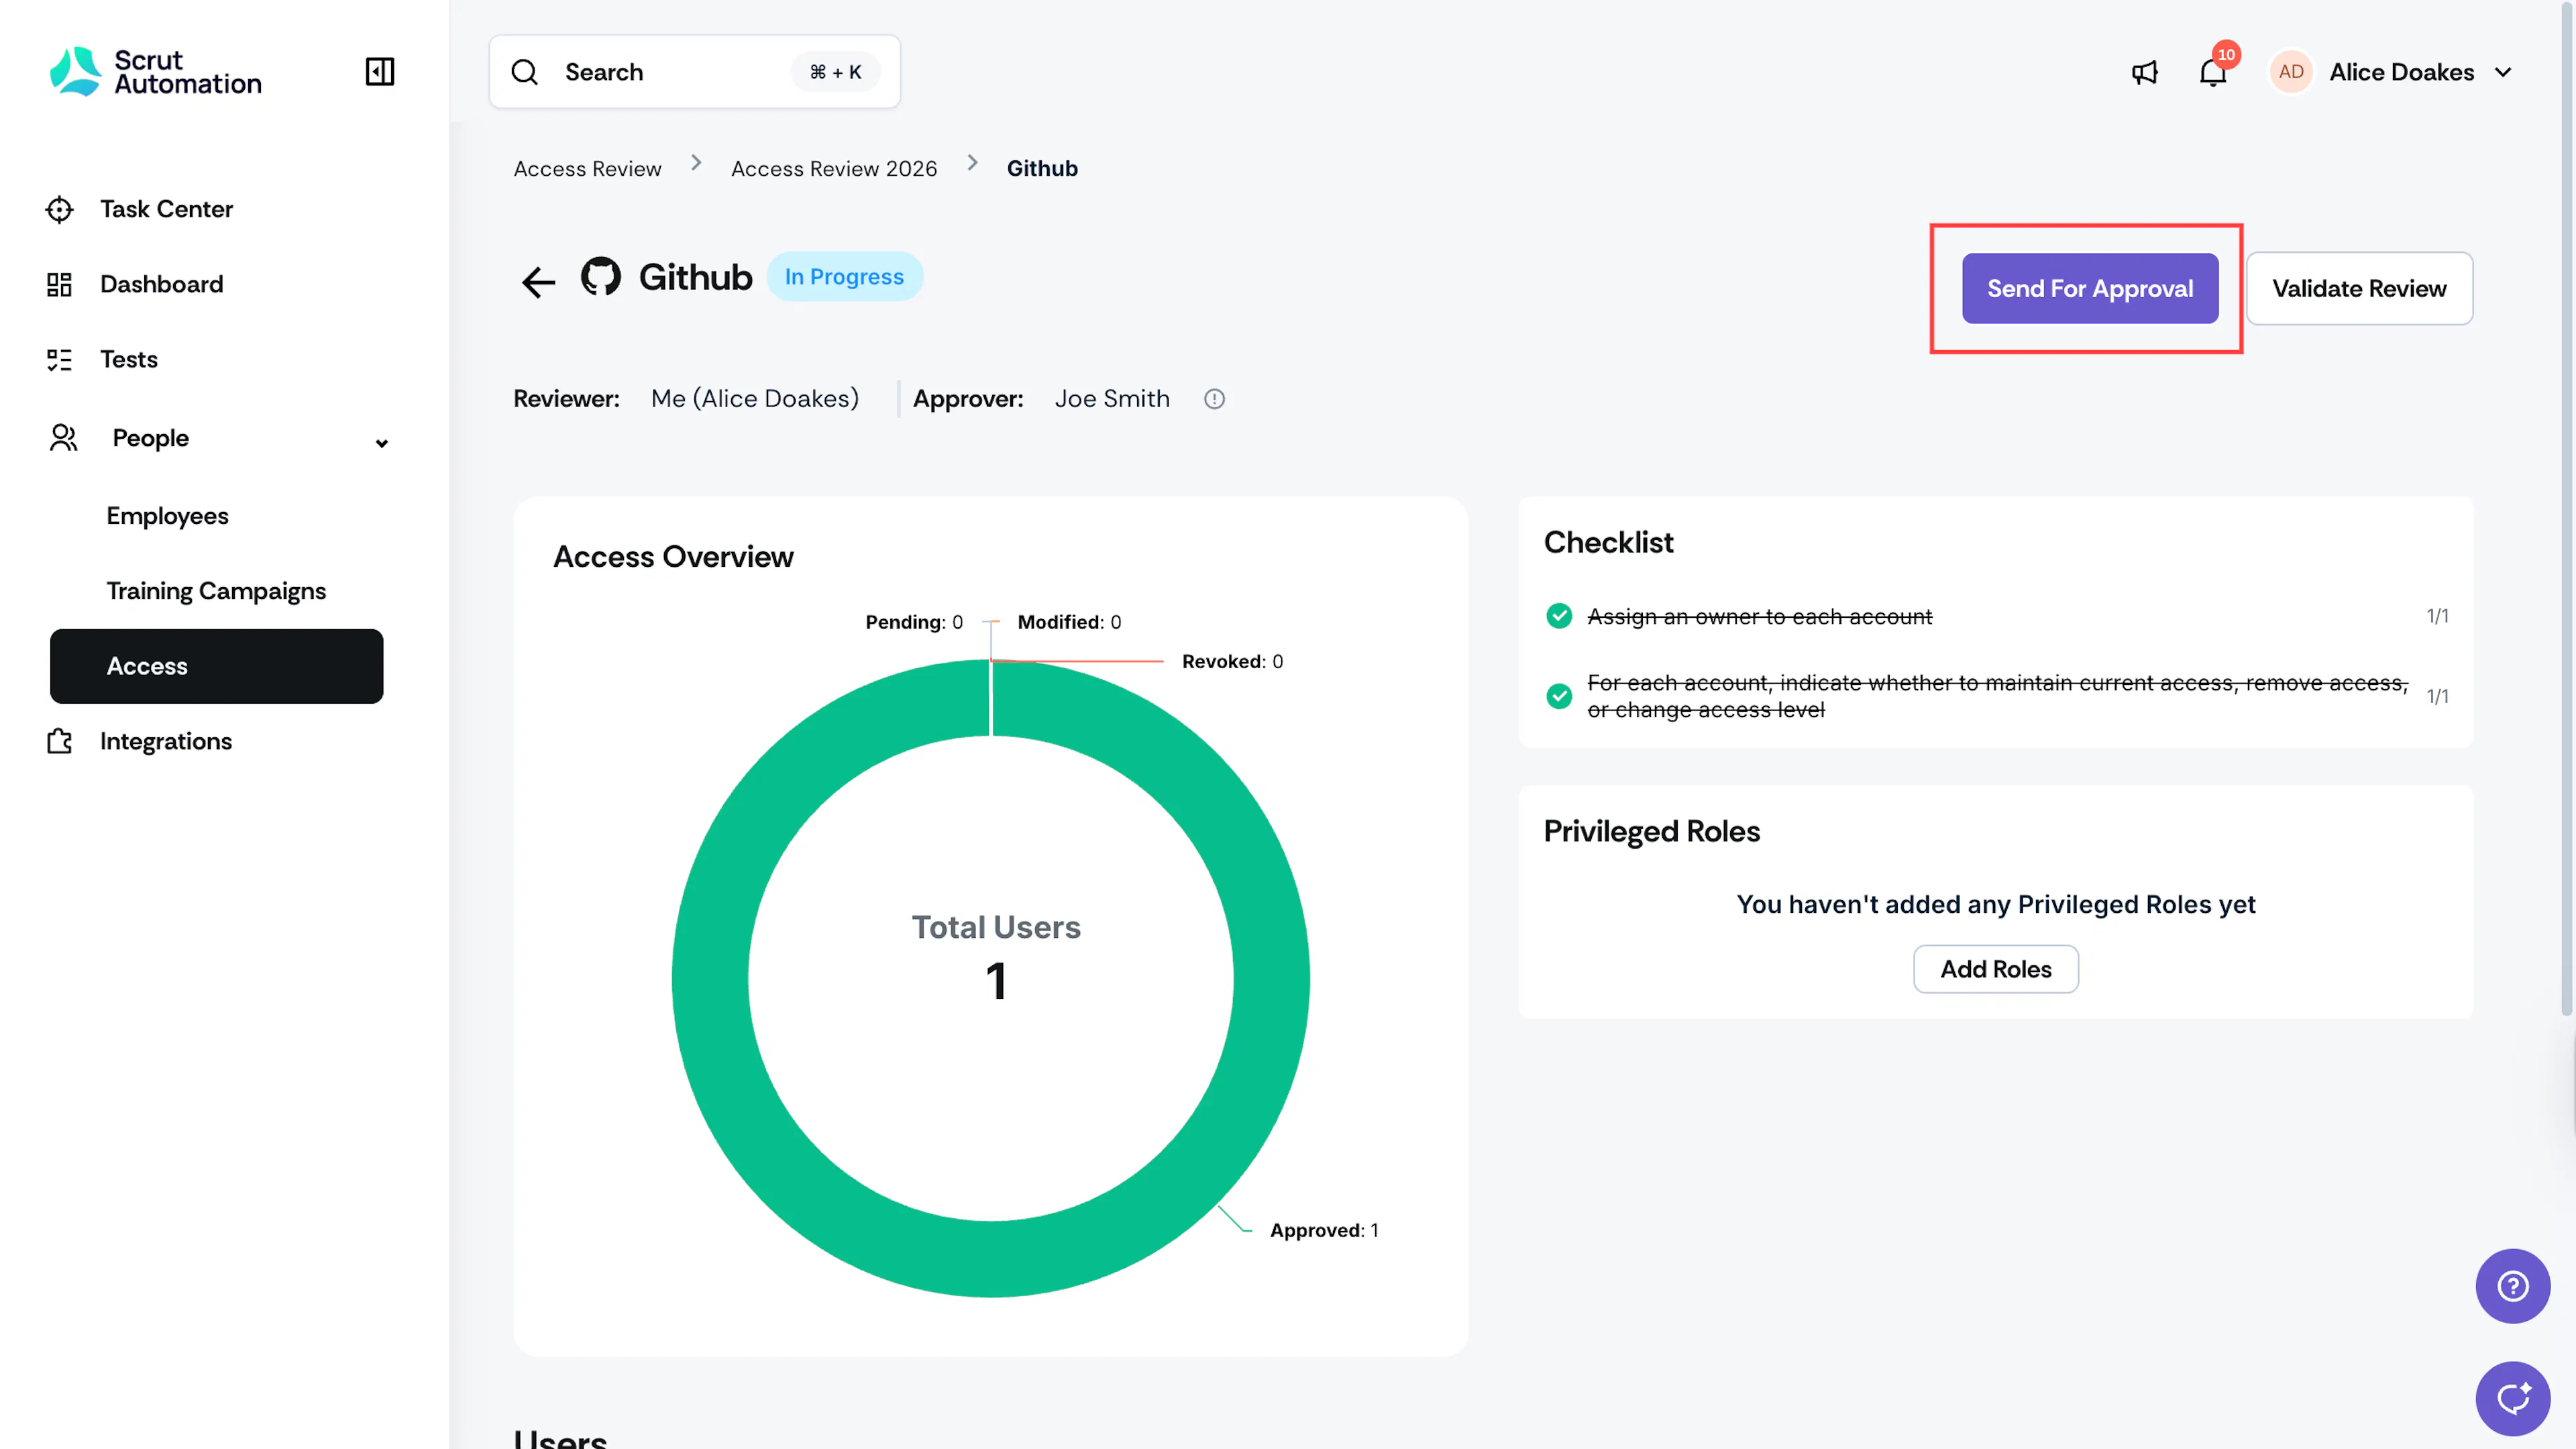
Click Send for Approval once you've completed reviewing all users. You can also click this button even if you still have pending users.
-
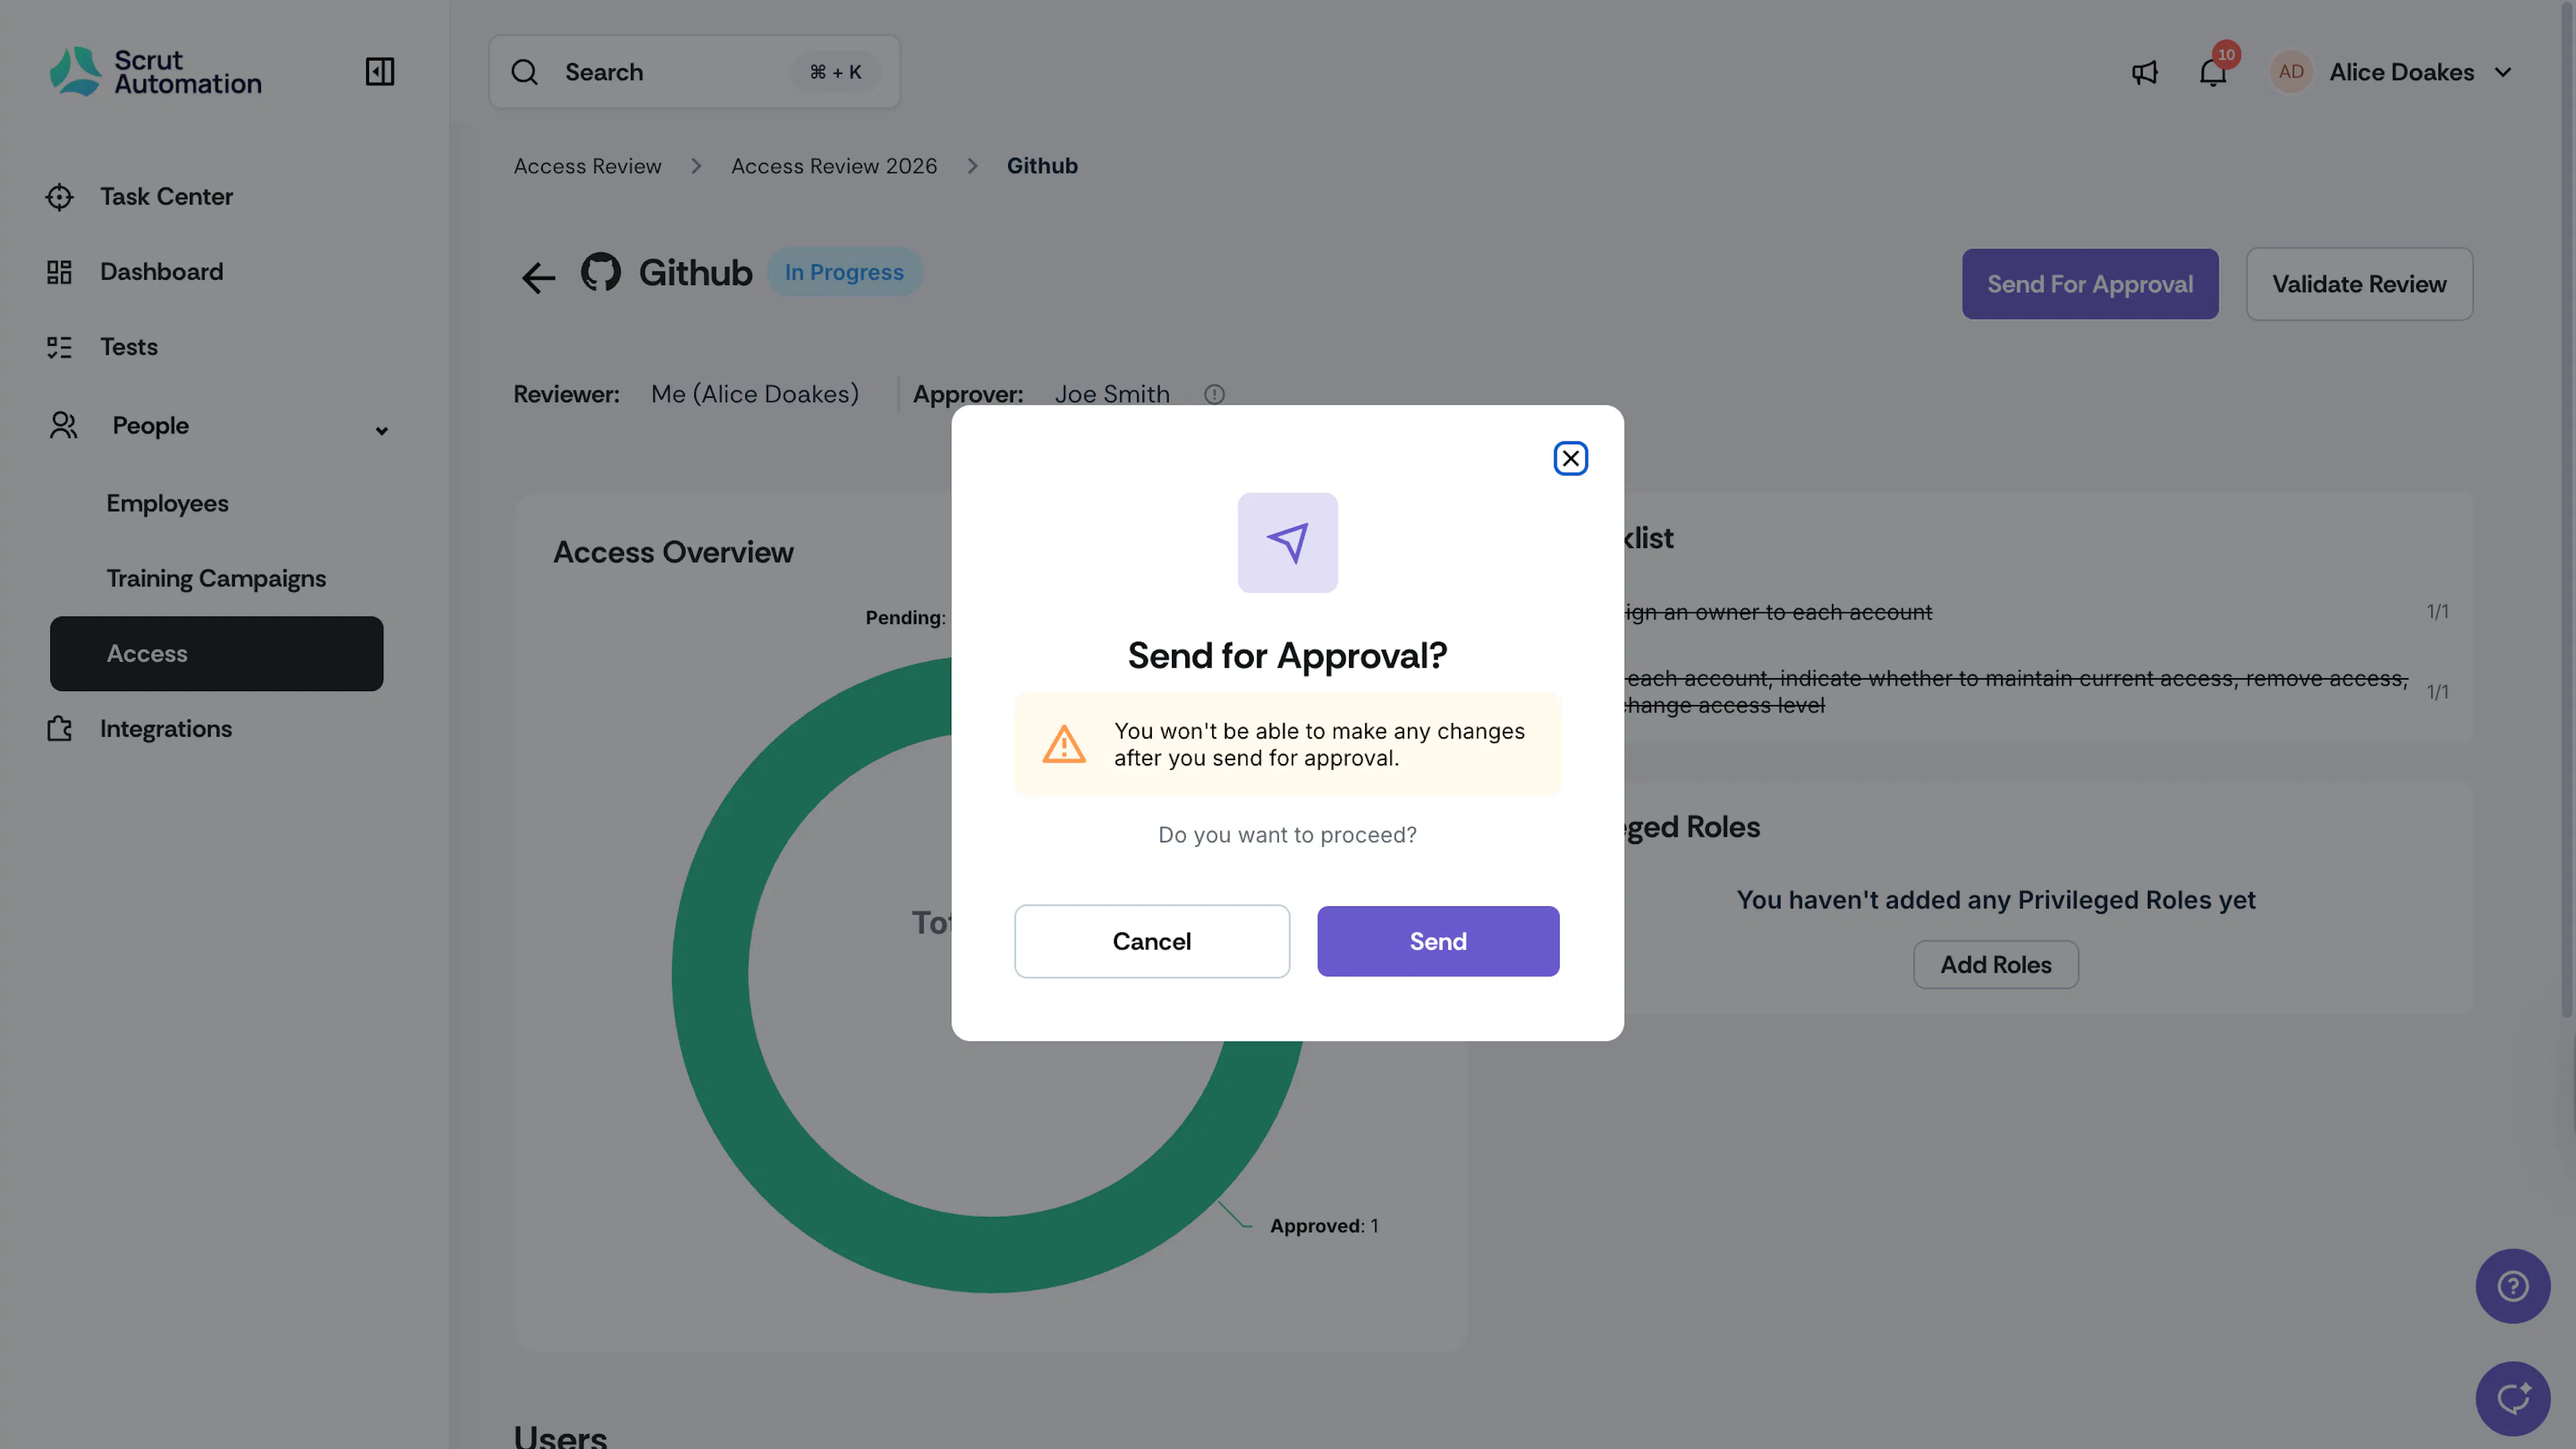
Click Send to proceed, or Cancel to go back.
What Happens After You Send for Approval
Once you submit:
-
You cannot make any further edits to your user-level decisions until the approver reviews them. All fields and actions are locked.
-
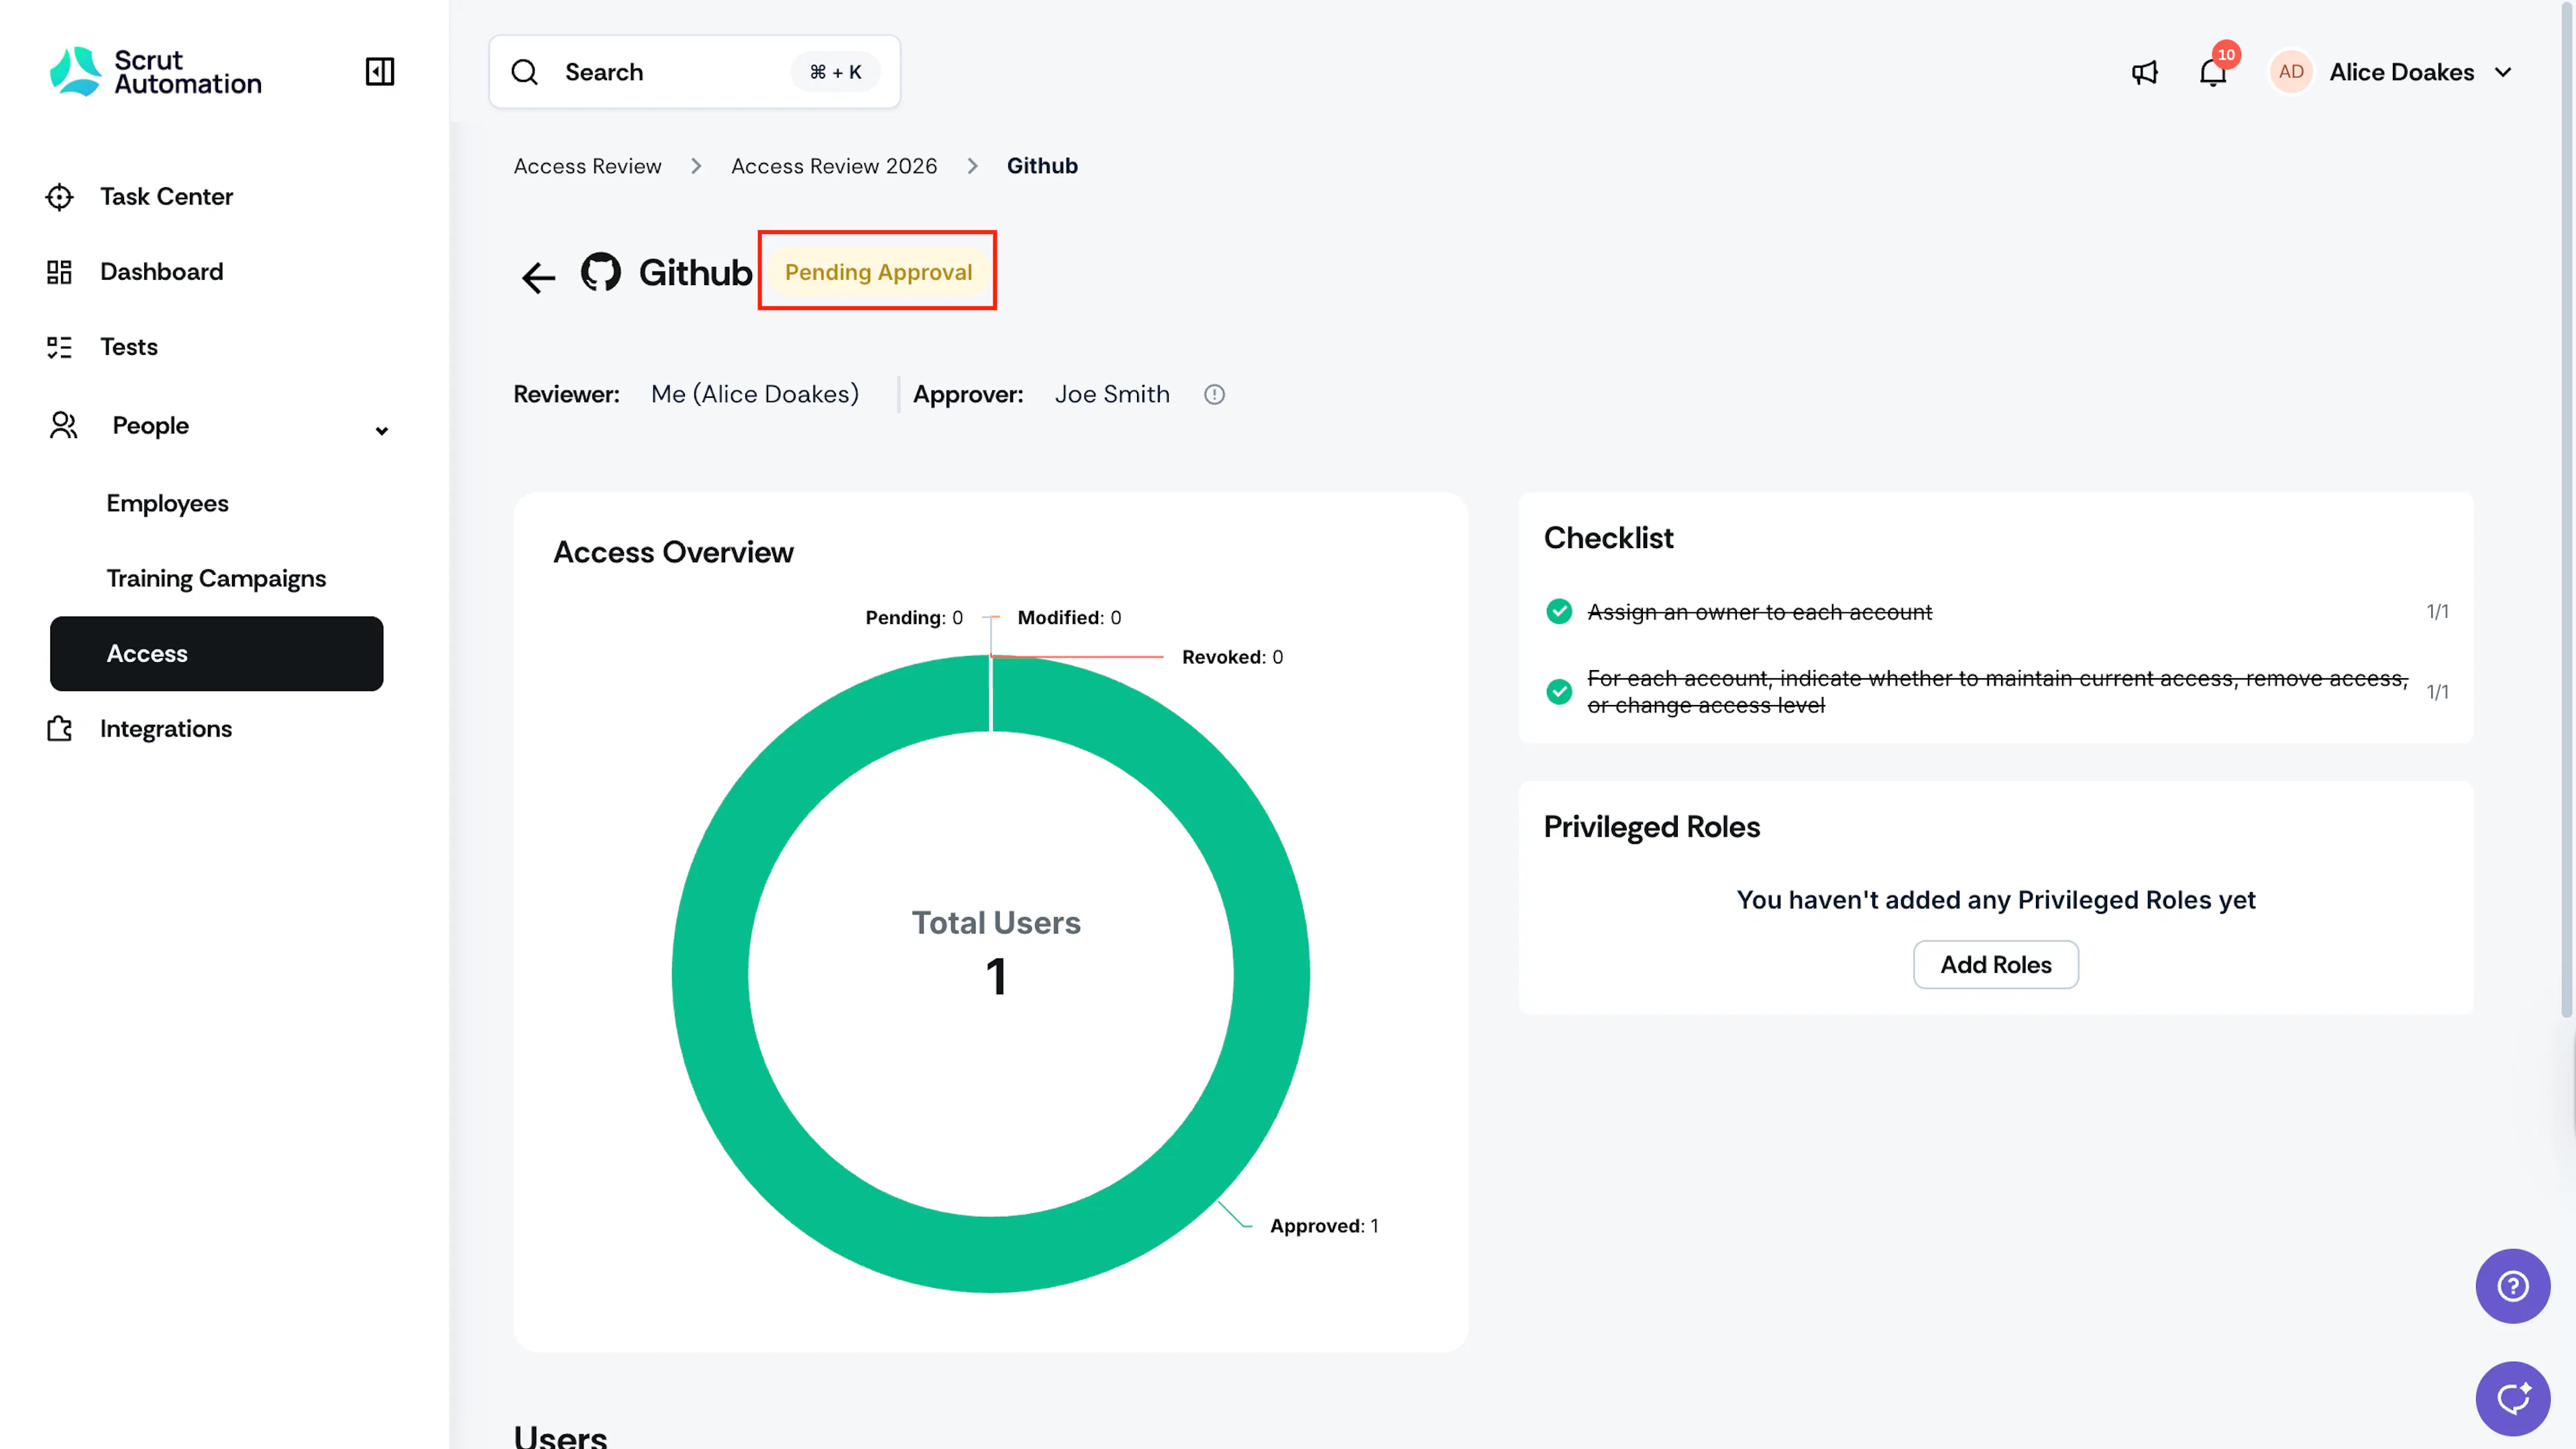
The application review status changes to Pending Approval.
-
The approver receives notifications via email, Slack, and in the Notifications Center.
If the Approver Declines Your Review
The approver may decline your review and request changes. If this happens:
-
You'll receive notifications via email, Slack, and in the Notifications Center.
-
The application review status changes back to In Progress.
-
When you open the review, you'll see a banner explaining why the approver has declined it.
-
You can now edit your previous decisions, make necessary adjustments, and resubmit using the Send for Approval button.
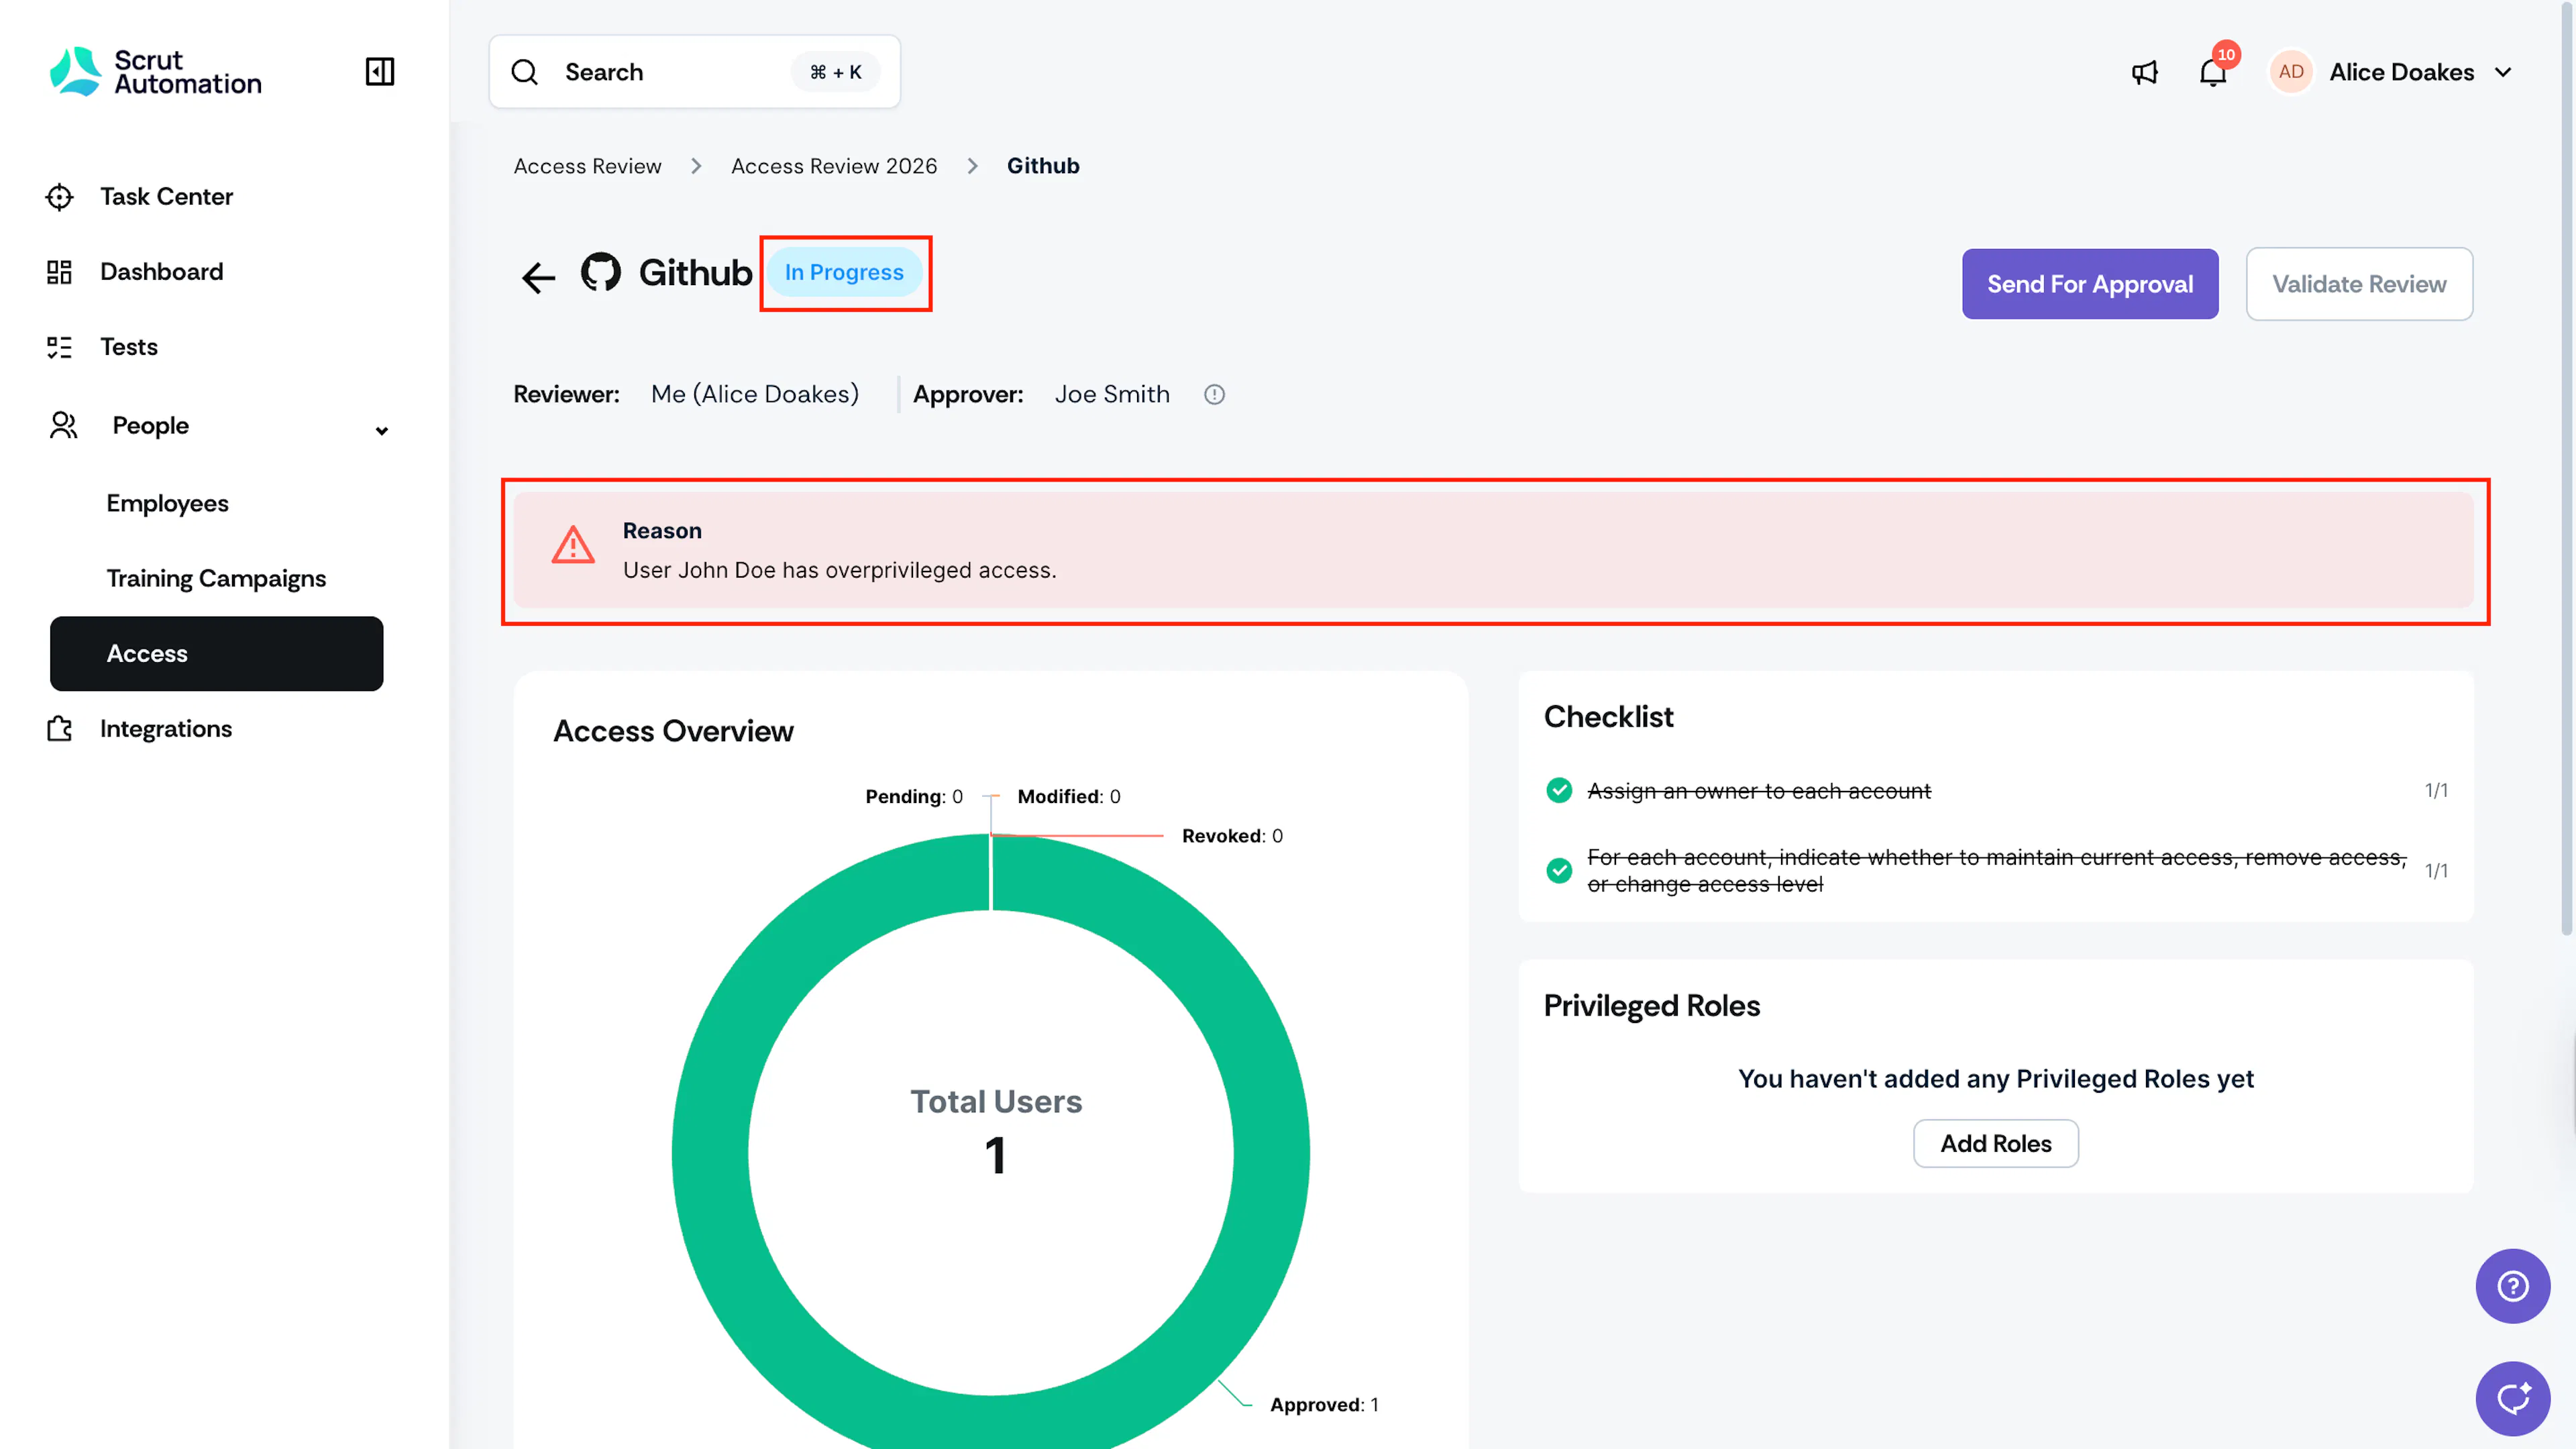
Upon re-submission, the status reverts to Pending Approval, and the approver is notified.
Step 5: (For Approvers) Approve & Validate Review
Approve or Decline Review
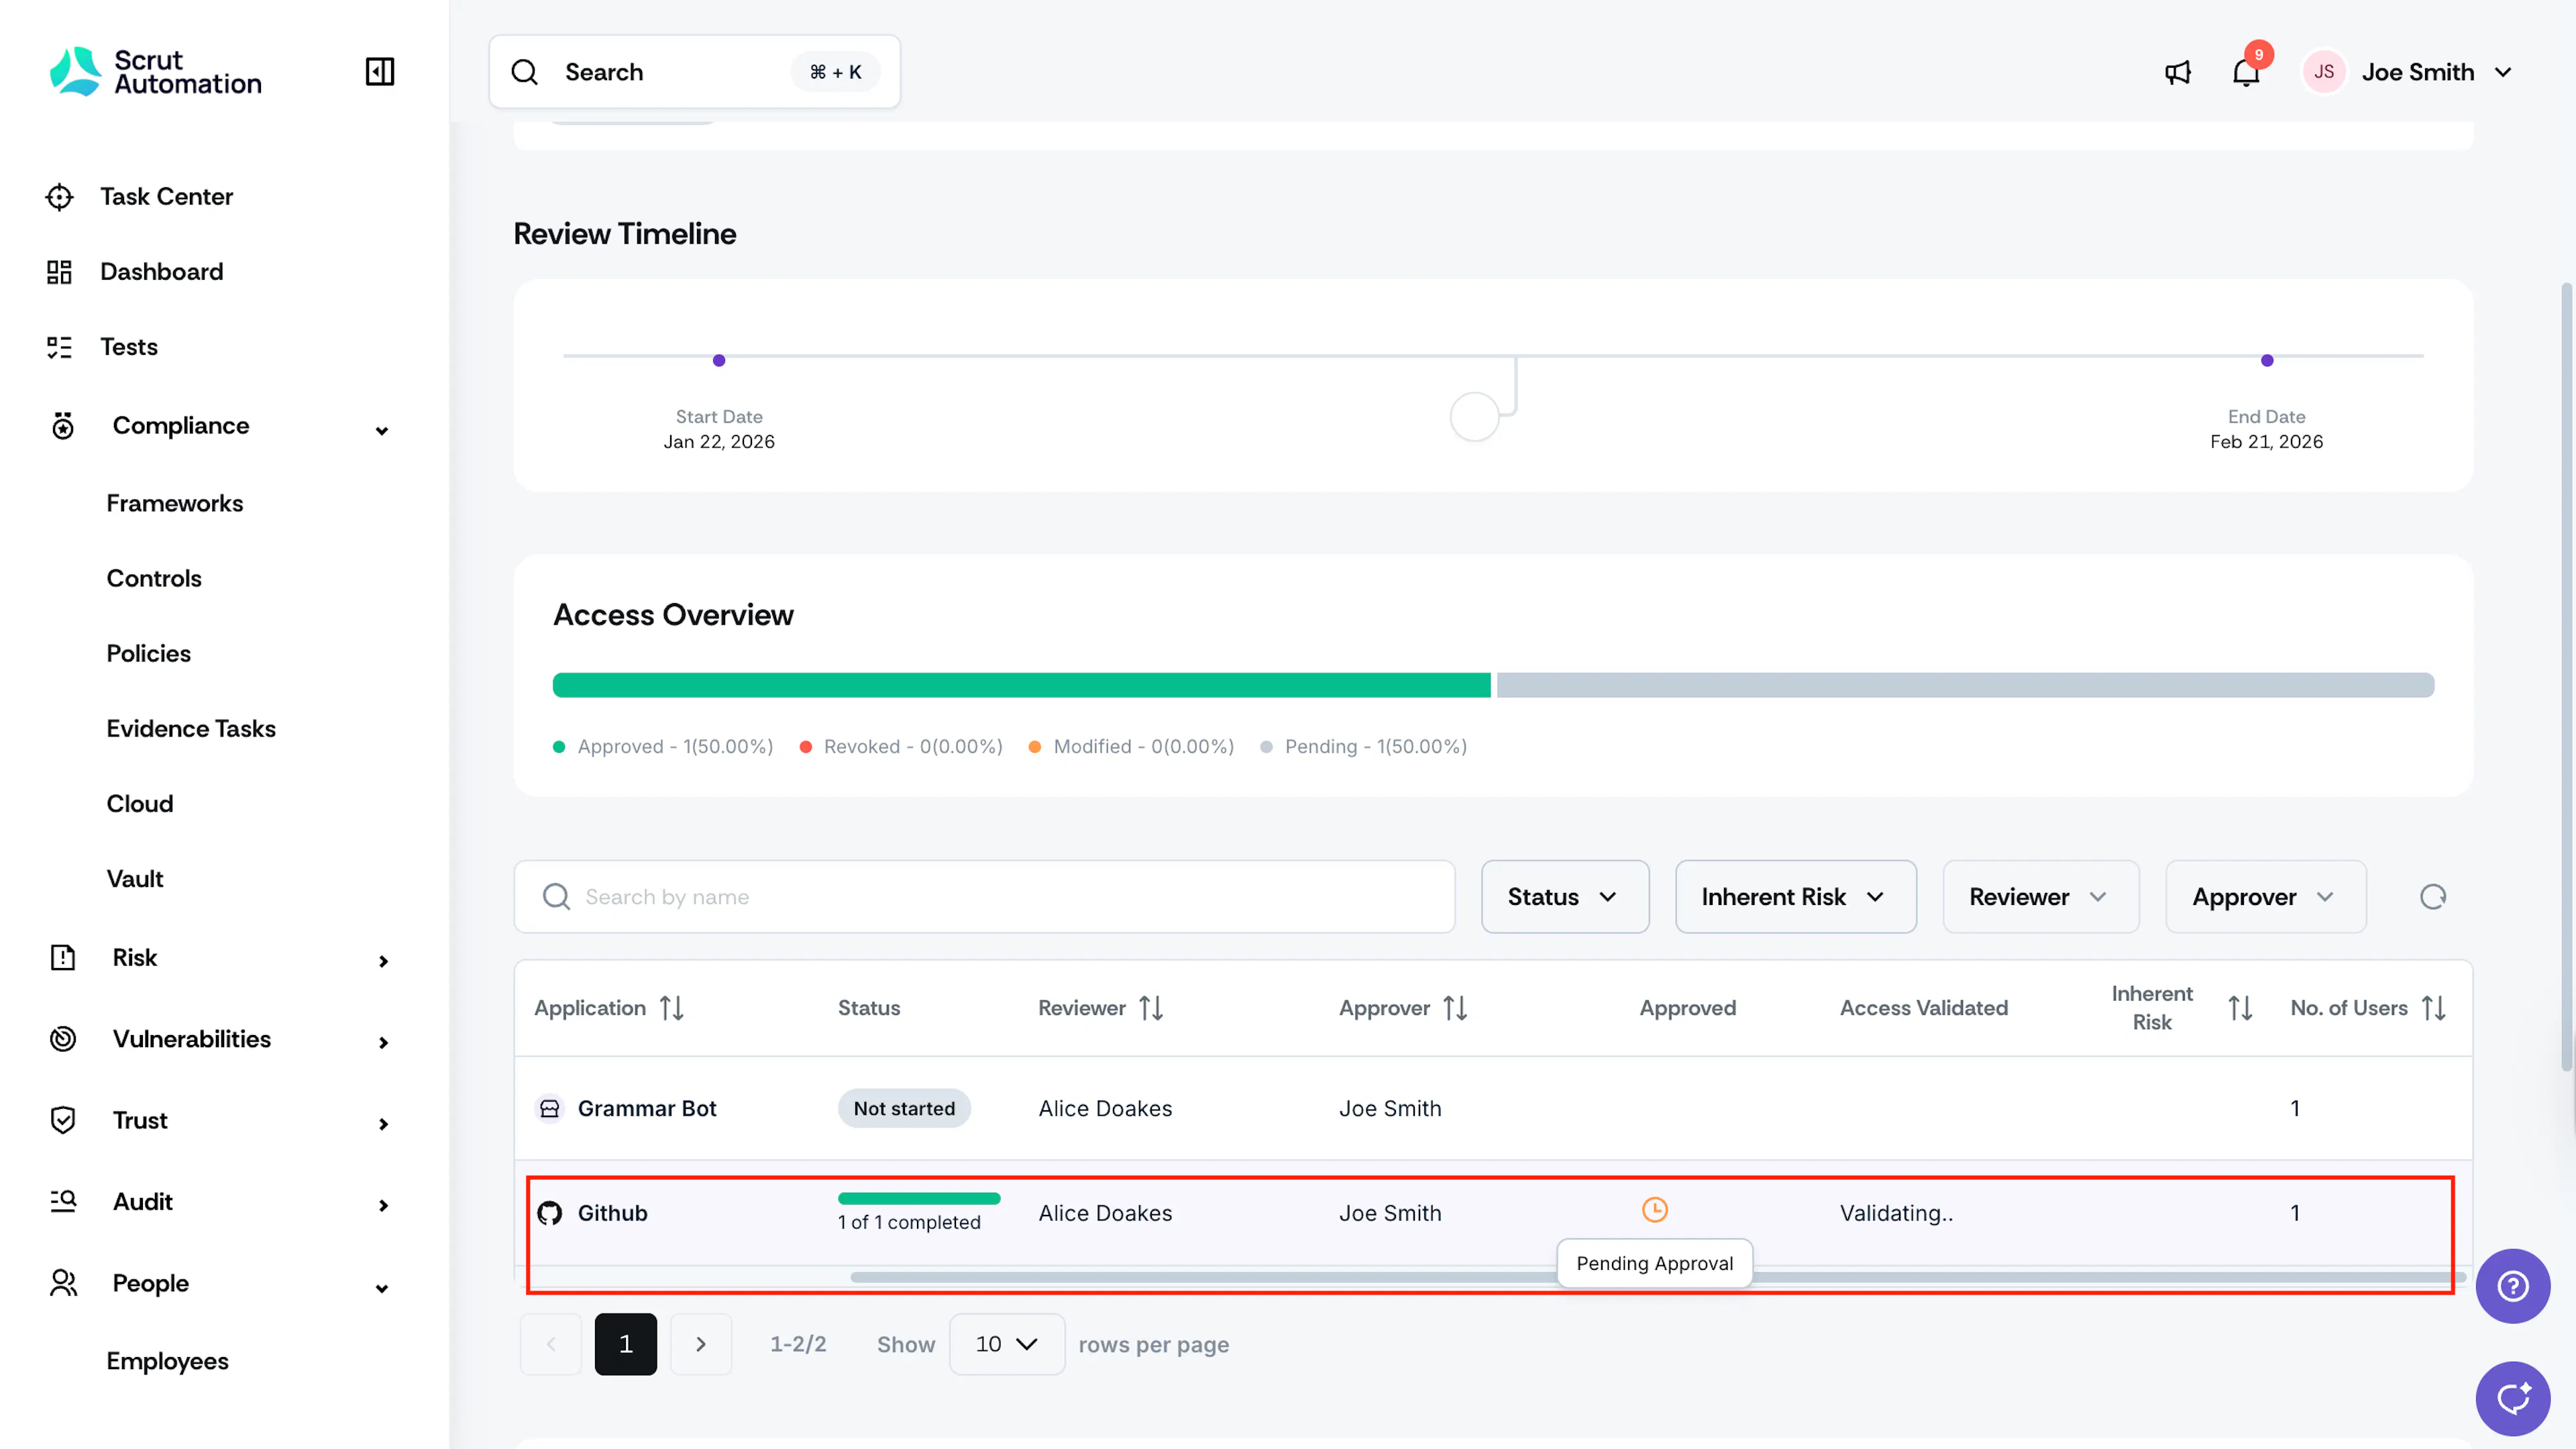
When you receive a notification that a review is Pending Approval:
-
Navigate to People → Access → Reviews, and open the review.
-
Click the application marked as Pending Approval.
-
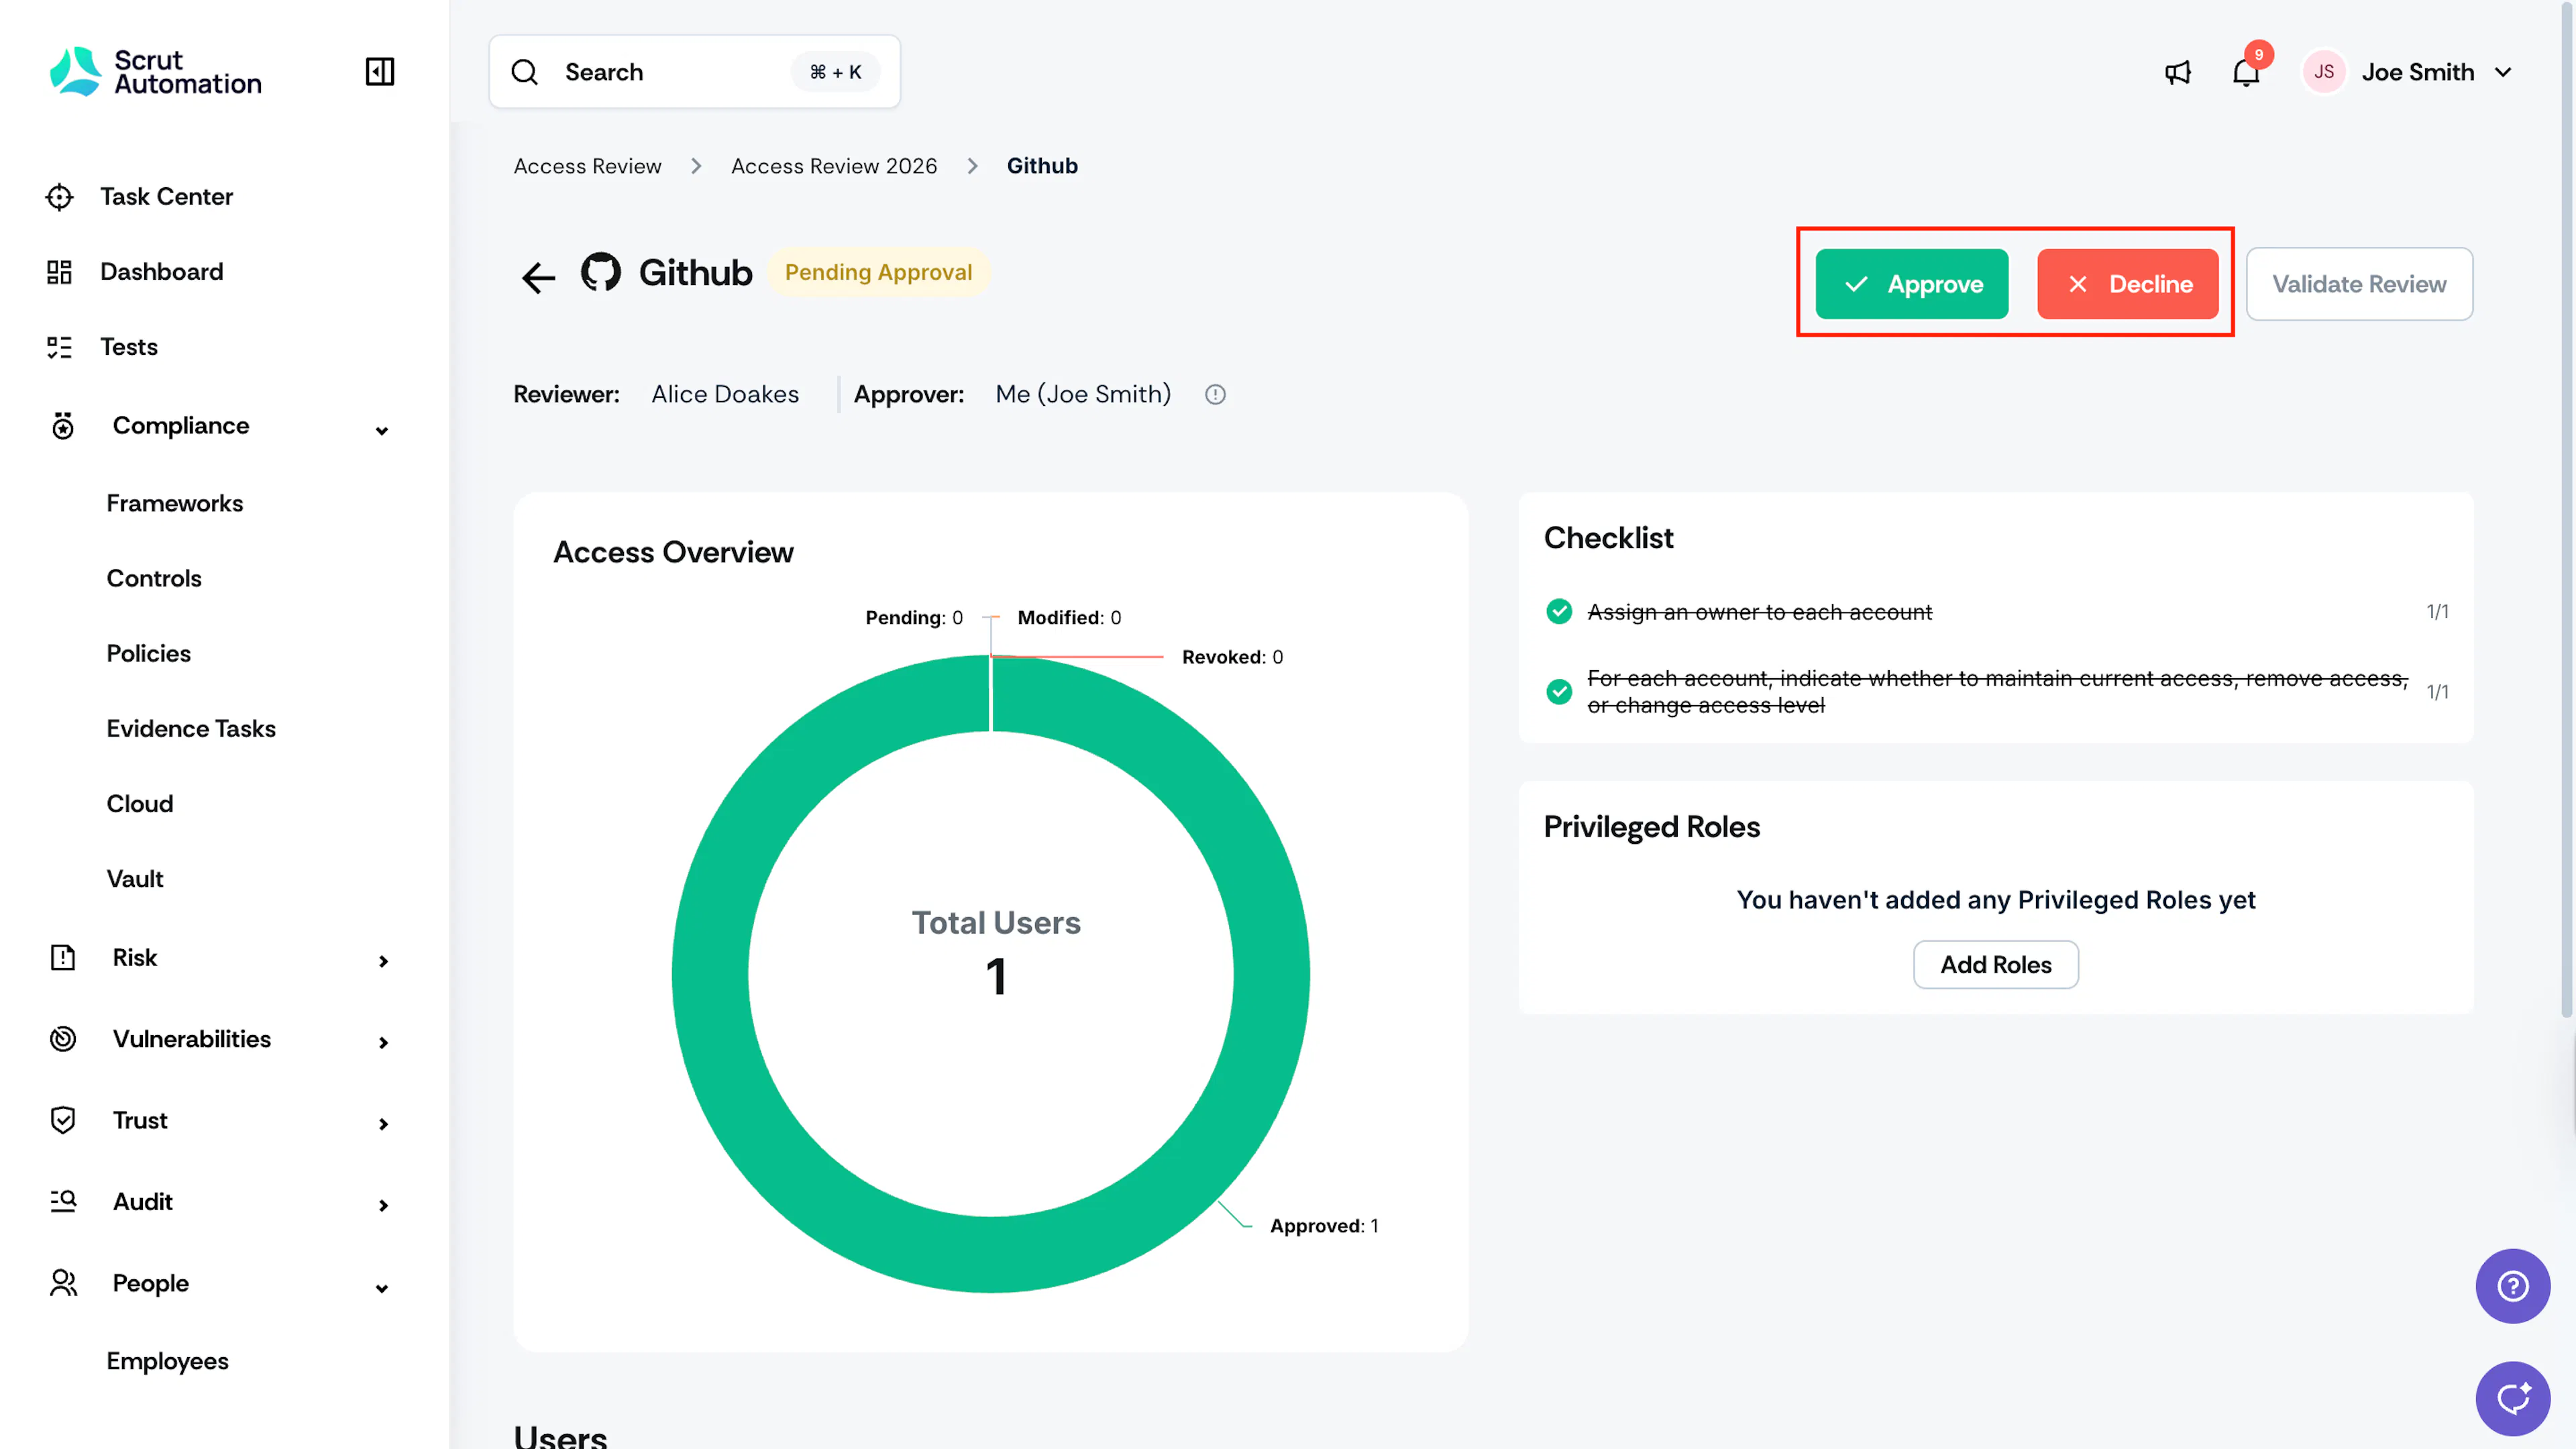
You'll see two options:
- Approve: Proceed with final approval
- Decline: Send the review back to the reviewer with feedback
To Approve the Review
-
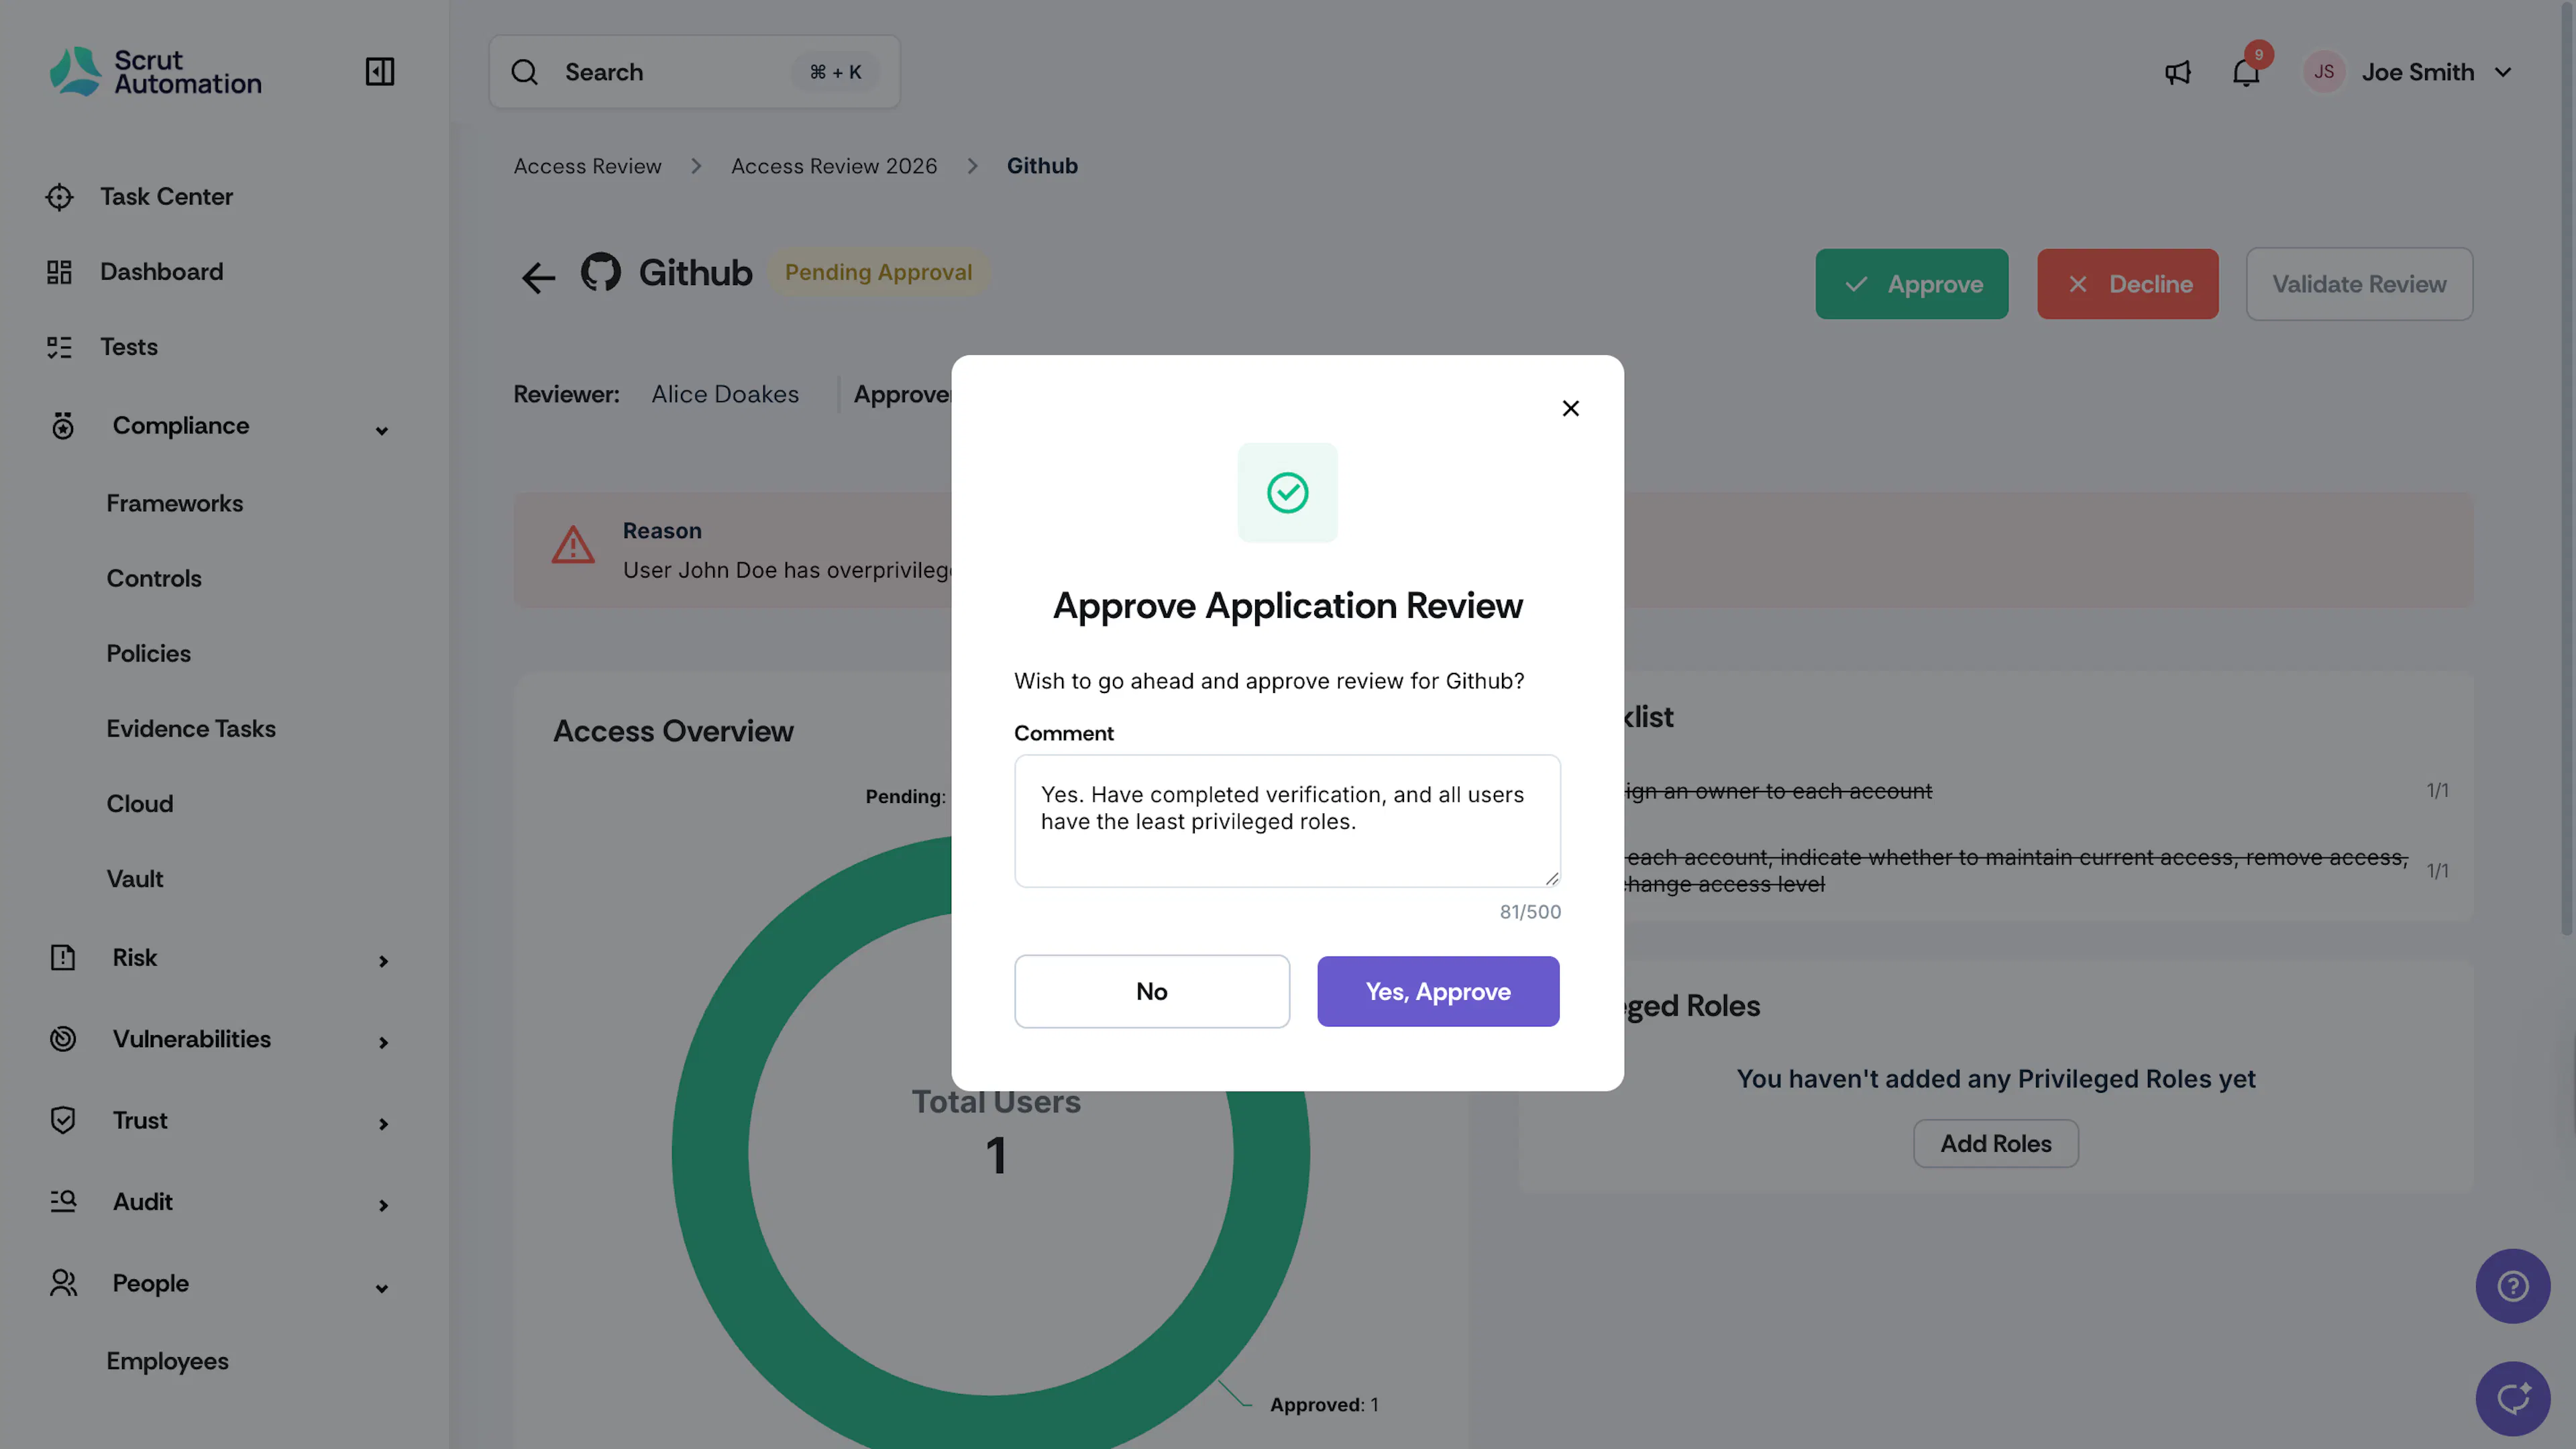
Click the Approve Review button in the top right corner.
-
Optionally, include a justification for the action, and click Yes, Approve.
To Decline and Request Re-Review
-
Click the Decline Review button.
-
Enter your reason for declining it.
-
Click Submit to send the review back to the reviewer.
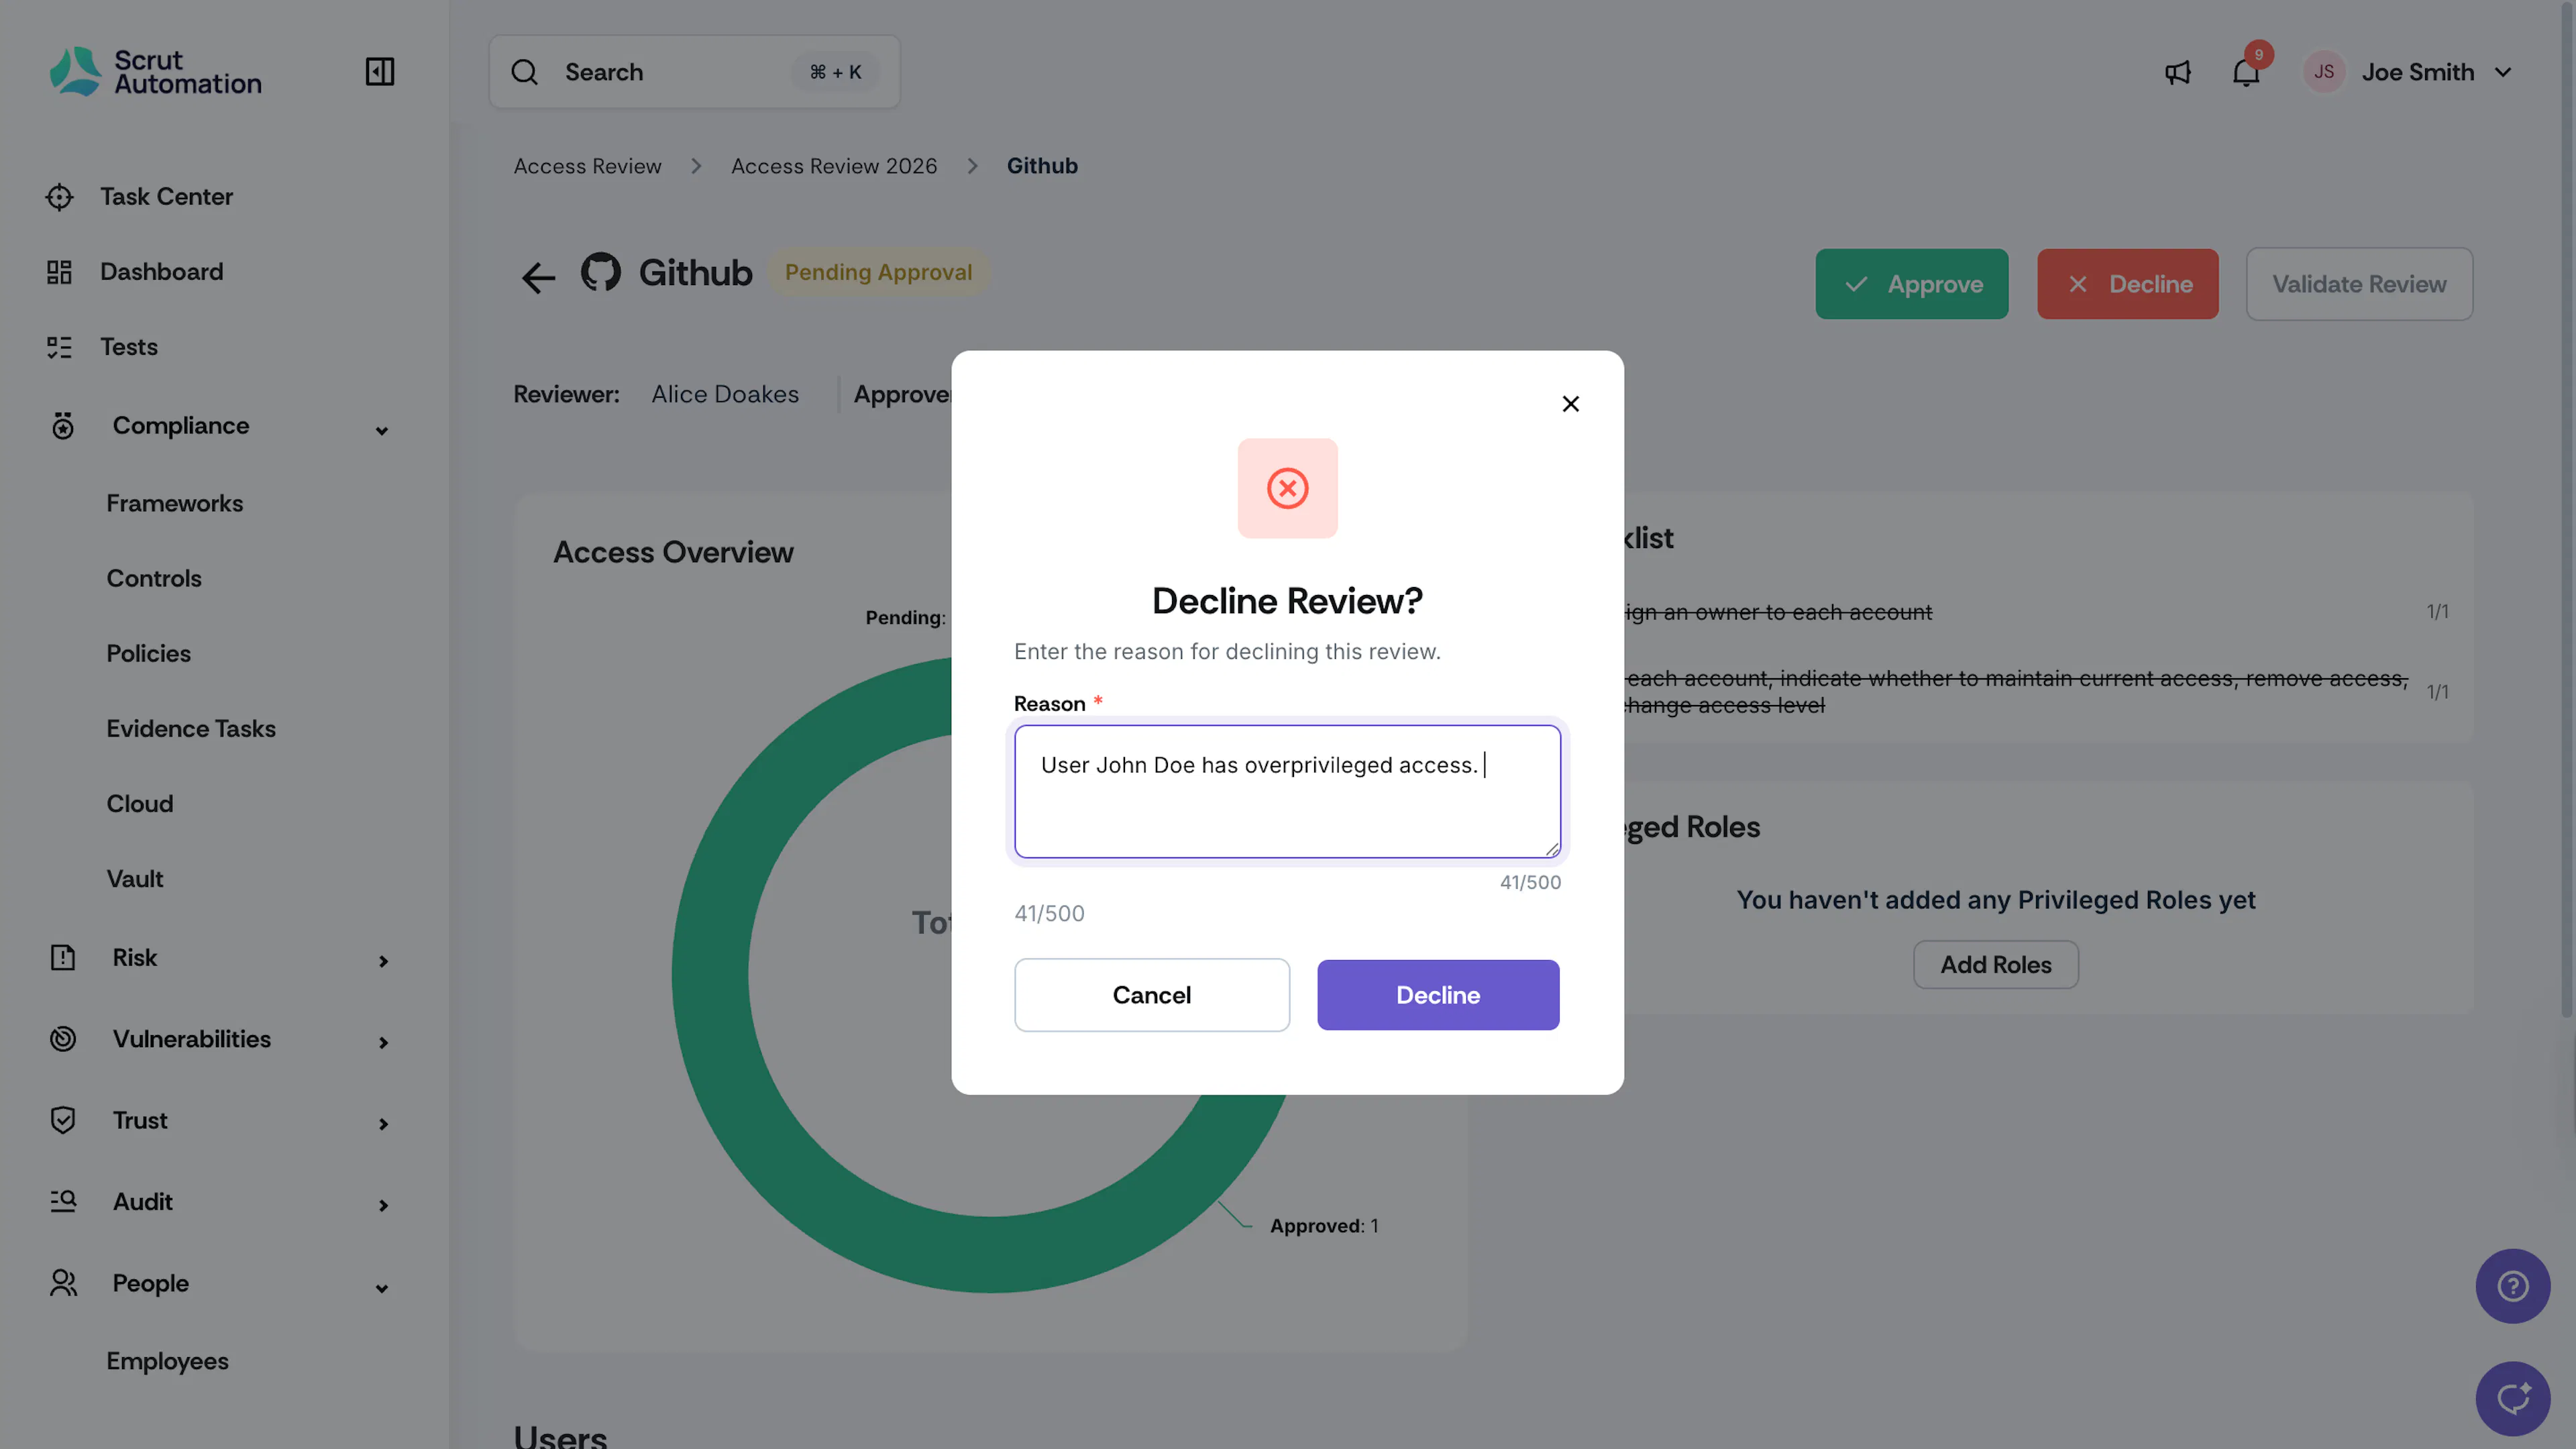
After you submit a decline:
- The application status changes from Pending Approval to In Progress.
- The reviewer receives notifications via email, Slack, and in the Notifications Center with your feedback message.
- The reviewer can make changes and resubmit for approval.
Validate Review
Pro Tip!
Check if all of these tasks are completed before validation:
- Verify that you’ve completed all tasks in the checklist.
- Ensure ownership assignments have been modified in the application
- Confirm all access decisions have been documented with proper justification
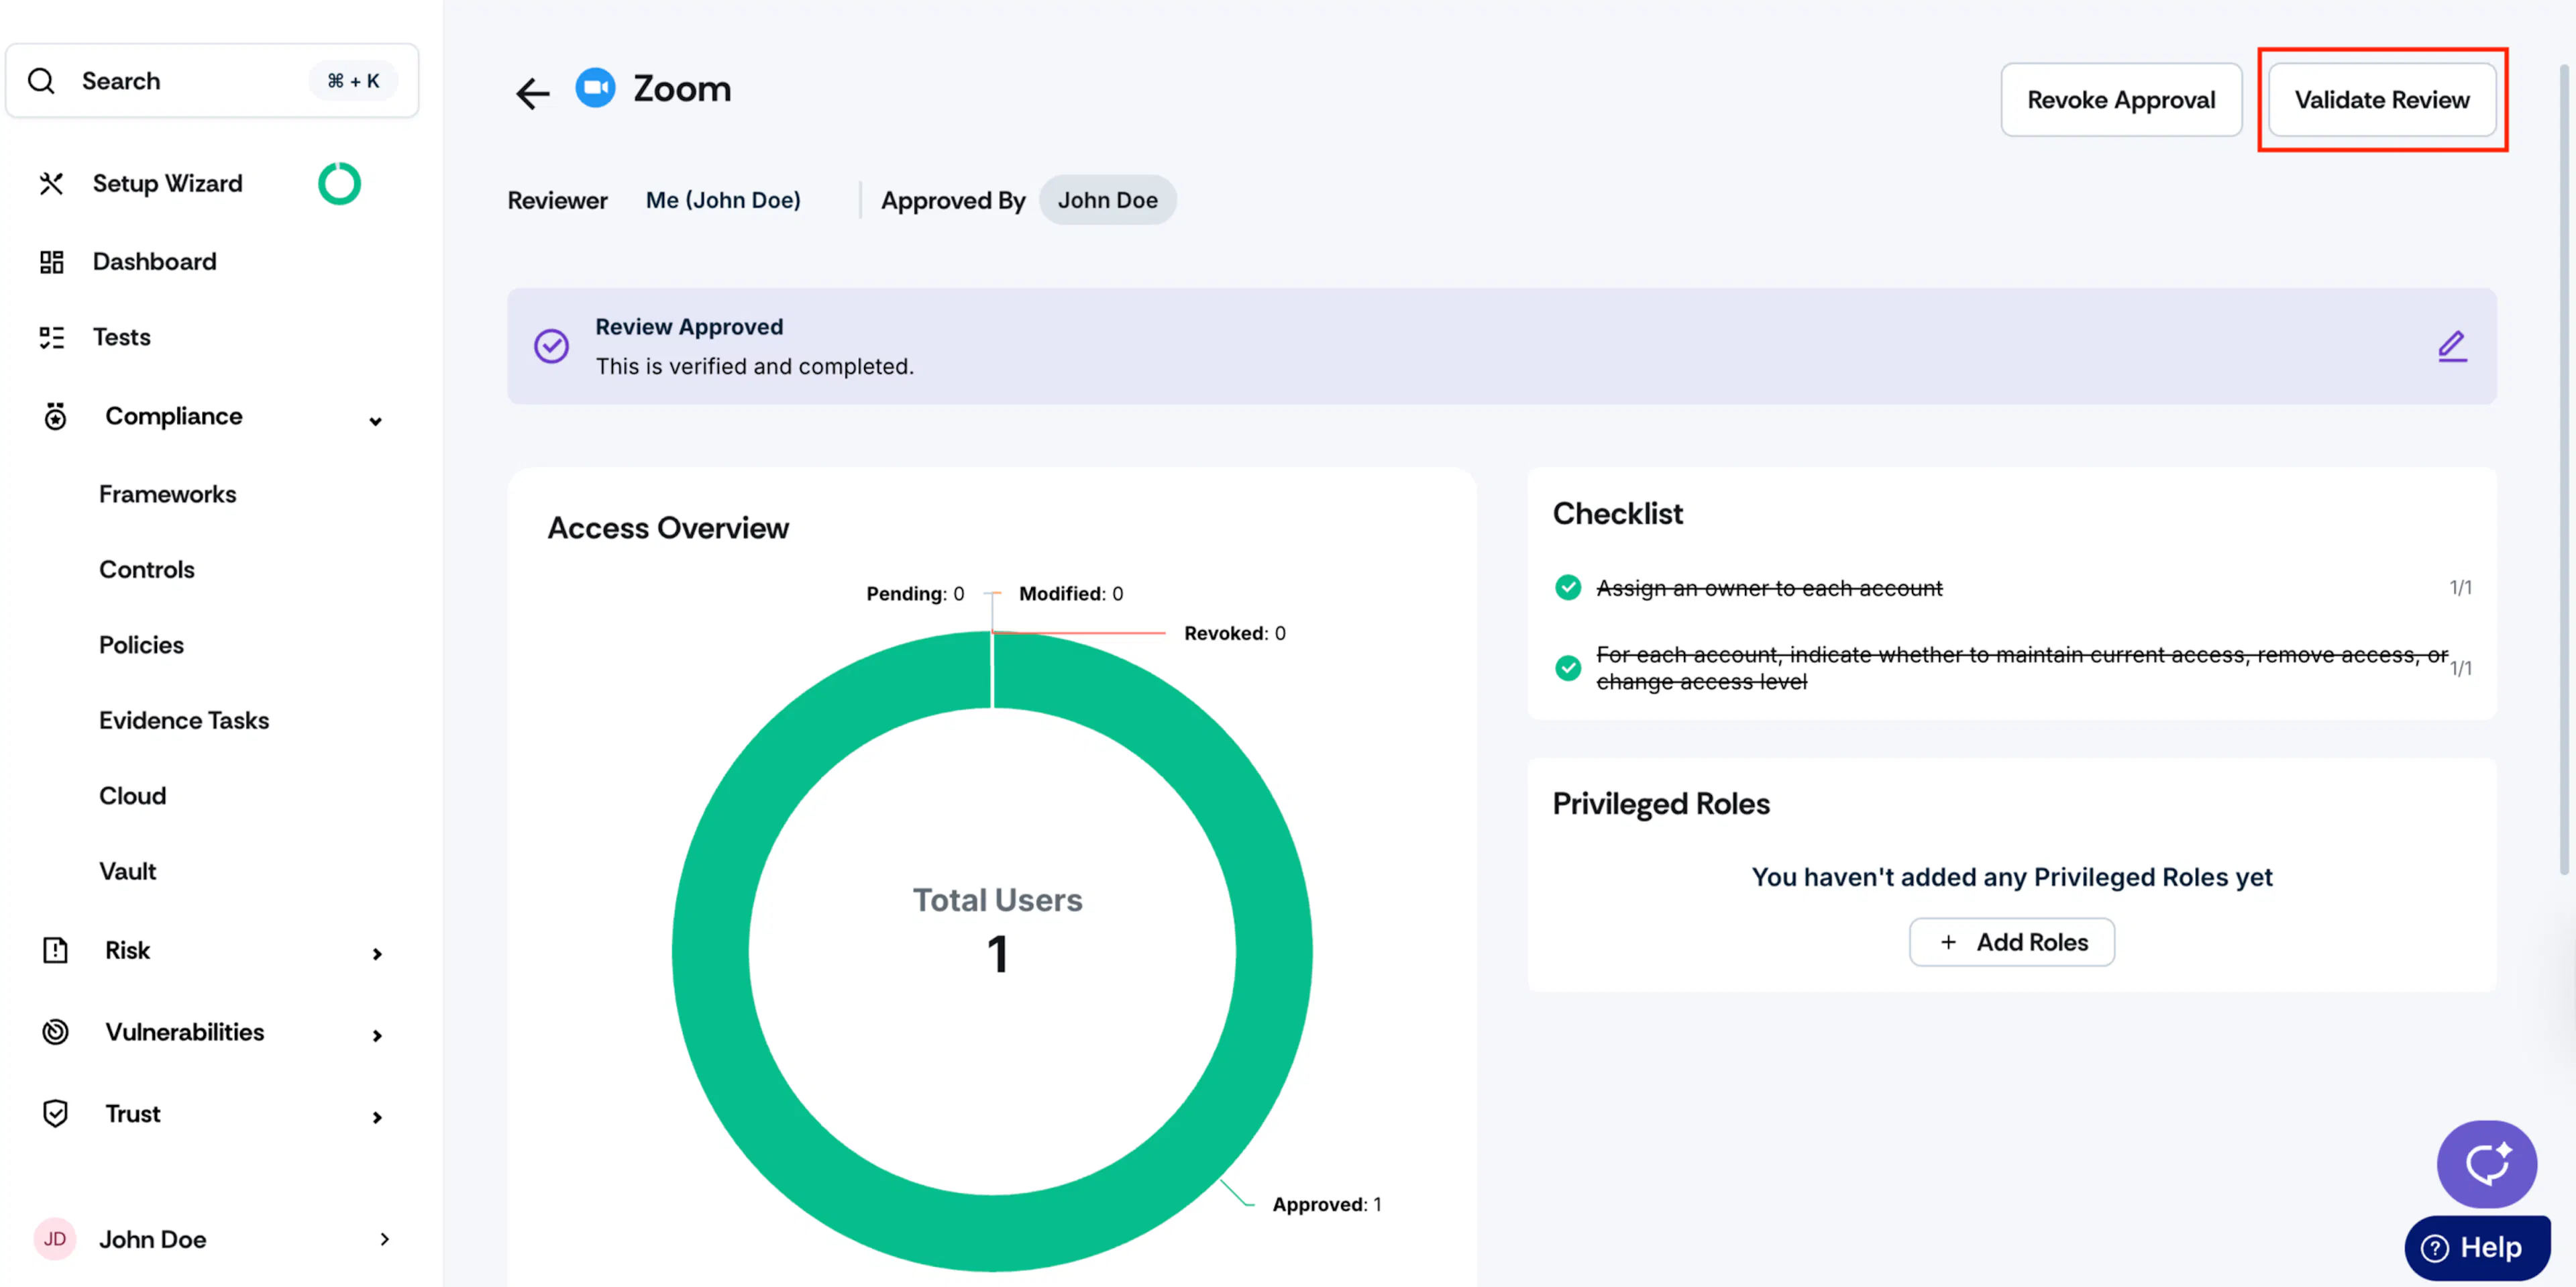
Once you've made the necessary access changes in the application and validated user access:
-
Click the Validate Review button in the top right of the page.
-
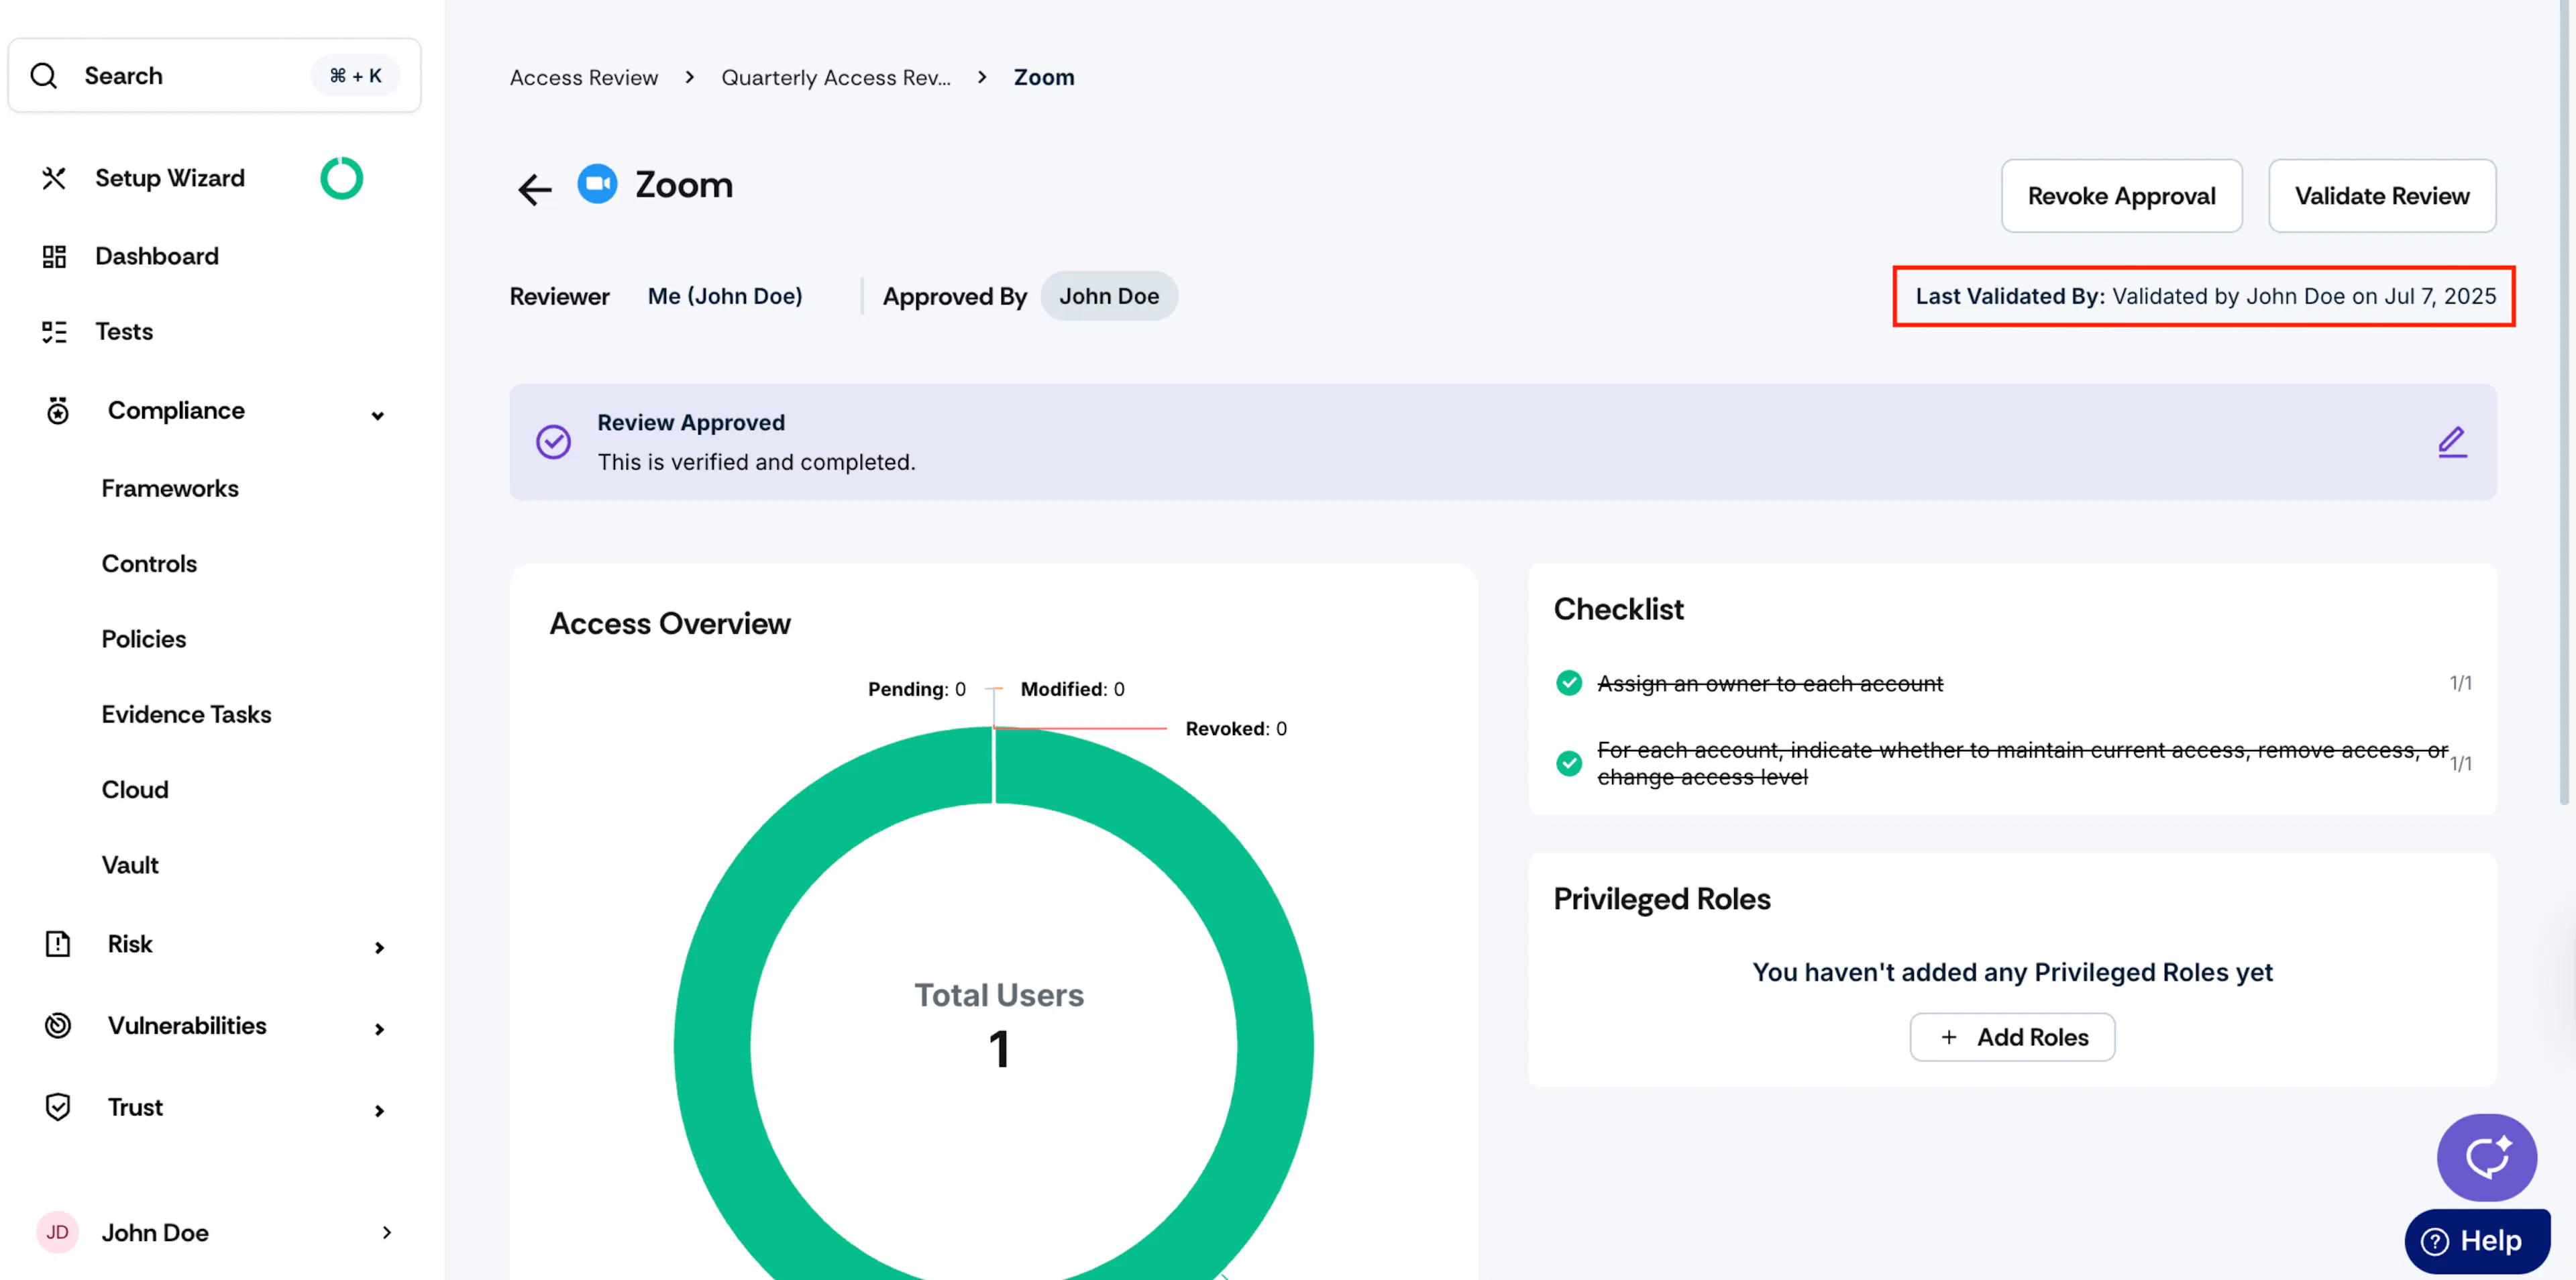
Watch out for the success notification. Once validated, Scrut displays the validation time on the page.
Step 6: Conclude Review
Repeat steps 2, 3, 4, and 5 for all other applications included in the Access Review.
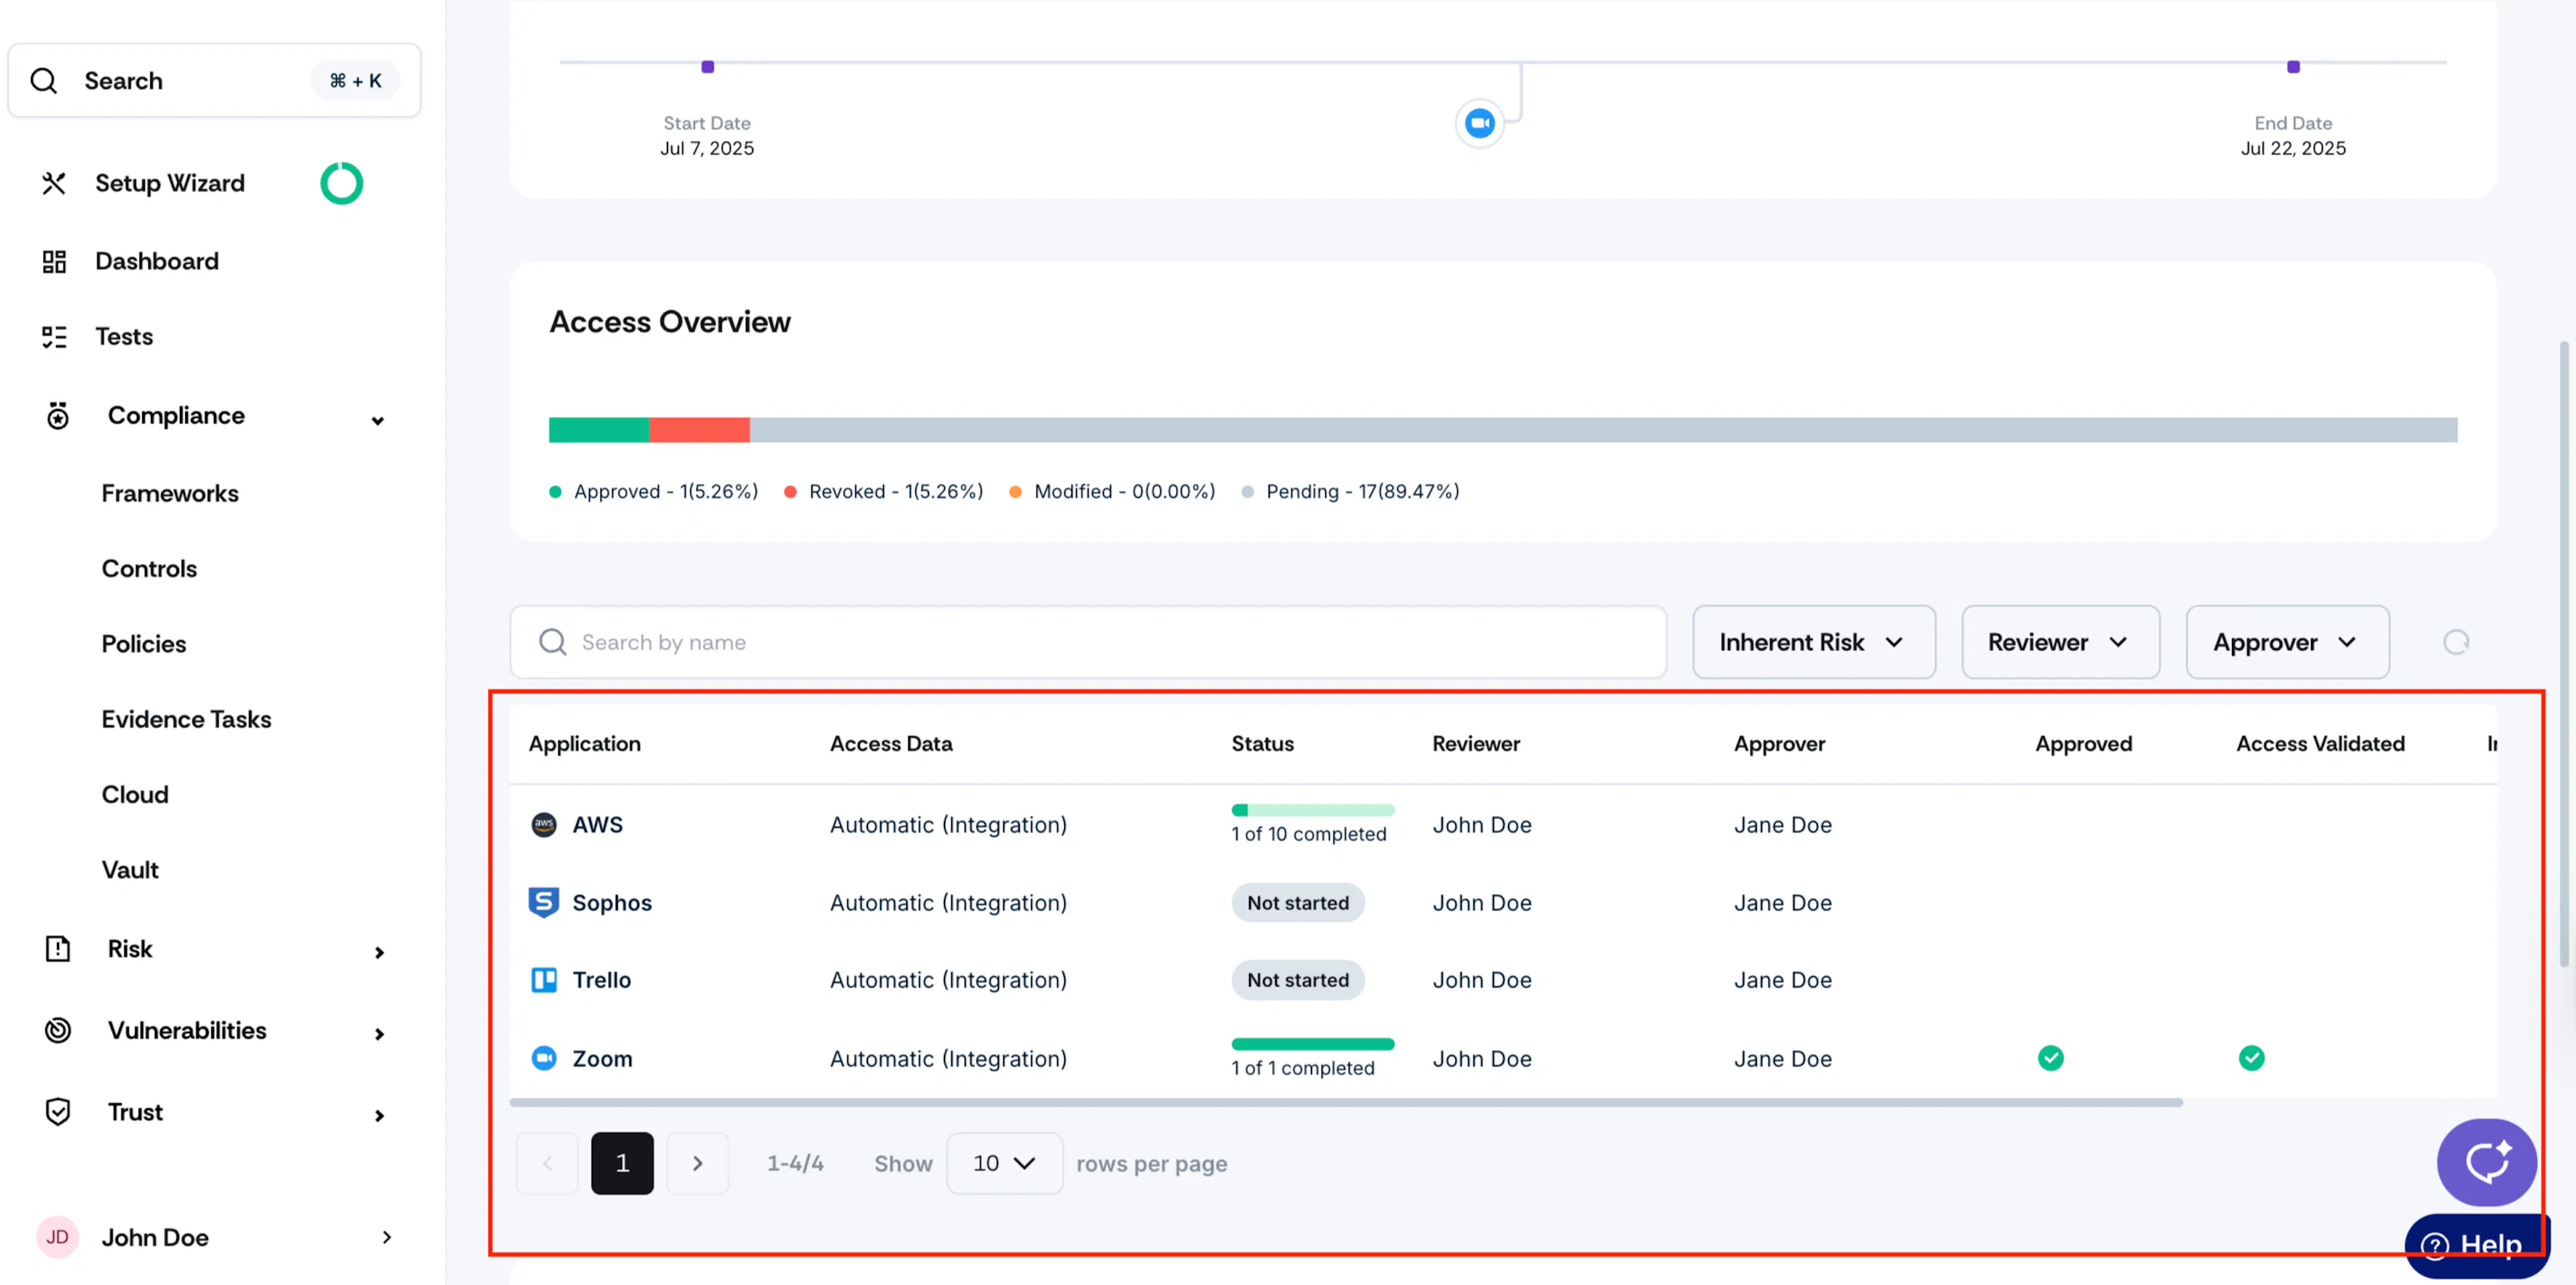
-
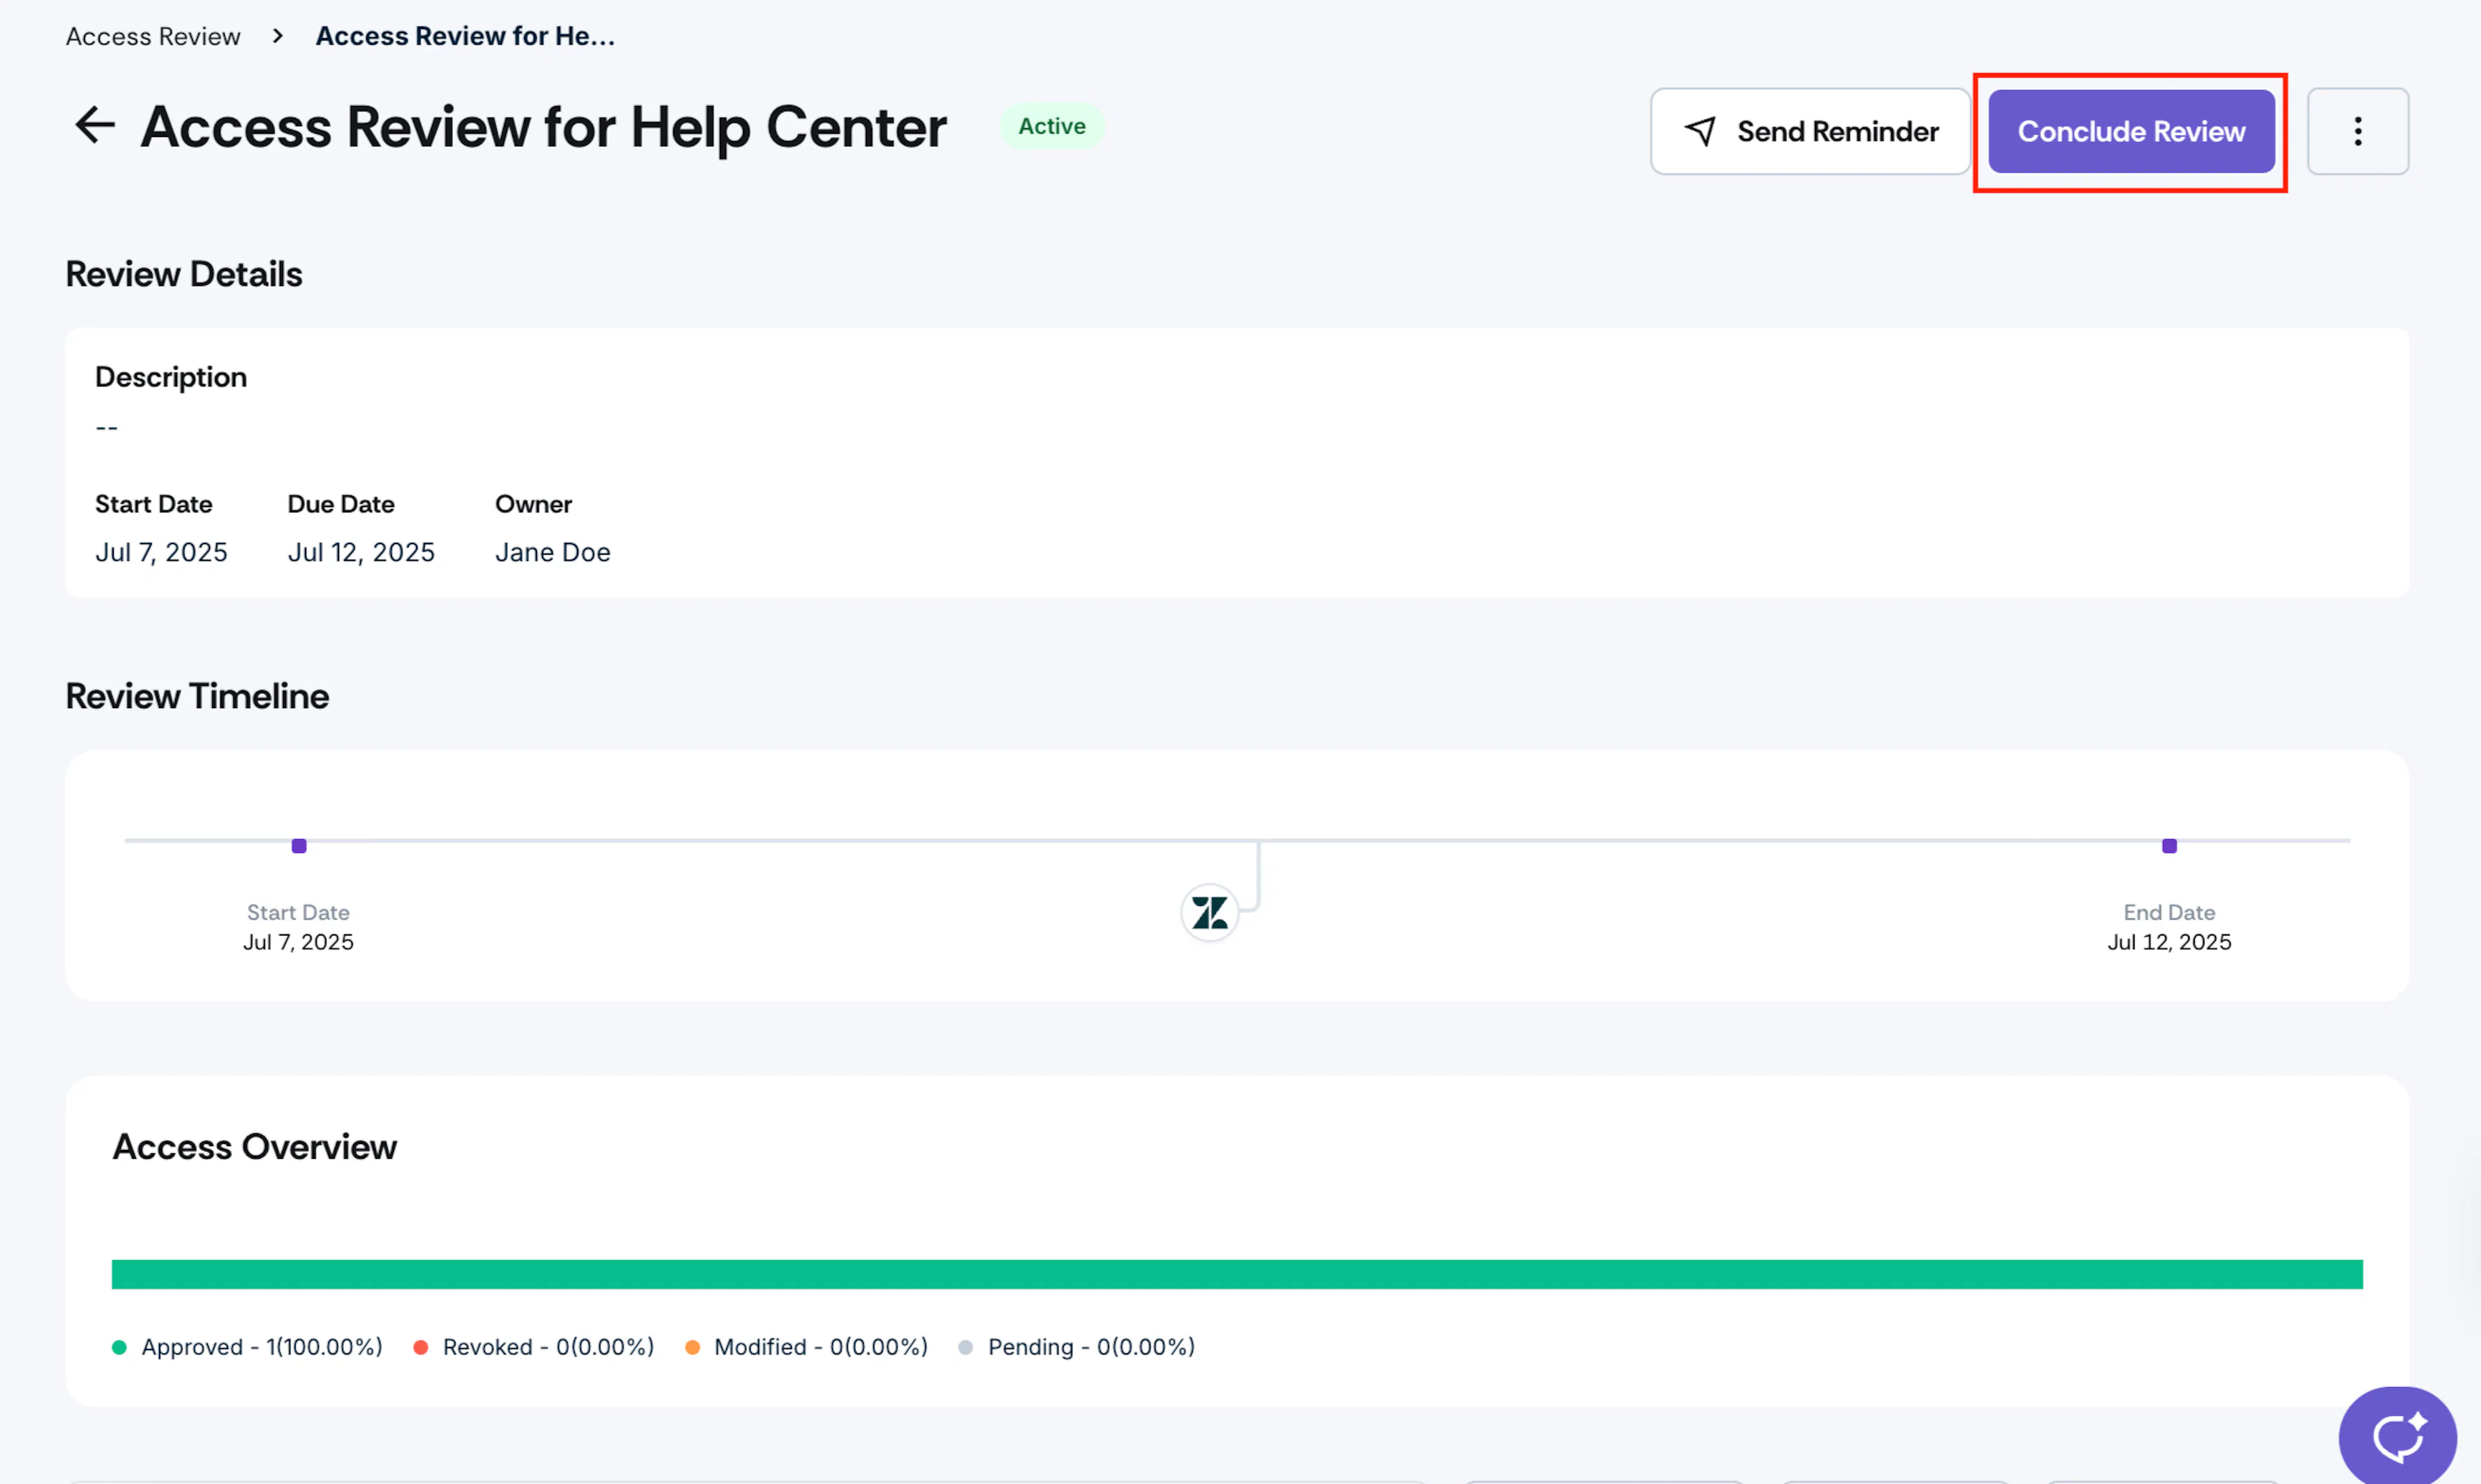
Once done, click the Conclude Review button at the top right of the page.
-
Click Yes, Conclude to complete the action.
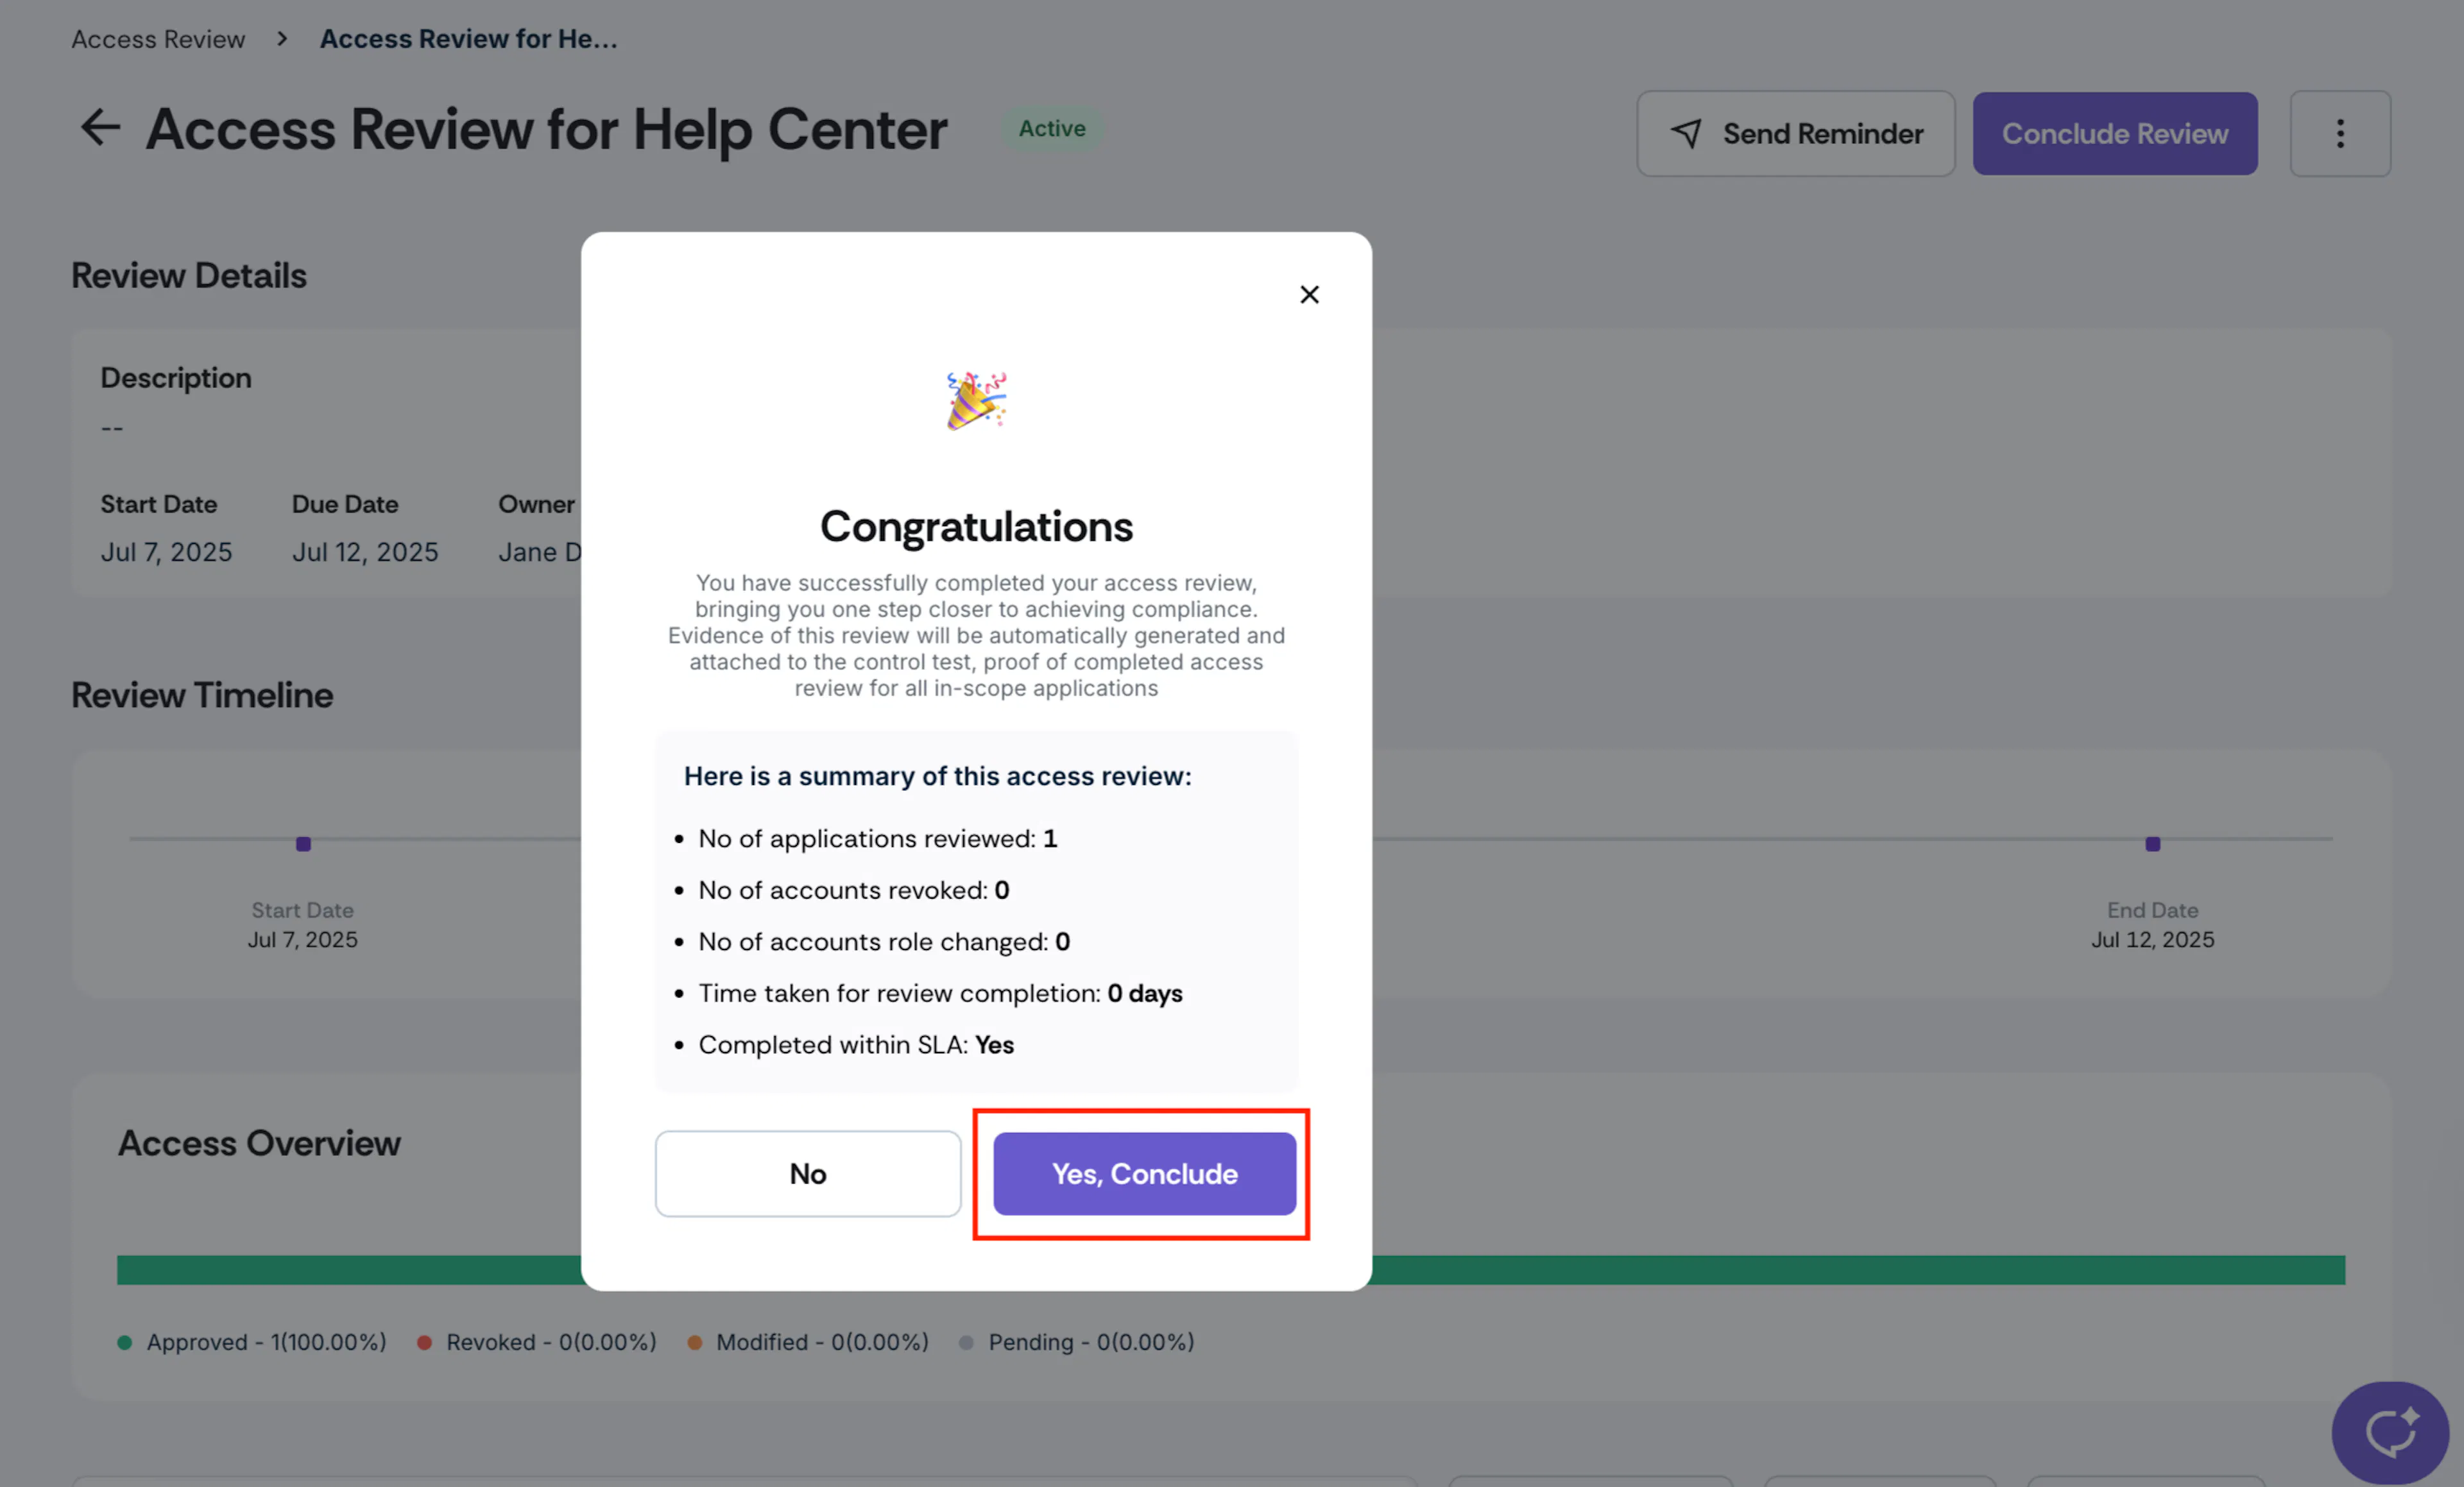
You have now completed the access review. Scrut will automatically generate evidence of this review and attach it to the control test as proof of completed access review for all in-scope applications.