

Integrate Microsoft Defender Endpoint
Connecting Microsoft Defender Endpoint with Scrut enables your team to continuously monitor device security posture, surface endpoint vulnerabilities, and automate compliance evidence collection.
What This Integration Does in Scrut
- Scrut Monitor: Collects evidence through Scrut Monitor. This helps automate evidence gathering and significantly speeds up compliance workflows.
- Automated Tests: Runs automated checks that continuously evaluate Microsoft Defender Endpoint for security misconfigurations and compliance checks against your applicable compliance frameworks.
- Vulnerability Management: Ingests vulnerability and affected asset data into Scrut, enabling end-to-end vulnerability tracking, assignment, and remediation.
Prerequisites
Before setting up the integration, make sure you have the following in place:
- An active Microsoft Defender Endpoint account
- Admin access to Microsoft Azure to register an application and configure API permissions
- The Application (client) ID, Directory (tenant) ID, and Client Secret Value from the registered Azure application (you will retrieve these during setup)
Permissions and Access Requirements
For Microsoft Defender Endpoint
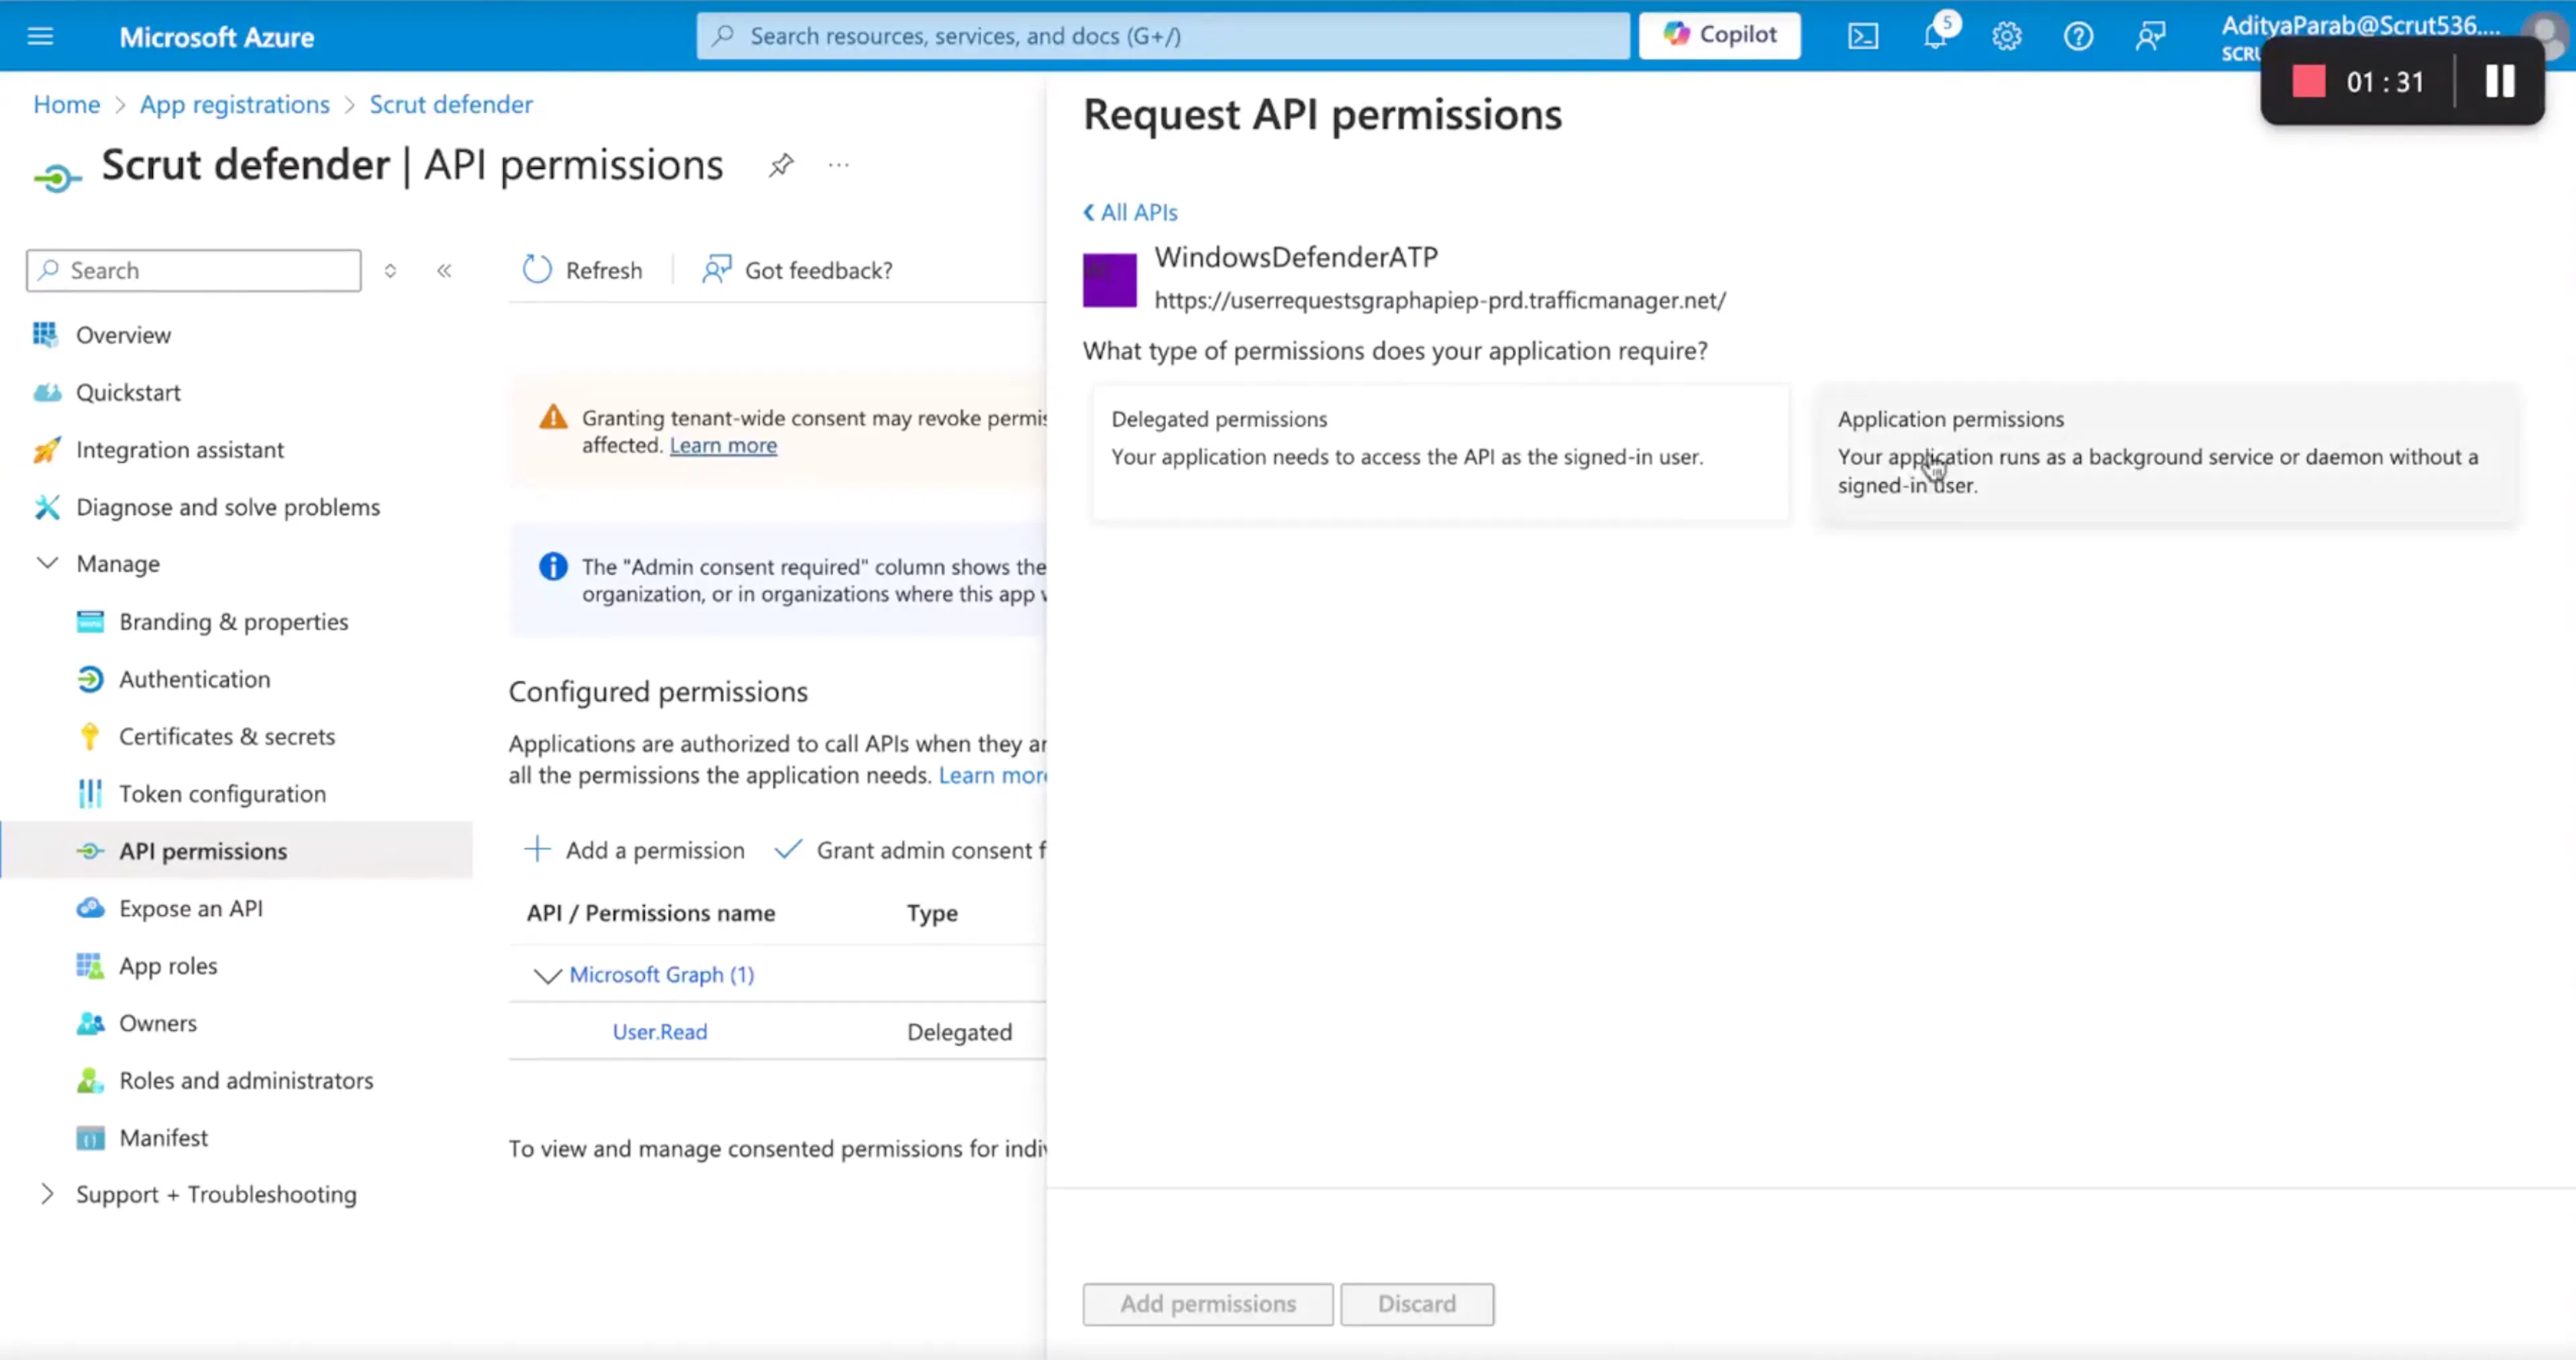
The integration requires the following read-only API permissions, all as Application permissions (not Delegated):
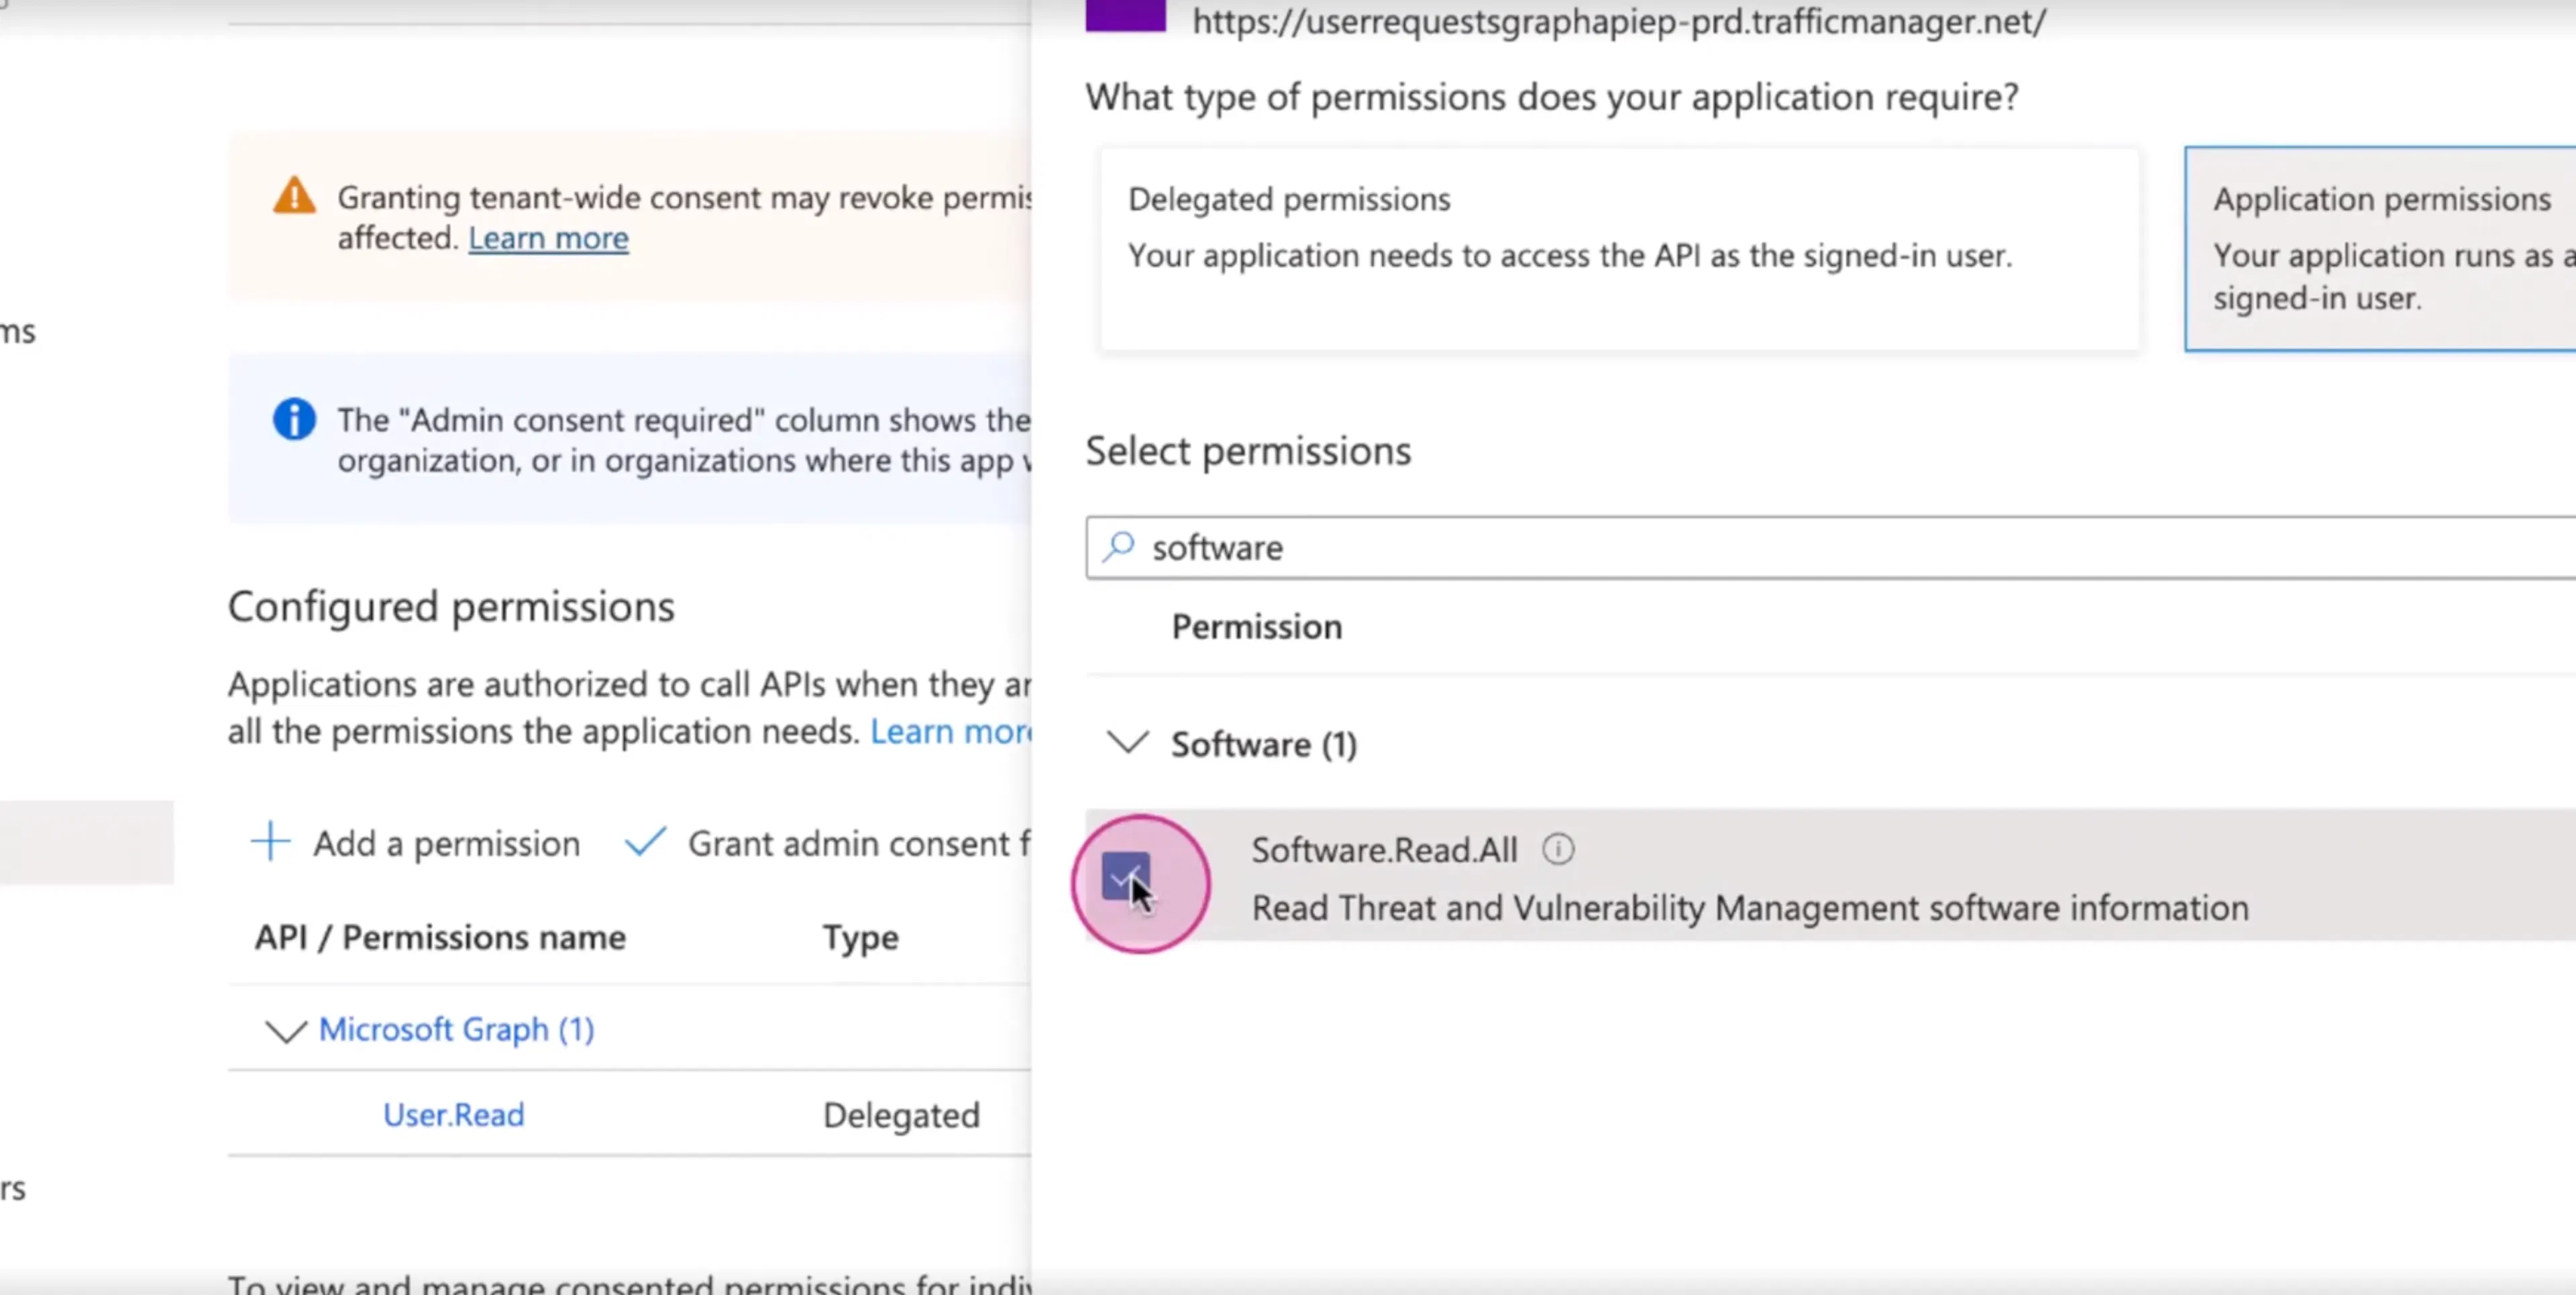
- Software.Read.All: Read threat and vulnerability management software information
- Machine.Read.All: Read all machine profiles
- Vulnerability.Read.All: Read threat and vulnerability management vulnerability information
For Scrut
- Admin access to Scrut, or Contributor access with permission to the Integrations module
Data Collected
- Devices: Machine name, operating system, and version
- Software: Installed software (Software inventory per device)
- Security findings
- Vulnerability name (CVE ID and finding title from Defender)
- Remediation status (Defender remediation state)
- Severity (Severity rating)
- Affected resources (Device name)
- Source (Visible as MS Defender in Scrut)
Sync Frequency
Data is synced automatically once every 24 hours. You can also manually trigger a sync from the integration settings page.
Integration Setup
Pro Tip:
We recommend logging into your Microsoft Defender Endpoint account before starting the integration to avoid doing so later.
Step 1: Create a Service Principal in Azure
Note:
To create a Service Principal, you must register an application in the Azure Active Directory. You need admin access to Microsoft Azure to complete this step.
- Go to the Azure Home Page.
- Log in to Microsoft Azure (if required).
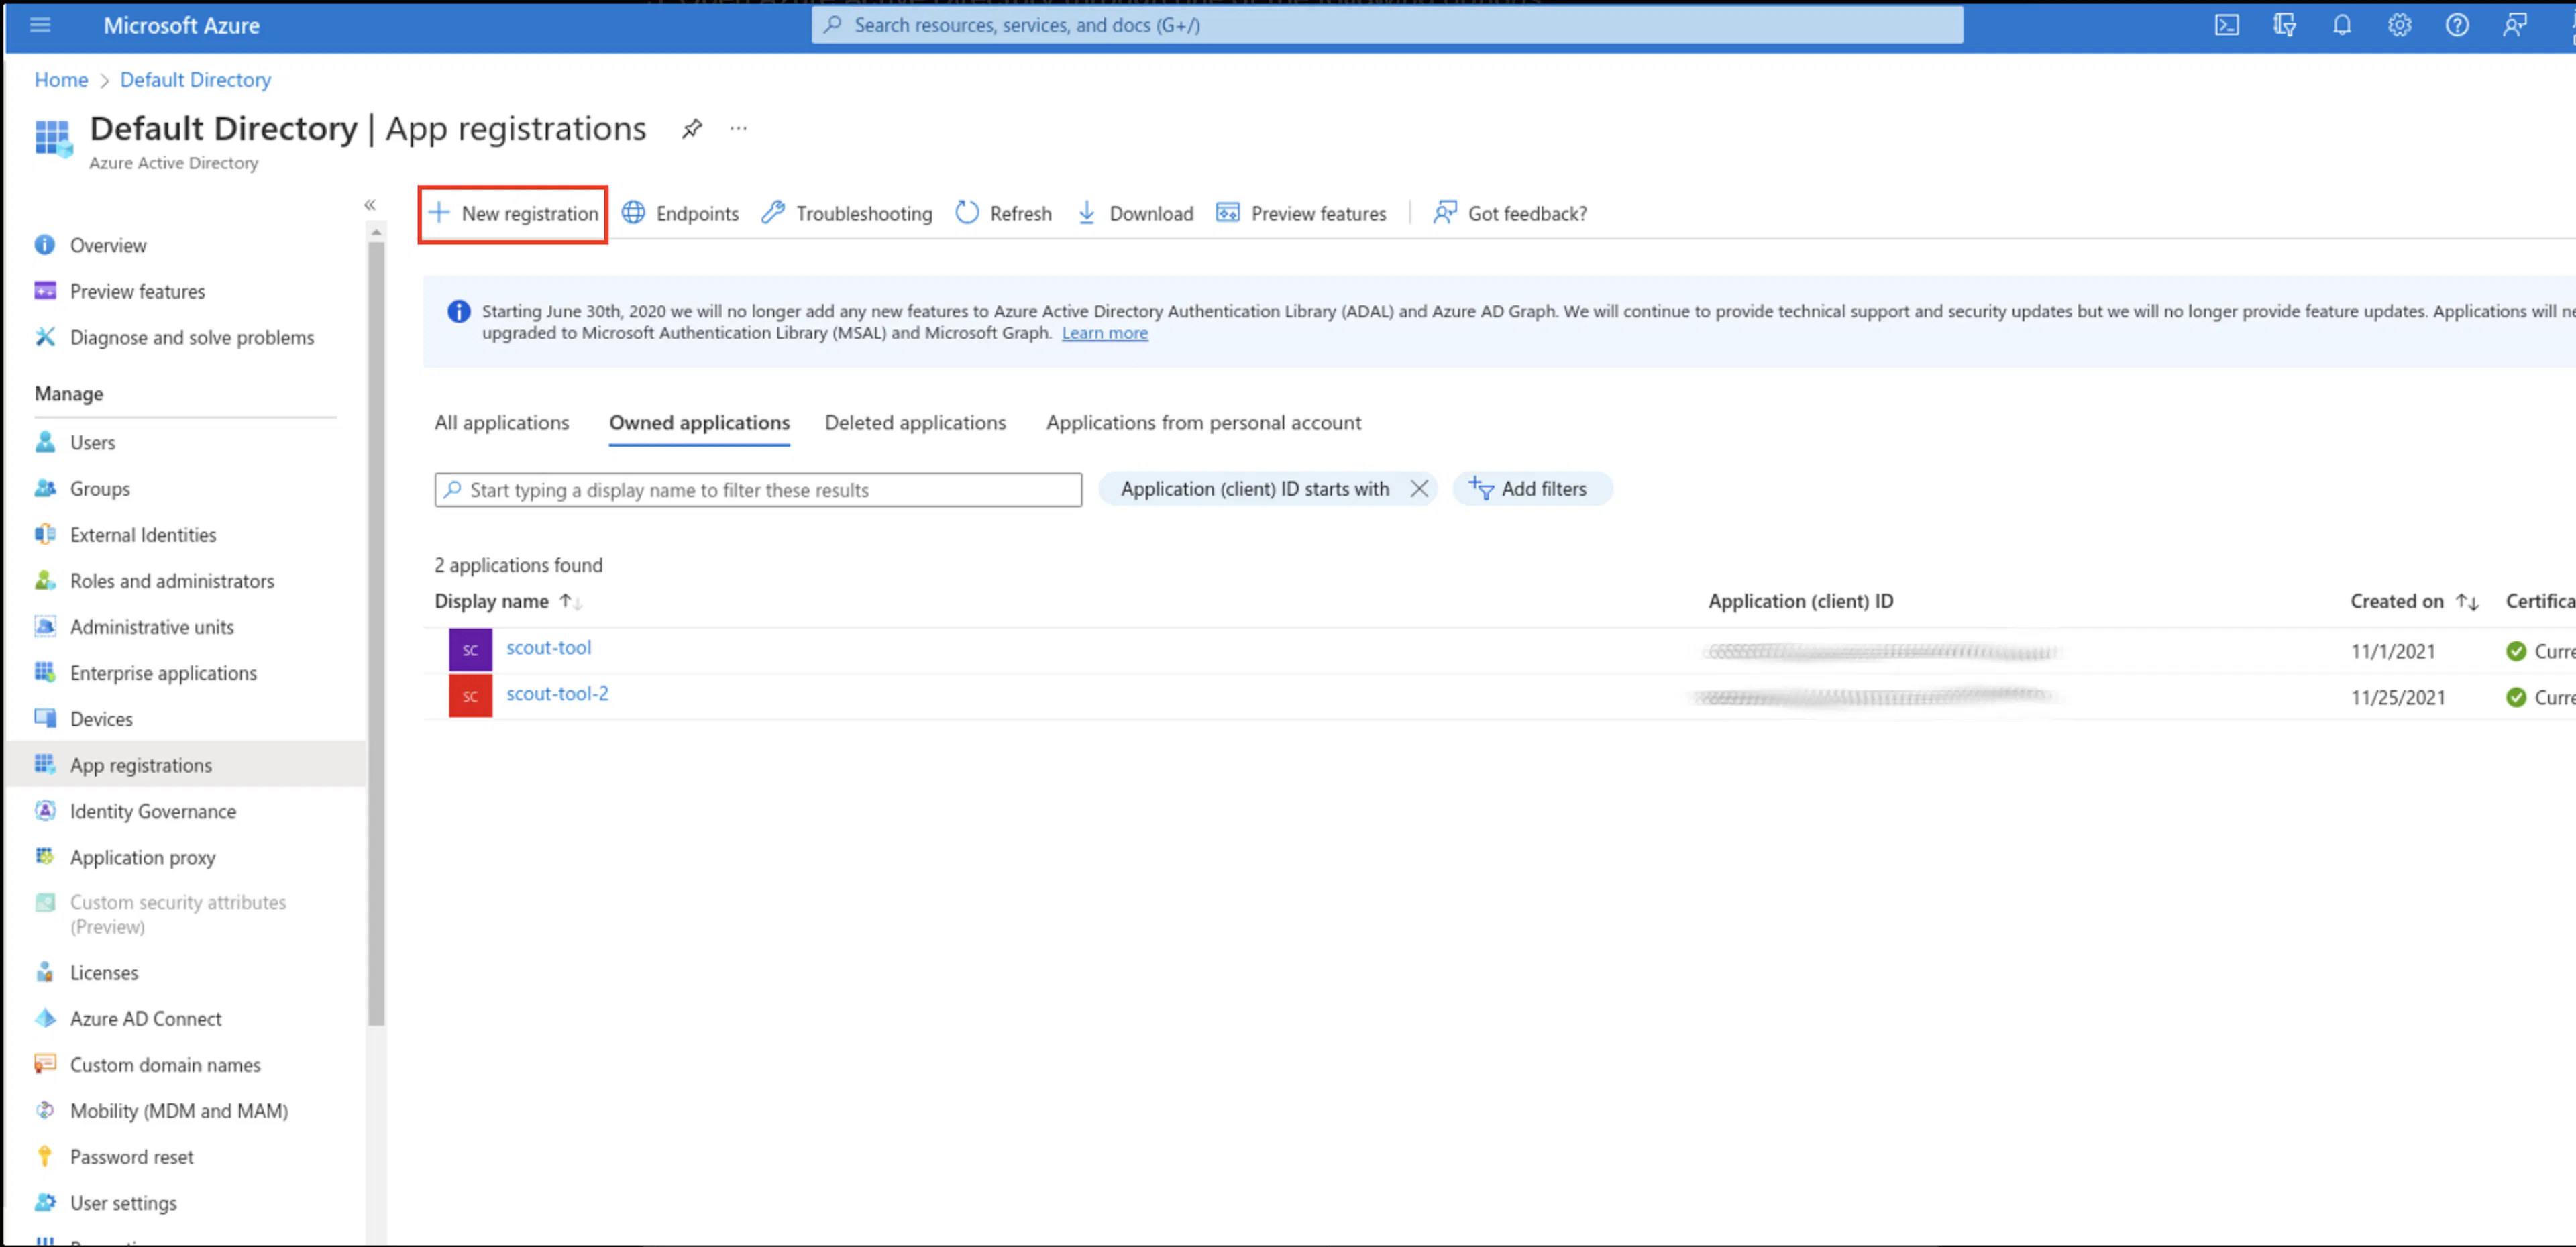
- Select App registrations from Microsoft services.
- Click + New registration from the top menu.
- The Register an Application page opens.
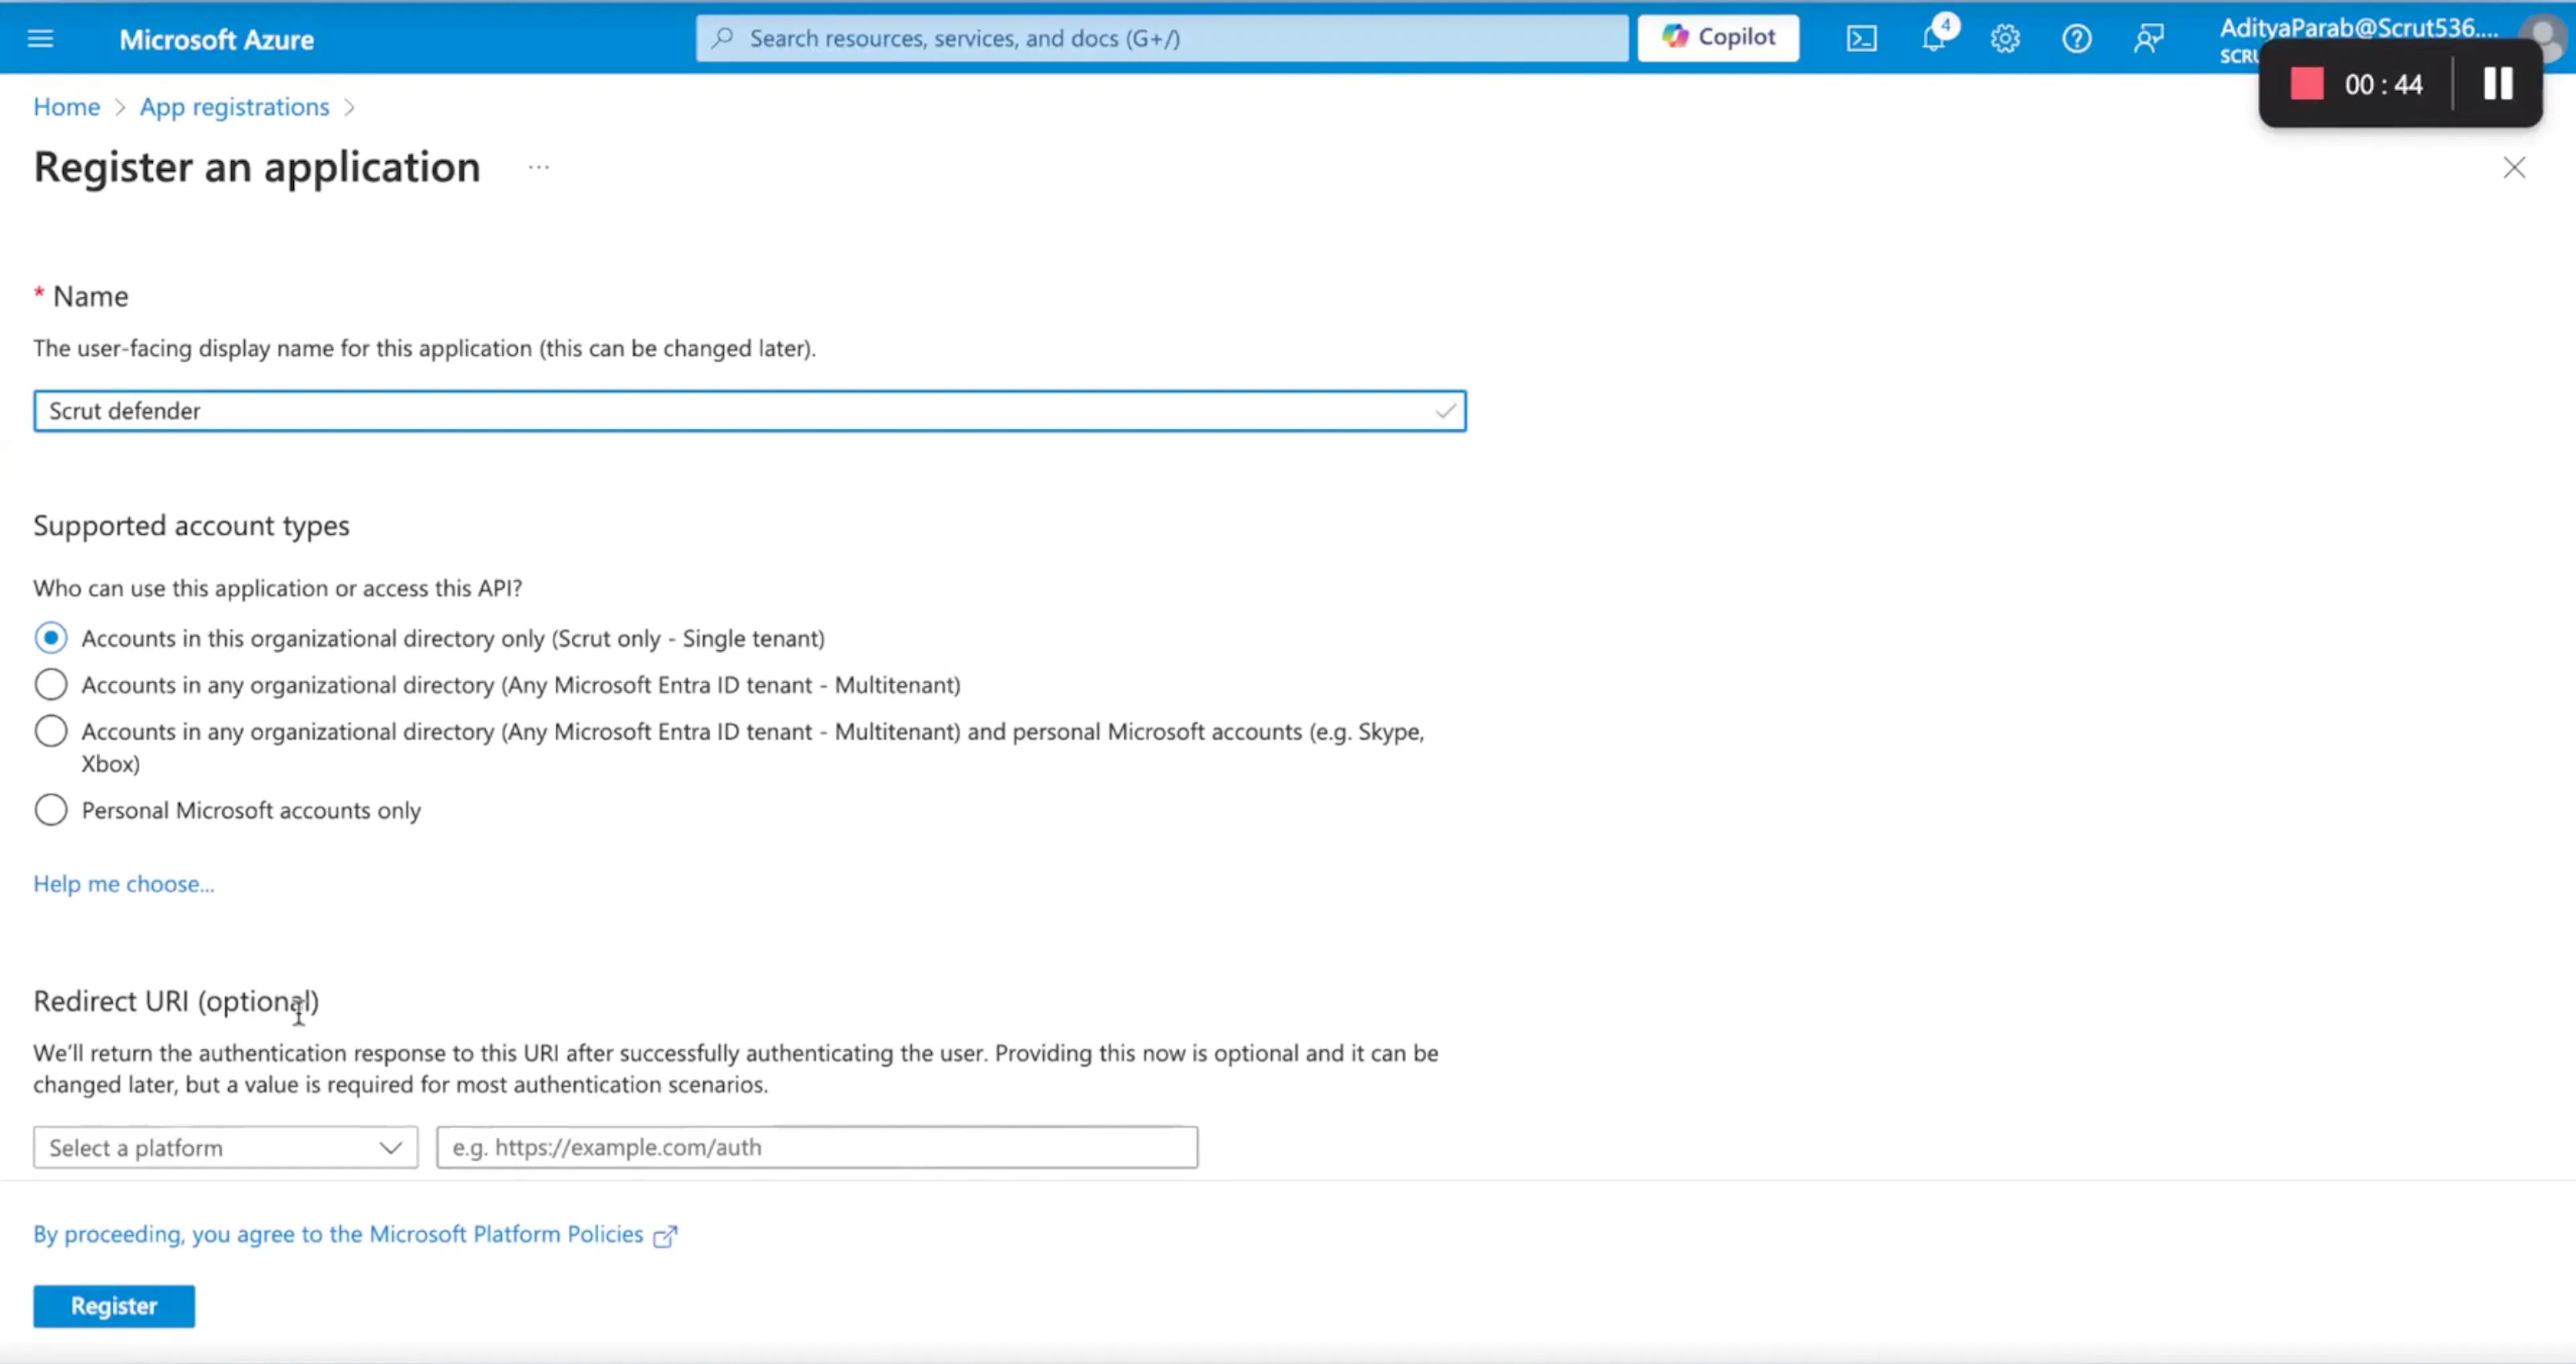
- In the Application Name field, enter the value Scrut Defender.
- Under Account Type, select Accounts in this organizational directory only ([Default Directory] only - Single tenant).
- Click Register.
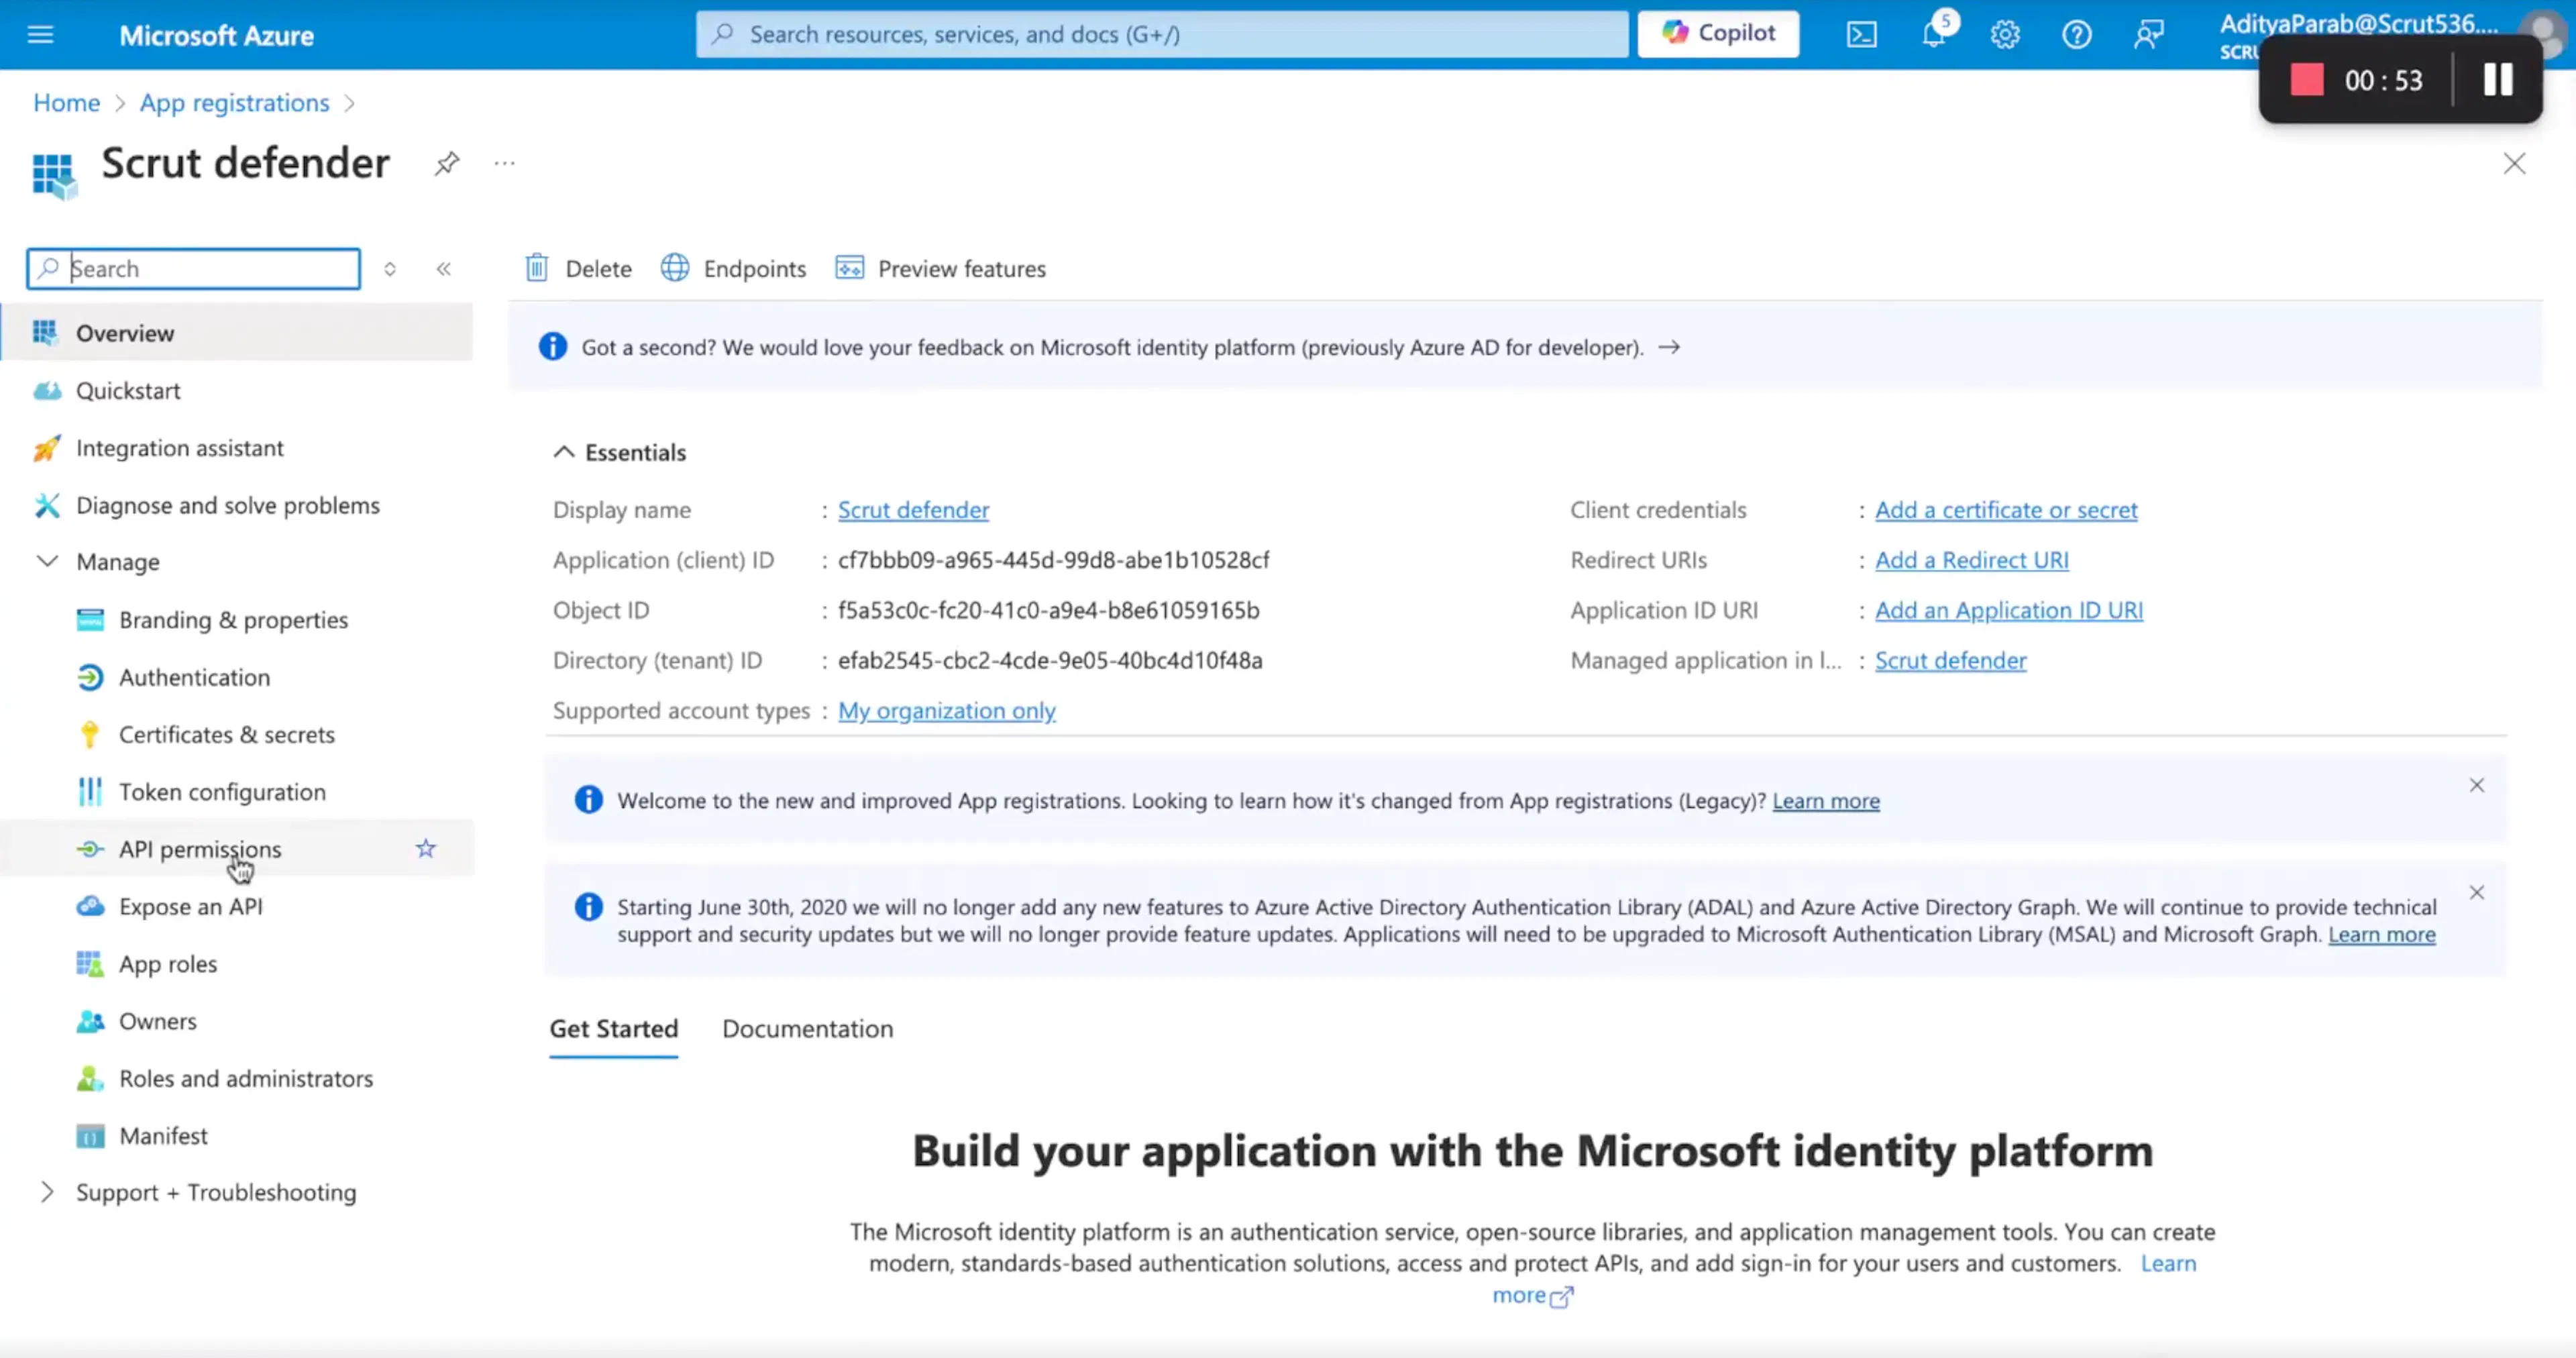
- On the application overview page, copy and save the Application (client) ID and Directory (tenant) ID.
Step 2: Add API Permissions to the Registered Application
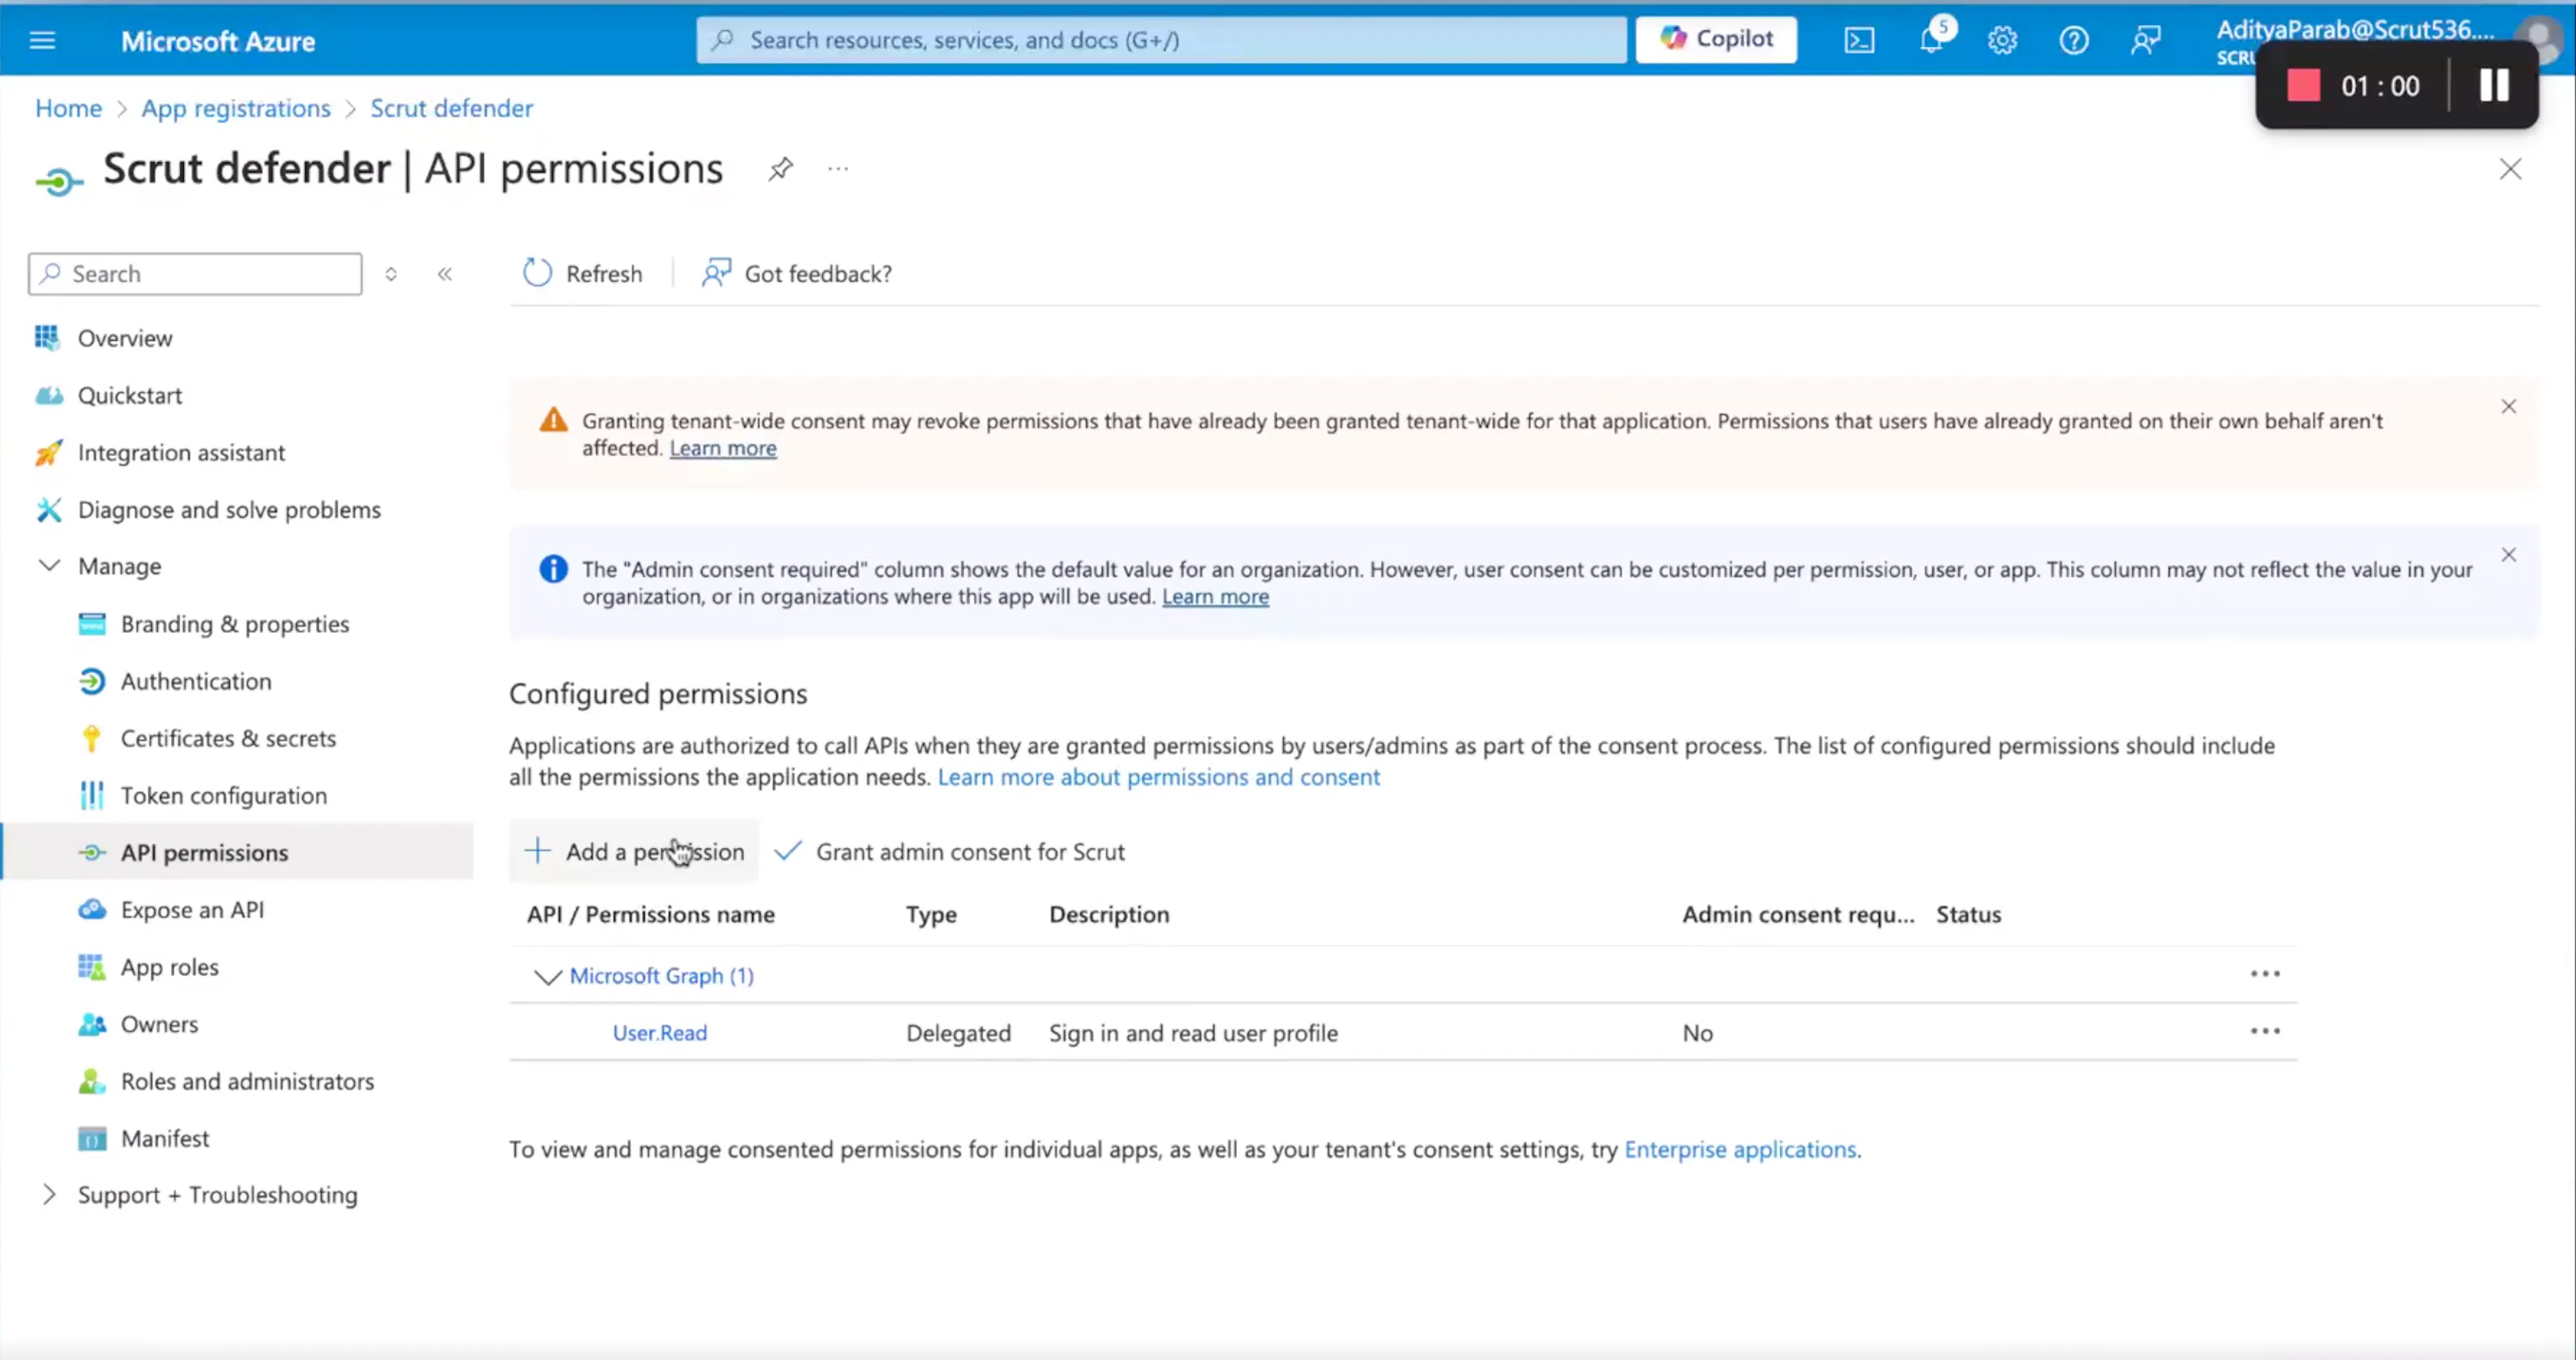
- Select API permissions from the left navigation menu.
- Click + Add a permission.
- Select APIs my Organization uses.
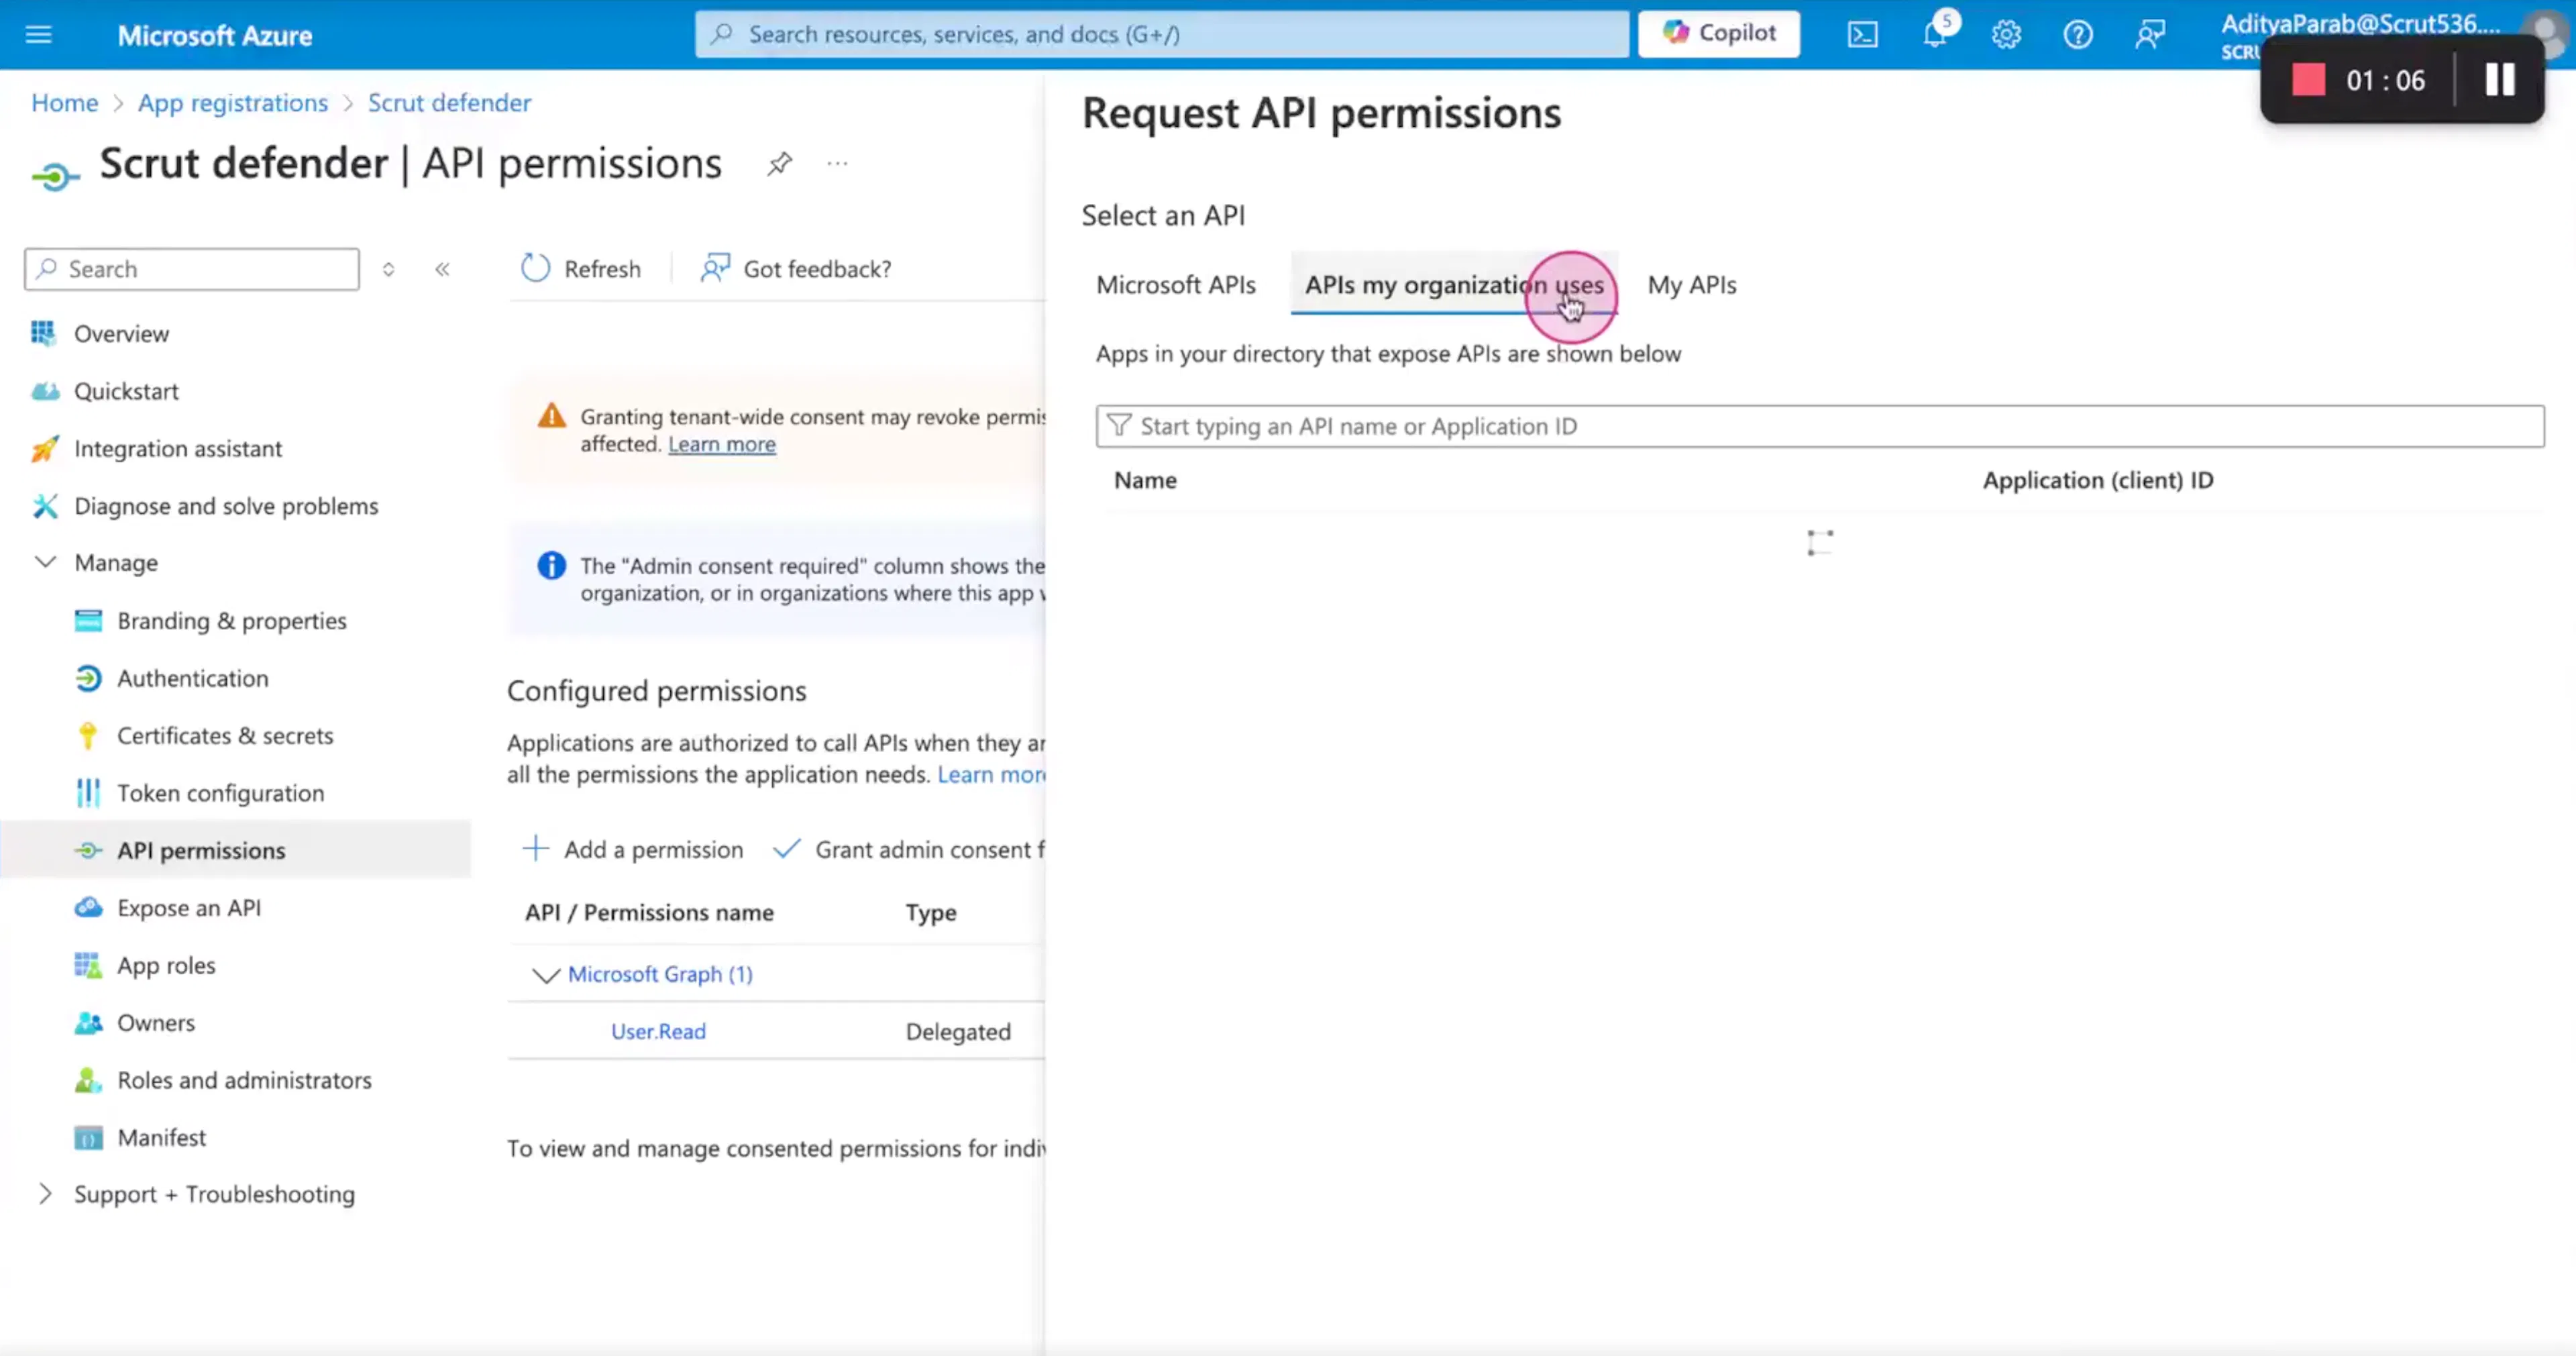
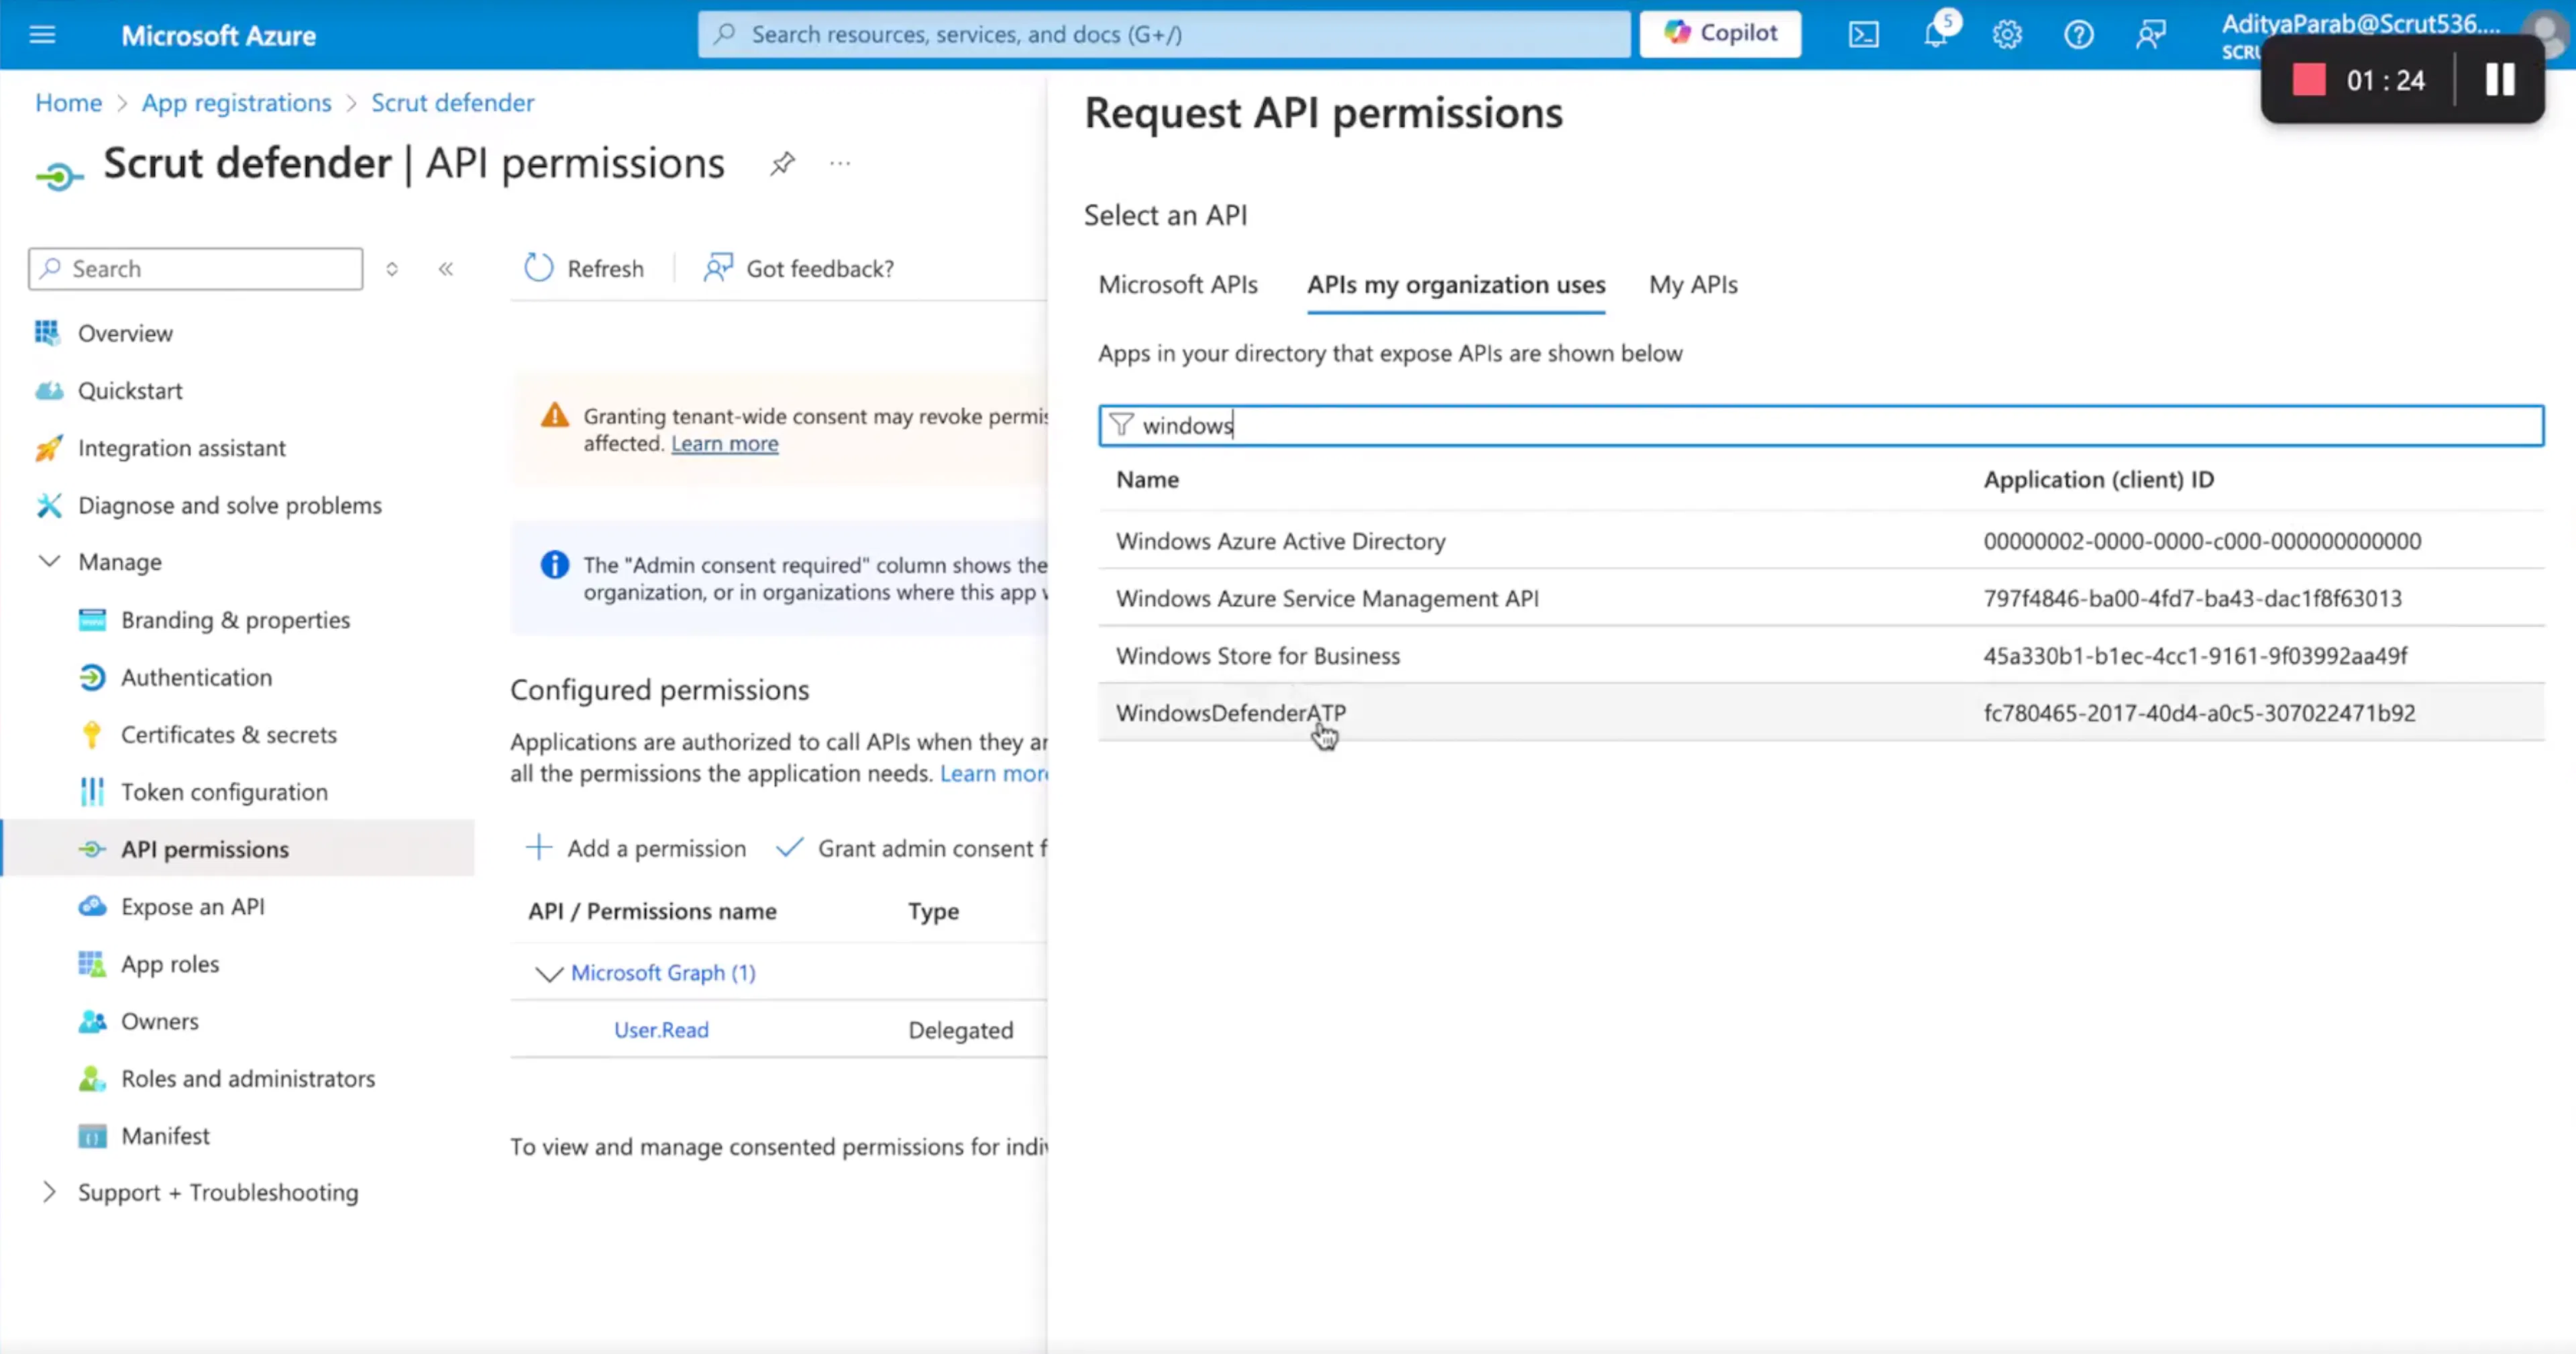
- In the search field, enter Windows and select WindowsDefenderATP.
- Click Application permissions.
- In the Select permissions search software, select Software.Read.All.
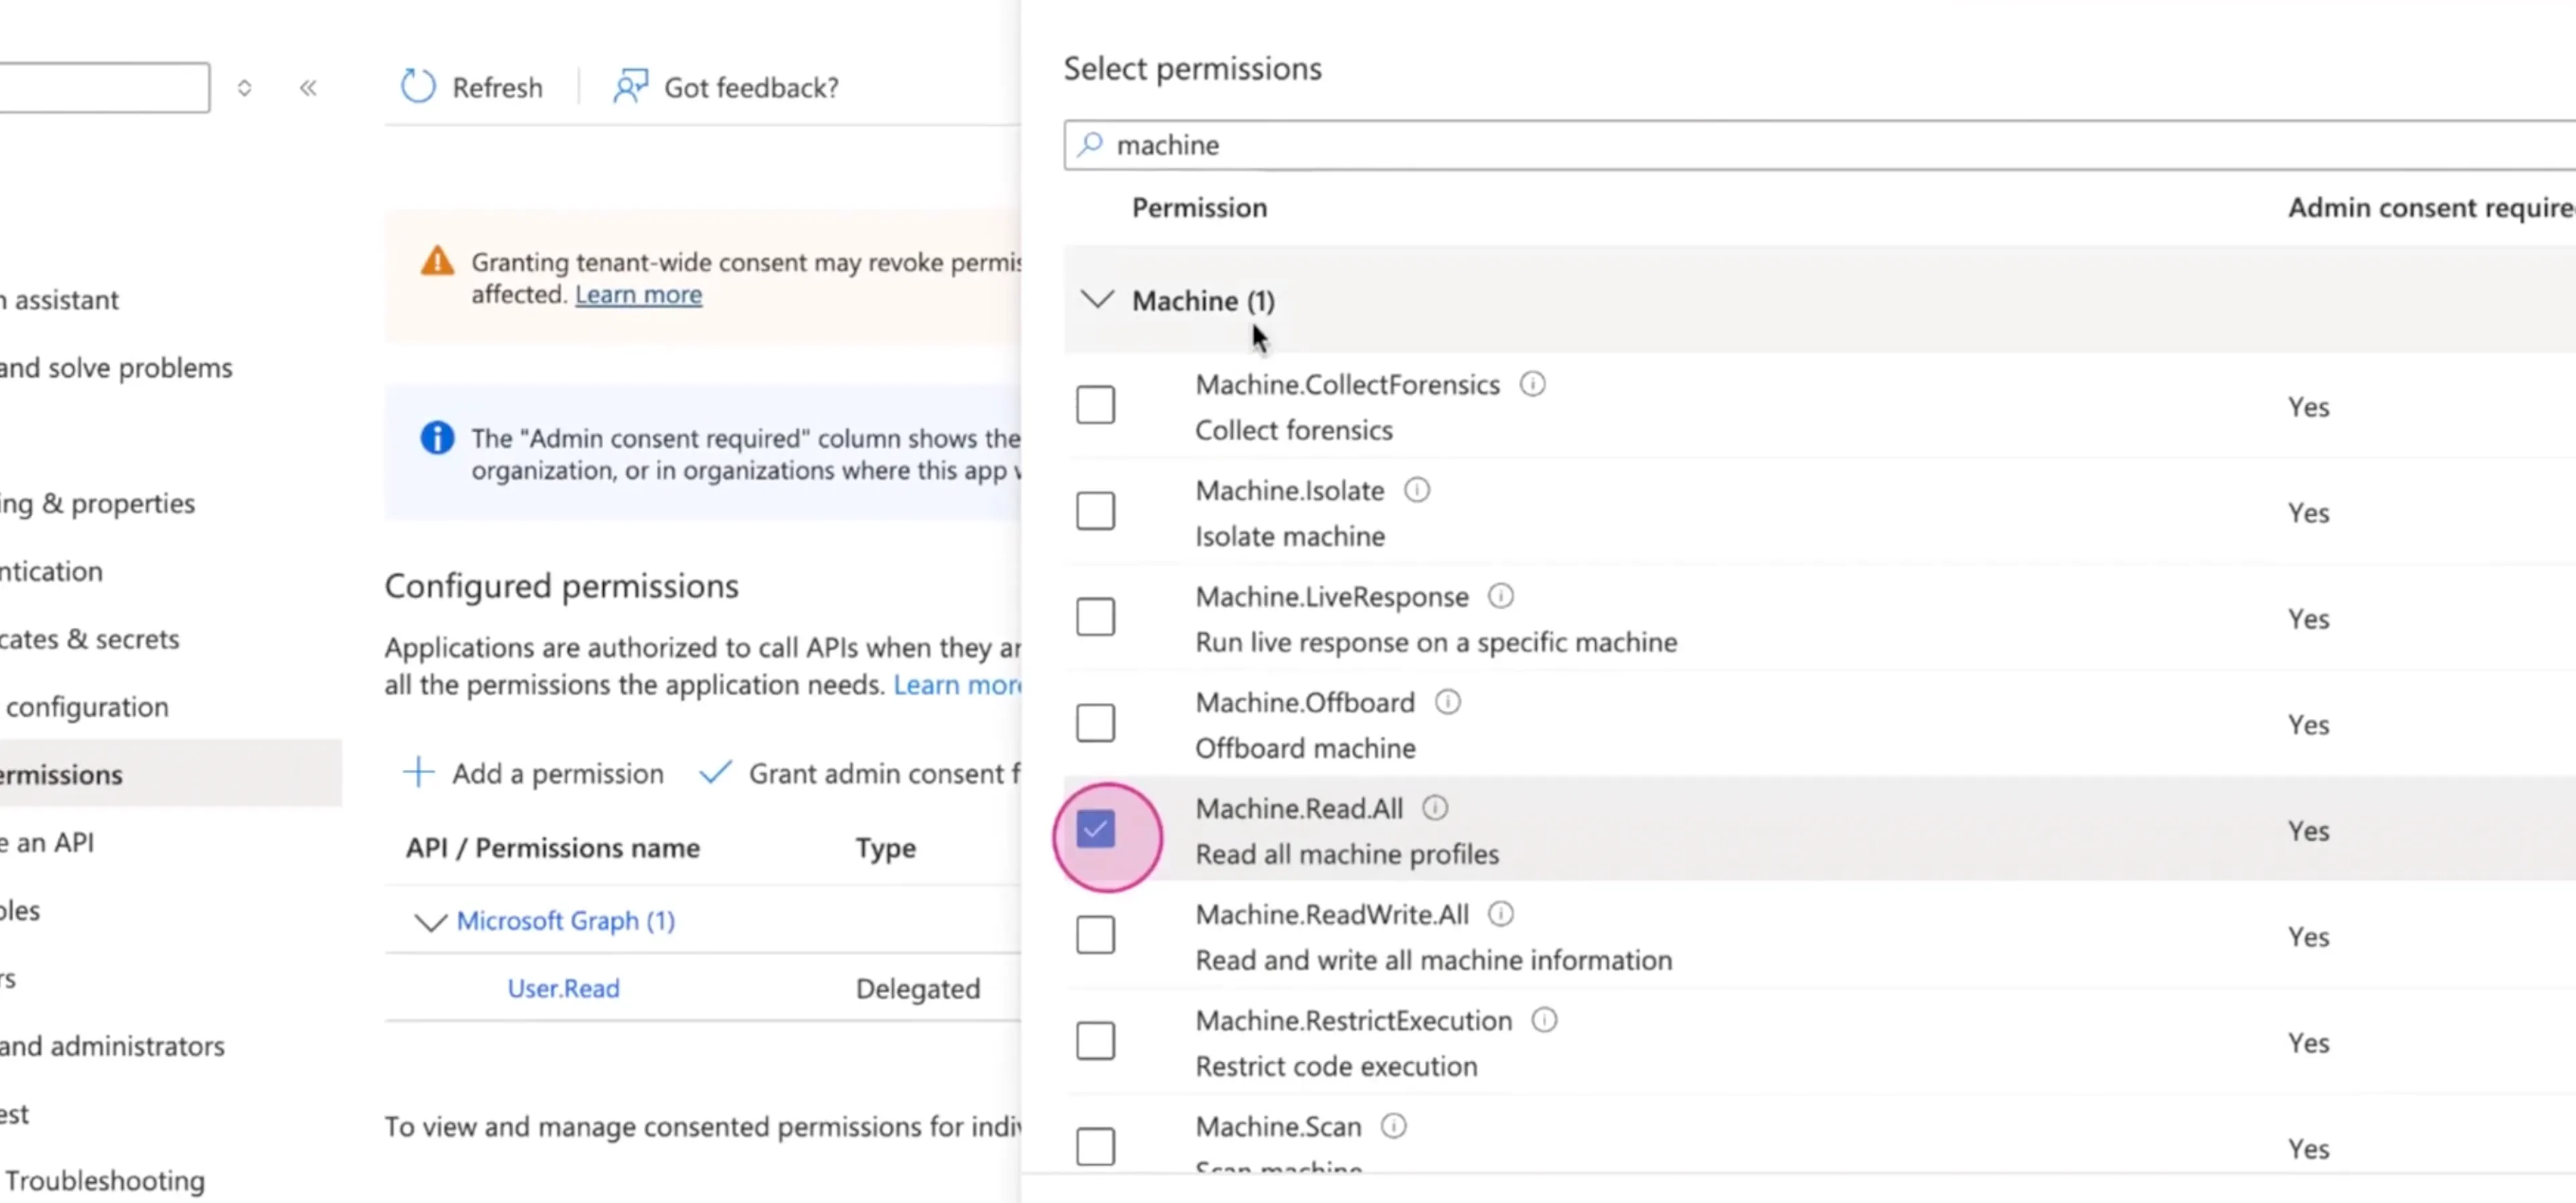
- Search Machine and select Machine.Read.All.
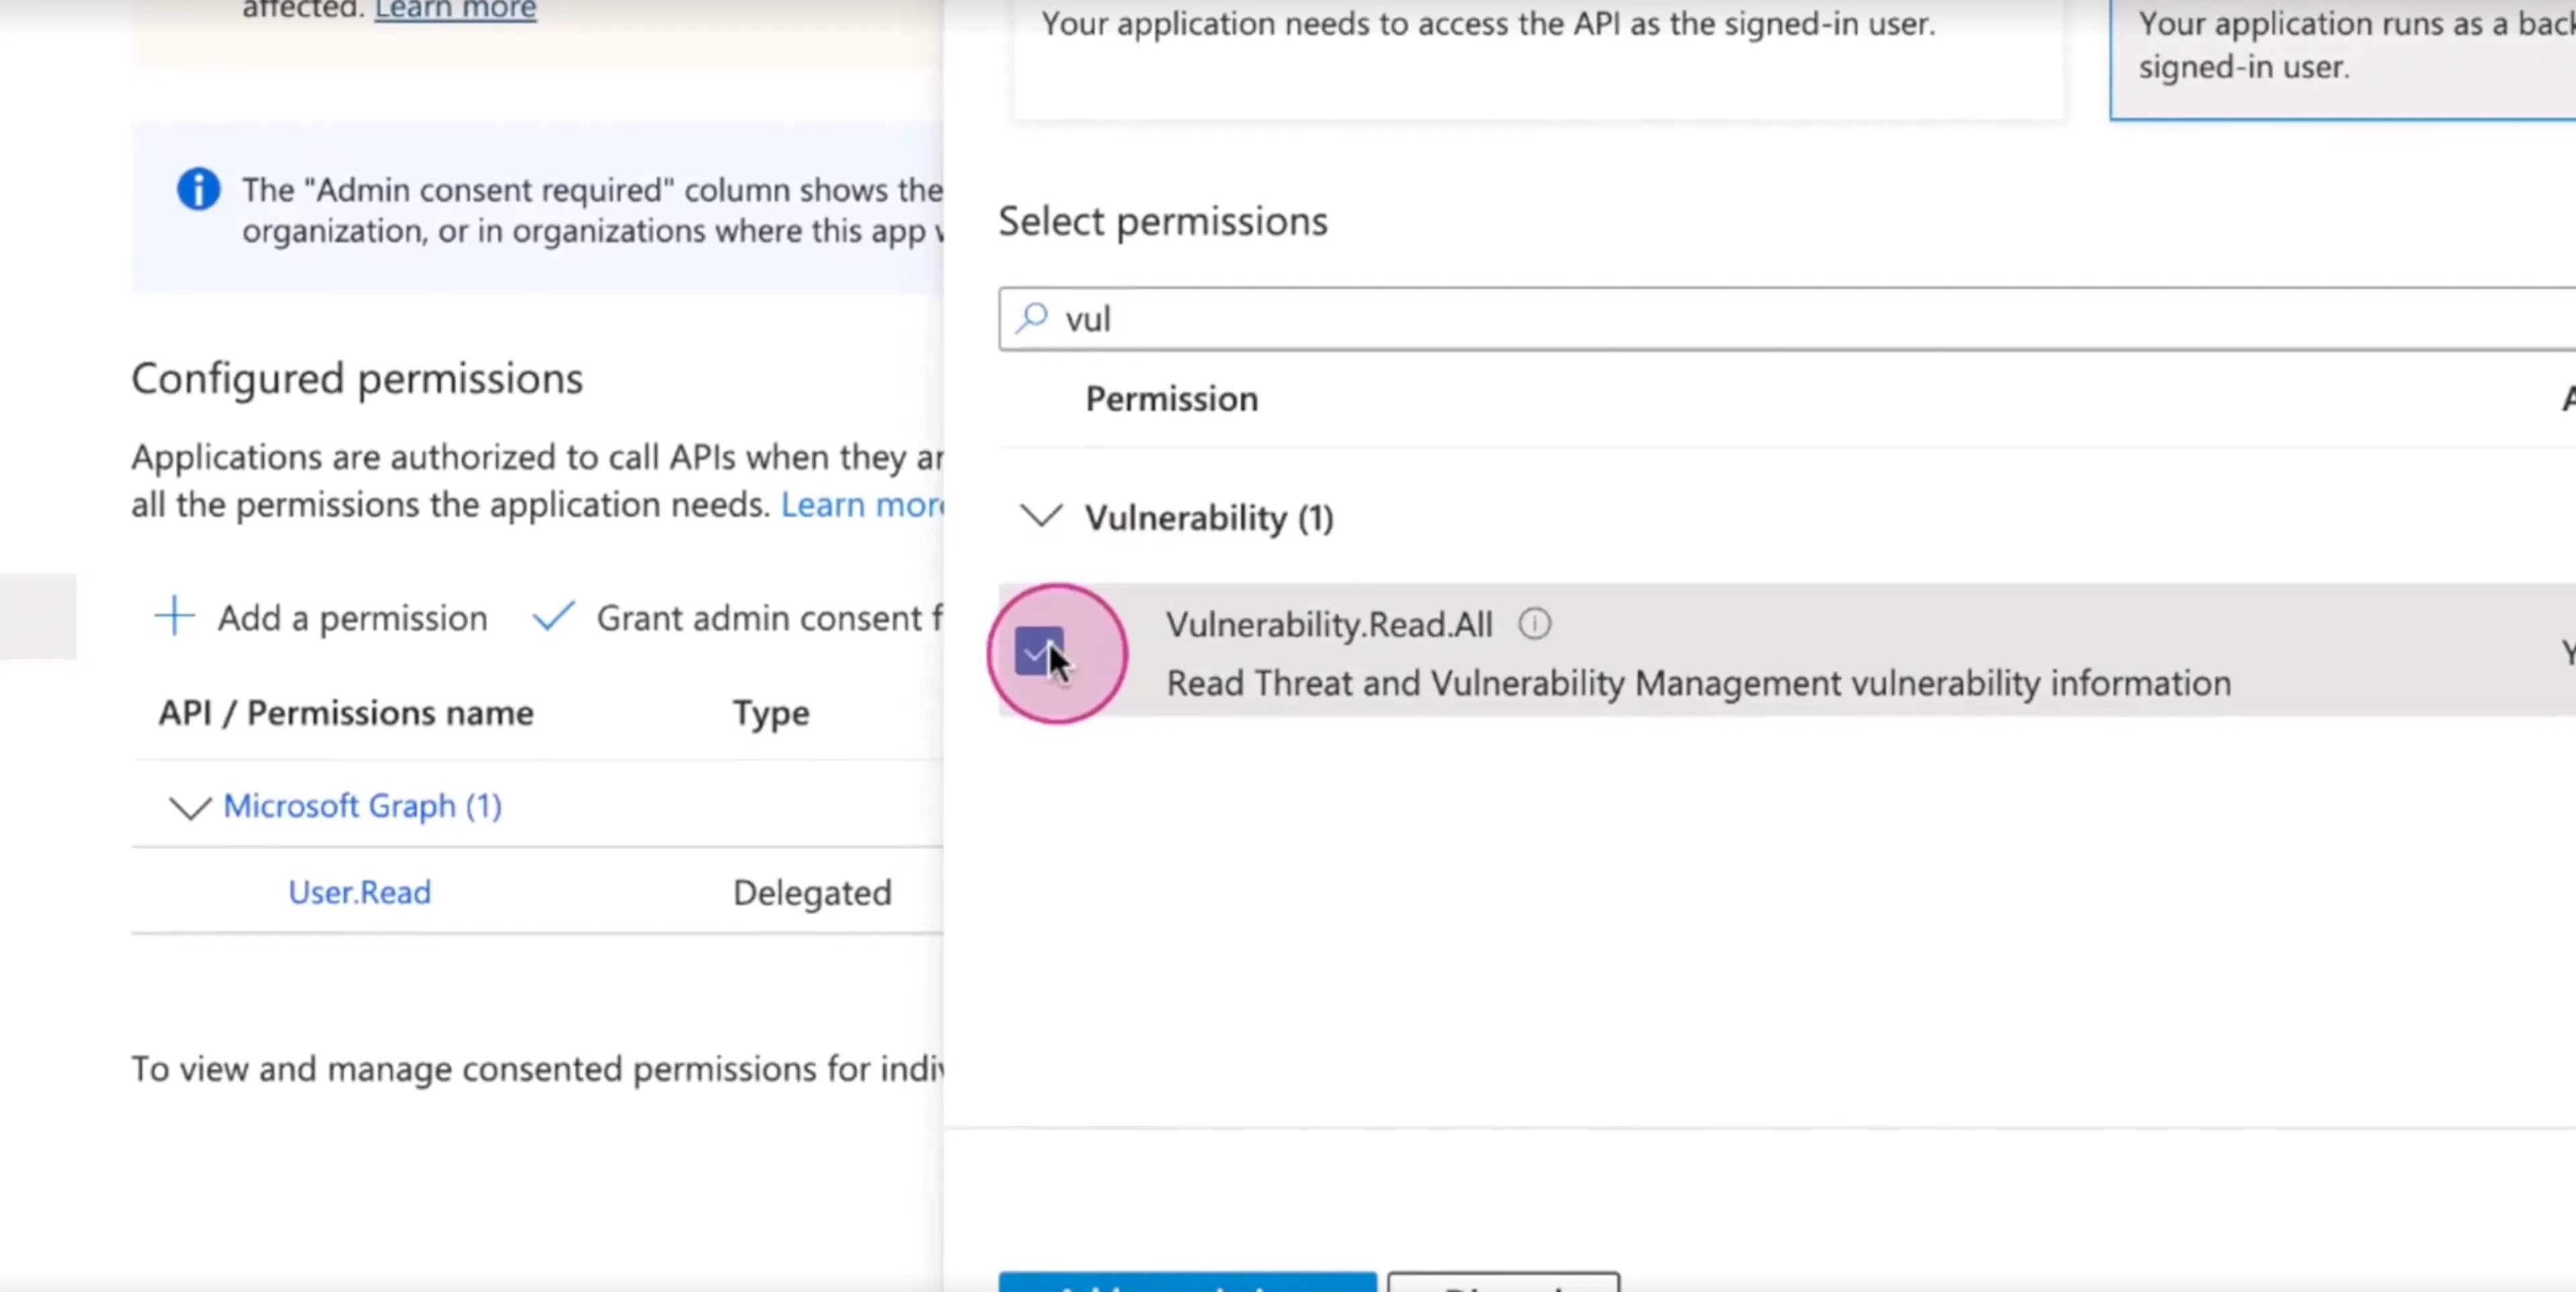
- Search Vulnerability and select Vulnerability.Read.All.
- Click Add Permissions.
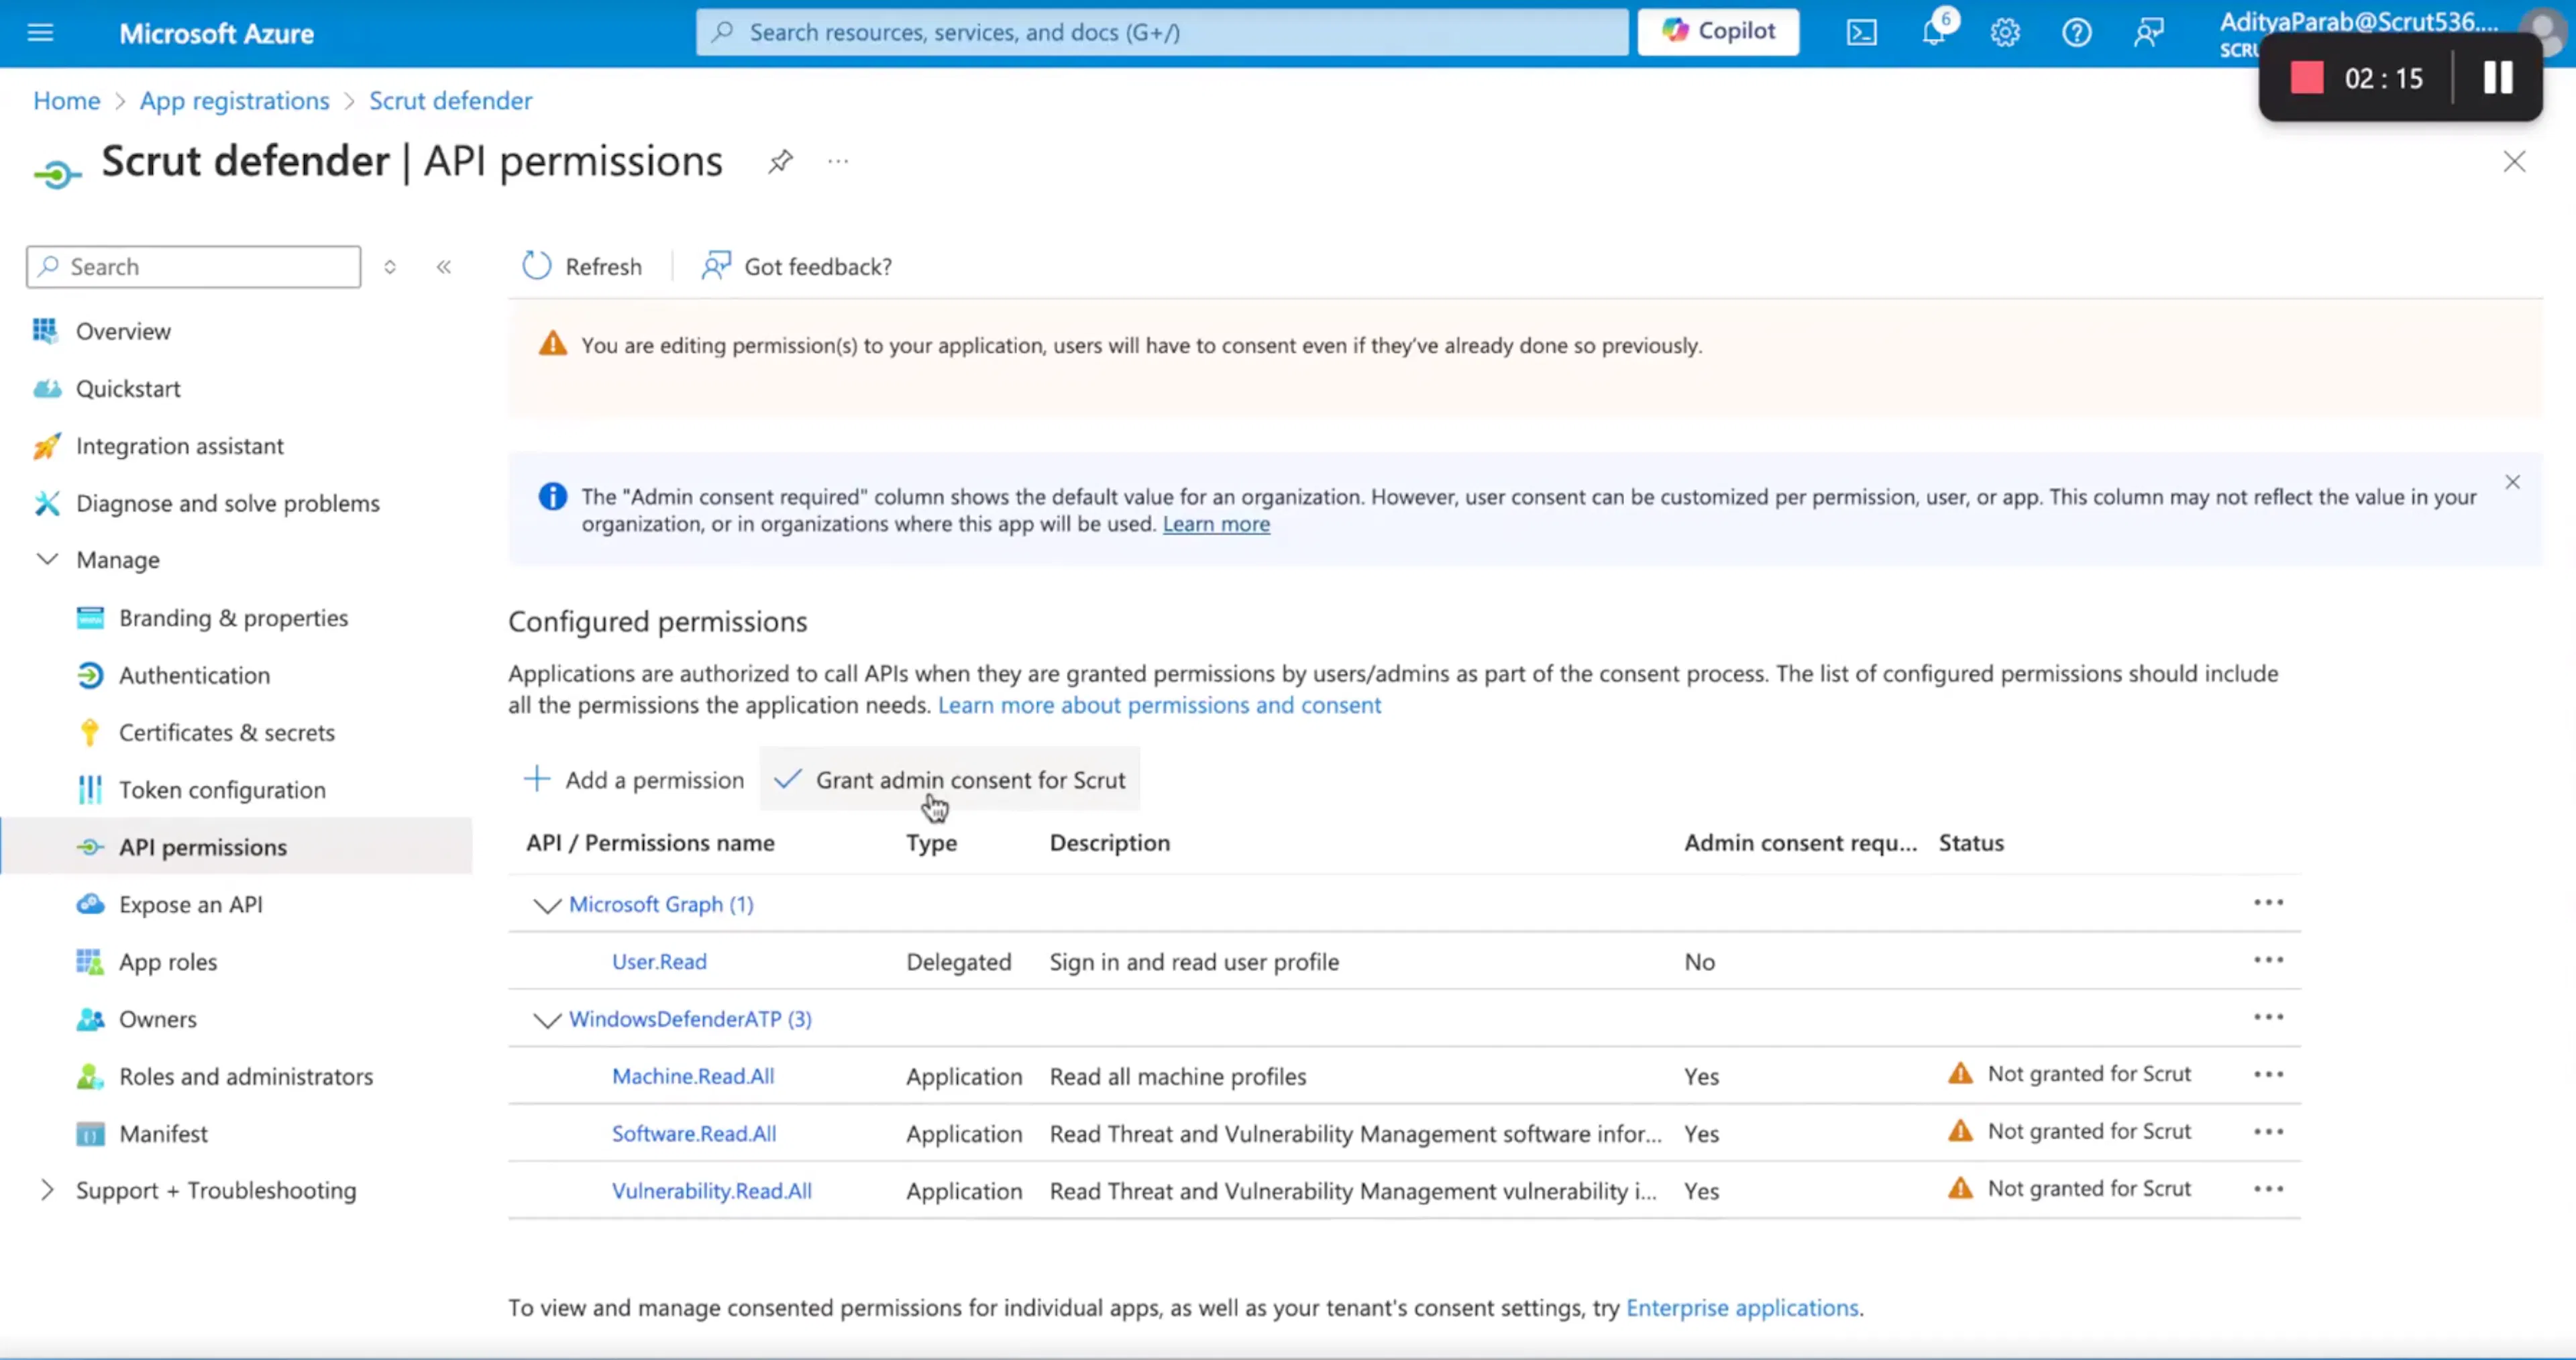
- Click Grant admin consent for Scrut.
- Click Yes to confirm.
Important:
All three permissions must show Granted status before proceeding. If any show Not granted, the integration will not function correctly.
Step 3: Create a Client Secret for the Registered Application
- Select Certificates & secrets from the left navigation menu.
- Click + New Client Secret.
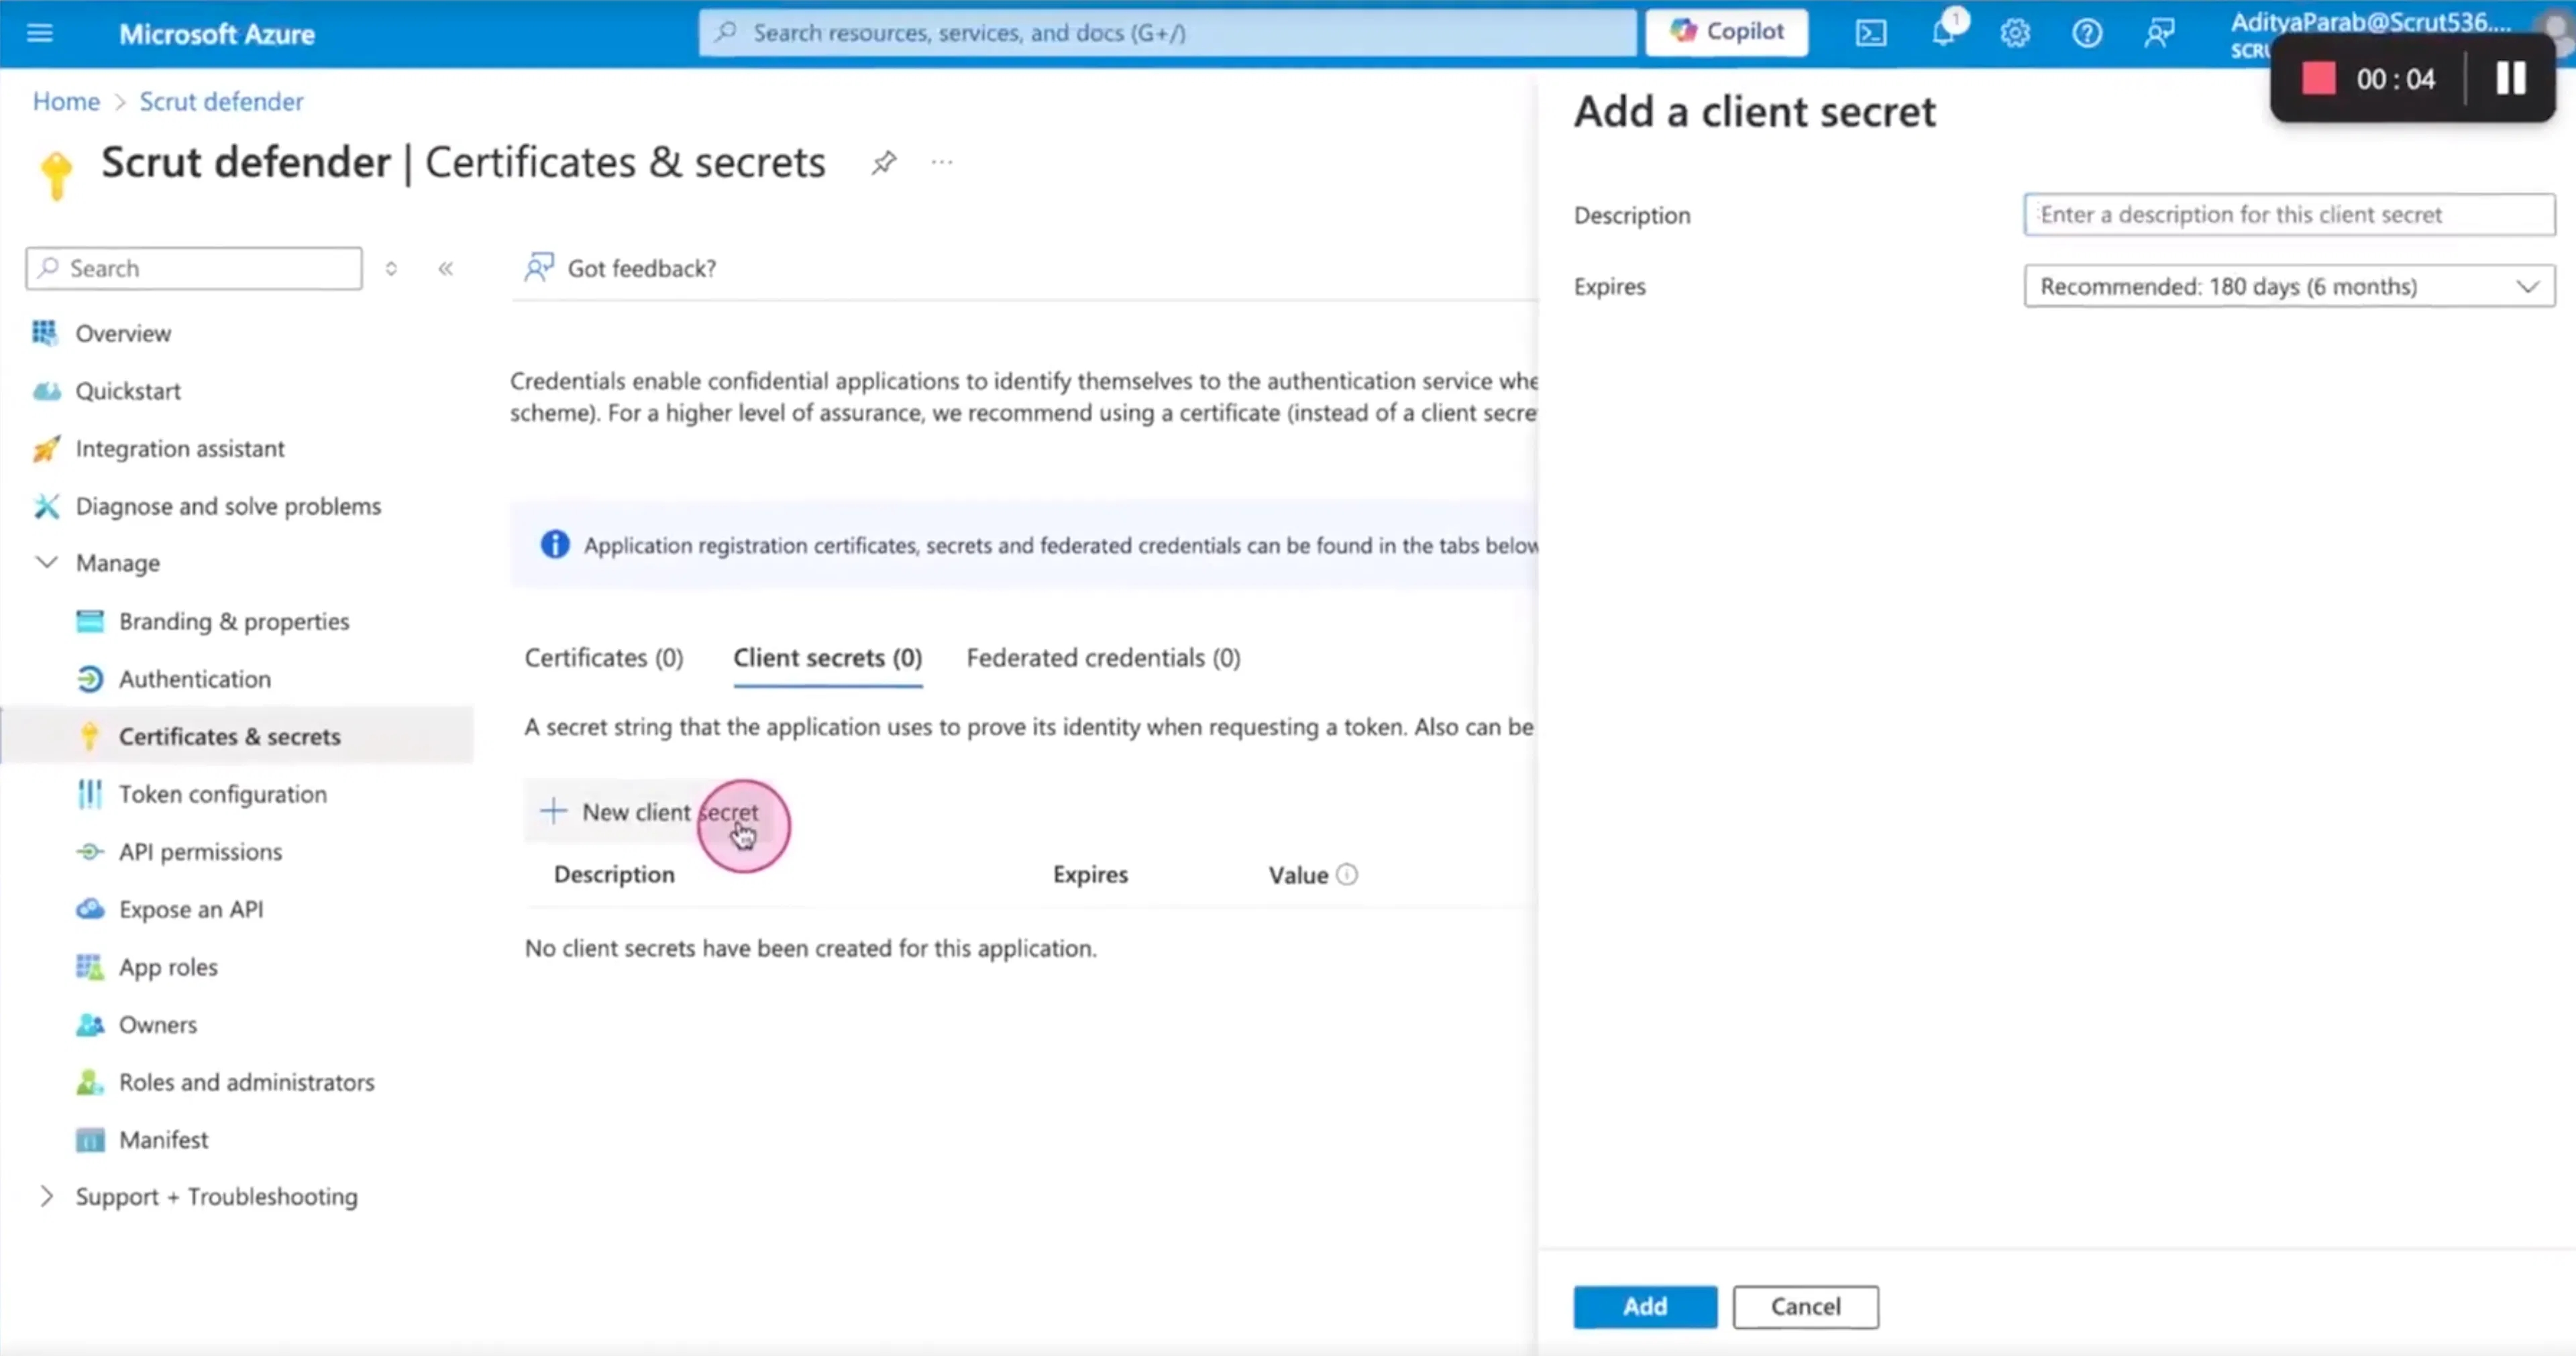
- Enter a Description for the secret.
- Select an expiry duration from the Expires dropdown menu.
- Click Add to save the new Client Secret.
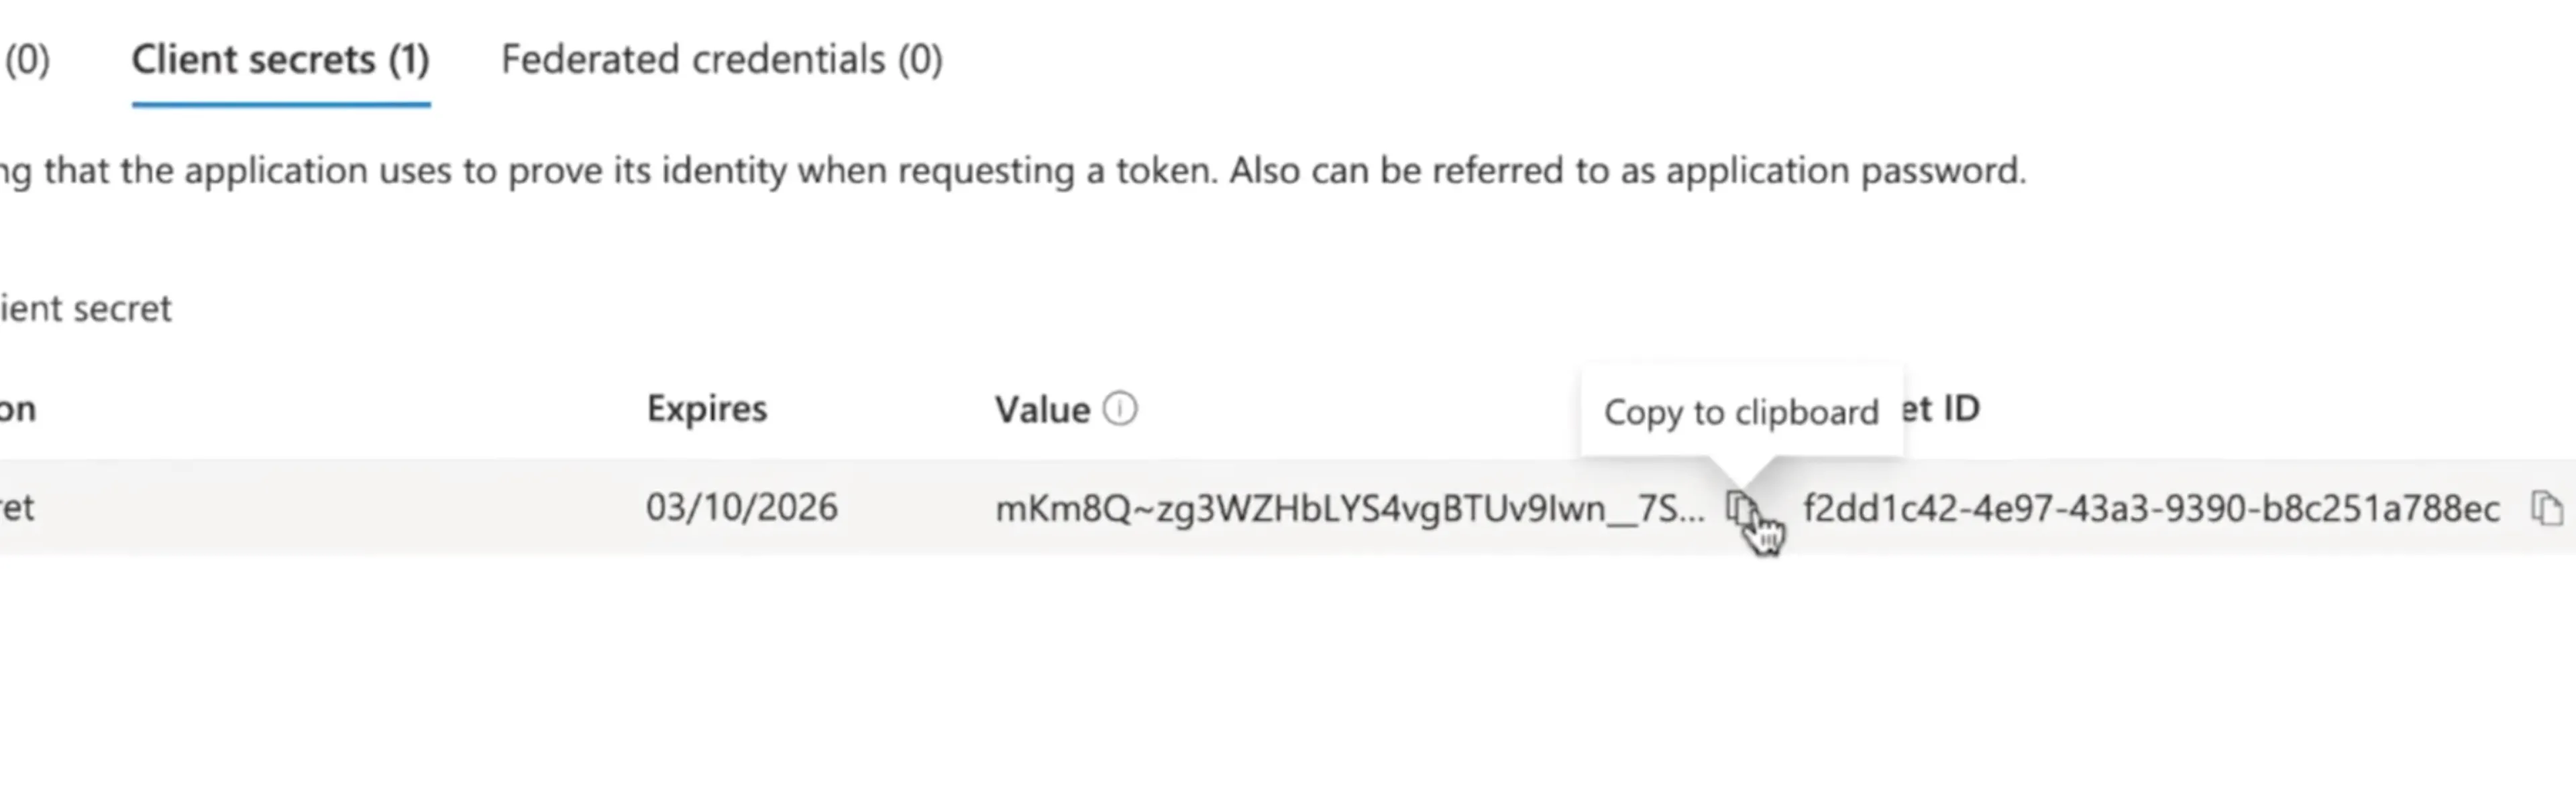
- Copy the Client Secret Value (third column) for later use. This is your Client Secret Value.
Important:
Copy the Client Secret Value immediately after creation. Azure does not show this value again after you navigate away from the page. Do not copy the Secret ID; only the Value is required.
Step 4: Connect the Integration in Scrut
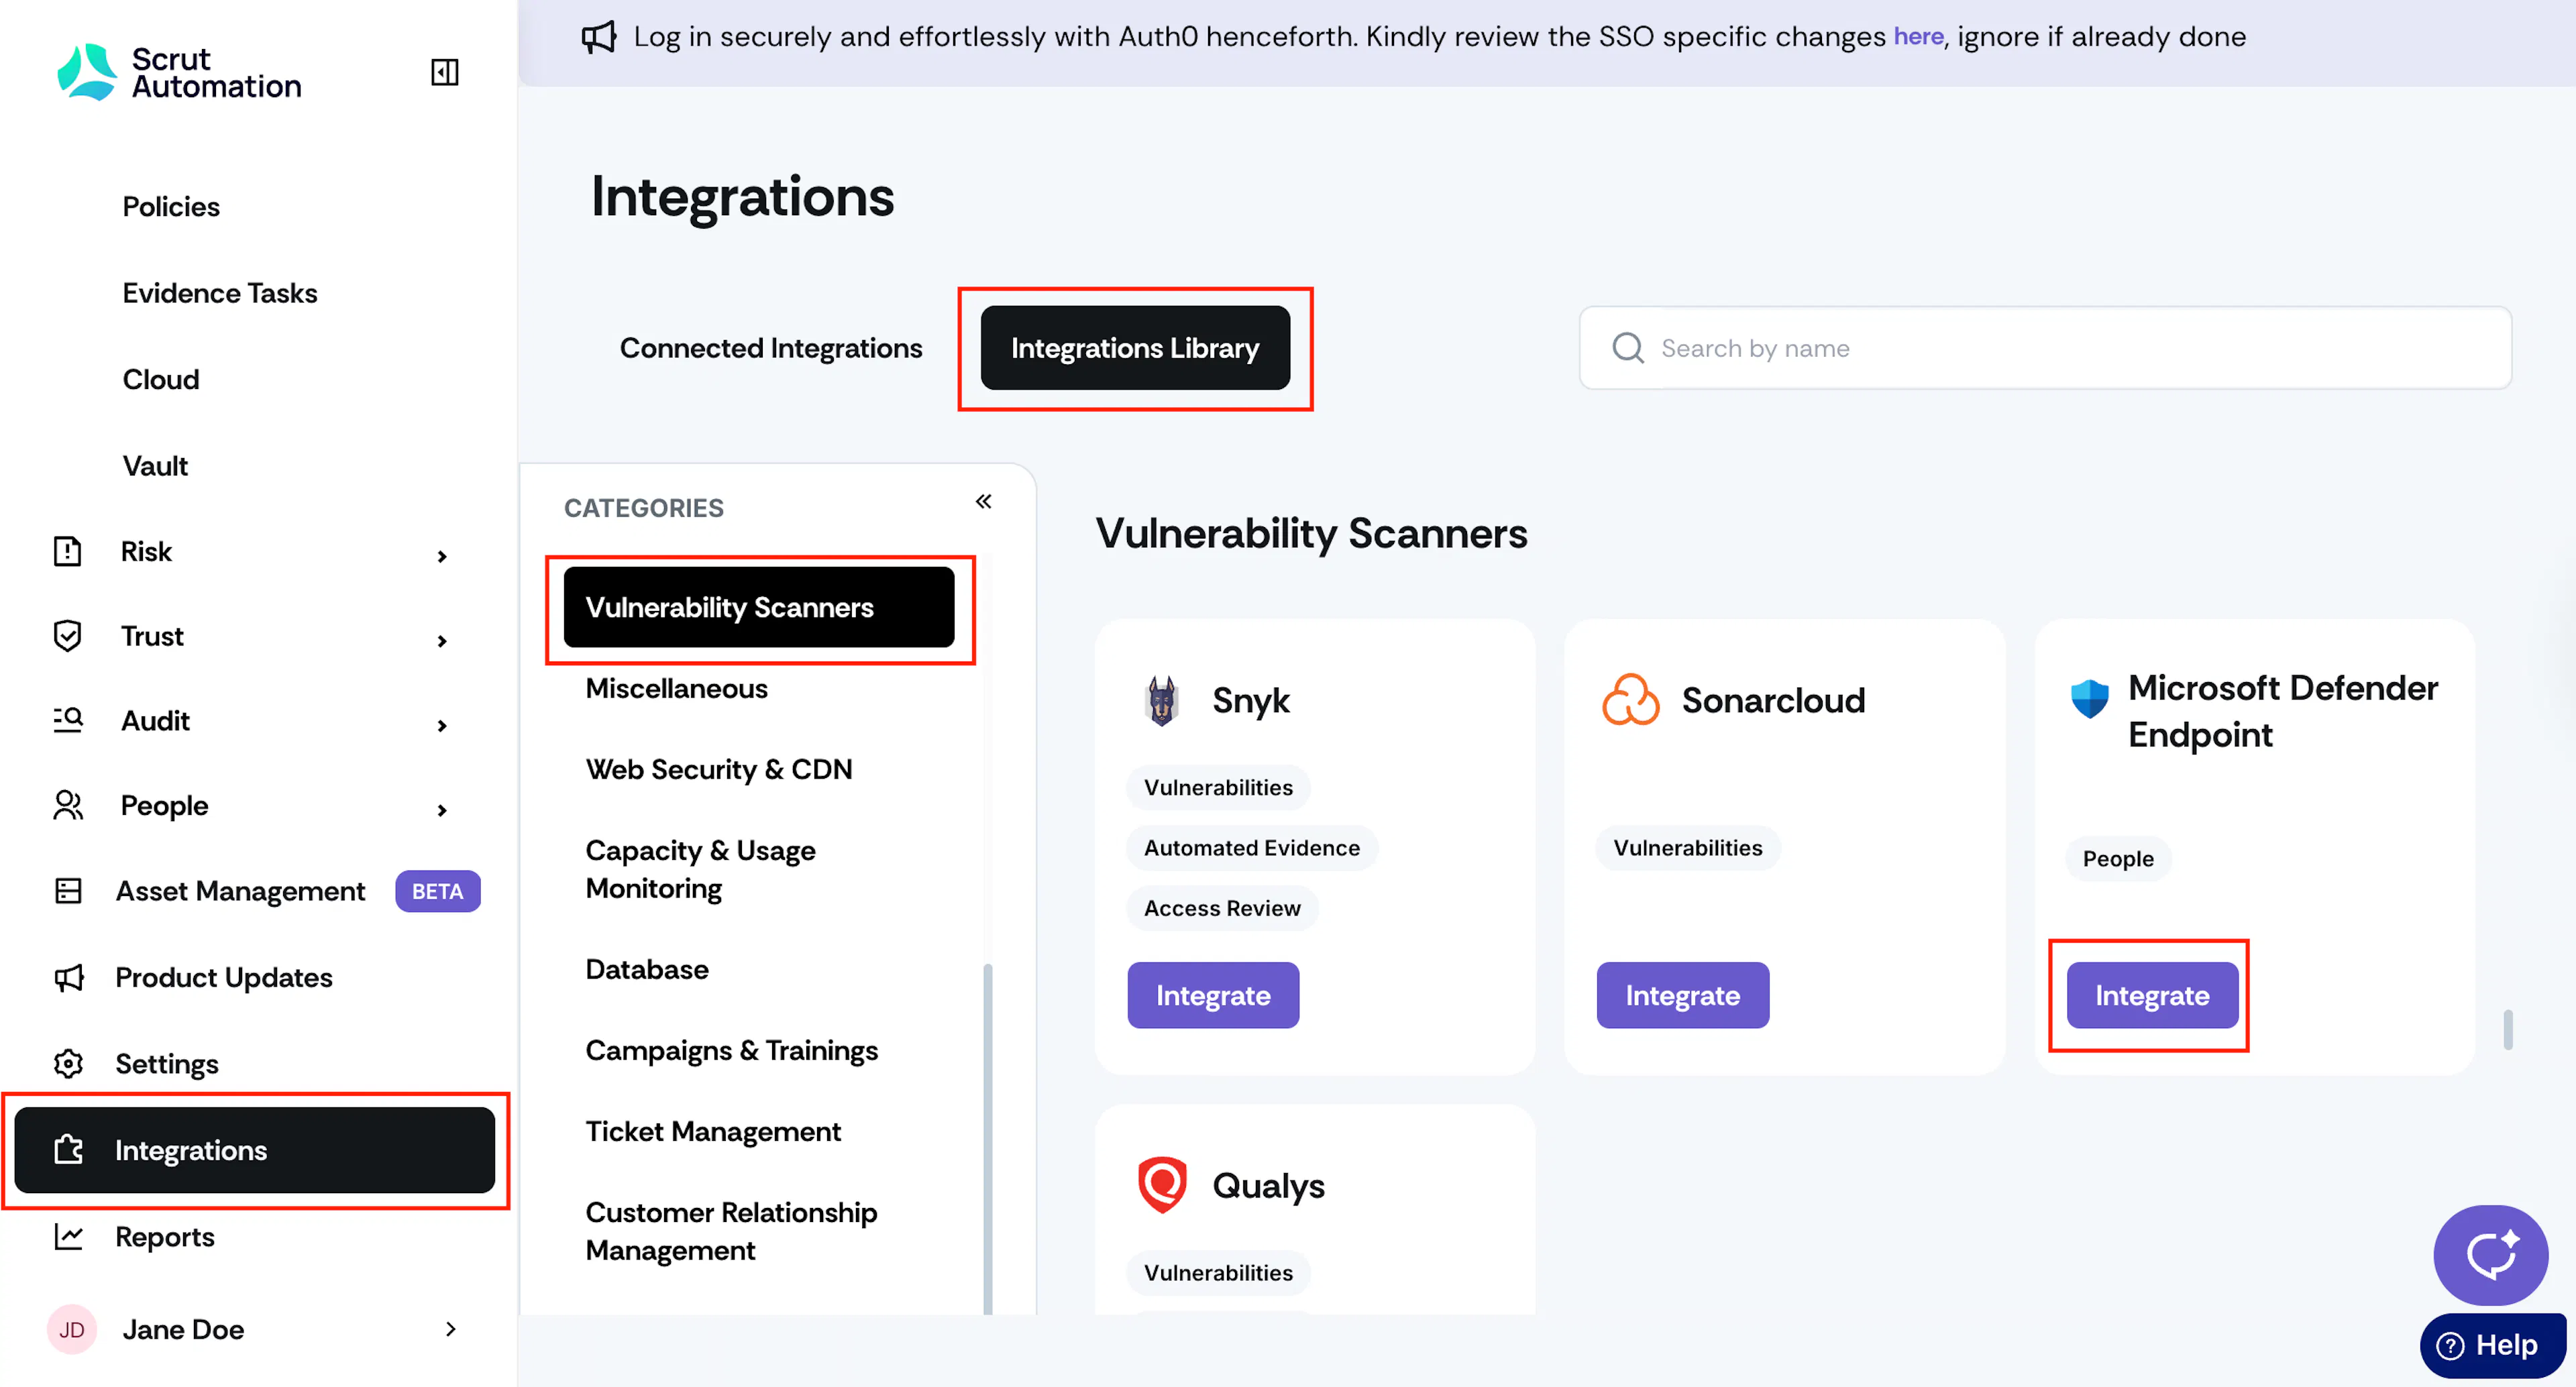
- Sign in to Scrut, and click Integrations → Integrations Library.
- In the Categories section, scroll to Vulnerability Scanners.
- Click the Integrate button in the Microsoft Defender Endpoint tile.
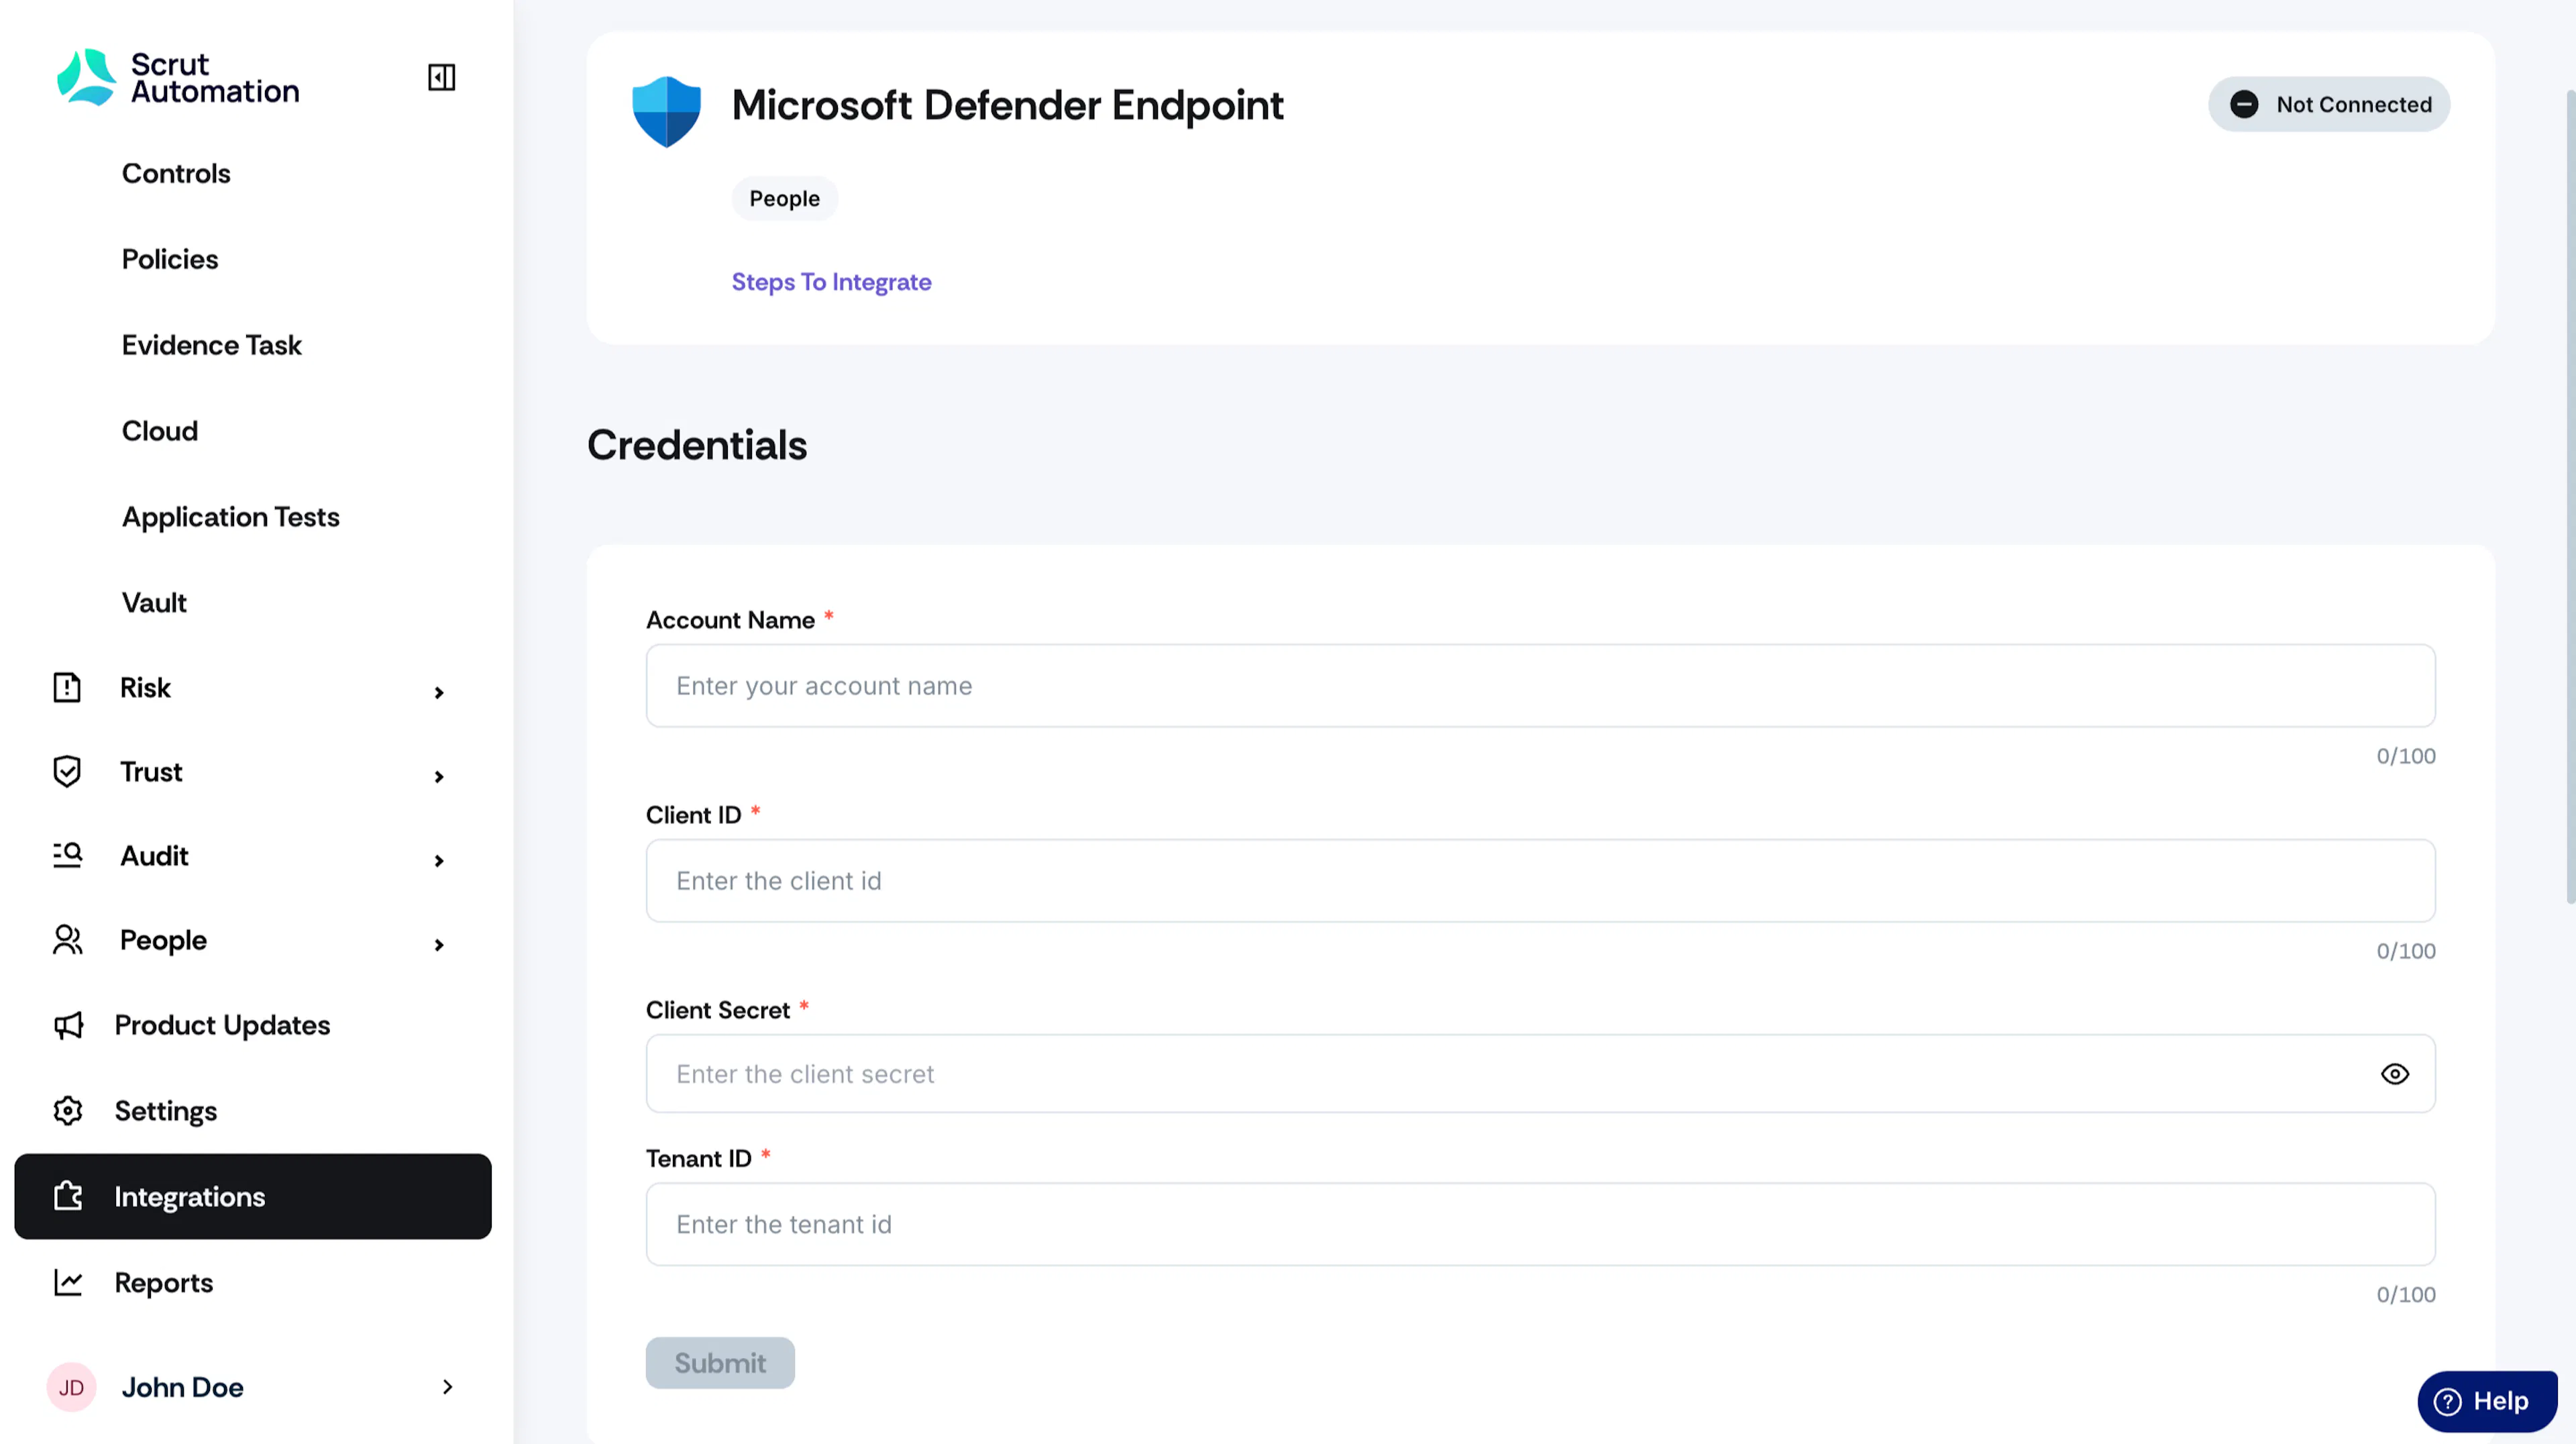
- On the credentials form, enter the following:
- Account Name: The display name for this integration
- Client ID: The Application (client) ID from Step 1
- Client Secret: The Client Secret Value from Step 3
- Tenant ID: The Directory (tenant) ID from Step 1
- Click Submit.
Note:
Do NOT enter the secret ID in place of the client secret value. Only enter the client secret value.
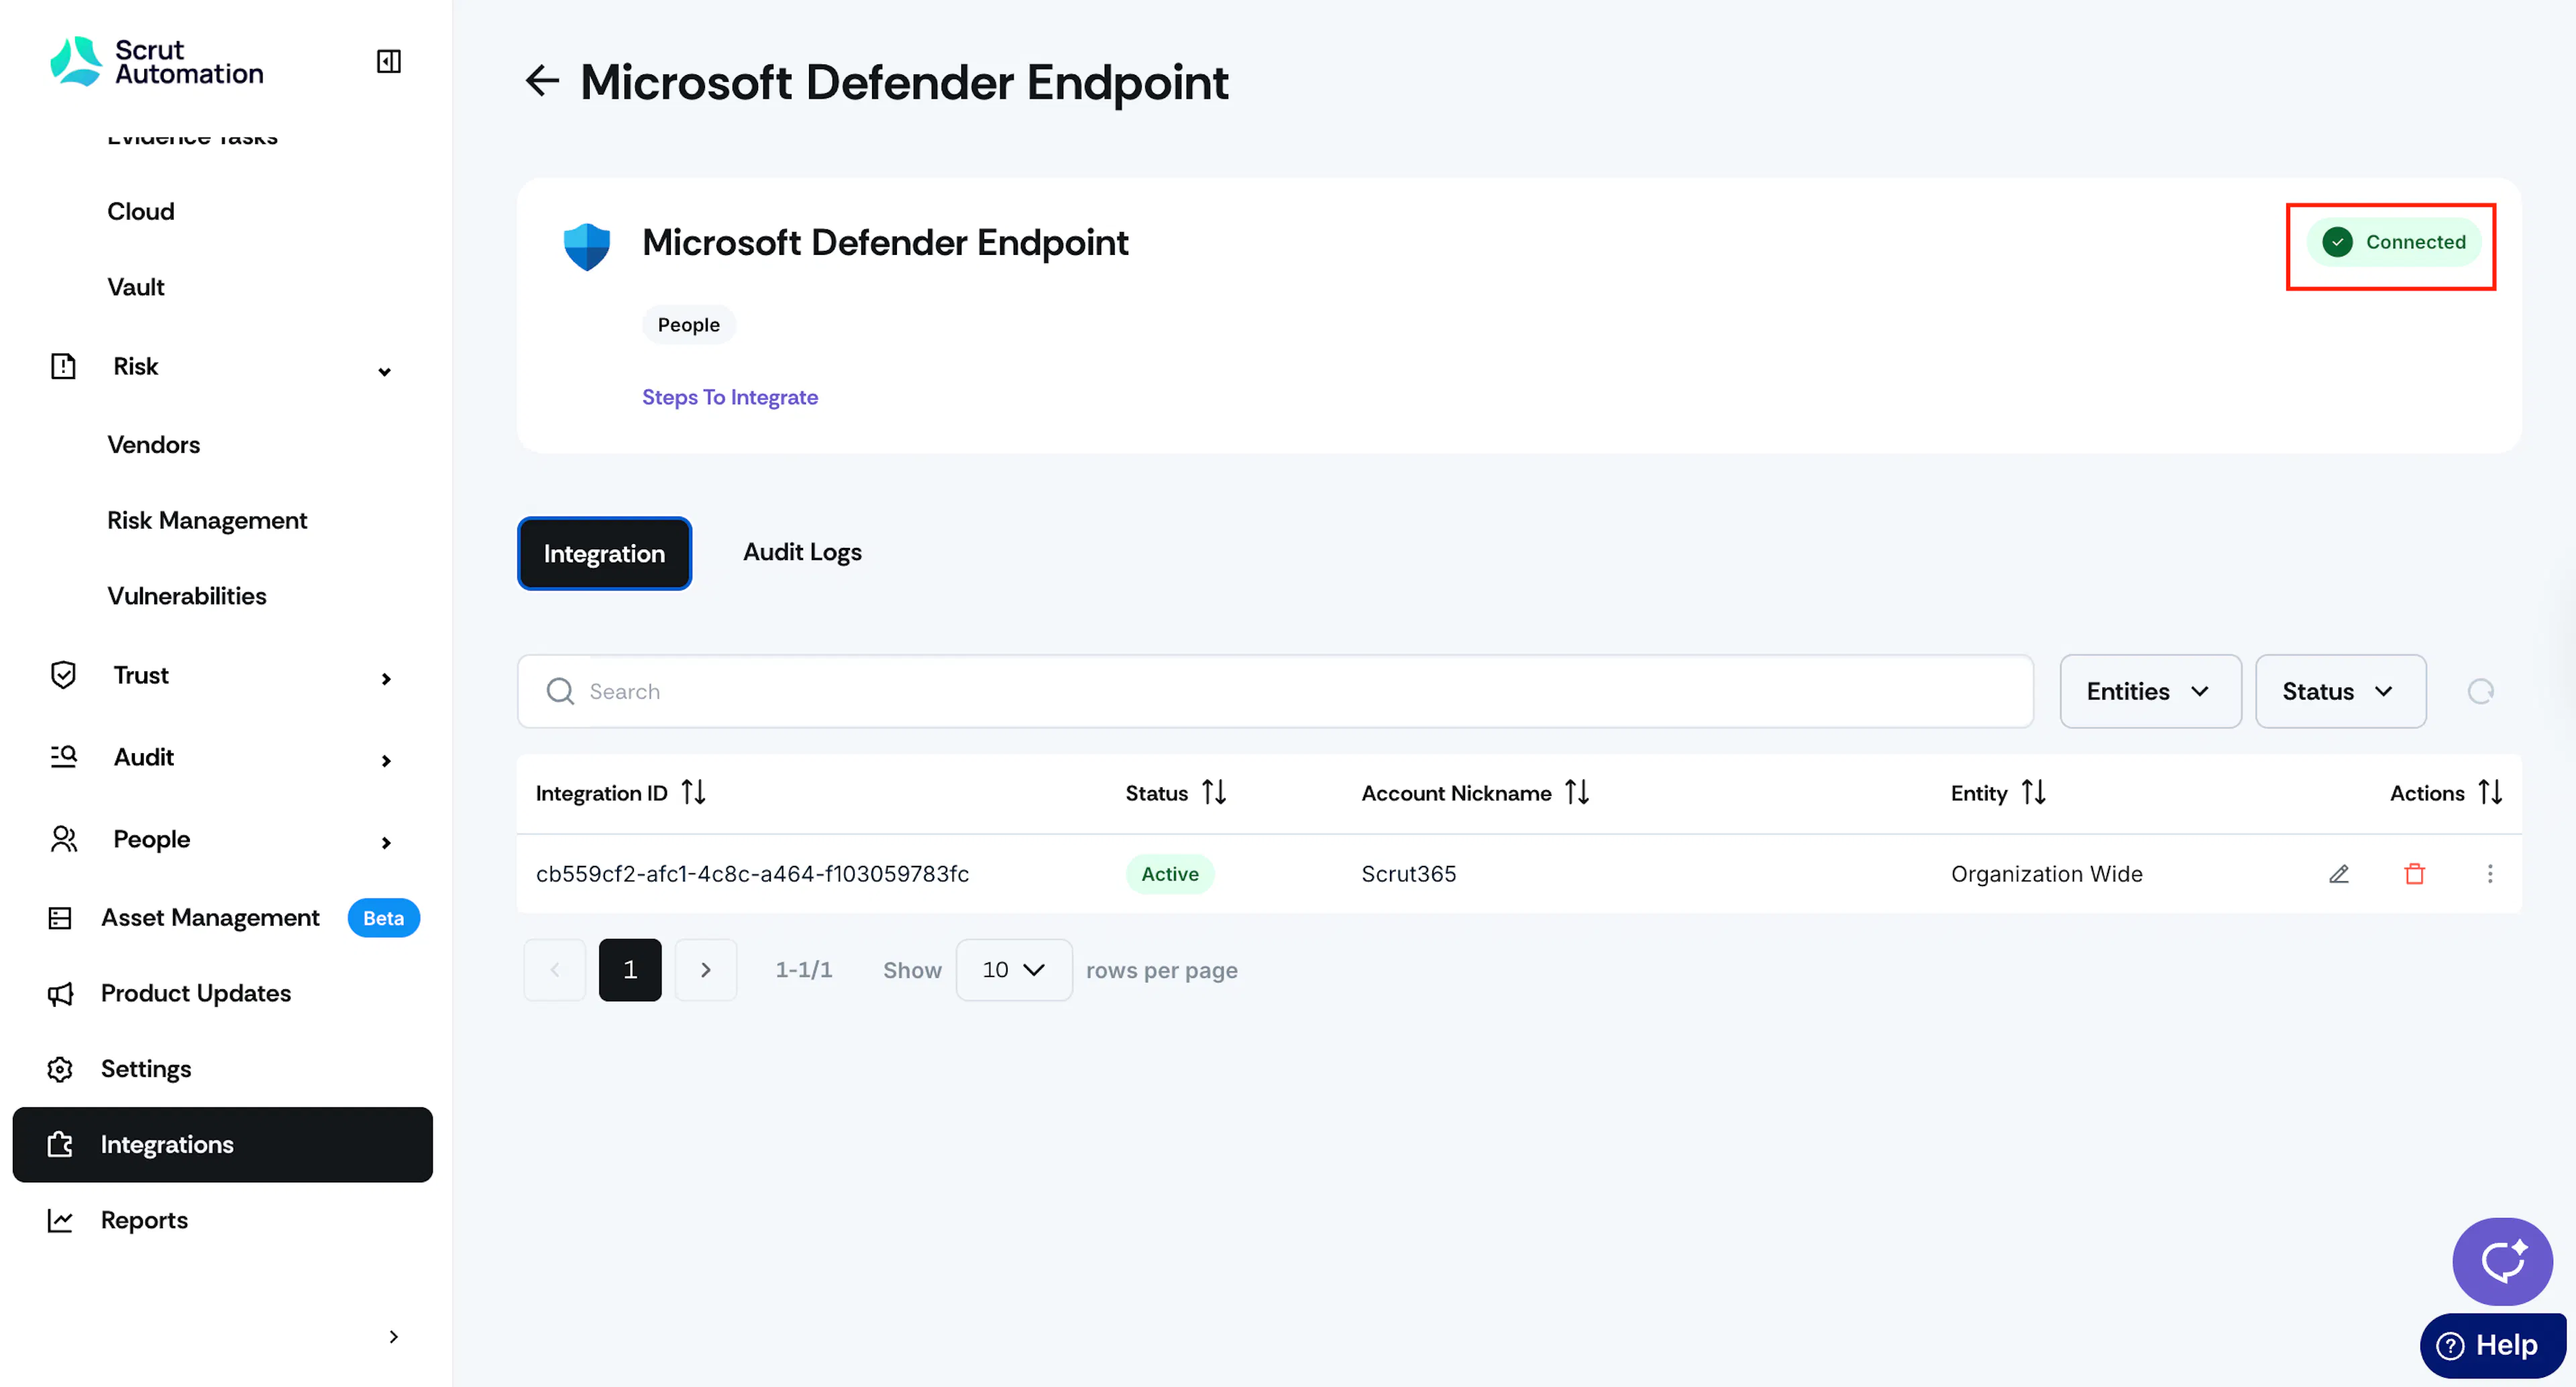
Watch for the success toast and the Connected status indicator on the Microsoft Defender Endpoint integration page.
Step 5: Configure Scope
After completing the integration, configure the scope by selecting the devices to include in the scan.
- Go to Integrations → Connected Integrations → Vulnerability Scanners.
- Click the Configure button on the Microsoft Defender Endpoint integration.
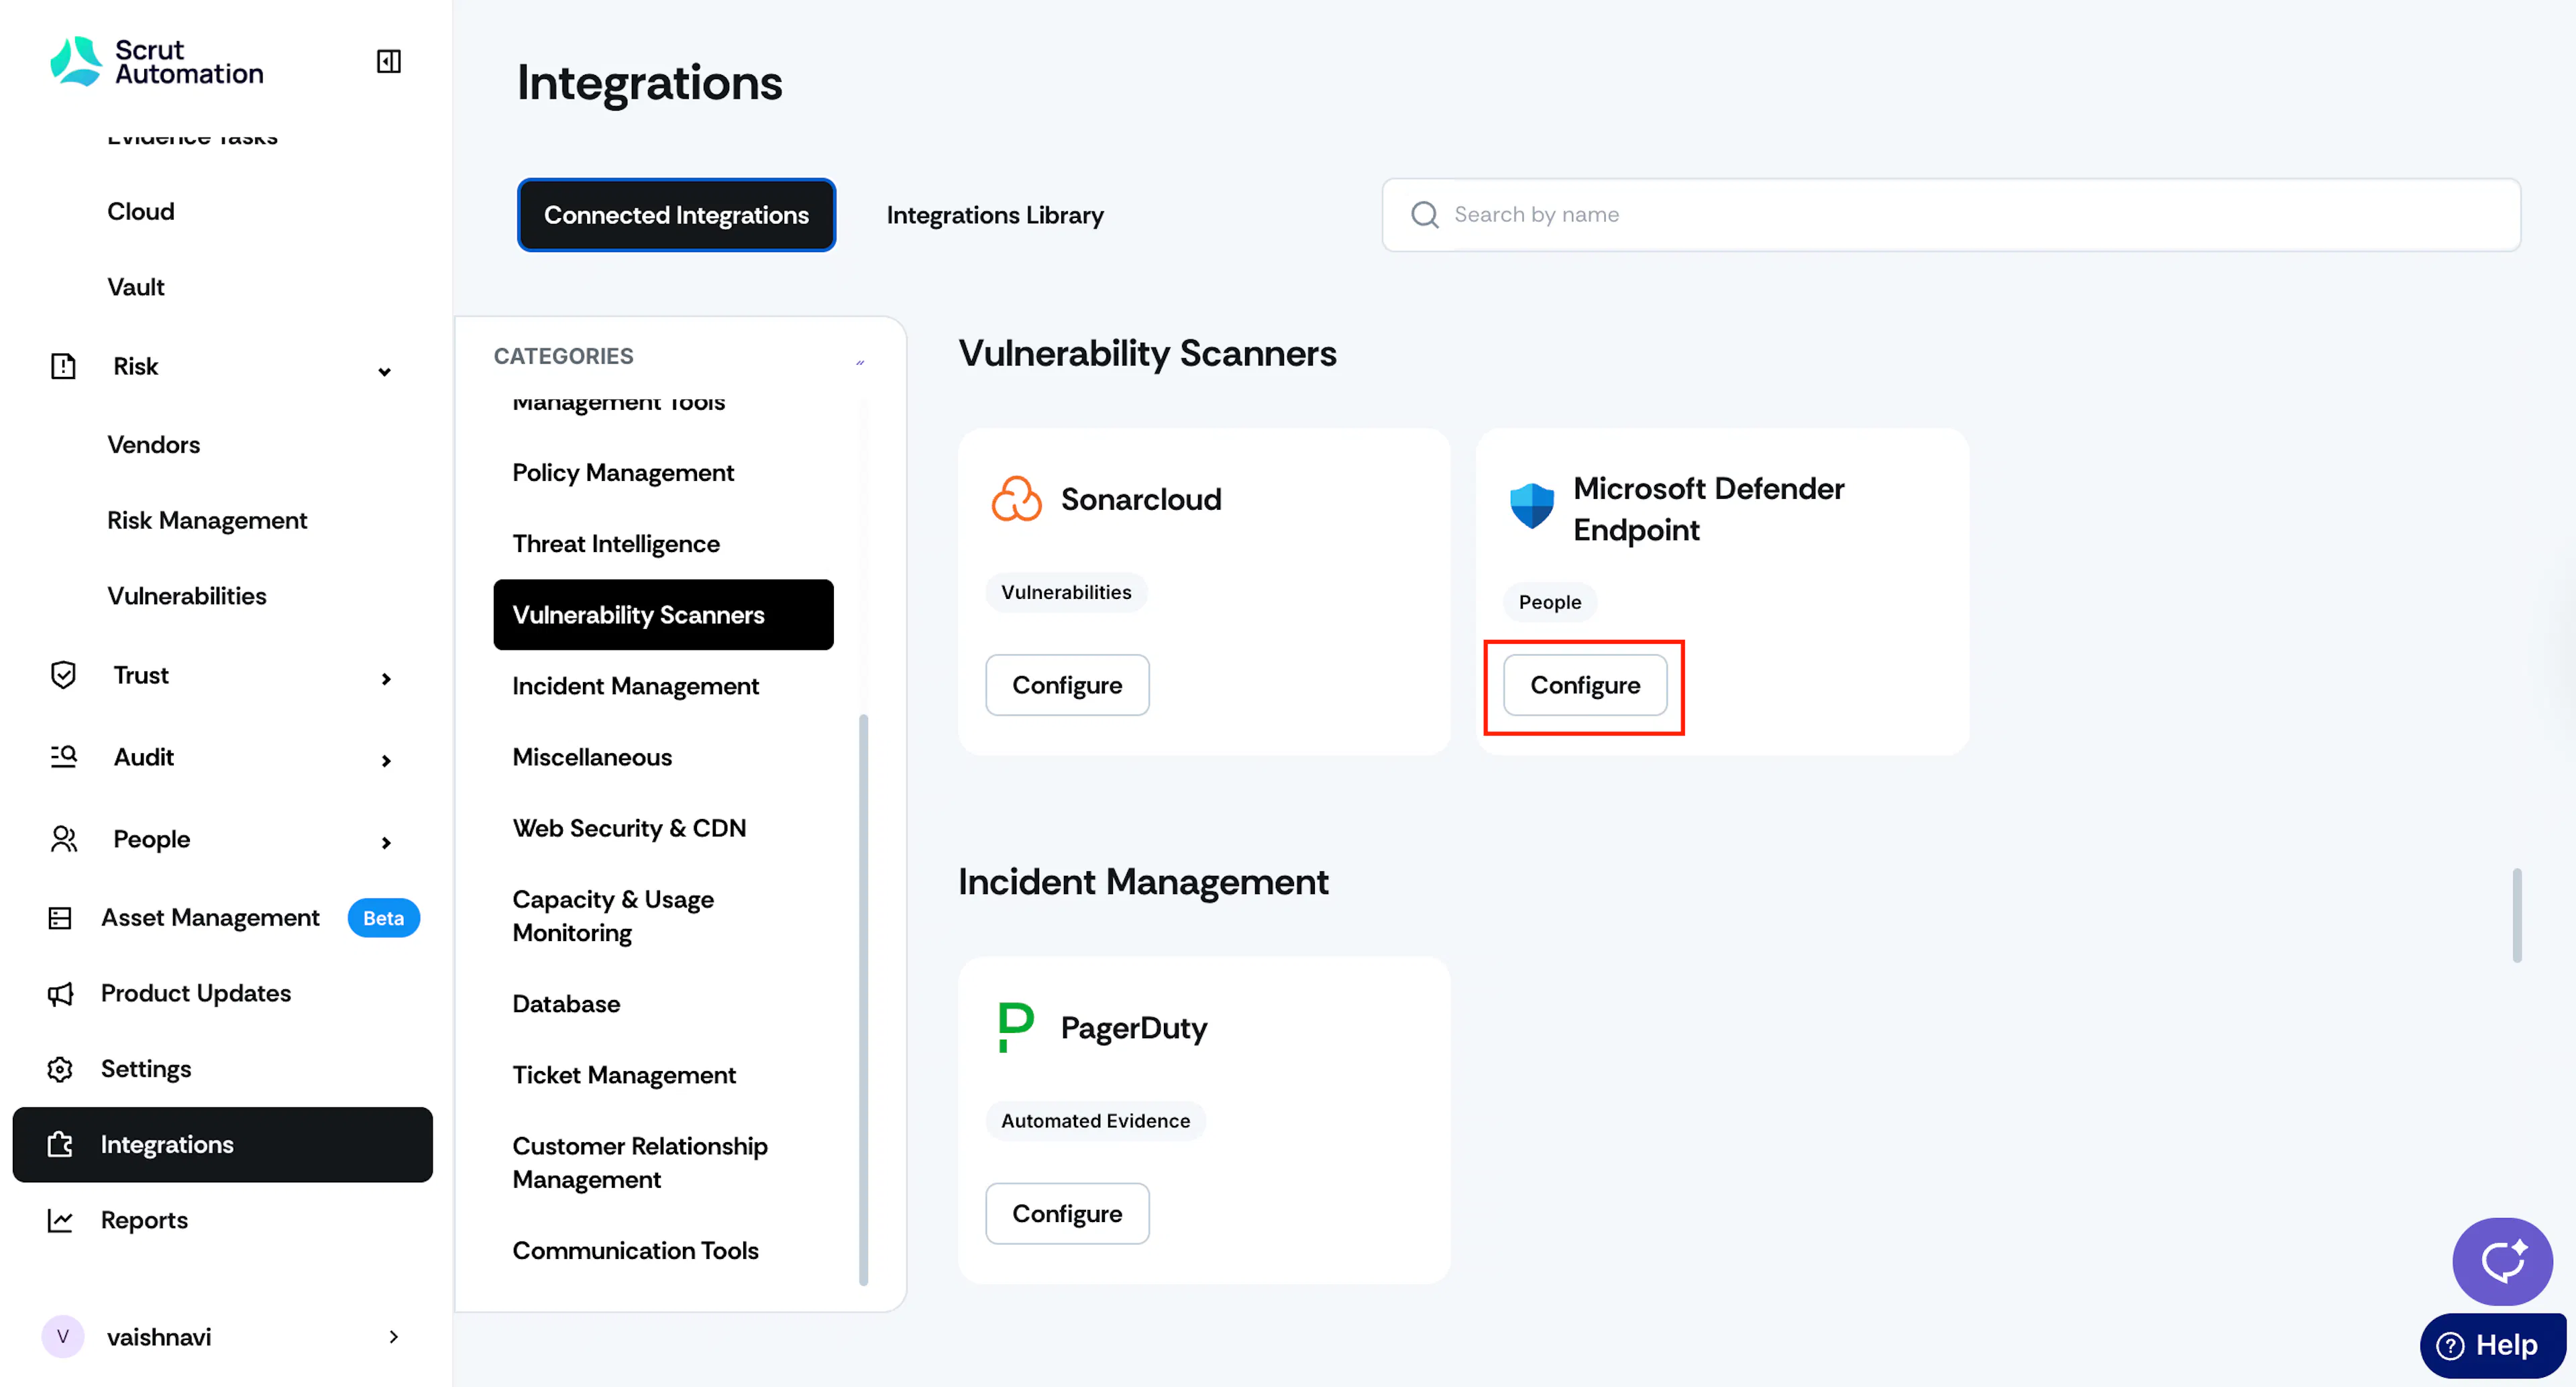
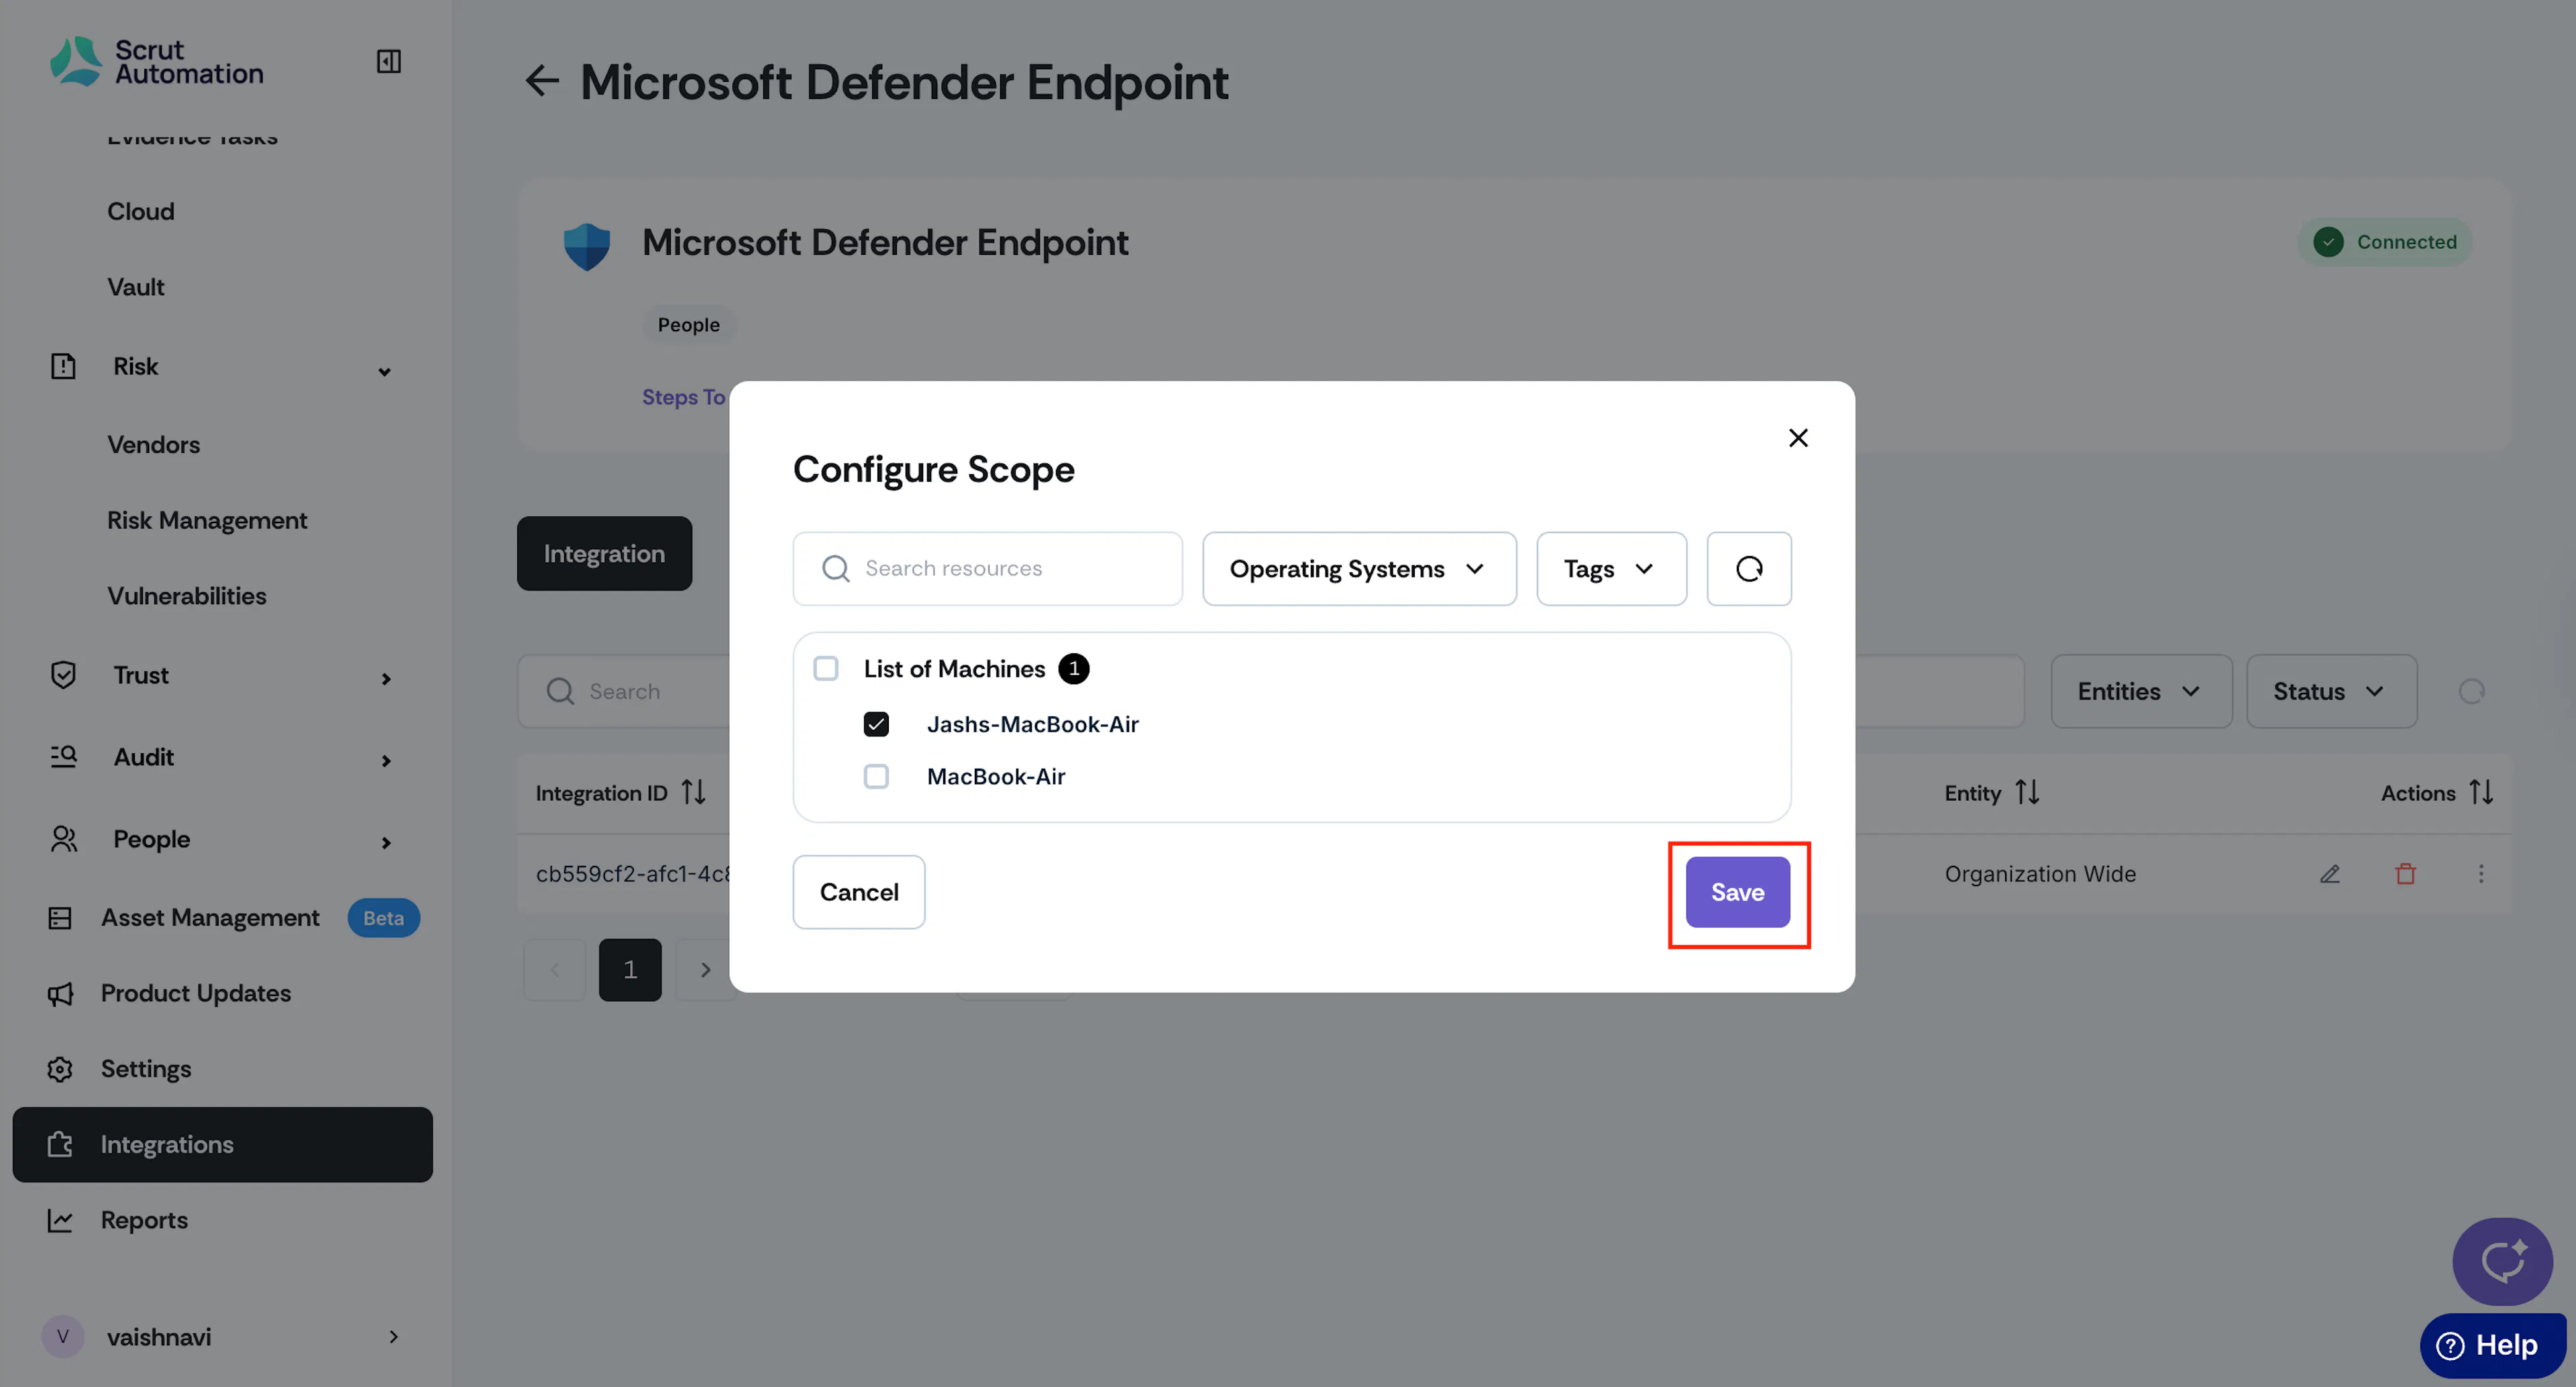
- On the MS Defender integration page, click the three-dot icon in the Actions column, and choose the devices you want to include in the integration scope.

- Select the topmost checkbox to select all devices at once.
- Click Save.
What Happens Next?
Initial data sync
The initial sync begins automatically after the integration is connected and the scope is saved. It takes up to 24 hours for the first scan results to appear in Scrut. To check sync status, navigate to Integrations, open the Microsoft Defender Endpoint integration page, and review the Audit Logs tab.
Review synced data
Once the sync completes, you can find the data in the following locations:
- Navigate Vulnerabilities → Third-Party Scans to view all vulnerabilities ingested from Defender. Use the Source filter and select MS Defender to view only Defender-sourced findings.
- Navigate to Tests → Automated Tests, and use the Application filter to view only tests specific to Defender.
- Navigate to Compliance → Evidence Tasks, open any evidence, and click Add Attachment to configure a Scrut Monitor to automated evidence collection from Defender.
Heads Up!
If results are not visible after 24 hours, check the Audit Logs on the Microsoft Defender Endpoint integration page to confirm whether the scan completed successfully.
Common Errors and Troubleshooting
Integration fails to connect
Possible solutions:
- Verify that the Client ID, Client Secret Value, and Tenant ID are entered correctly. Do not enter the Secret ID in place of the Client Secret Value.
- Confirm that admin consent has been granted for all three API permissions in Azure. All permissions must show Granted status.
- Ensure the registered application in Azure is set to Single tenant and is associated with the correct directory.
Vulnerabilities not appearing in Scrut
Possible solutions:
- Allow up to 24 hours for the initial sync to complete.
- Check the Audit Logs tab on the Microsoft Defender Endpoint integration page to confirm the scan ran successfully.
- Verify that at least one device is selected in the Configure Scope panel. If no devices are in scope, no data is collected.
Missing devices in scope selection
Possible solutions:
- Confirm that the devices are enrolled and active in Microsoft Defender Endpoint.
- Check that the Machine.Read.All permission is granted and active on the registered Azure application.
FAQs
Reach out to support@scrut.io or contact your CSM for further assistance.