

Set up a Scrut Monitor for Scrut Modules
The Scrut Monitor is a powerful tool designed to download audit-ready evidence from connected third-party applications at scheduled intervals automatically. It then attaches the downloads to Evidence Tasks, reducing the time and effort required for manually collecting and uploading evidence into Scrut.
Besides collecting evidence from your integrated tools, the Scrut Monitor can also automatically collect compliance-ready reports from various Scrut modules and attach them to relevant Evidence Tasks.
Instead of manually downloading a report from a Scrut module and attaching it to an Evidence Task, the Scrut Monitor automates the process. You can configure it to automatically download relevant Scrut reports at predefined intervals and seamlessly upload them as attachments to designated Evidence Tasks.
In simple terms, the Scrut Monitor automates evidence collection from both external connected tools and your organization’s data within Scrut, reducing the need for manual intervention.
How It Works
-
Automated Internal Evidence Generation: Scrut Monitor can automatically collect compliance reports from Scrut’s native modules, including:
-
Flexible Scheduling: You can customize the evidence collection cadence (once, daily, weekly, monthly, or annually) per your requirements.
Available Internal Reports
You can configure the Monitor to download the following internal reports from Scrut and attach them to specific Evidence Tasks:
1: Risk Register Report
Captures the risks available in your risk register at the time of report generation. The report mirrors the data you would get by clicking the Export button on the Risk Register page. It includes all active risks with their current status, ratings, and associated metadata.
Customization: You can select the risk register columns to include in the report.
Format: CSV (single sheet)
Cadence: Once, daily, weekly, monthly, or annually
2: Vendor Compliance Report
Captures your vendor compliance assessment status. On the cadence date, the Scrut Monitor checks vendor compliance status. If all vendors are compliant (with the status Assessed), it automatically generates and attaches the report as evidence. If not all vendors are compliant, the Monitor initiates daily monitoring until the next cadence period. The report is attached as evidence on the first day when all vendors become compliant.
Format: CSV (single sheet)
Cadence: Once, daily, weekly, monthly, or annually
3: Employee Directory Report
Exports employee information from Scrut’s People module, showing employee compliance status and other details. It pulls employee data from your selected sources: IdP and HRIS tools. All employee records are consolidated into one sheet.
Customization: You can select the data sources from which to retrieve employee information, including connected HRIS and IdP tools.
Format: CSV (single sheet)
Cadence: Once, daily, weekly, monthly, or annually
4: Asset Inventory Report
Generates a comprehensive inventory of assets in your organization. Each asset type is populated in a separate sheet with complete asset details based on Scrut's asset table schema.
Customization: You can select the asset types to include in the report.
Format: CSV (multi-sheet, one for each asset type)
Cadence: Once, daily, weekly, monthly, or annually
5: Internal Audit Report
Captures and compiles findings from all closed internal audits. It includes detailed information about internal audit findings, their status, and outcomes.
Note: This attachment uses pro-rata logic to export only new or status-changed audits since the last monitoring to avoid duplicate attachments.
Format: CSV (multi-sheet, one for each audit)
Cadence: Once, daily, weekly, monthly, or annually
How To Use Scrut Monitor To Automate Internal Evidence Collection
Step 1: Access Evidence Tasks
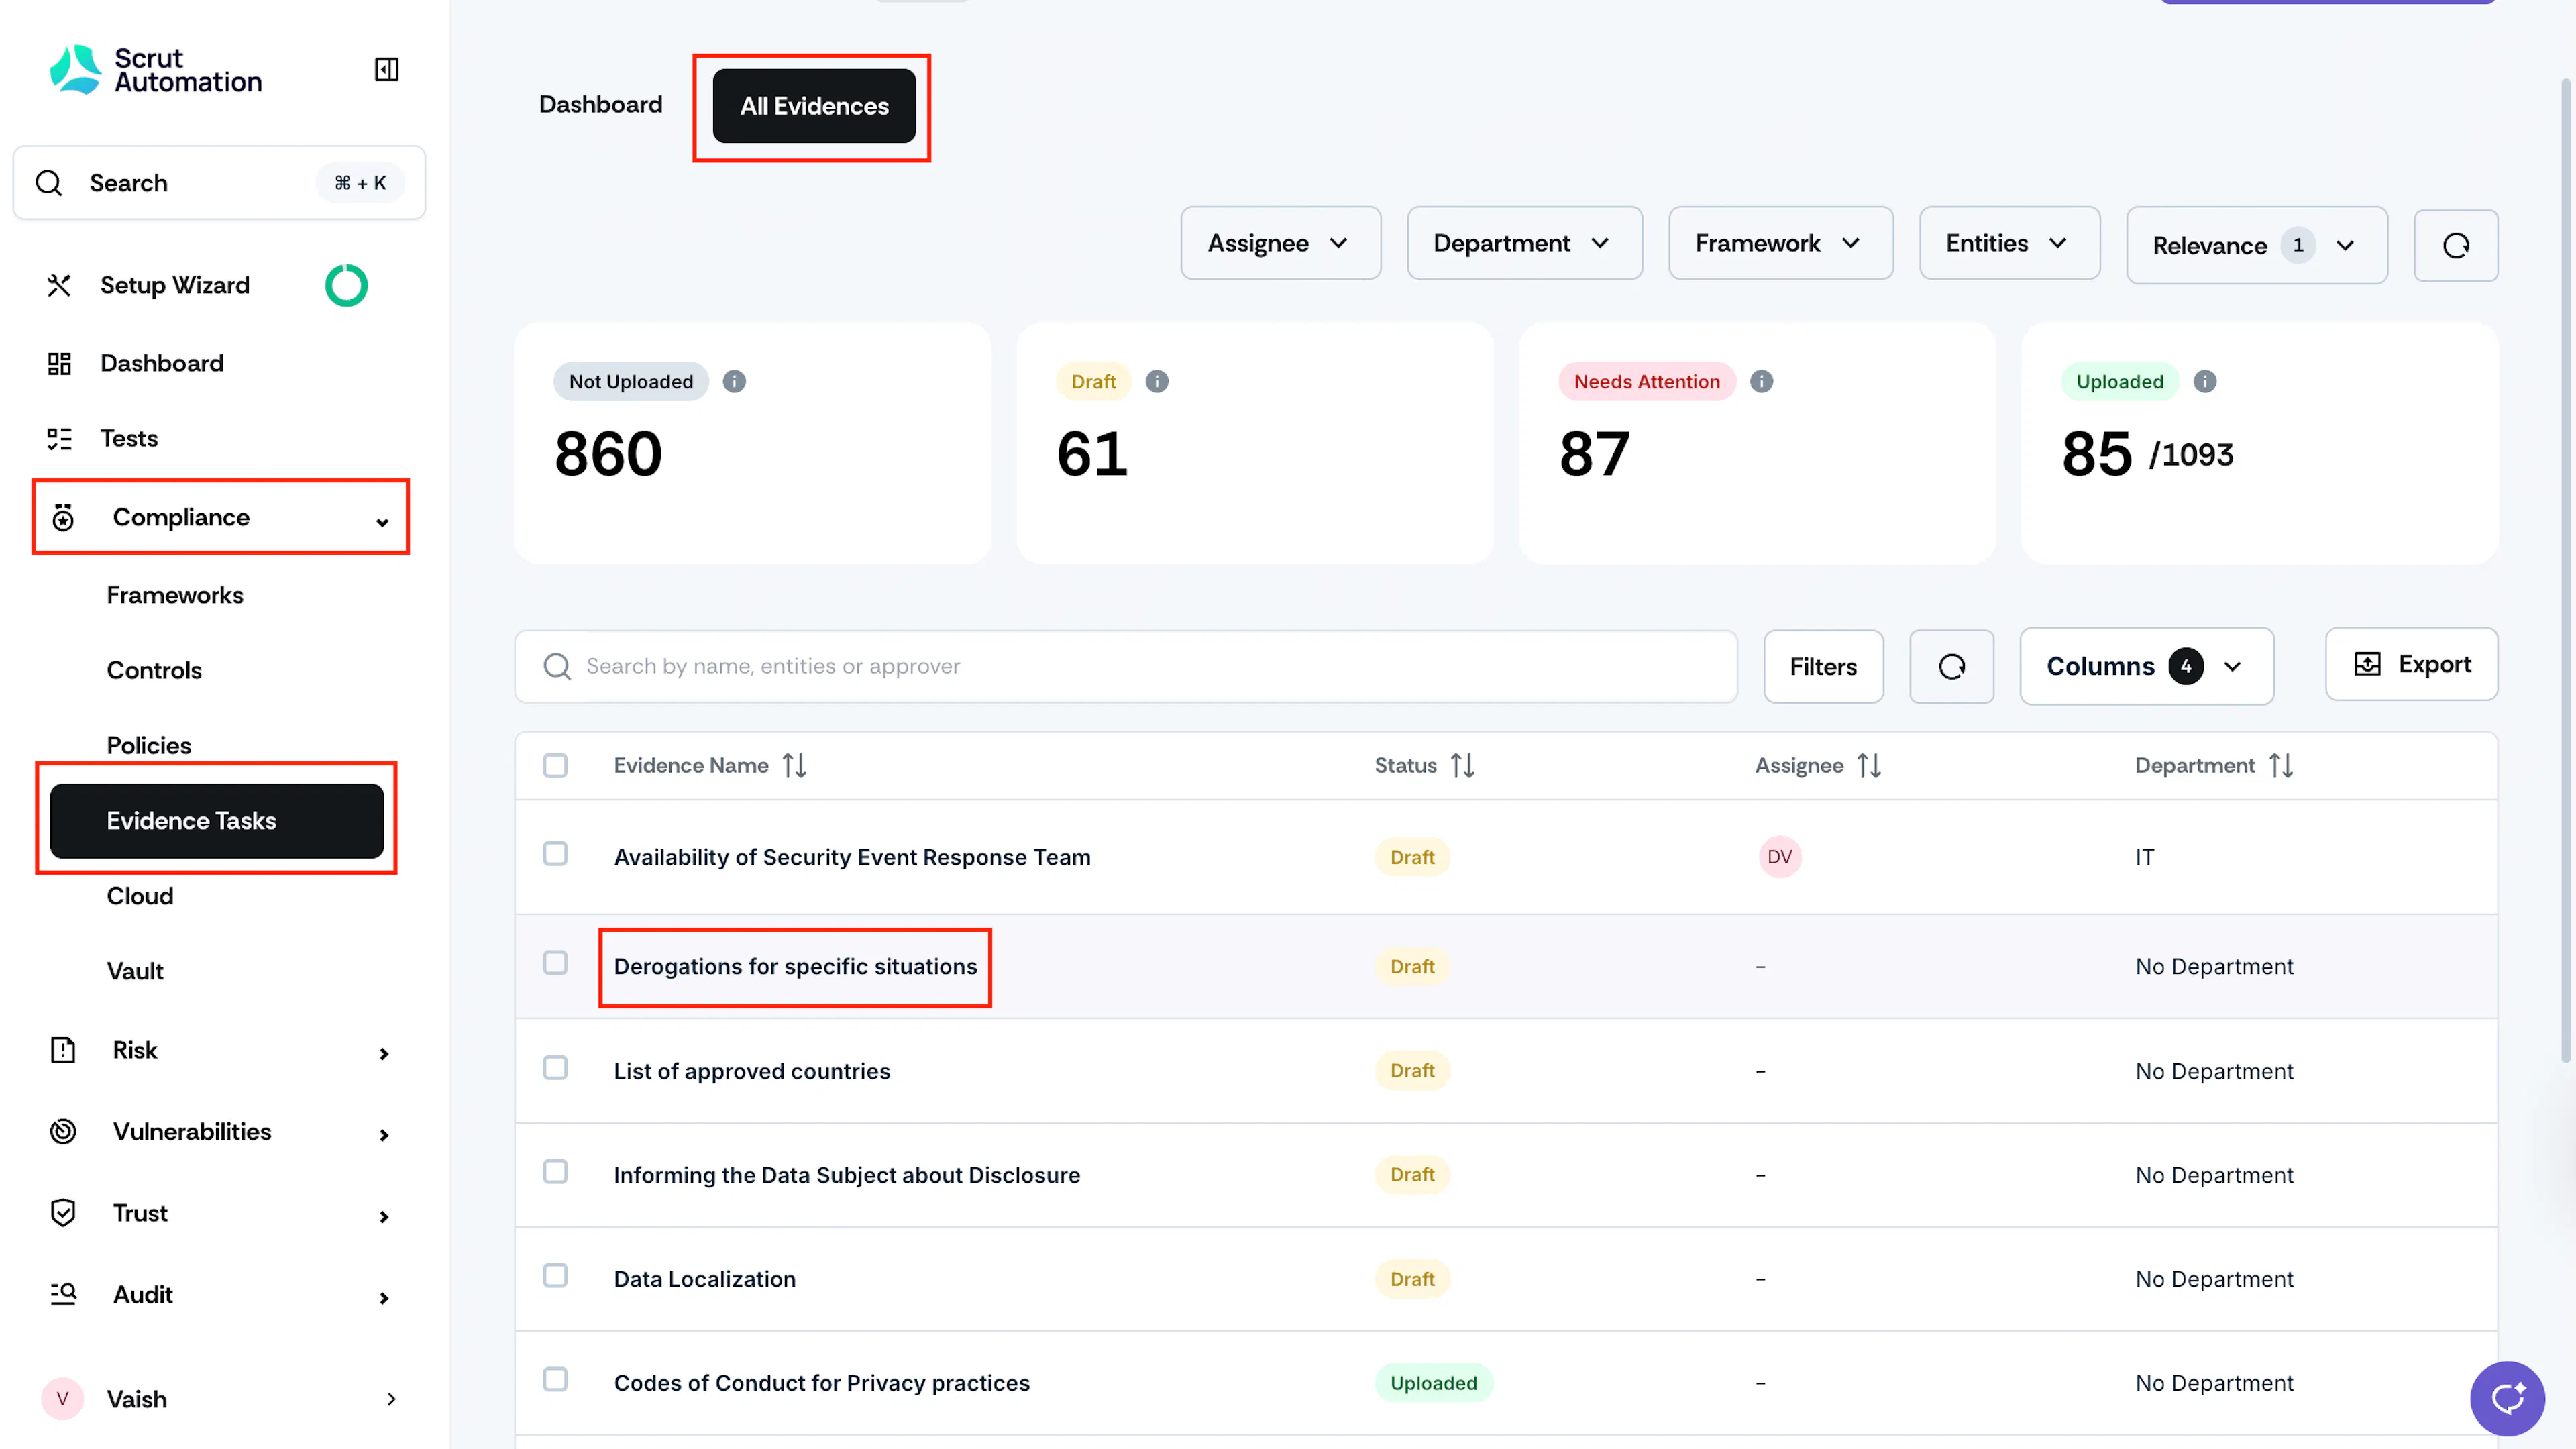
- Sign in to Scrut and navigate to Compliance → Evidence Tasks using the left navigation panel.
- Click the All Evidences tab.
- Select an evidence task that you want to automate using Scrut’s Monitor’s native Scrut application.
Step 2: Configure Scrut Monitor Workflow
-
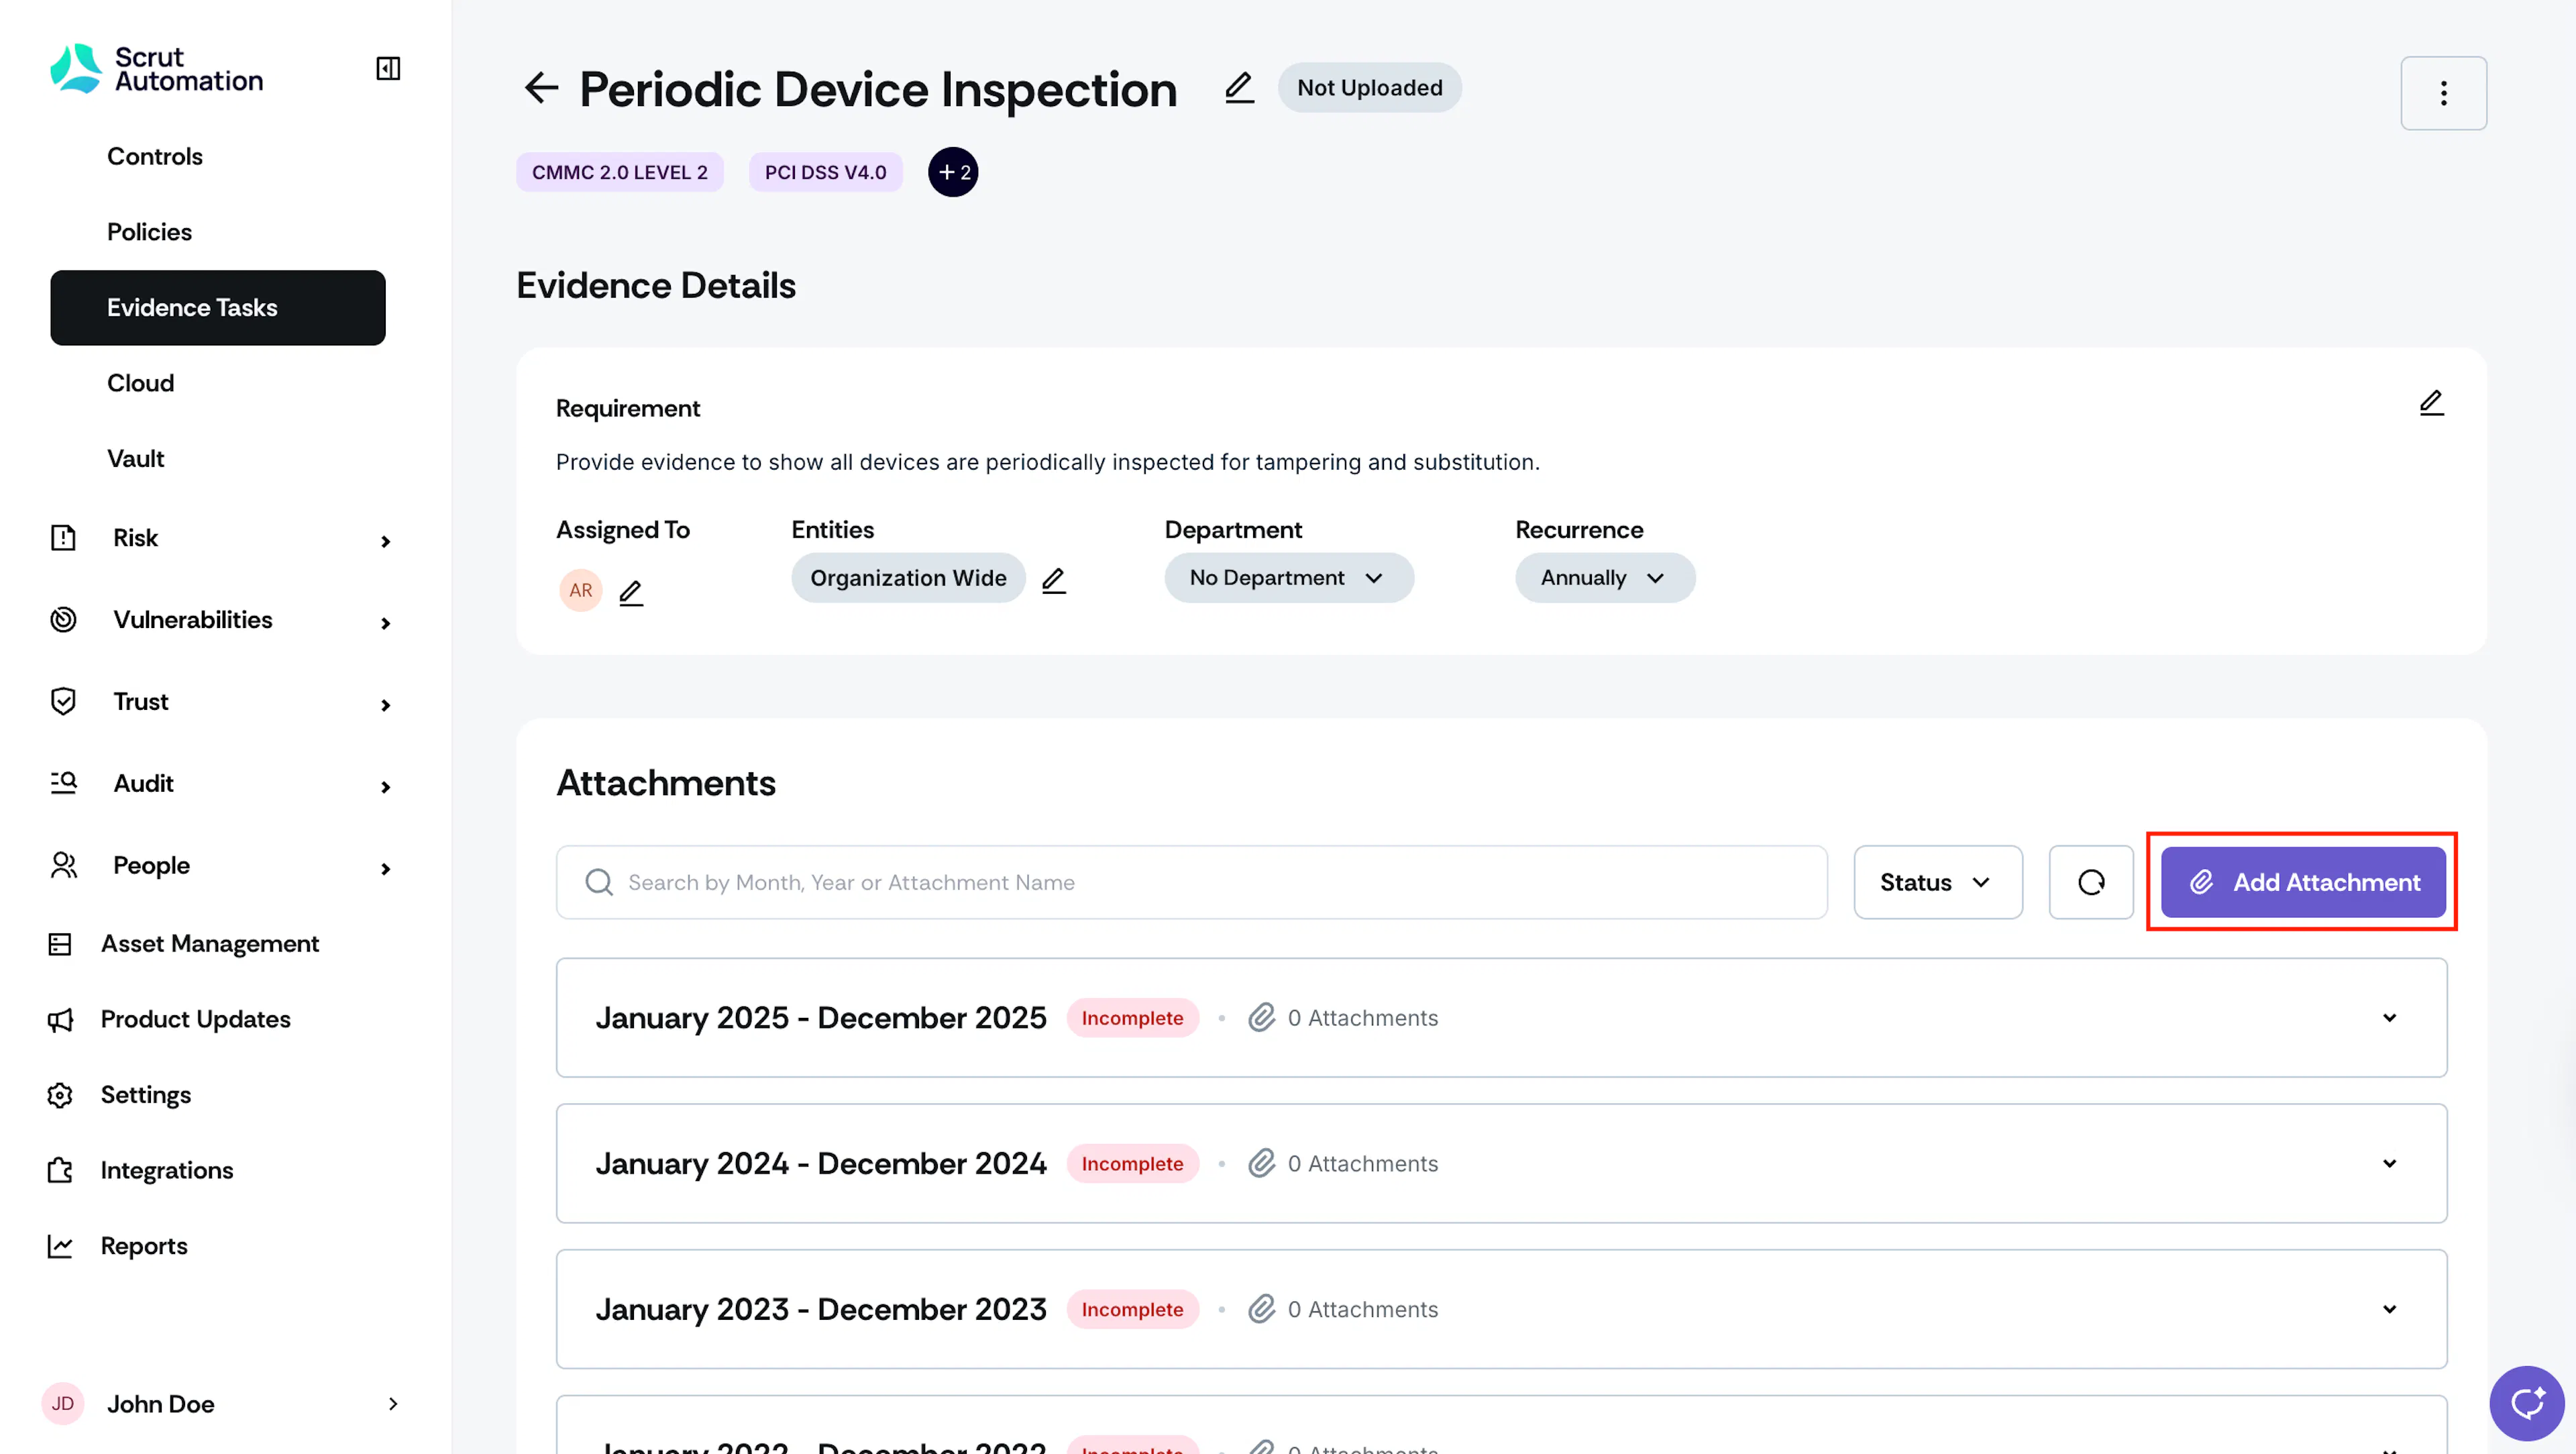
On the Evidence detail page, click the Upload Attachment button.
-
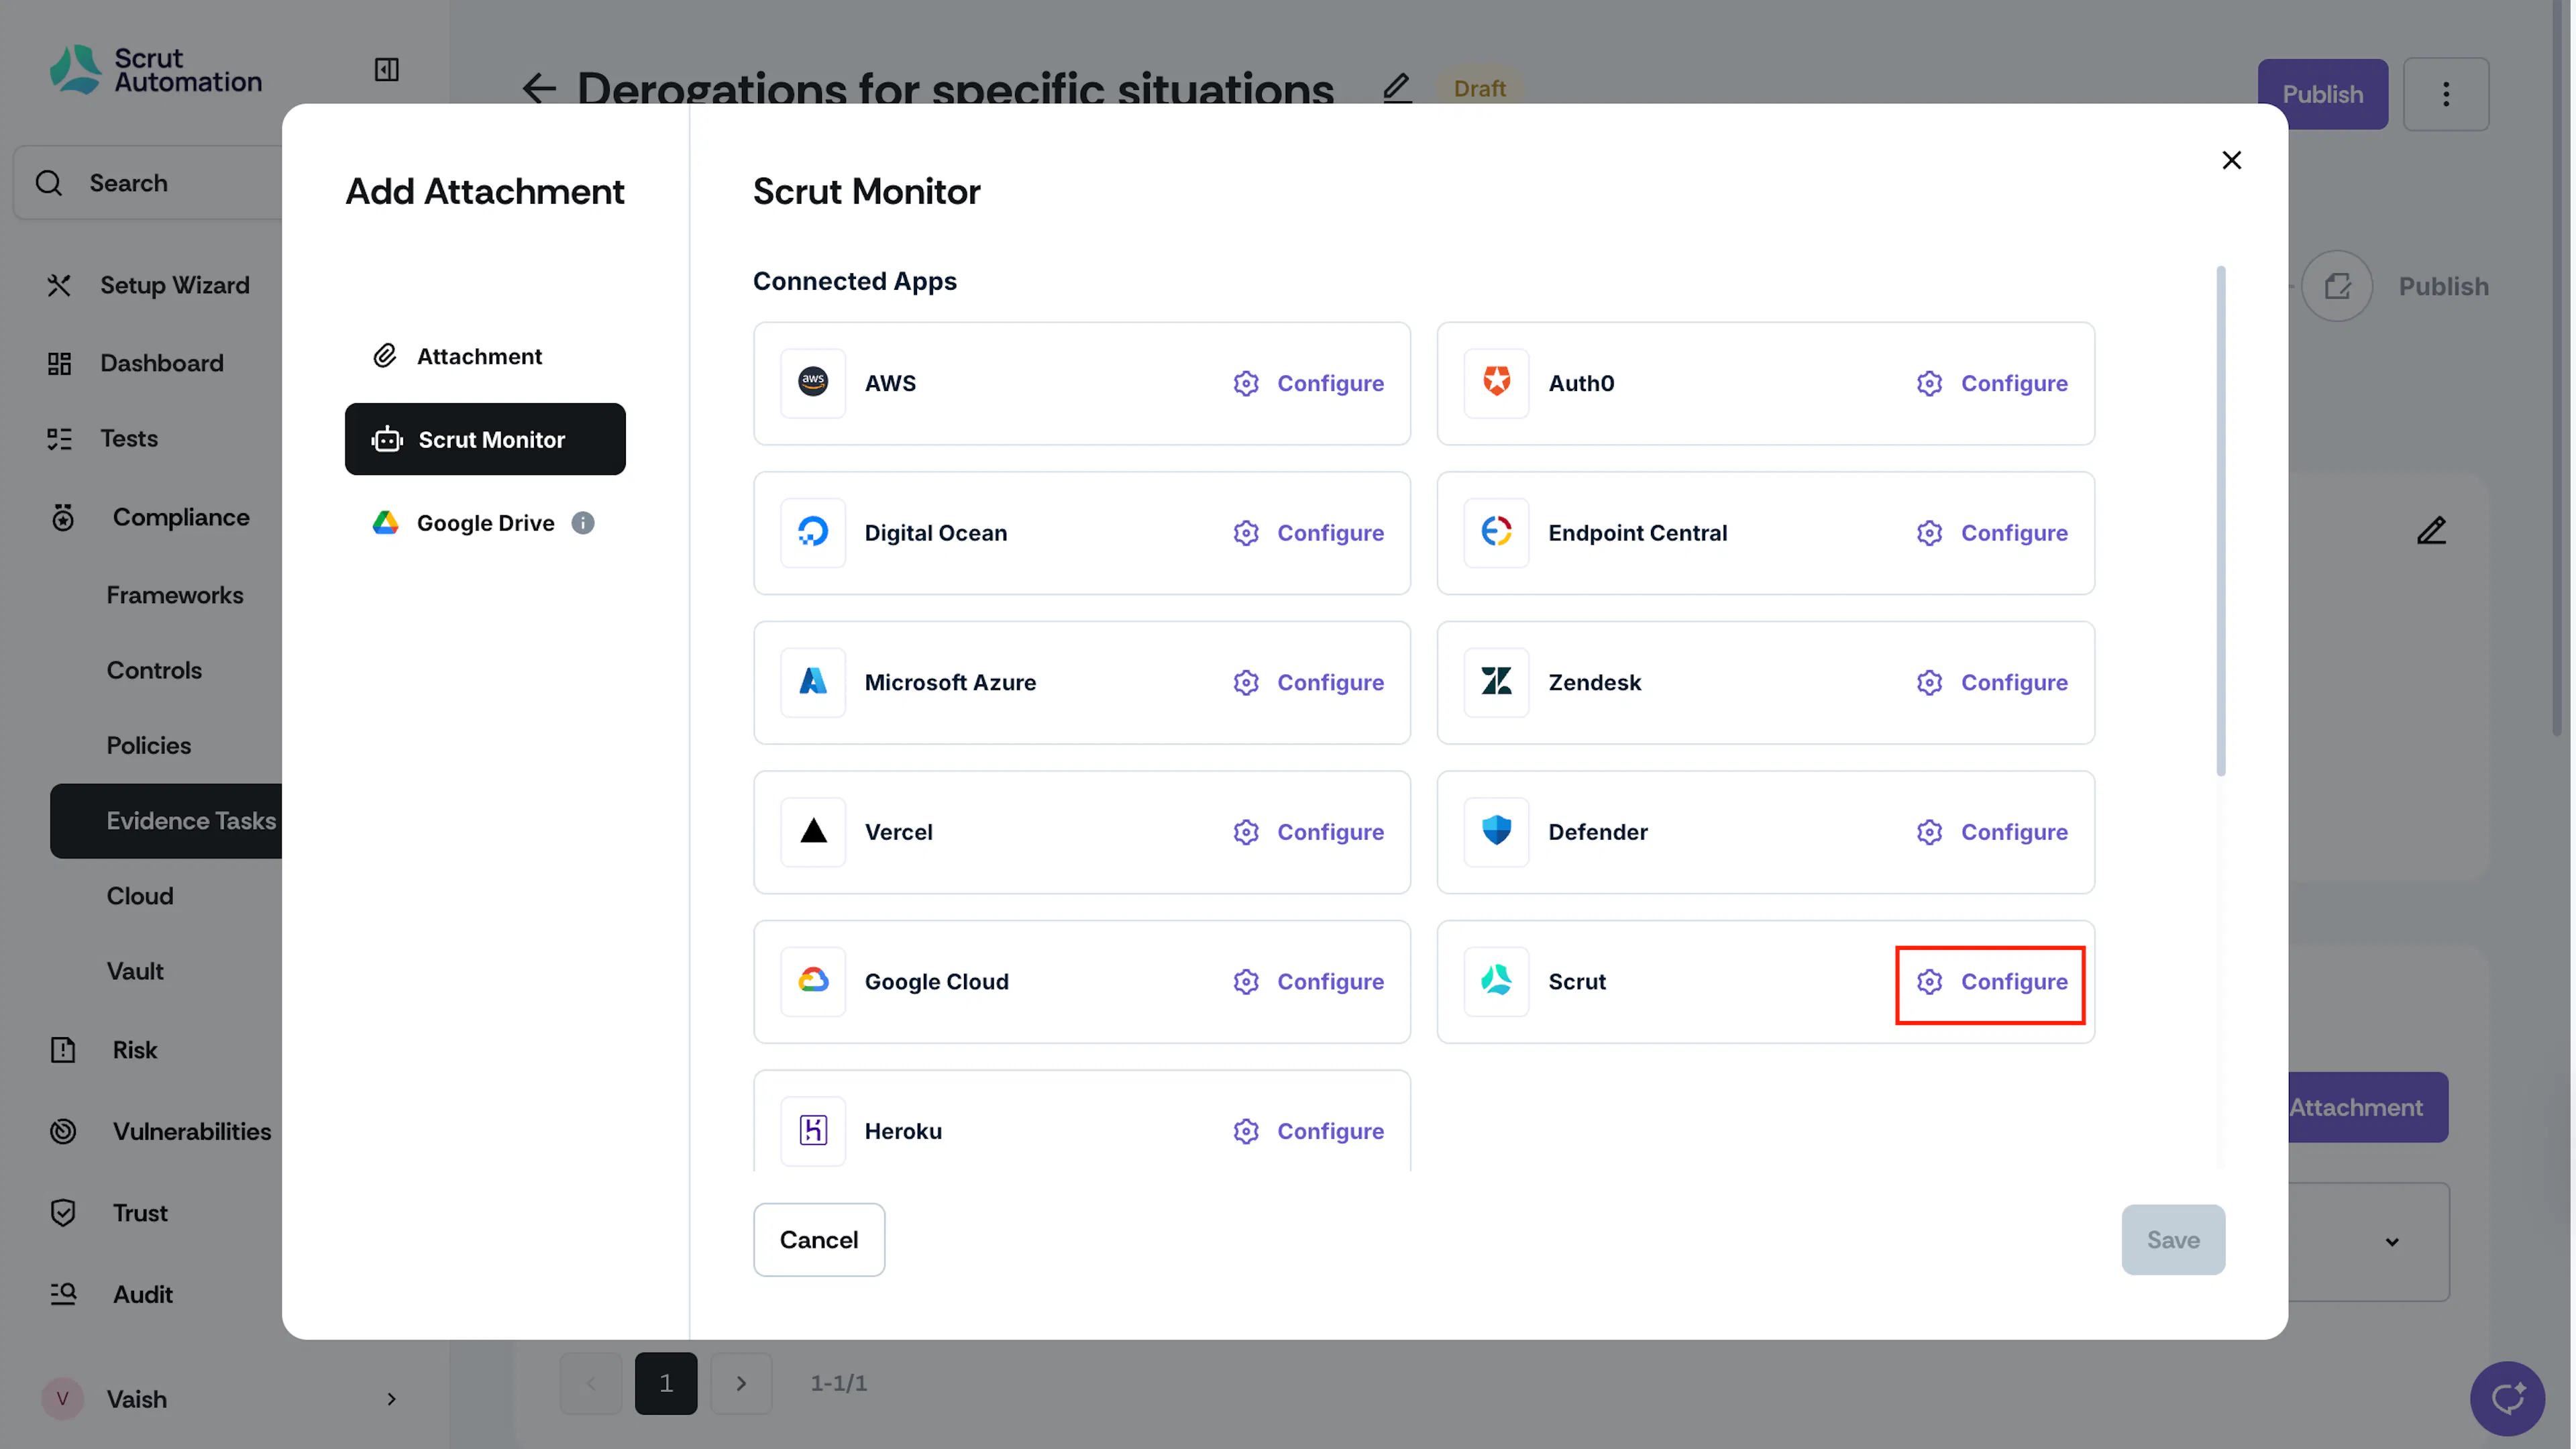
Navigate to the Scrut Monitor tab, and click the Configure button next to the Scrut application.
-
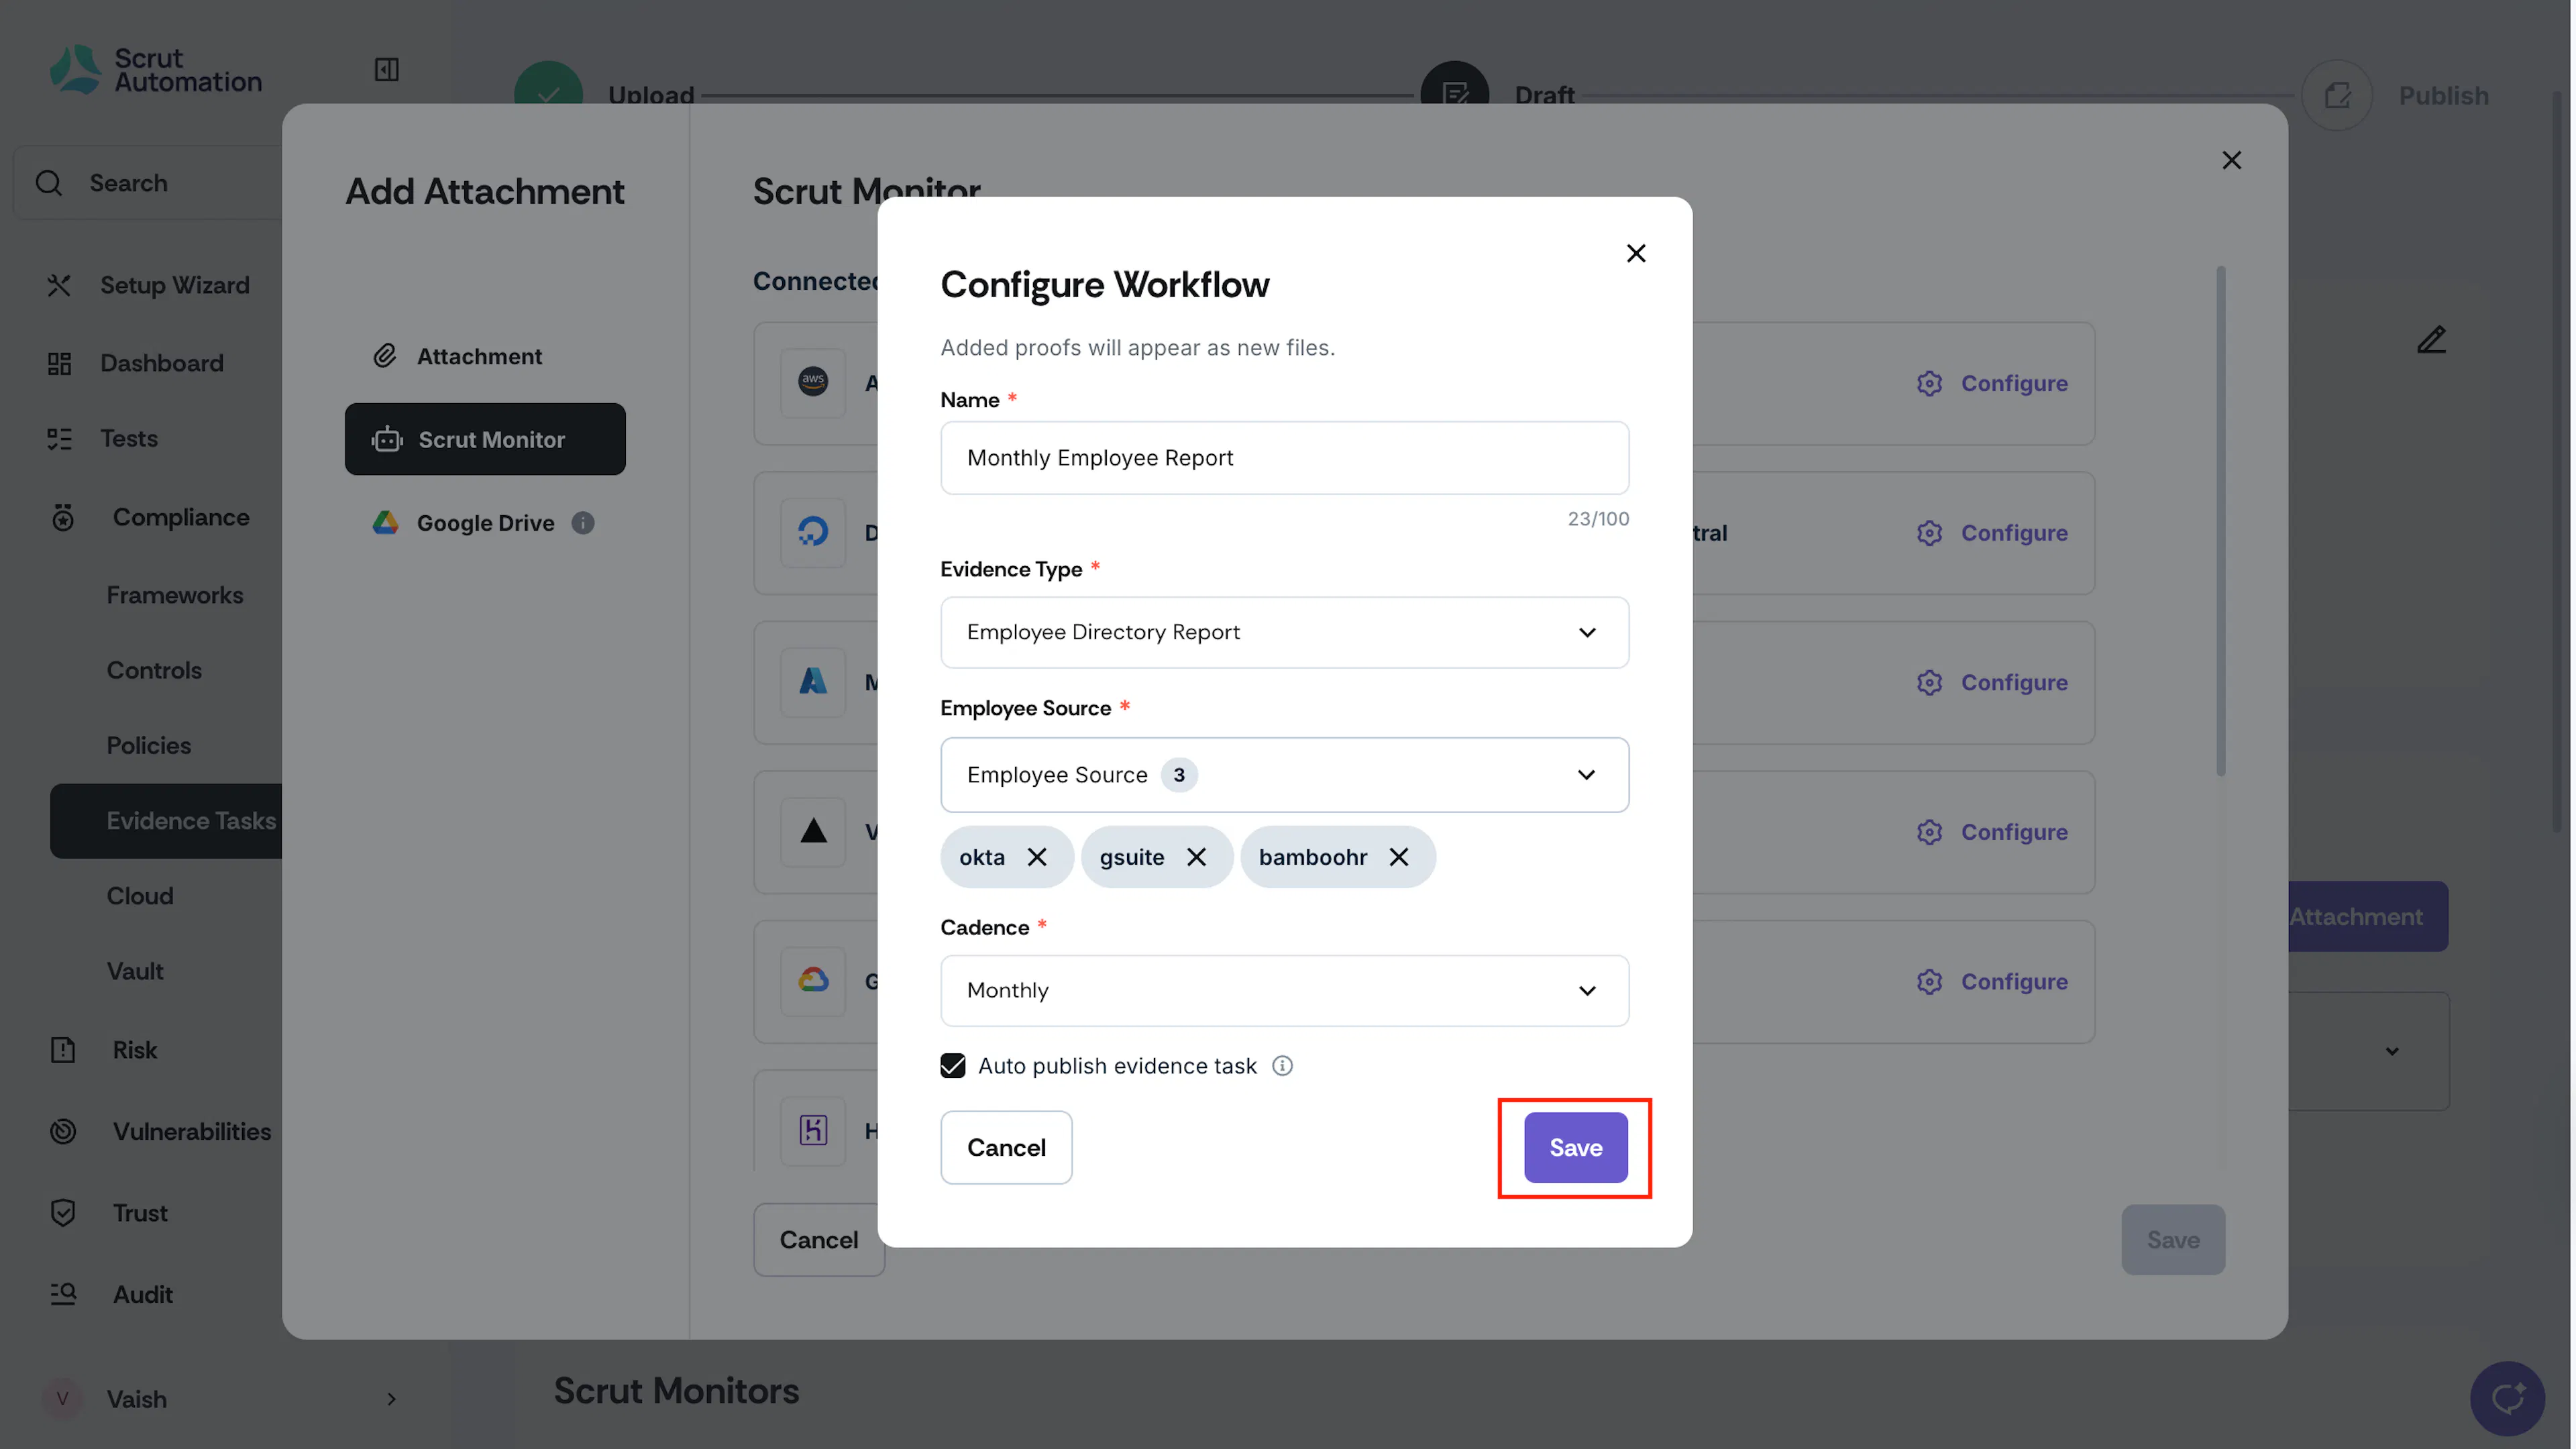
Set up the automated workflow by entering the following details:
- Evidence Name: Enter a descriptive name for the evidence collection workflow.
- Evidence Type: Select from the available internal evidence types listed above.
- Cadence: Select how often you want the Scrut Monitor to generate and attach the report: Once, daily, weekly, monthly, or annually
-
Select the Auto-publish evidence task checkbox if you want to auto-publish the evidence task.
Note: If left unselected, the task status will change to draft whenever the Scrut Monitor attaches new evidence, and you’ll need to publish it manually. Leave it unchecked if you want to review the evidence before publishing.
-
Click Save.