

Configure Clickwrap NDA
Learn how to customize and enable a clickwrap NDA for users accessing sensitive information on your Trust Portal.
Who can use this feature
- Supported on Foundation, Growth, and Scale plans
Scrut offers three different NDA (non-disclosure agreement) options for users accessing sensitive information on your Trust Portal:
- Clickwrap NDA: Users sign an NDA directly within Scrut before accessing your Trust Portal.
- No NDA: Grant access without requiring any NDA signature
- NDA signed outside of Scrut: Acknowledge that users have already signed an NDA through external channels.
In this article, we walk you through customizing a clickwrap NDA template in Scrut.
What is a Clickwrap NDA?
Clickwrap NDA is Scrut's built-in, click-through Non-Disclosure Agreement that allows you to protect confidential information in your Trust Portal. When enabled, visitors must accept the NDA terms directly within your Trust Portal before they can access sensitive documents and reports. This streamlines your workflow by eliminating the need to manage NDAs outside Scrut.
How Clickwrap NDA works
When you configure a Clickwrap NDA for your Trust Portal:
-
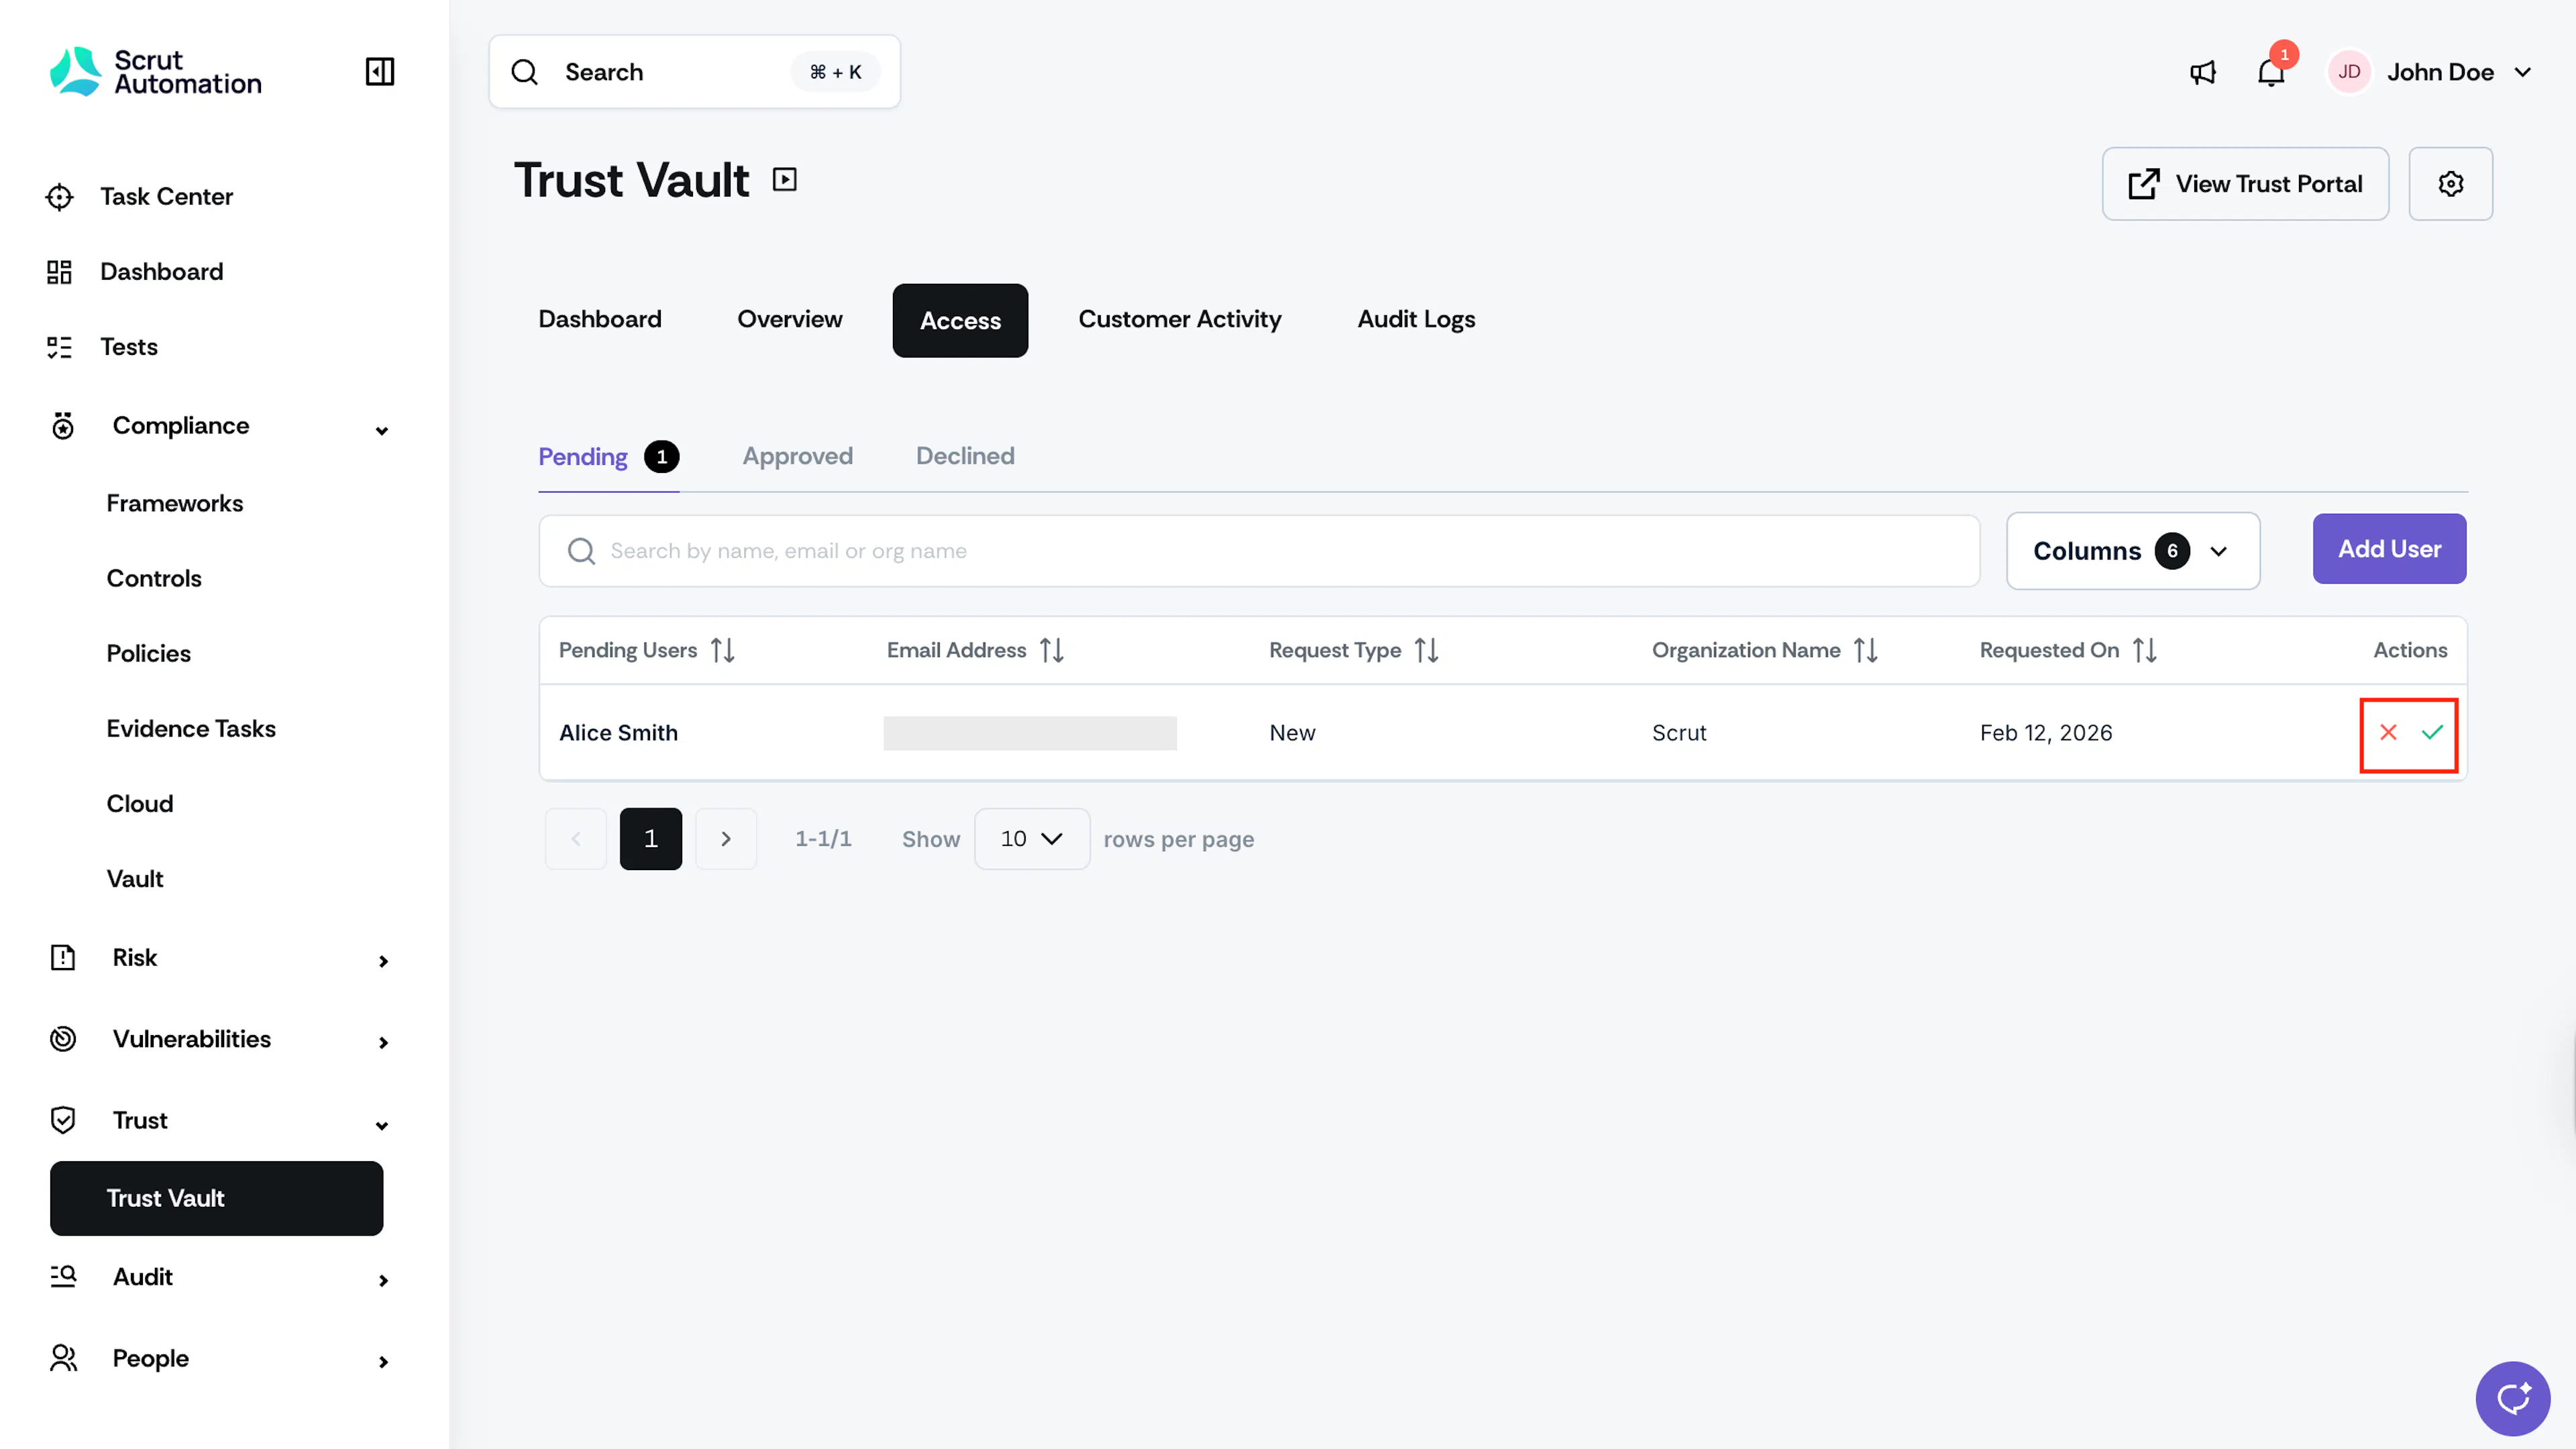
A user requests access to your Trust Portal.
-
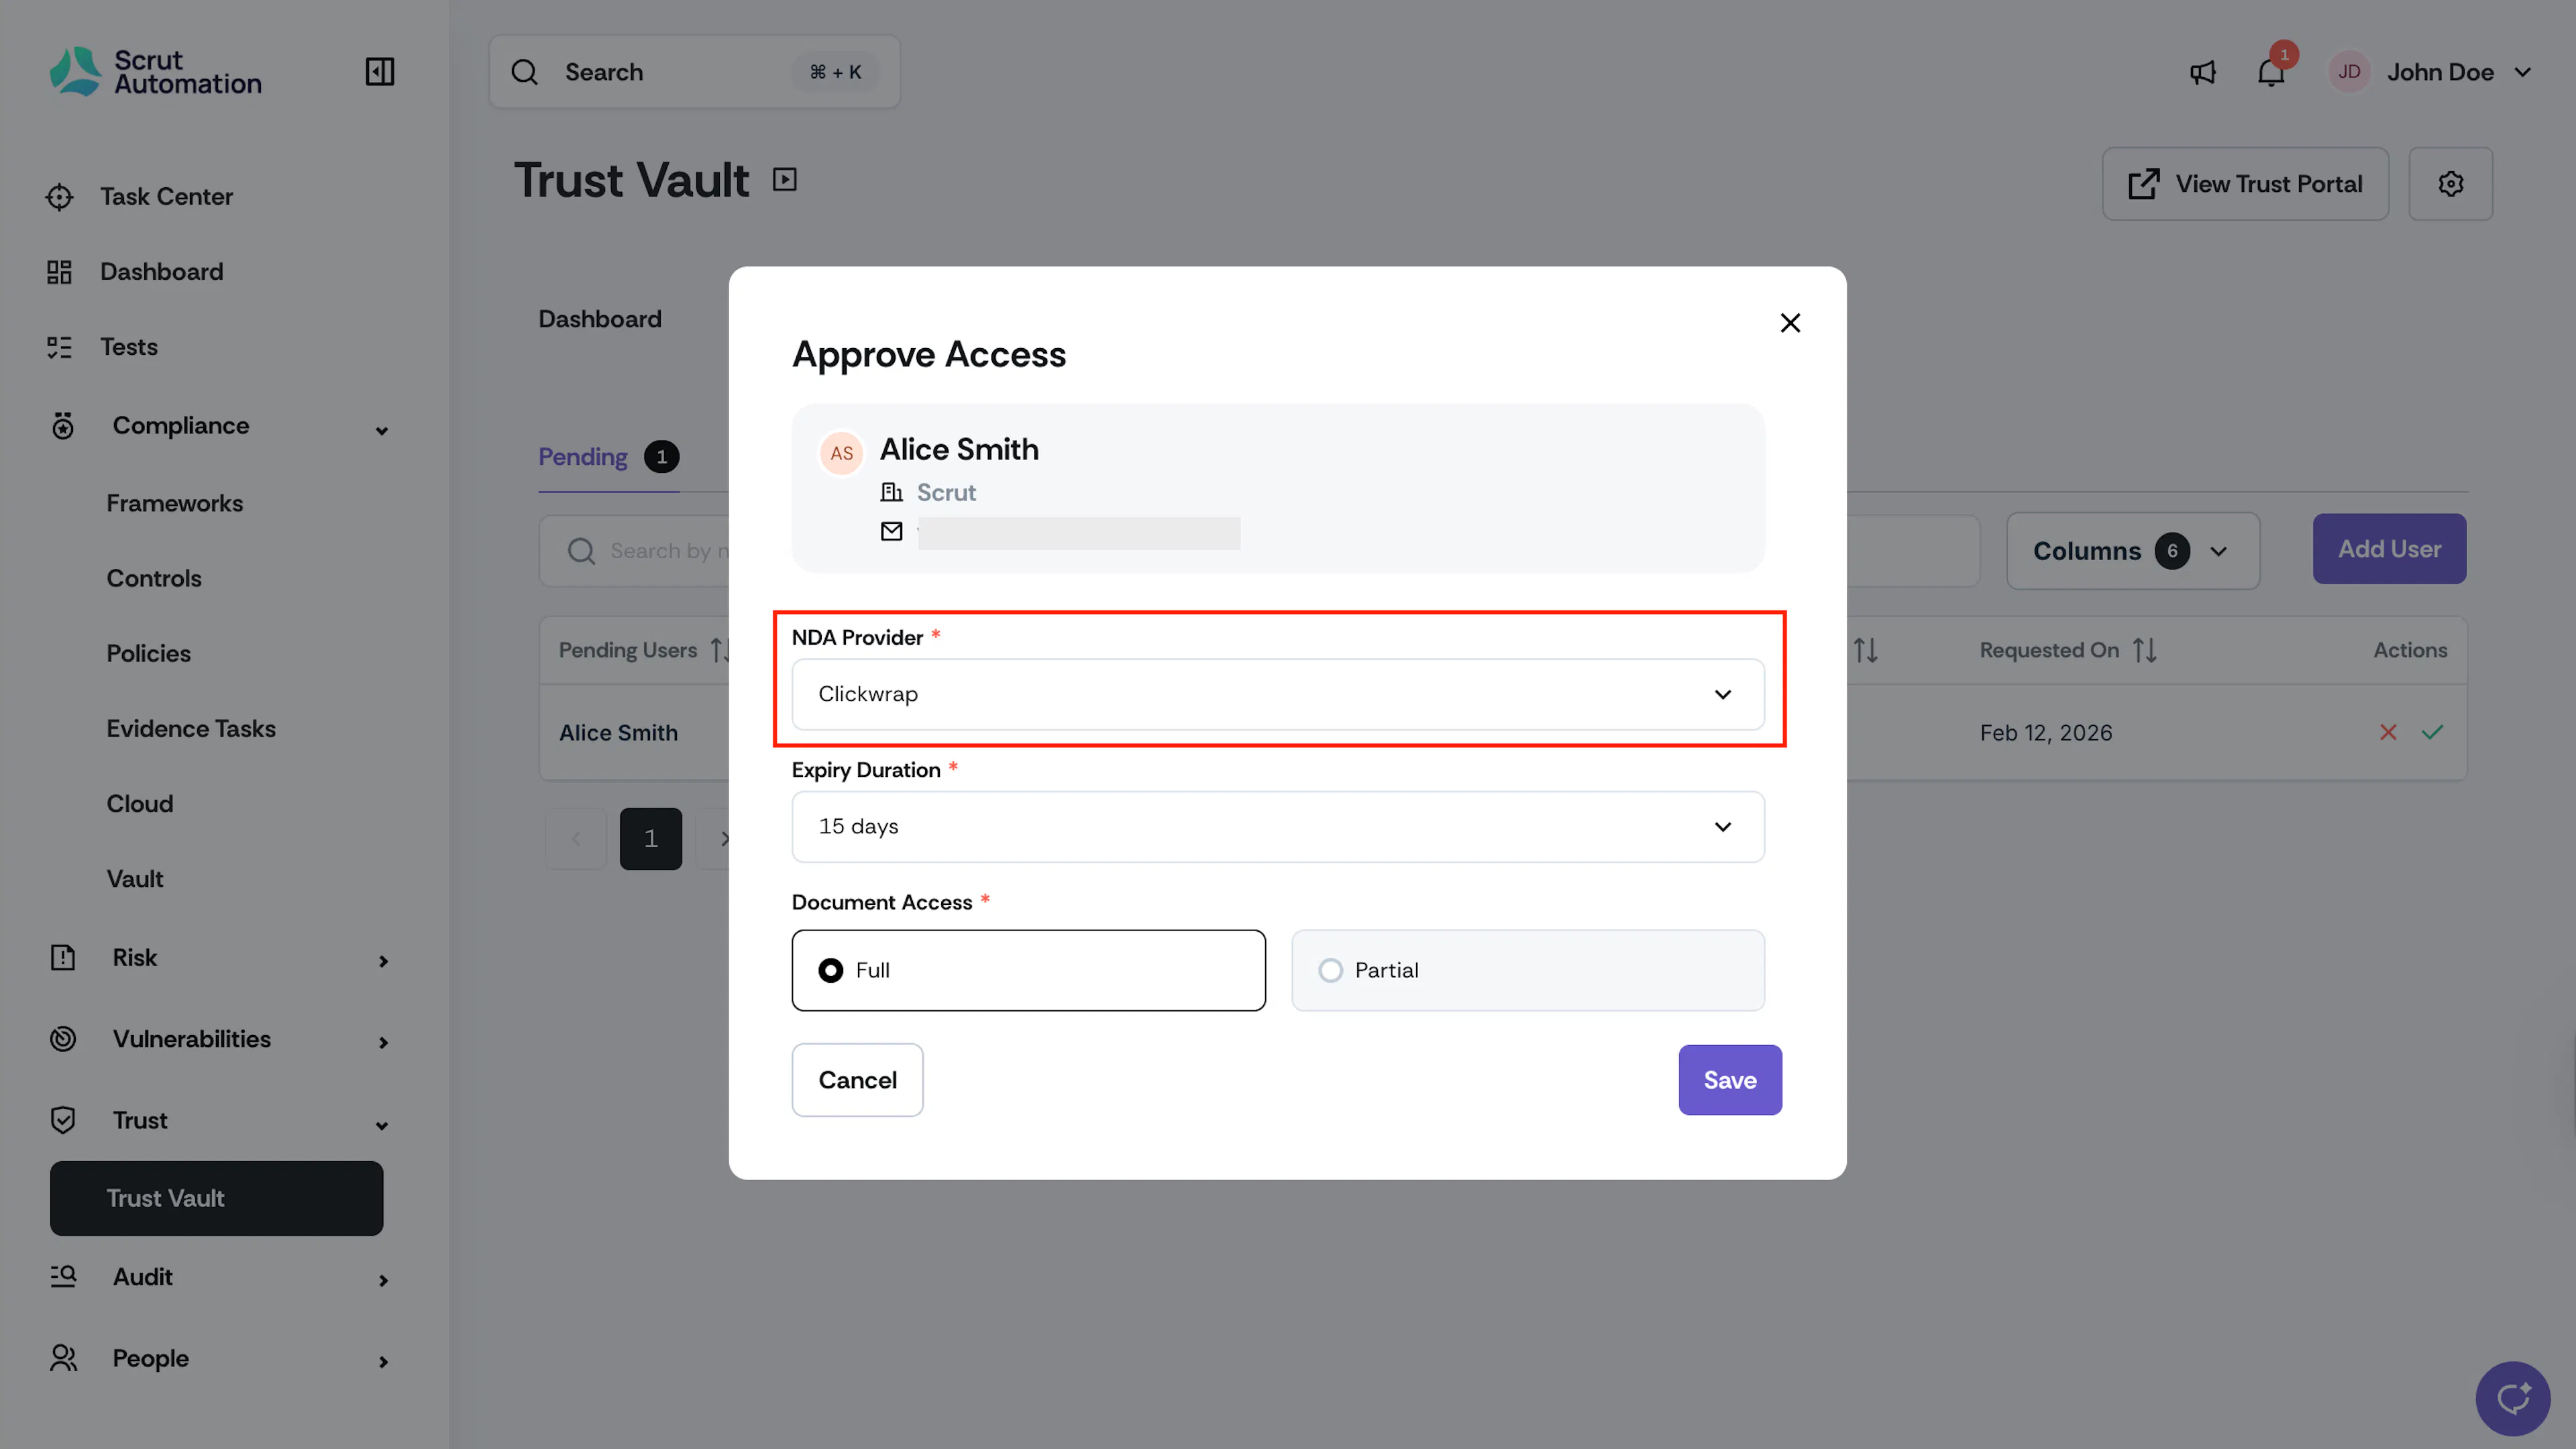
You approve their request and select "Clickwrap" as the NDA Provider.
-
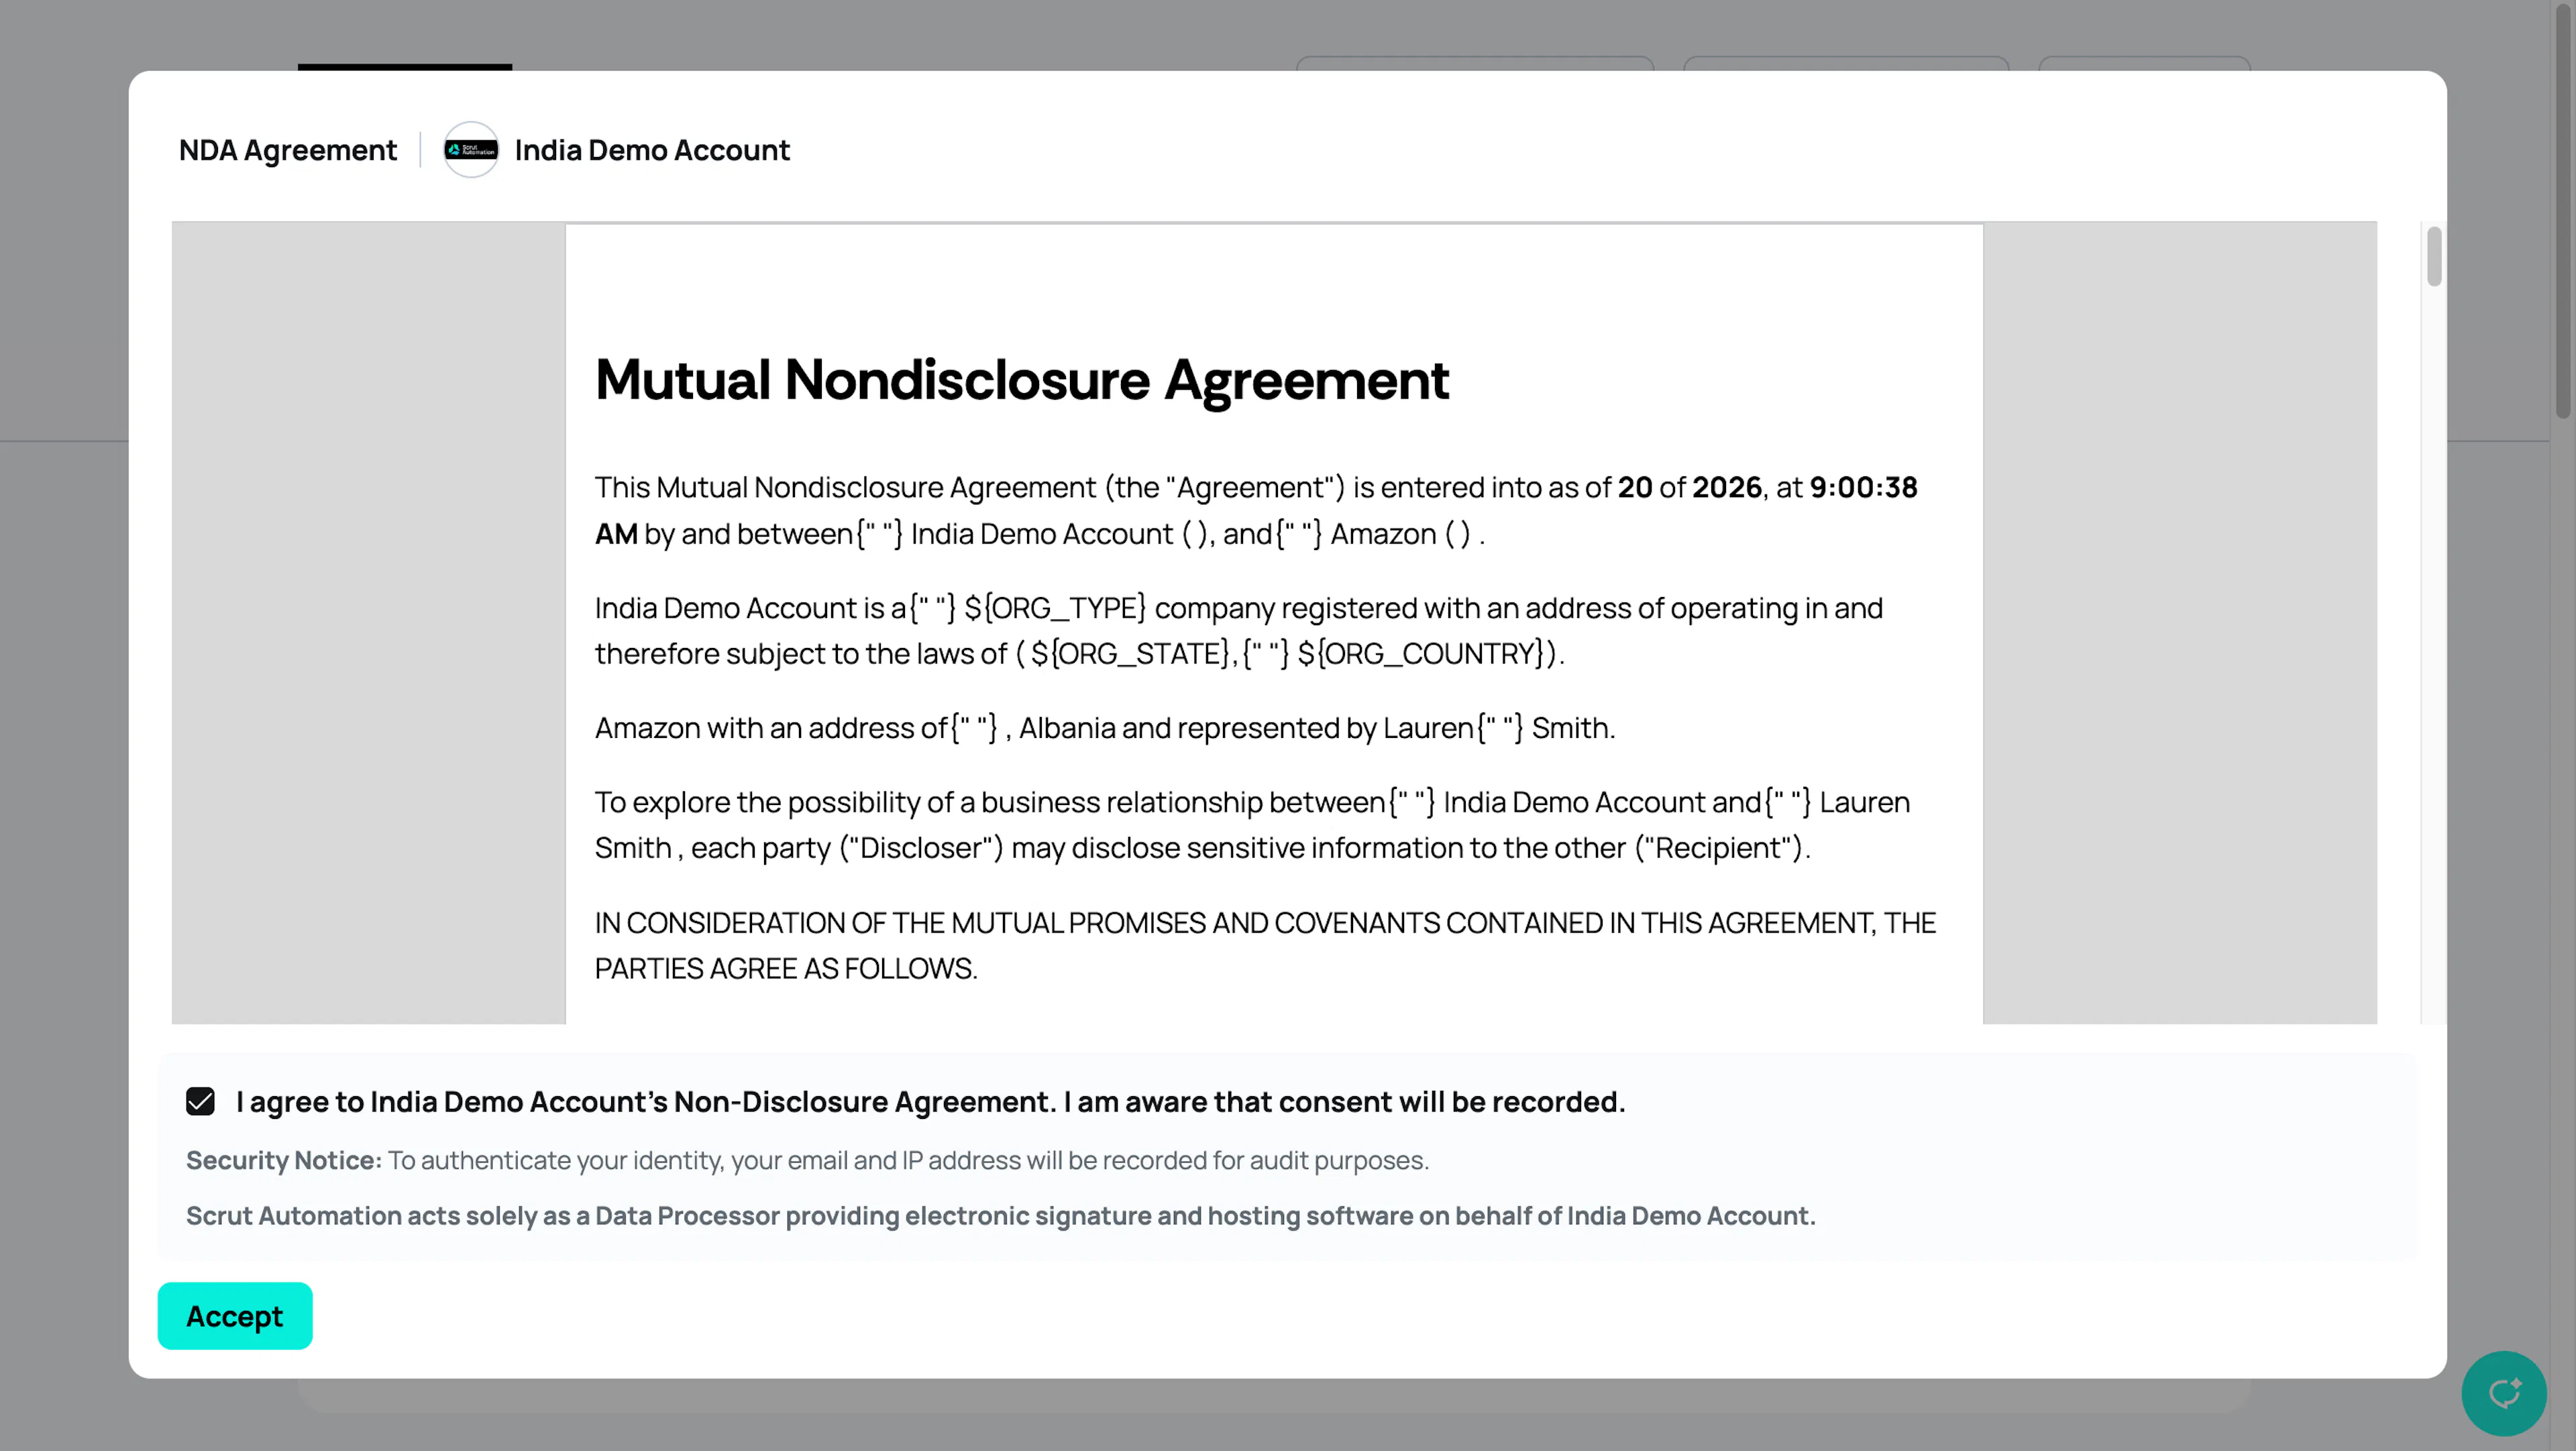
The next time the user visits your Trust Portal, they will see the NDA terms.
-
The user must accept the agreement before proceeding.
-
Once accepted, the user gains access to your Trust Portal content.
-
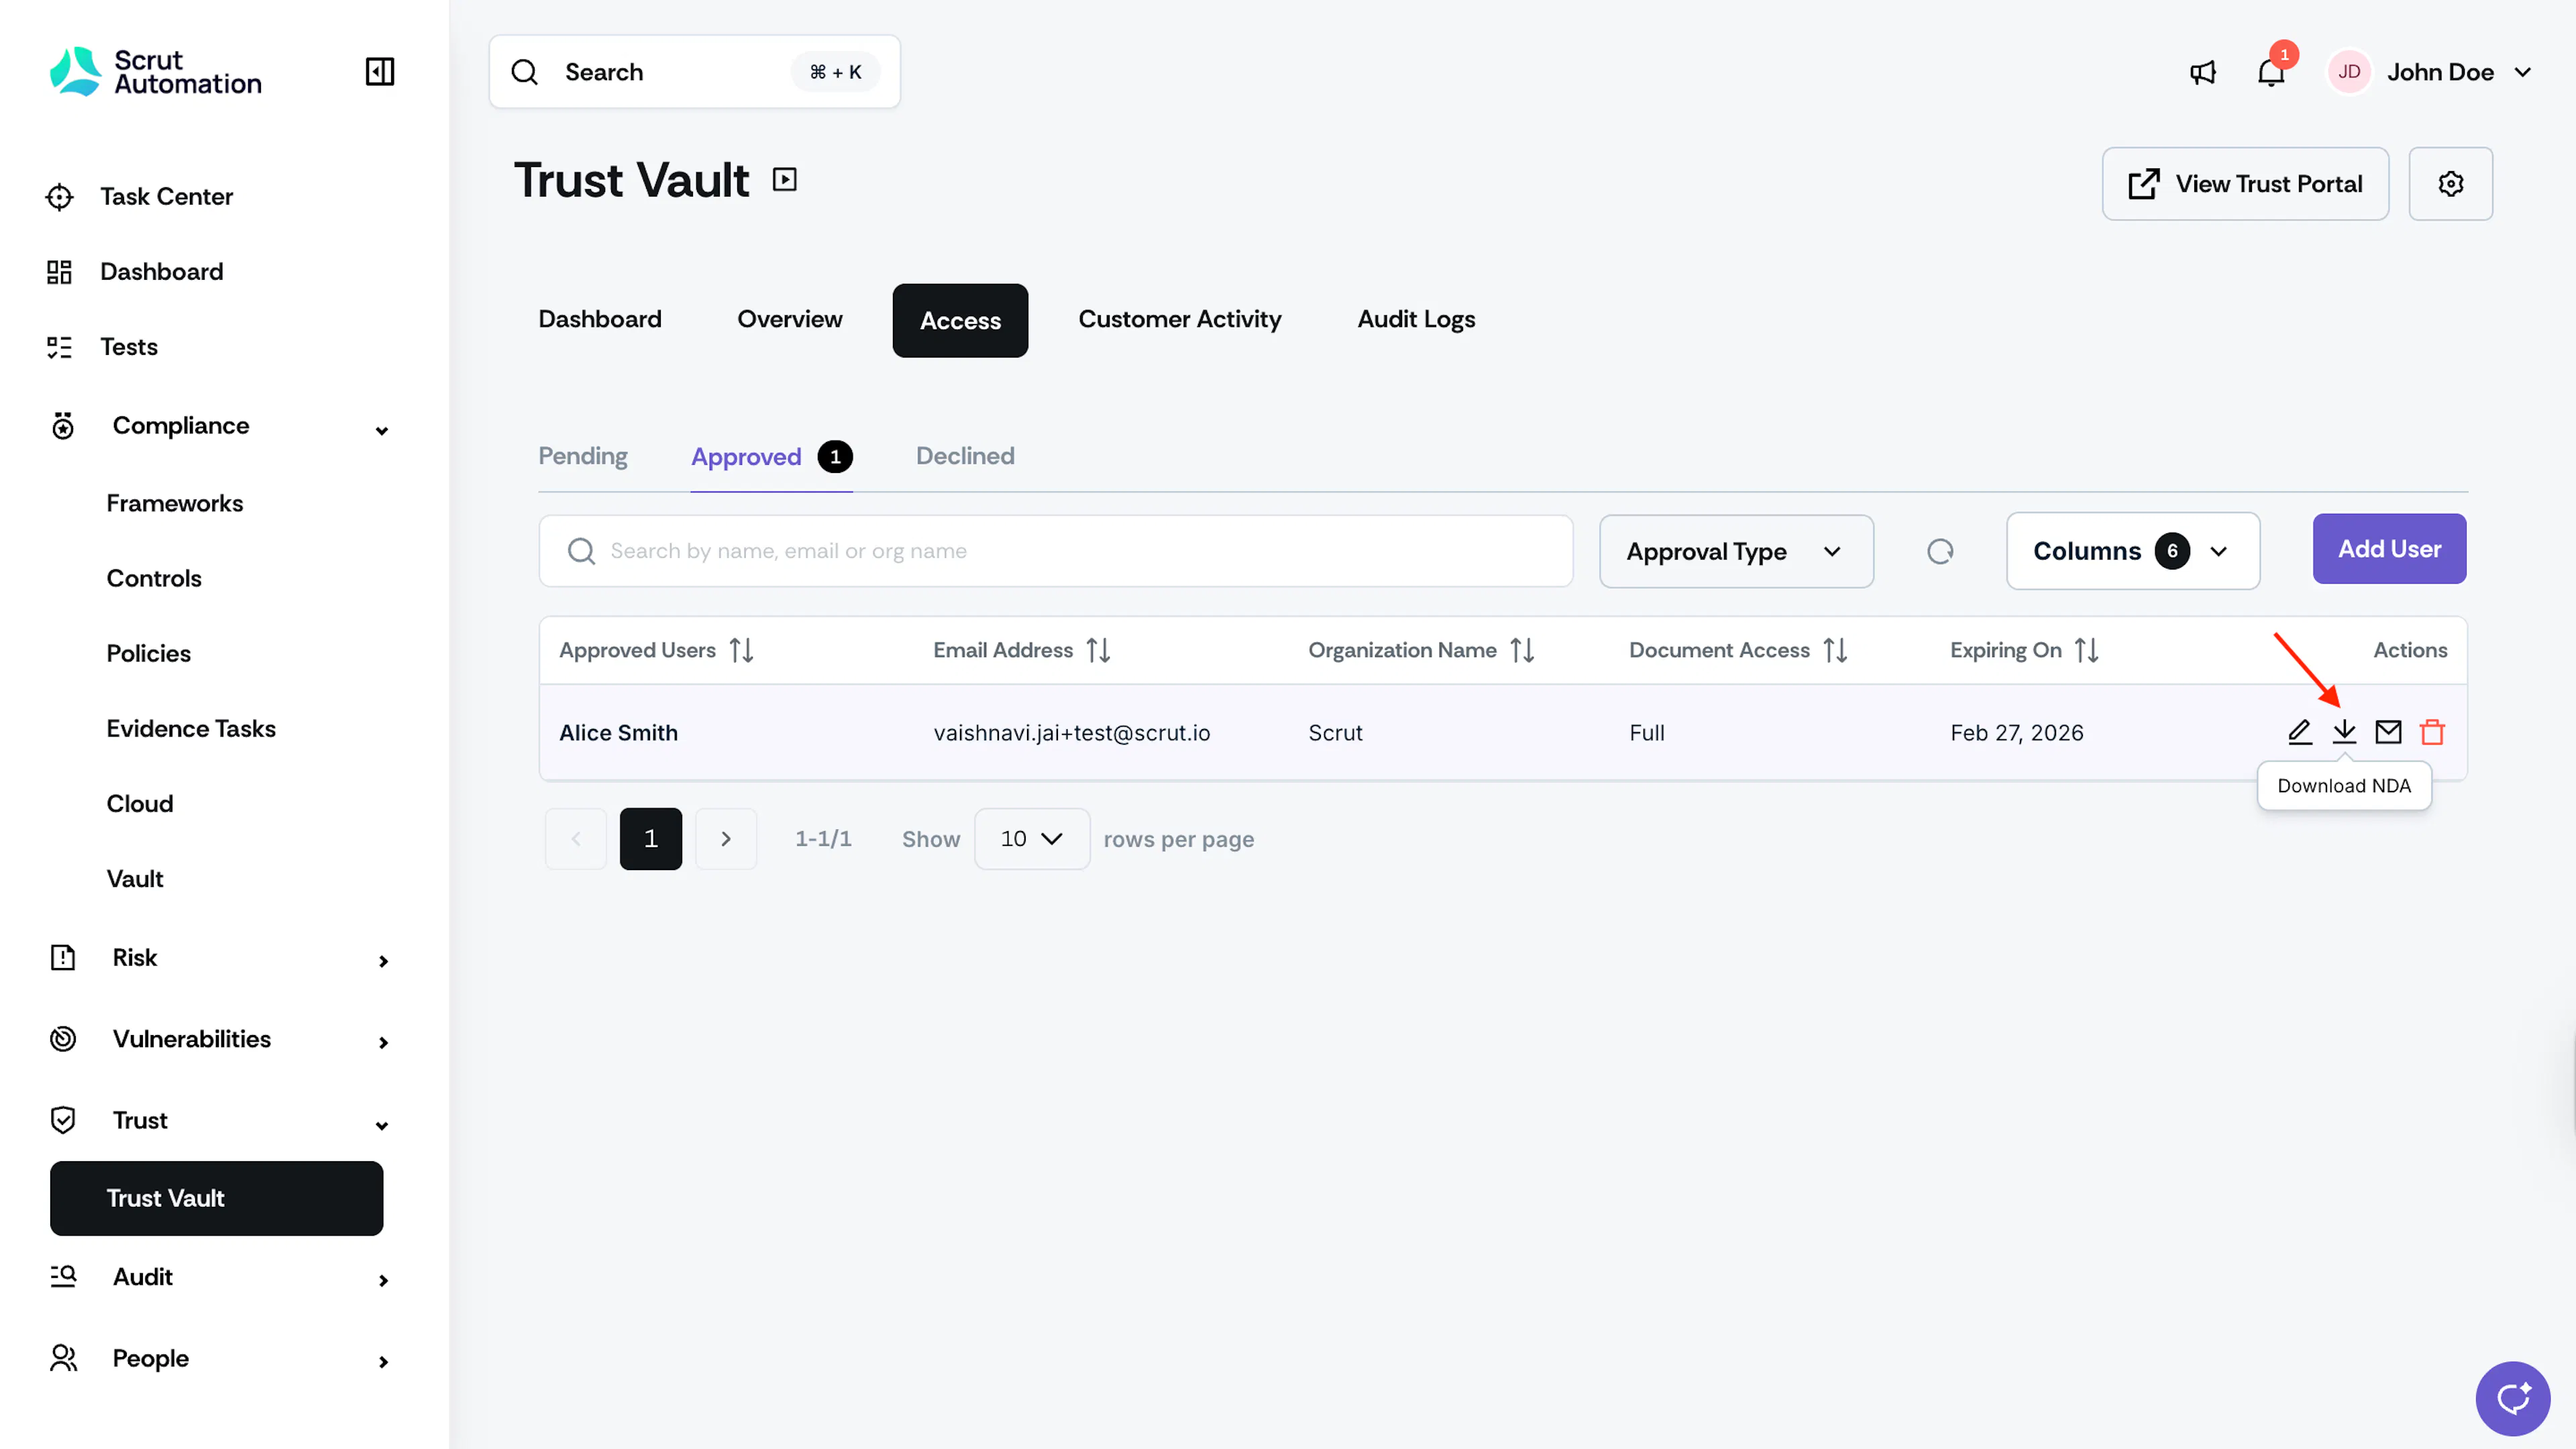
The signed NDA is automatically recorded and stored in Scrut. You can download it from the Access → Approved tab in Trust Vault.
This creates a legally binding agreement without requiring external document management or manual signature collection.
Customer-Branded NDA Title and Checkbox
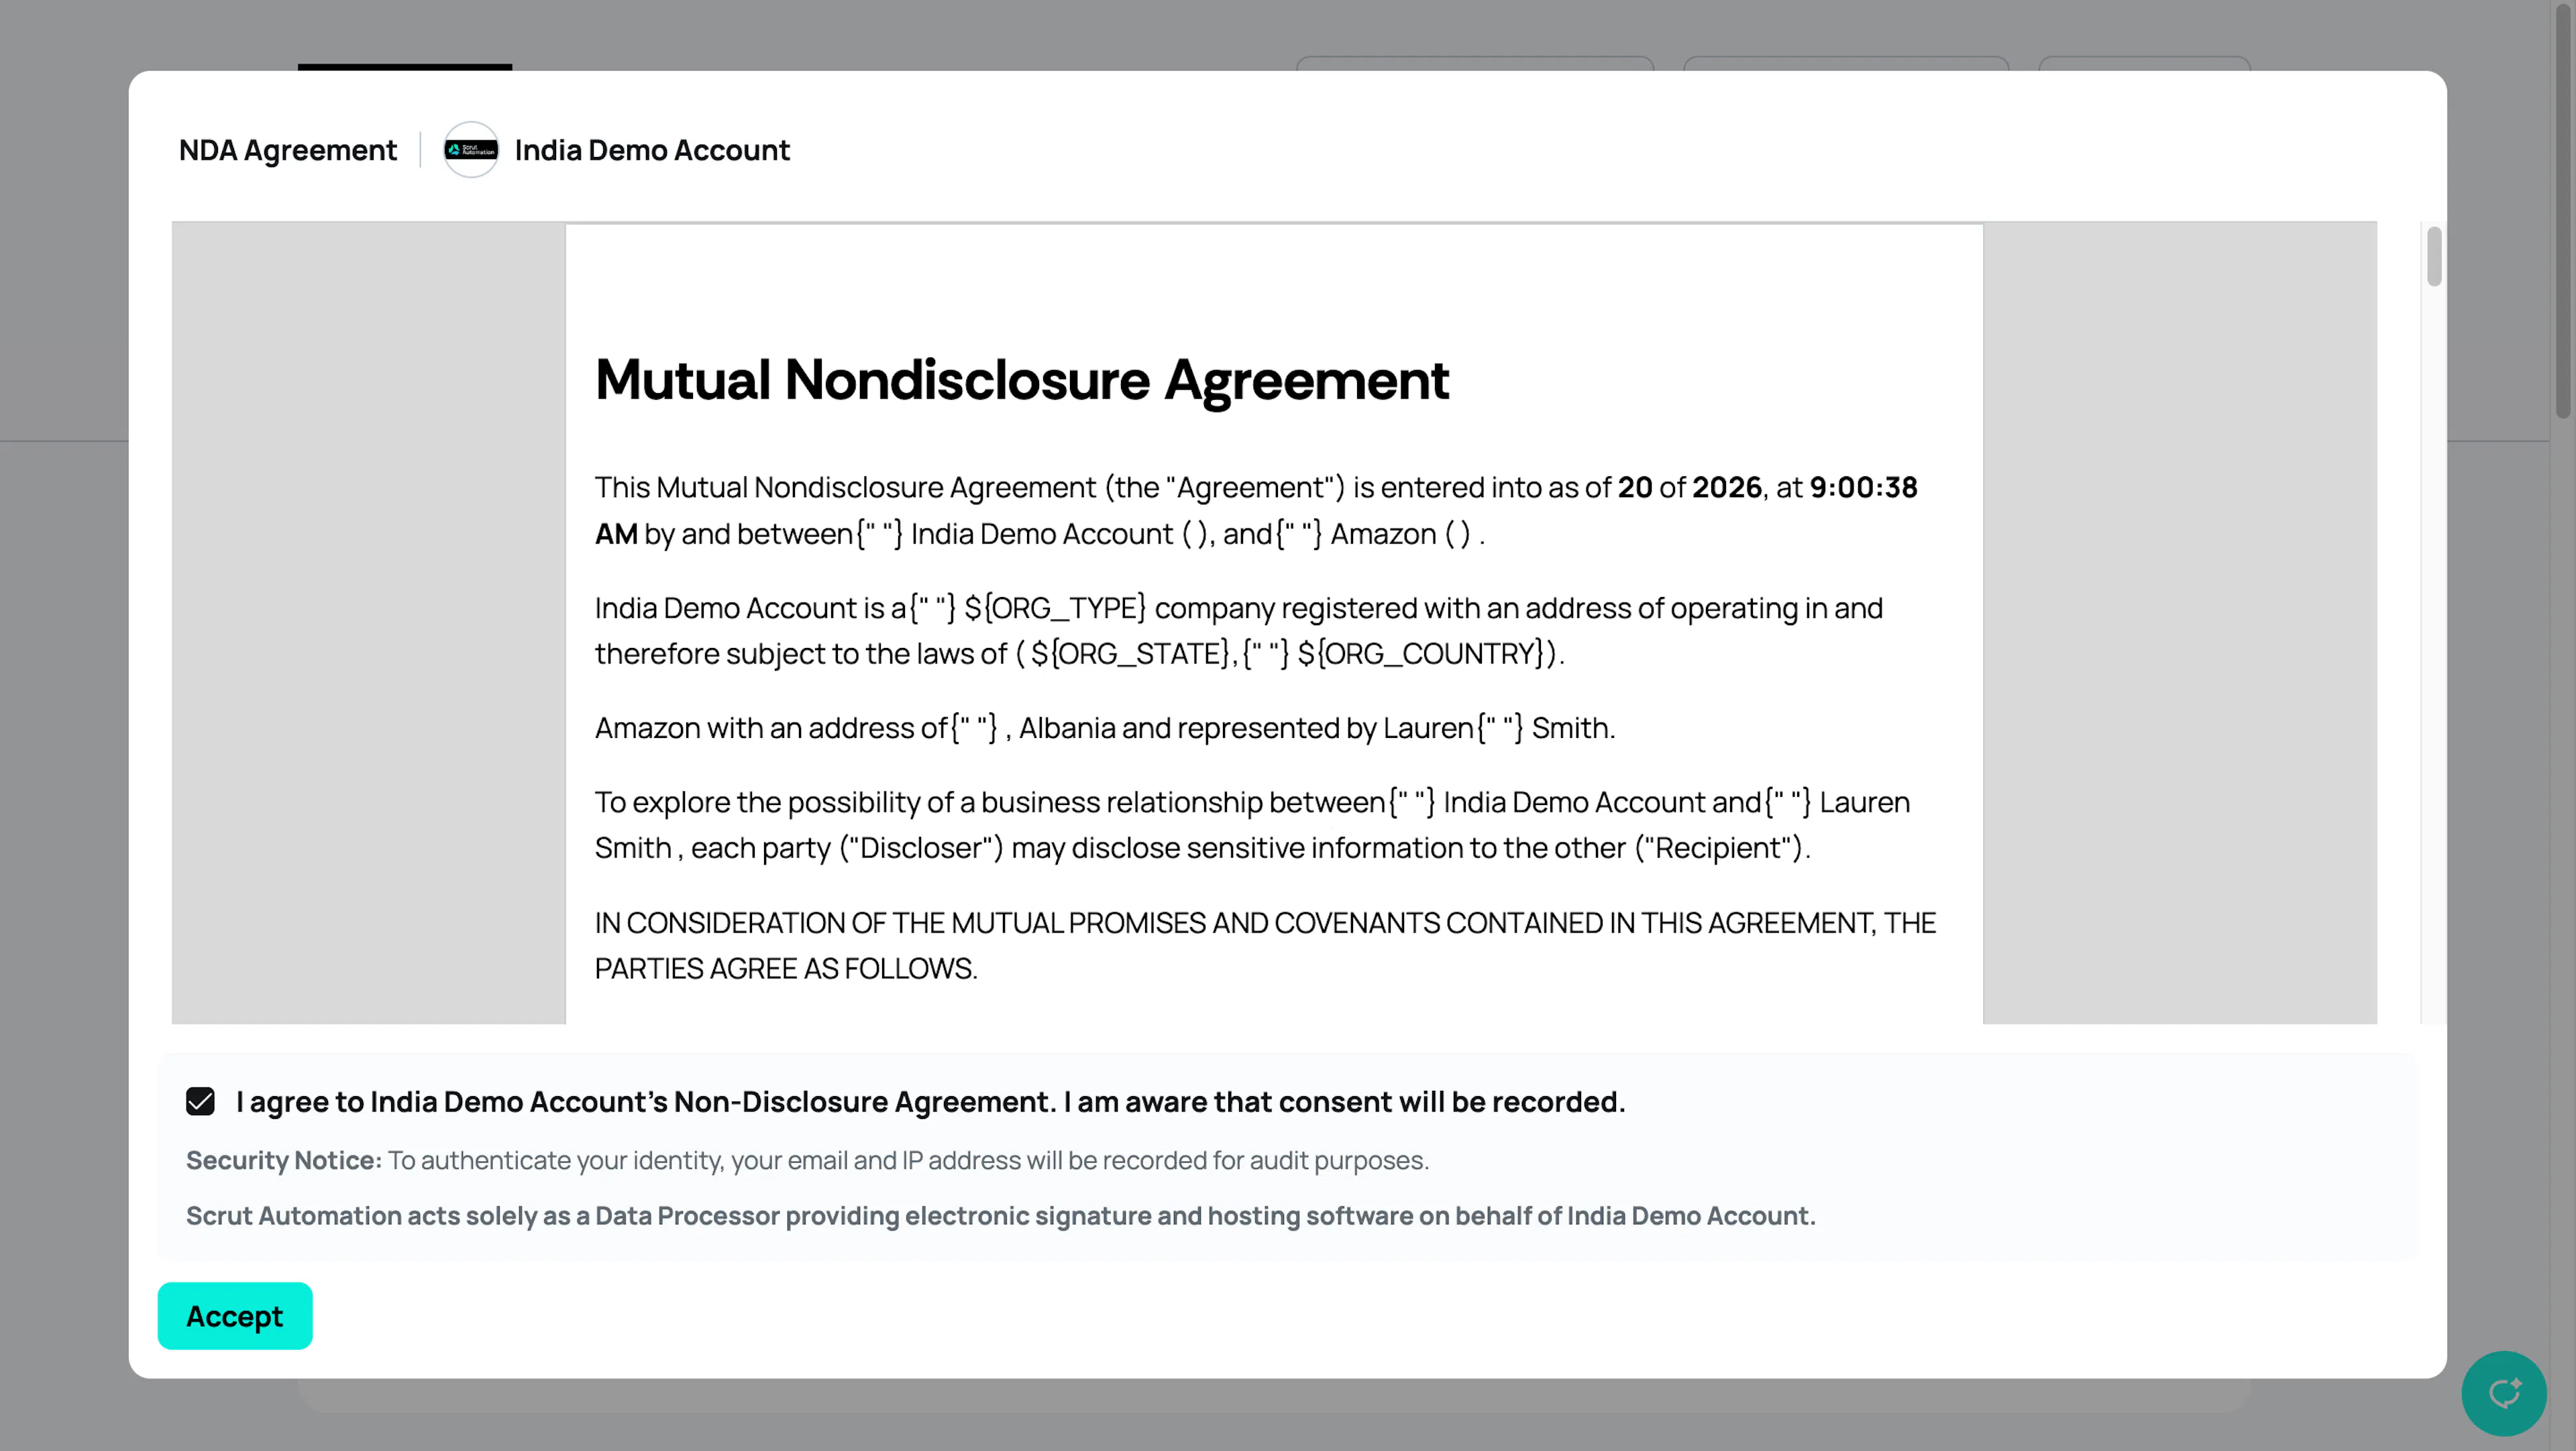
The NDA modal automatically displays your organization's name instead of generic labels, so visitors clearly understand they're agreeing to your NDA, not Scrut's:
- The modal title reads NDA Agreement | [Your Organization Name].
- The checkbox reads I agree to [Your Organization Name]'s Non-Disclosure Agreement.
Below the checkbox, visitors see a processor disclaimer confirming that Scrut acts solely as a data processor providing the electronic signature and hosting software on your organization's behalf, and that their email and IP address are recorded for audit purposes. This uses the same organization display name shown elsewhere in Trust Vault, such as in the OTP and access request emails.
Customizing Your Clickwrap NDA Template
Scrut allows you to fully customize the NDA language to match your organization's legal requirements and existing agreements.
To edit your NDA template:
-
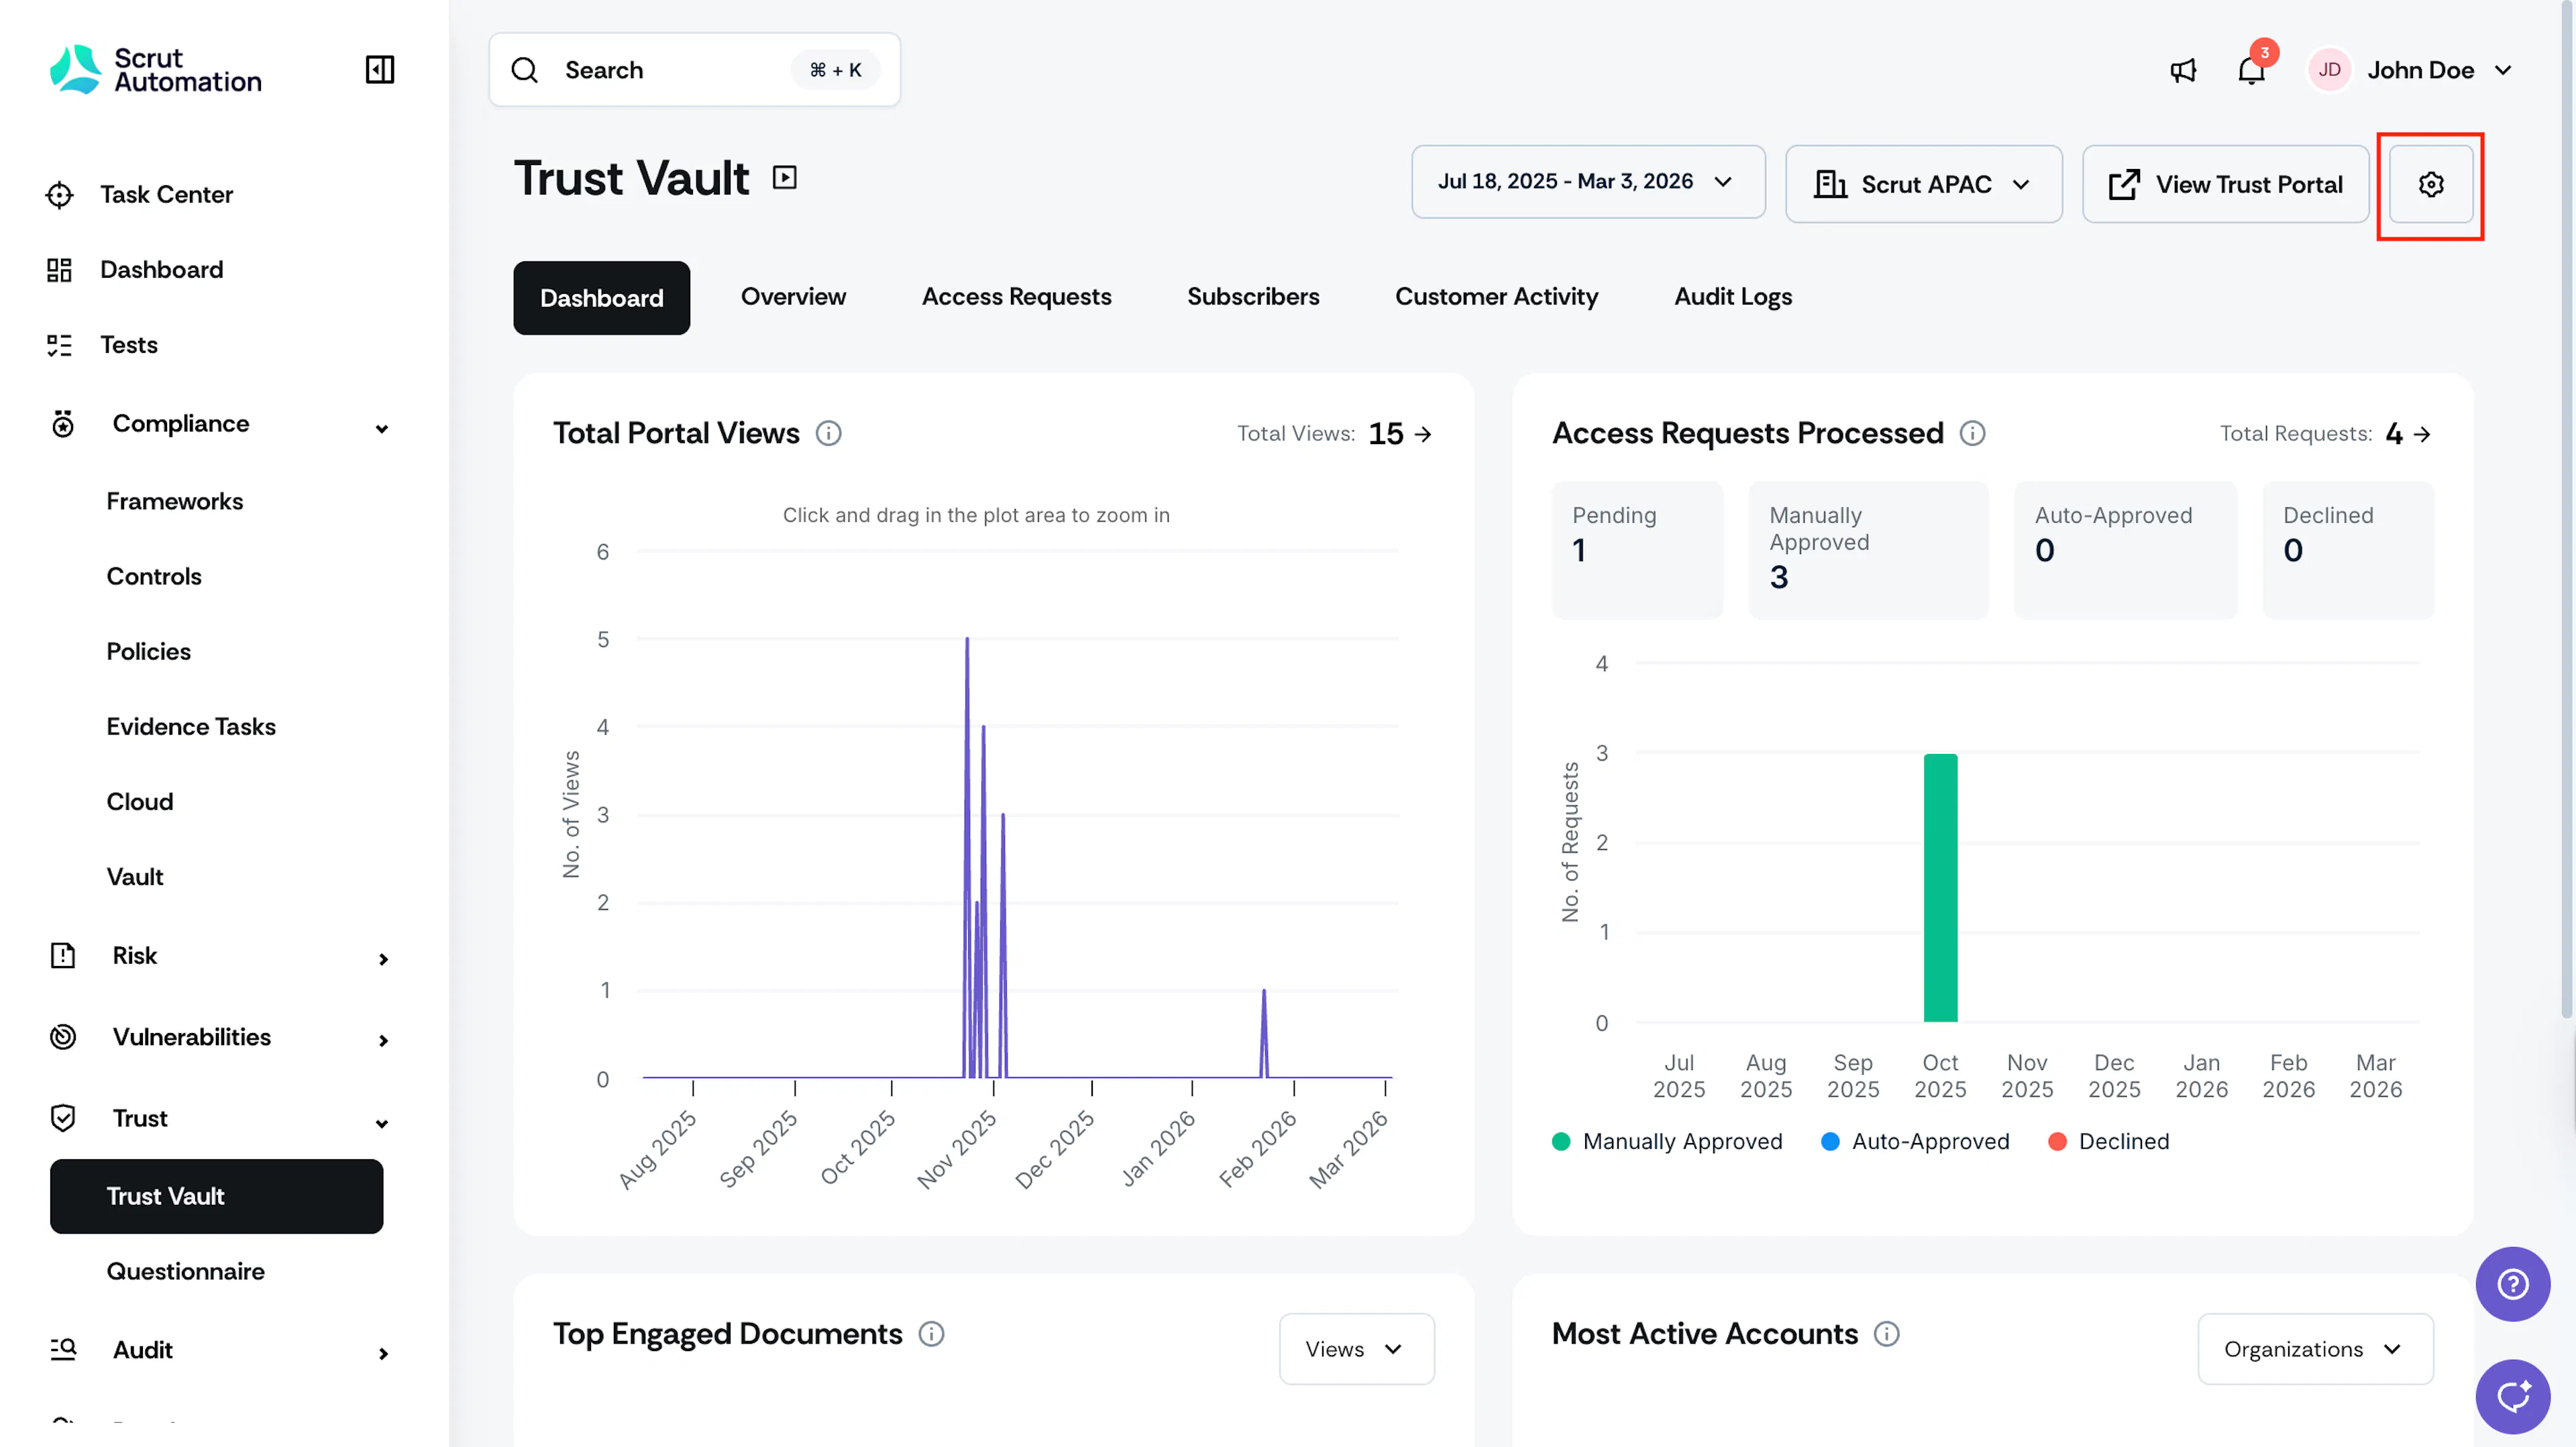
Click Trust → Trust Vault on the left navigation panel and click the Settings icon in the top-right corner of the Trust Vault module.
-
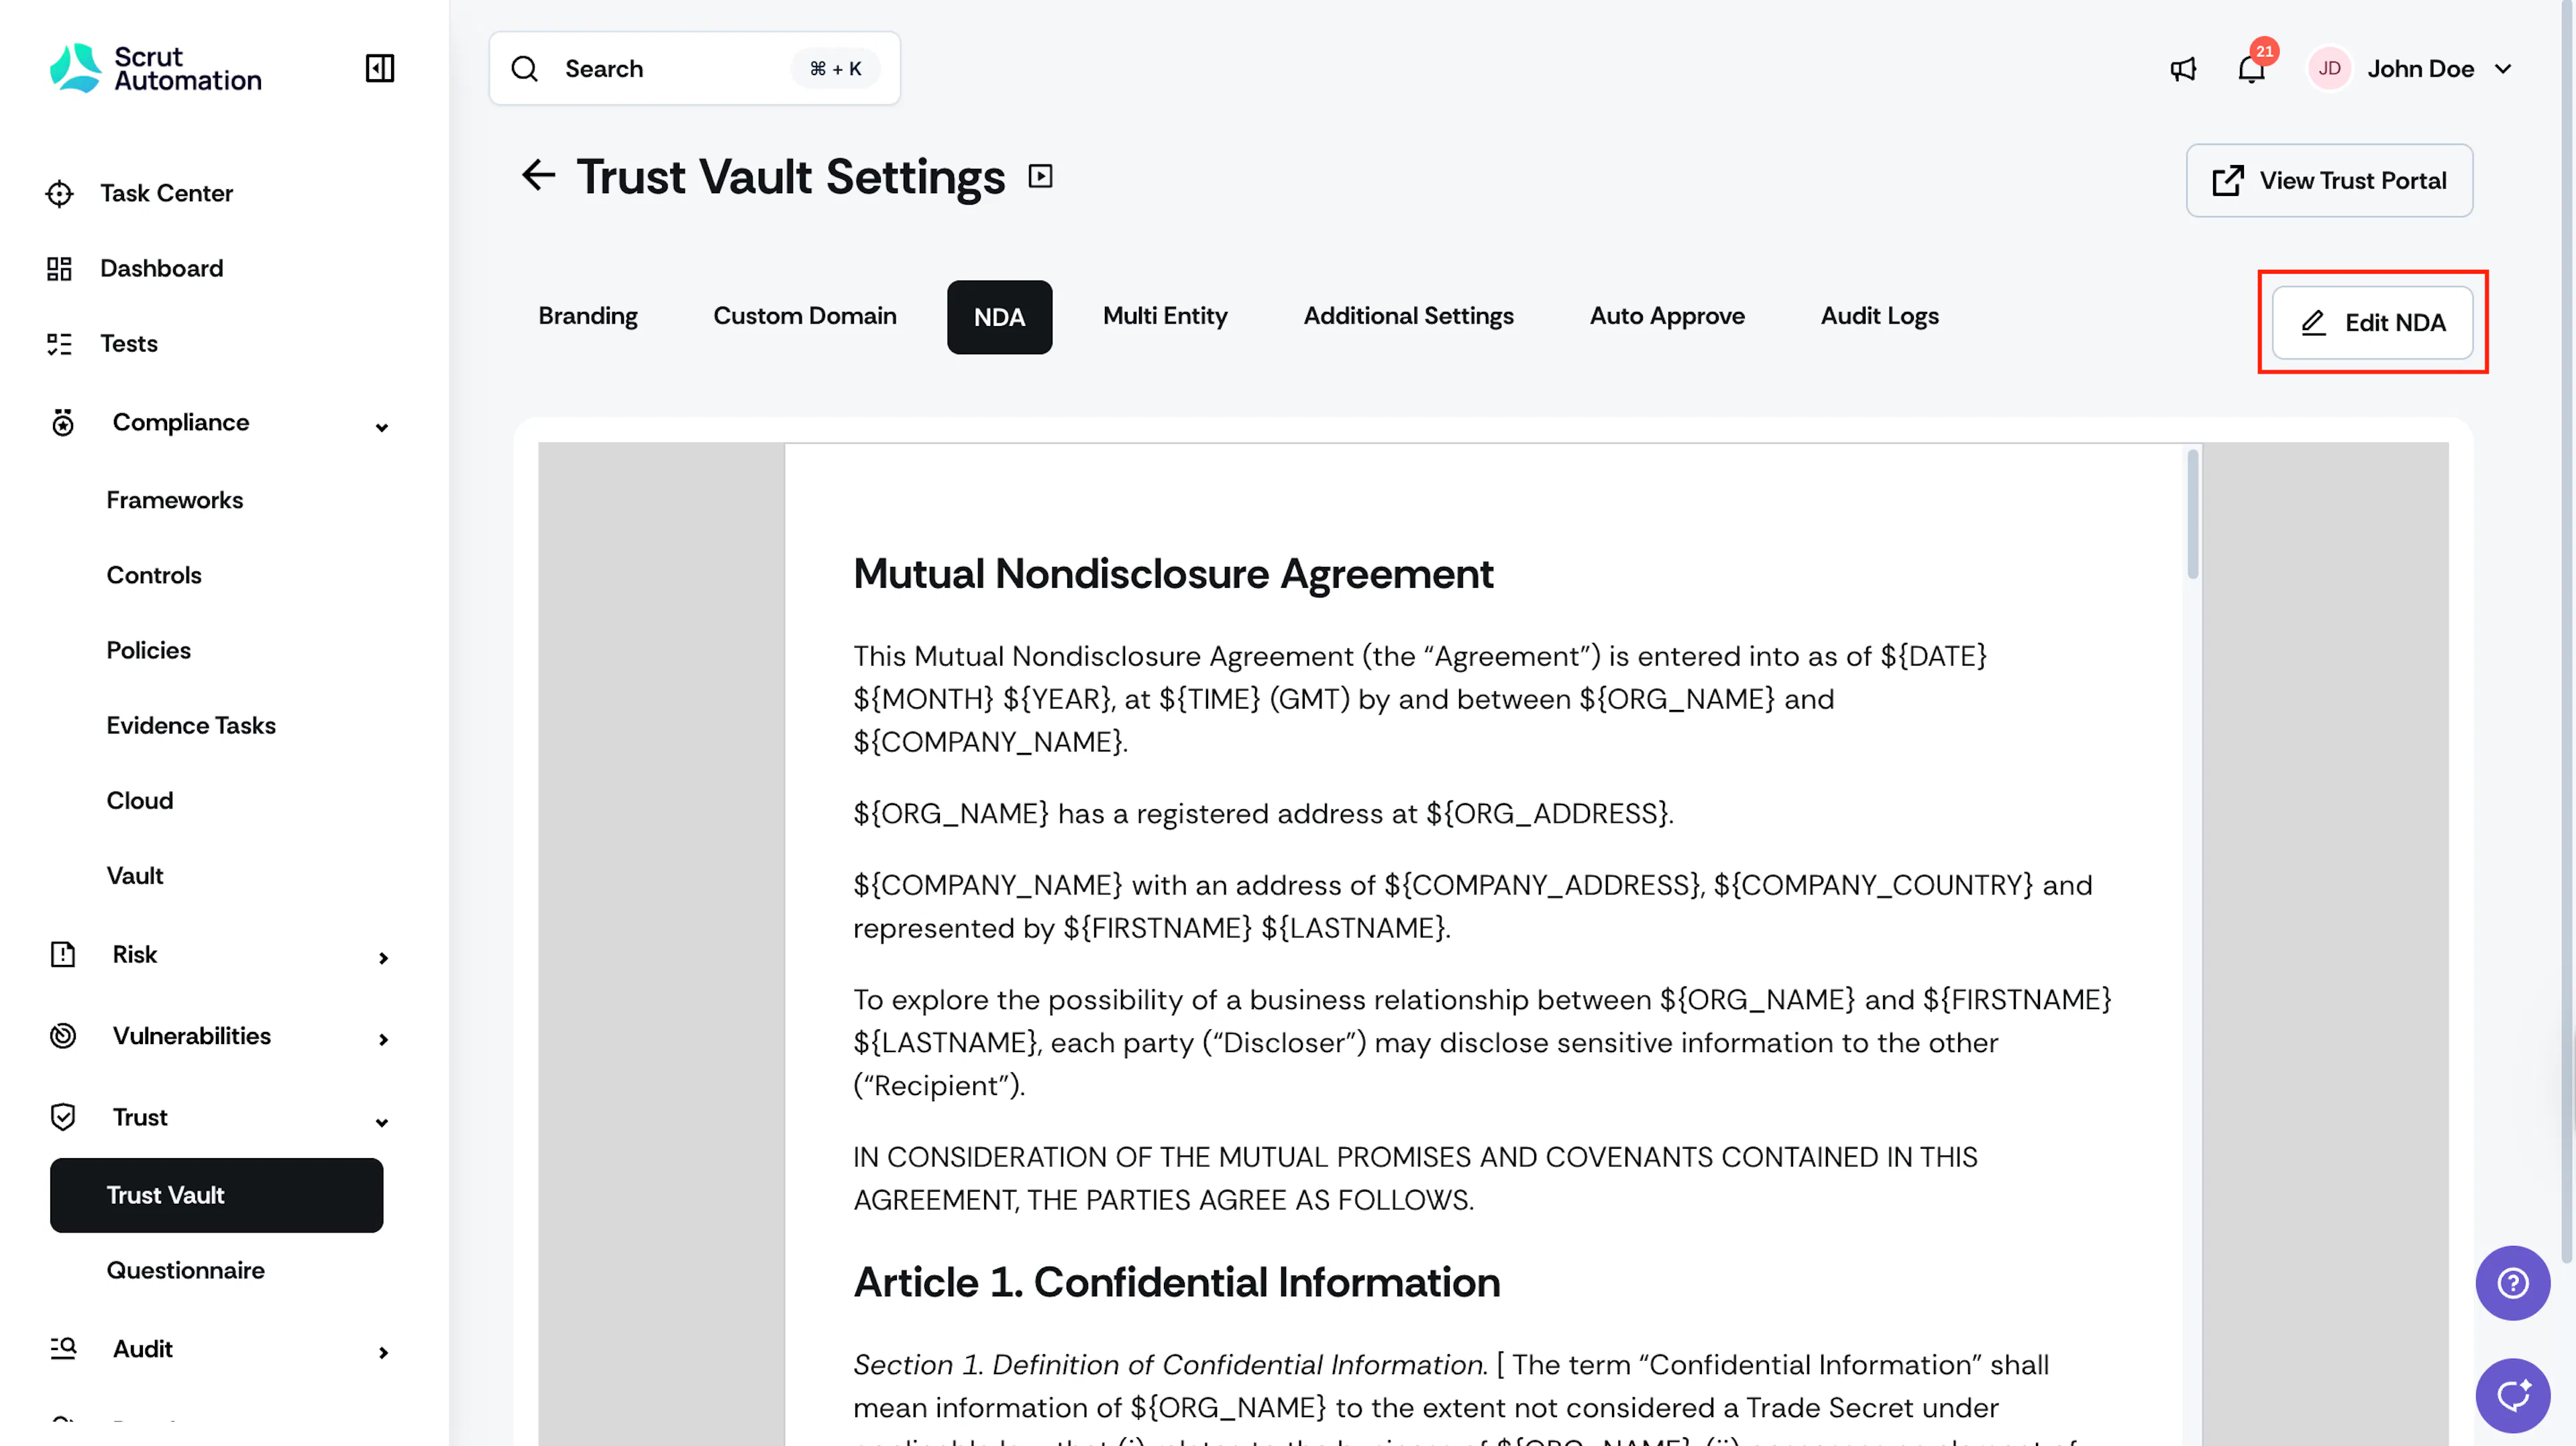
On the Trust Vault settings page, click the NDA tab.
-
Click the Edit NDA button.
-
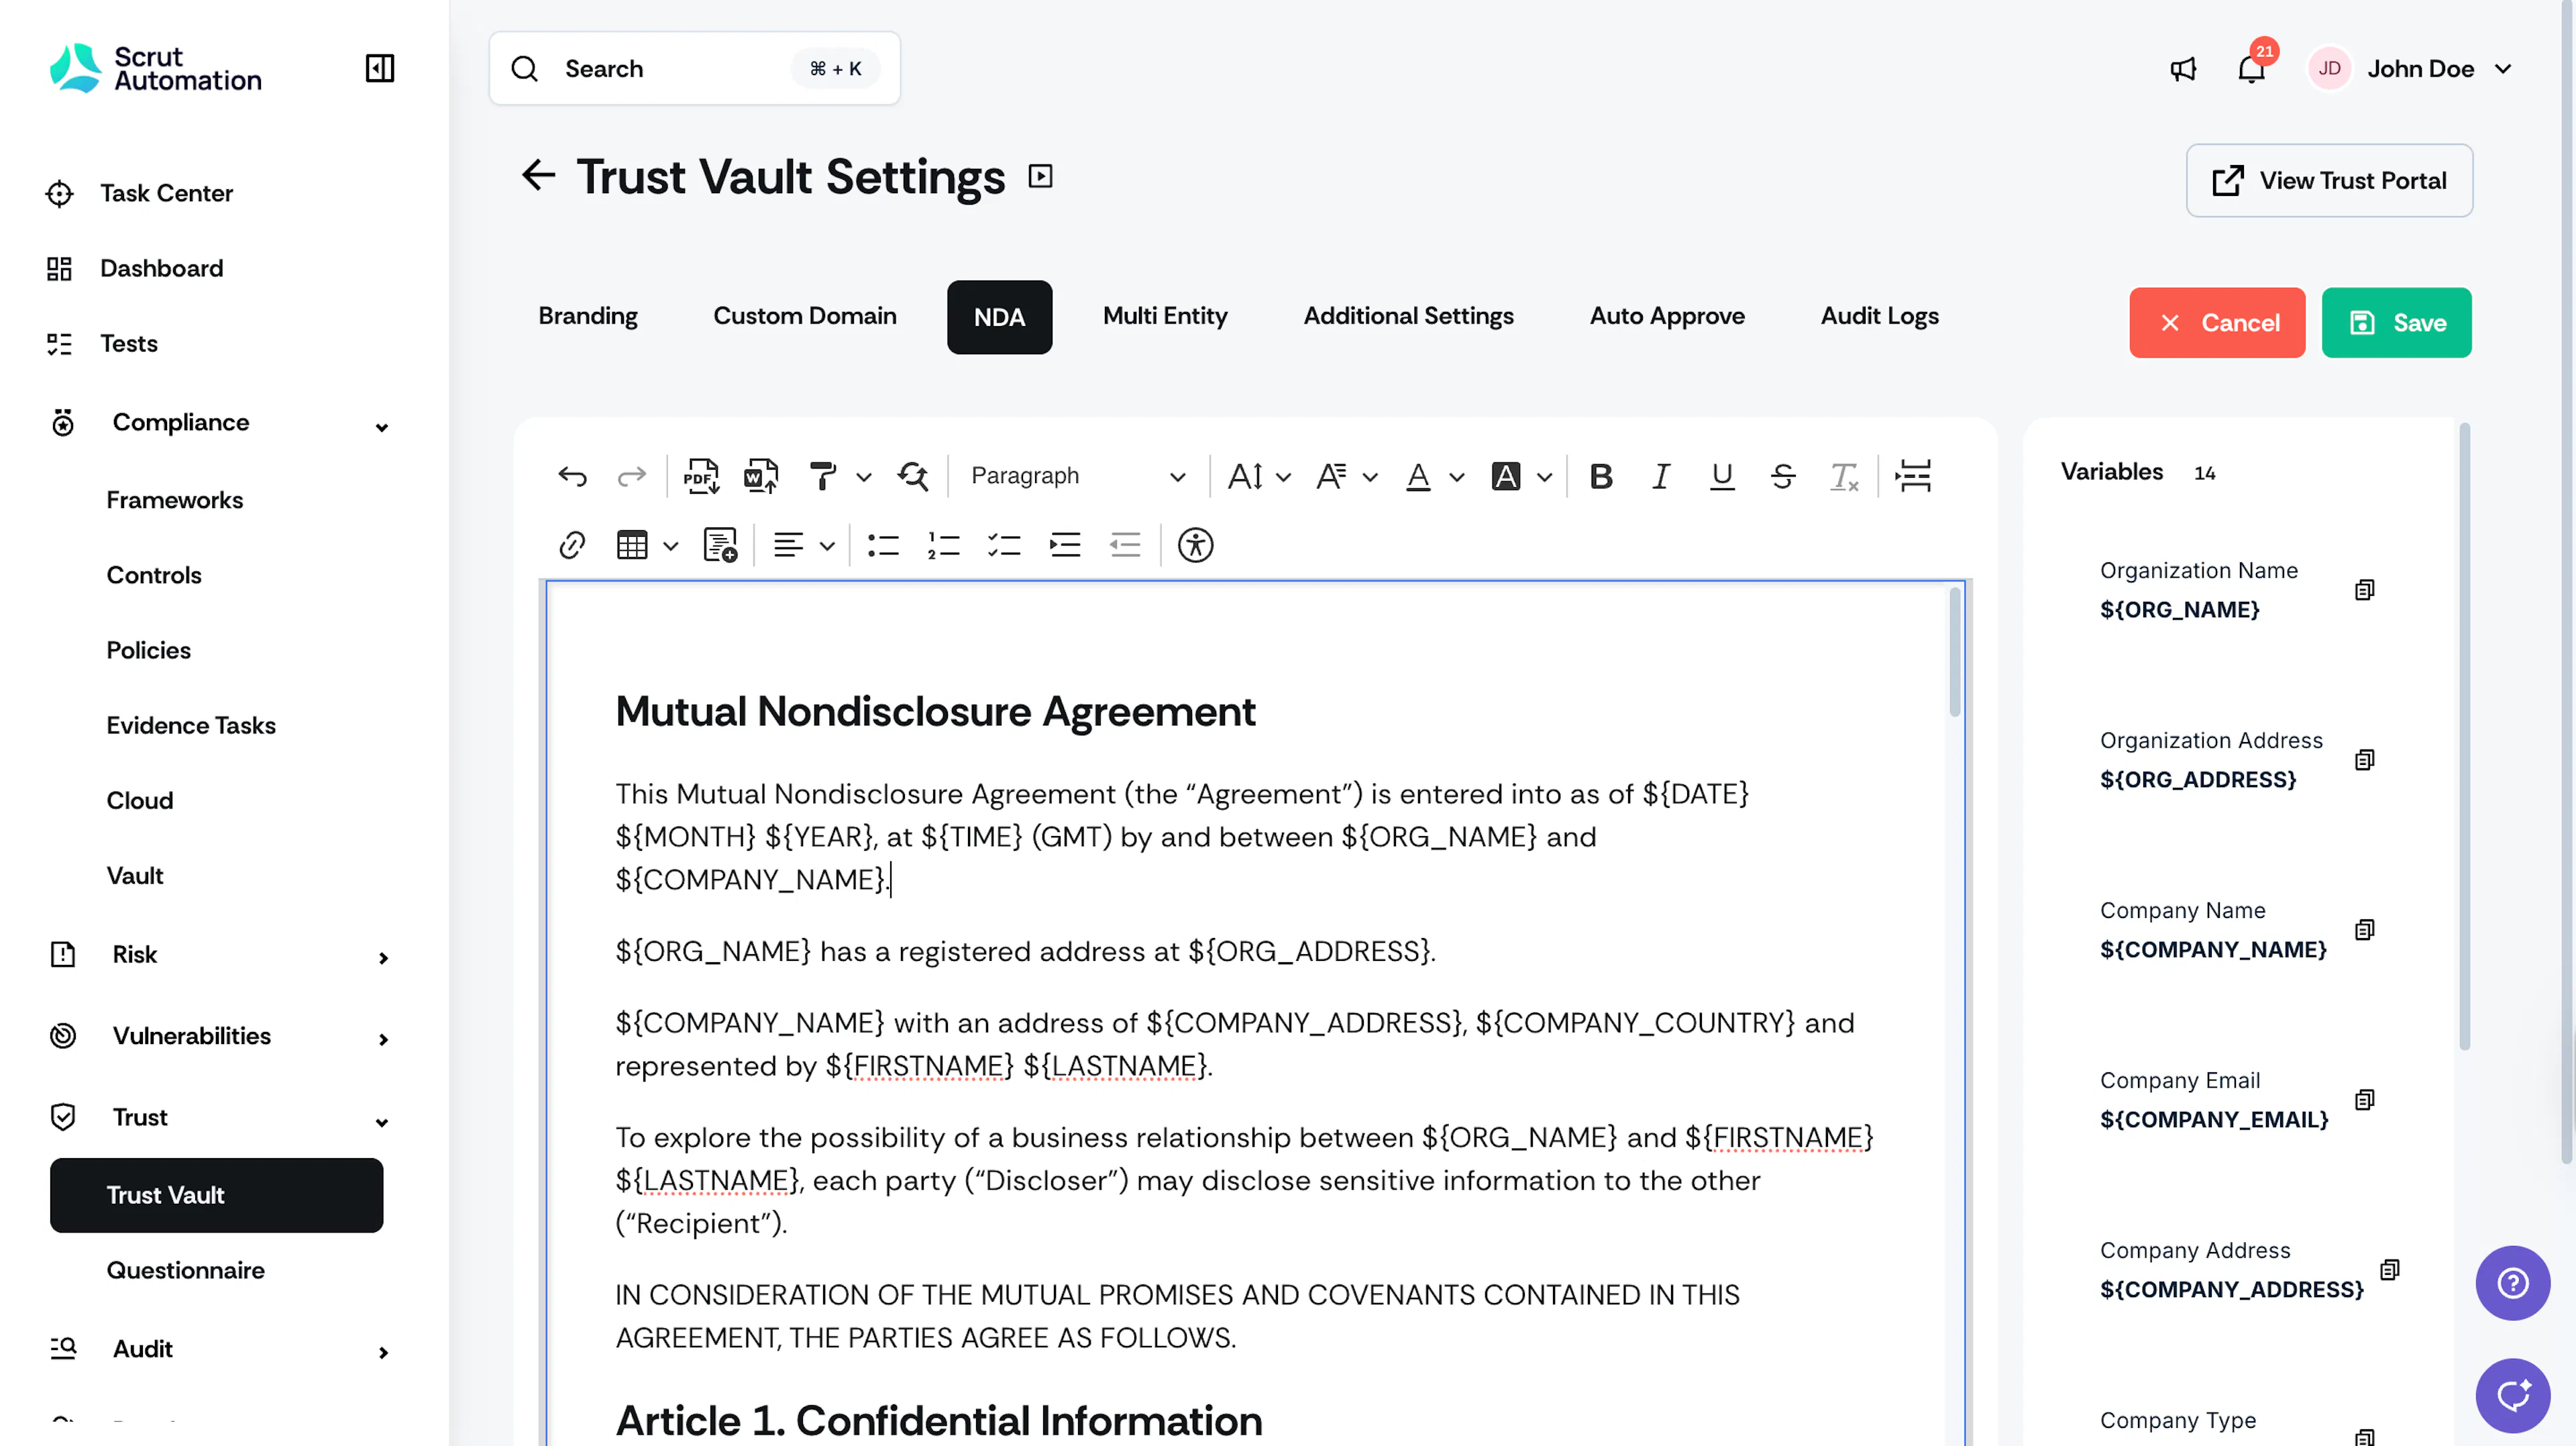
An inline editor window will open, displaying the default NDA template.
-
Edit the content to reflect your specific business requirements and legal terms.
-
Use the right panel to insert dynamic variables in the template. Learn how to use variables to personalize the NDA template.
-
Click Save to apply your changes.
Using Variables
The Variables panel on the right side of the editor provides placeholders that automatically populate with actual information when a user signs the NDA. This eliminates manual data entry and ensures accuracy across all signed agreements.
Why use variables?
Variables transform your static NDA template into a personalized legal agreement for each user. Instead of creating individual NDAs for each access requester, you create a single template that automatically adapts to include the correct party information, dates, and organizational details.
Available variables:
- Organization Name -
${ORG_NAME}: Your company's legal name - Organization Address -
${ORG_ADDRESS}: Your company's registered address - Company Name -
${COMPANY_NAME}: The requester's company name - Company Email -
${COMPANY_EMAIL}: The requester's company email address - Company Address -
${COMPANY_ADDRESS}: The requester's company address - Company Type -
${COMPANY_TYPE}: The type or category of the requester's organization - Location variables -
${COMPANY_STATE}: The requester's company’s state and country - Date/Time variables:
${DATE},${MONTH},${YEAR},${TIME}- Automatically captures when the agreement is signed - Requester details:
${FIRSTNAME},${LASTNAME}- The individual signing the NDA
How to insert variables:
- Click on the desired variable from the variables panel on the right to copy it.
- Place your cursor in the NDA text where you want the variable to appear and paste it.
- The variable placeholder (e.g.,
${COMPANY_NAME}) will be inserted into your template. - When a user signs the NDA, Scrut automatically replaces the placeholder with the actual information.
Example:
Template: This Mutual Nondisclosure Agreement is entered into as of ${DATE} ${MONTH} ${YEAR}, at ${TIME} (GMT) by and between ${ORG_NAME} and ${COMPANY_NAME}.
When John Smith from Acme Corp signs the NDA on February 10, 2026, it automatically becomes:
This Mutual Nondisclosure Agreement is entered into as of 10 February 2026, at 14:30 (GMT) by and between Scrut Automation and Acme Corp.
Pro Tip!
Review your completed template to verify all variables are correctly placed and that the resulting text will read naturally when populated with actual data.
Note:
The Clickwrap NDA will only be displayed to users when you explicitly select "Clickwrap" as the NDA provider during the access approval process.