

Integrate Jira
The Scrut-Jira integration connects your Jira workspace with Scrut, allowing you to manage compliance tasks, run automated tests, collect evidence, and review user access without switching between tools.
What This Integration Does in Scrut
-
Task Management: Enables you to create project management tickets in Scrut and sync them to Jira.
- Bidirectional status sync: Status changes made to a linked ticket in Jira are automatically reflected in Scrut.
- Ticket automation: When a linked compliance item moves to a non-compliant status, Scrut automatically creates a new Jira ticket to keep your team notified.
- Fetches attachments for evidence tasks: Scrut automatically pulls attachments on tickets linked to evidence tasks from Jira.
-
Automated Tests: Runs automated compliance checks that continuously evaluate your configurations against applicable compliance frameworks.
-
Scrut Monitor: Collects evidence through Scrut Monitor. This helps automate evidence gathering and significantly speeds up compliance workflows.
-
User Access Data: Fetches user details, roles, and permissions from Jira for Access Reviews.
Prerequisites
Before starting the integration, make sure you have the following in place:
- An active Jira account with administrator access. Your Jira login email address.
Pro Tip!
Log in to your Jira account before starting the integration to avoid being interrupted mid-setup.
Permissions and Access Requirements
For Jira
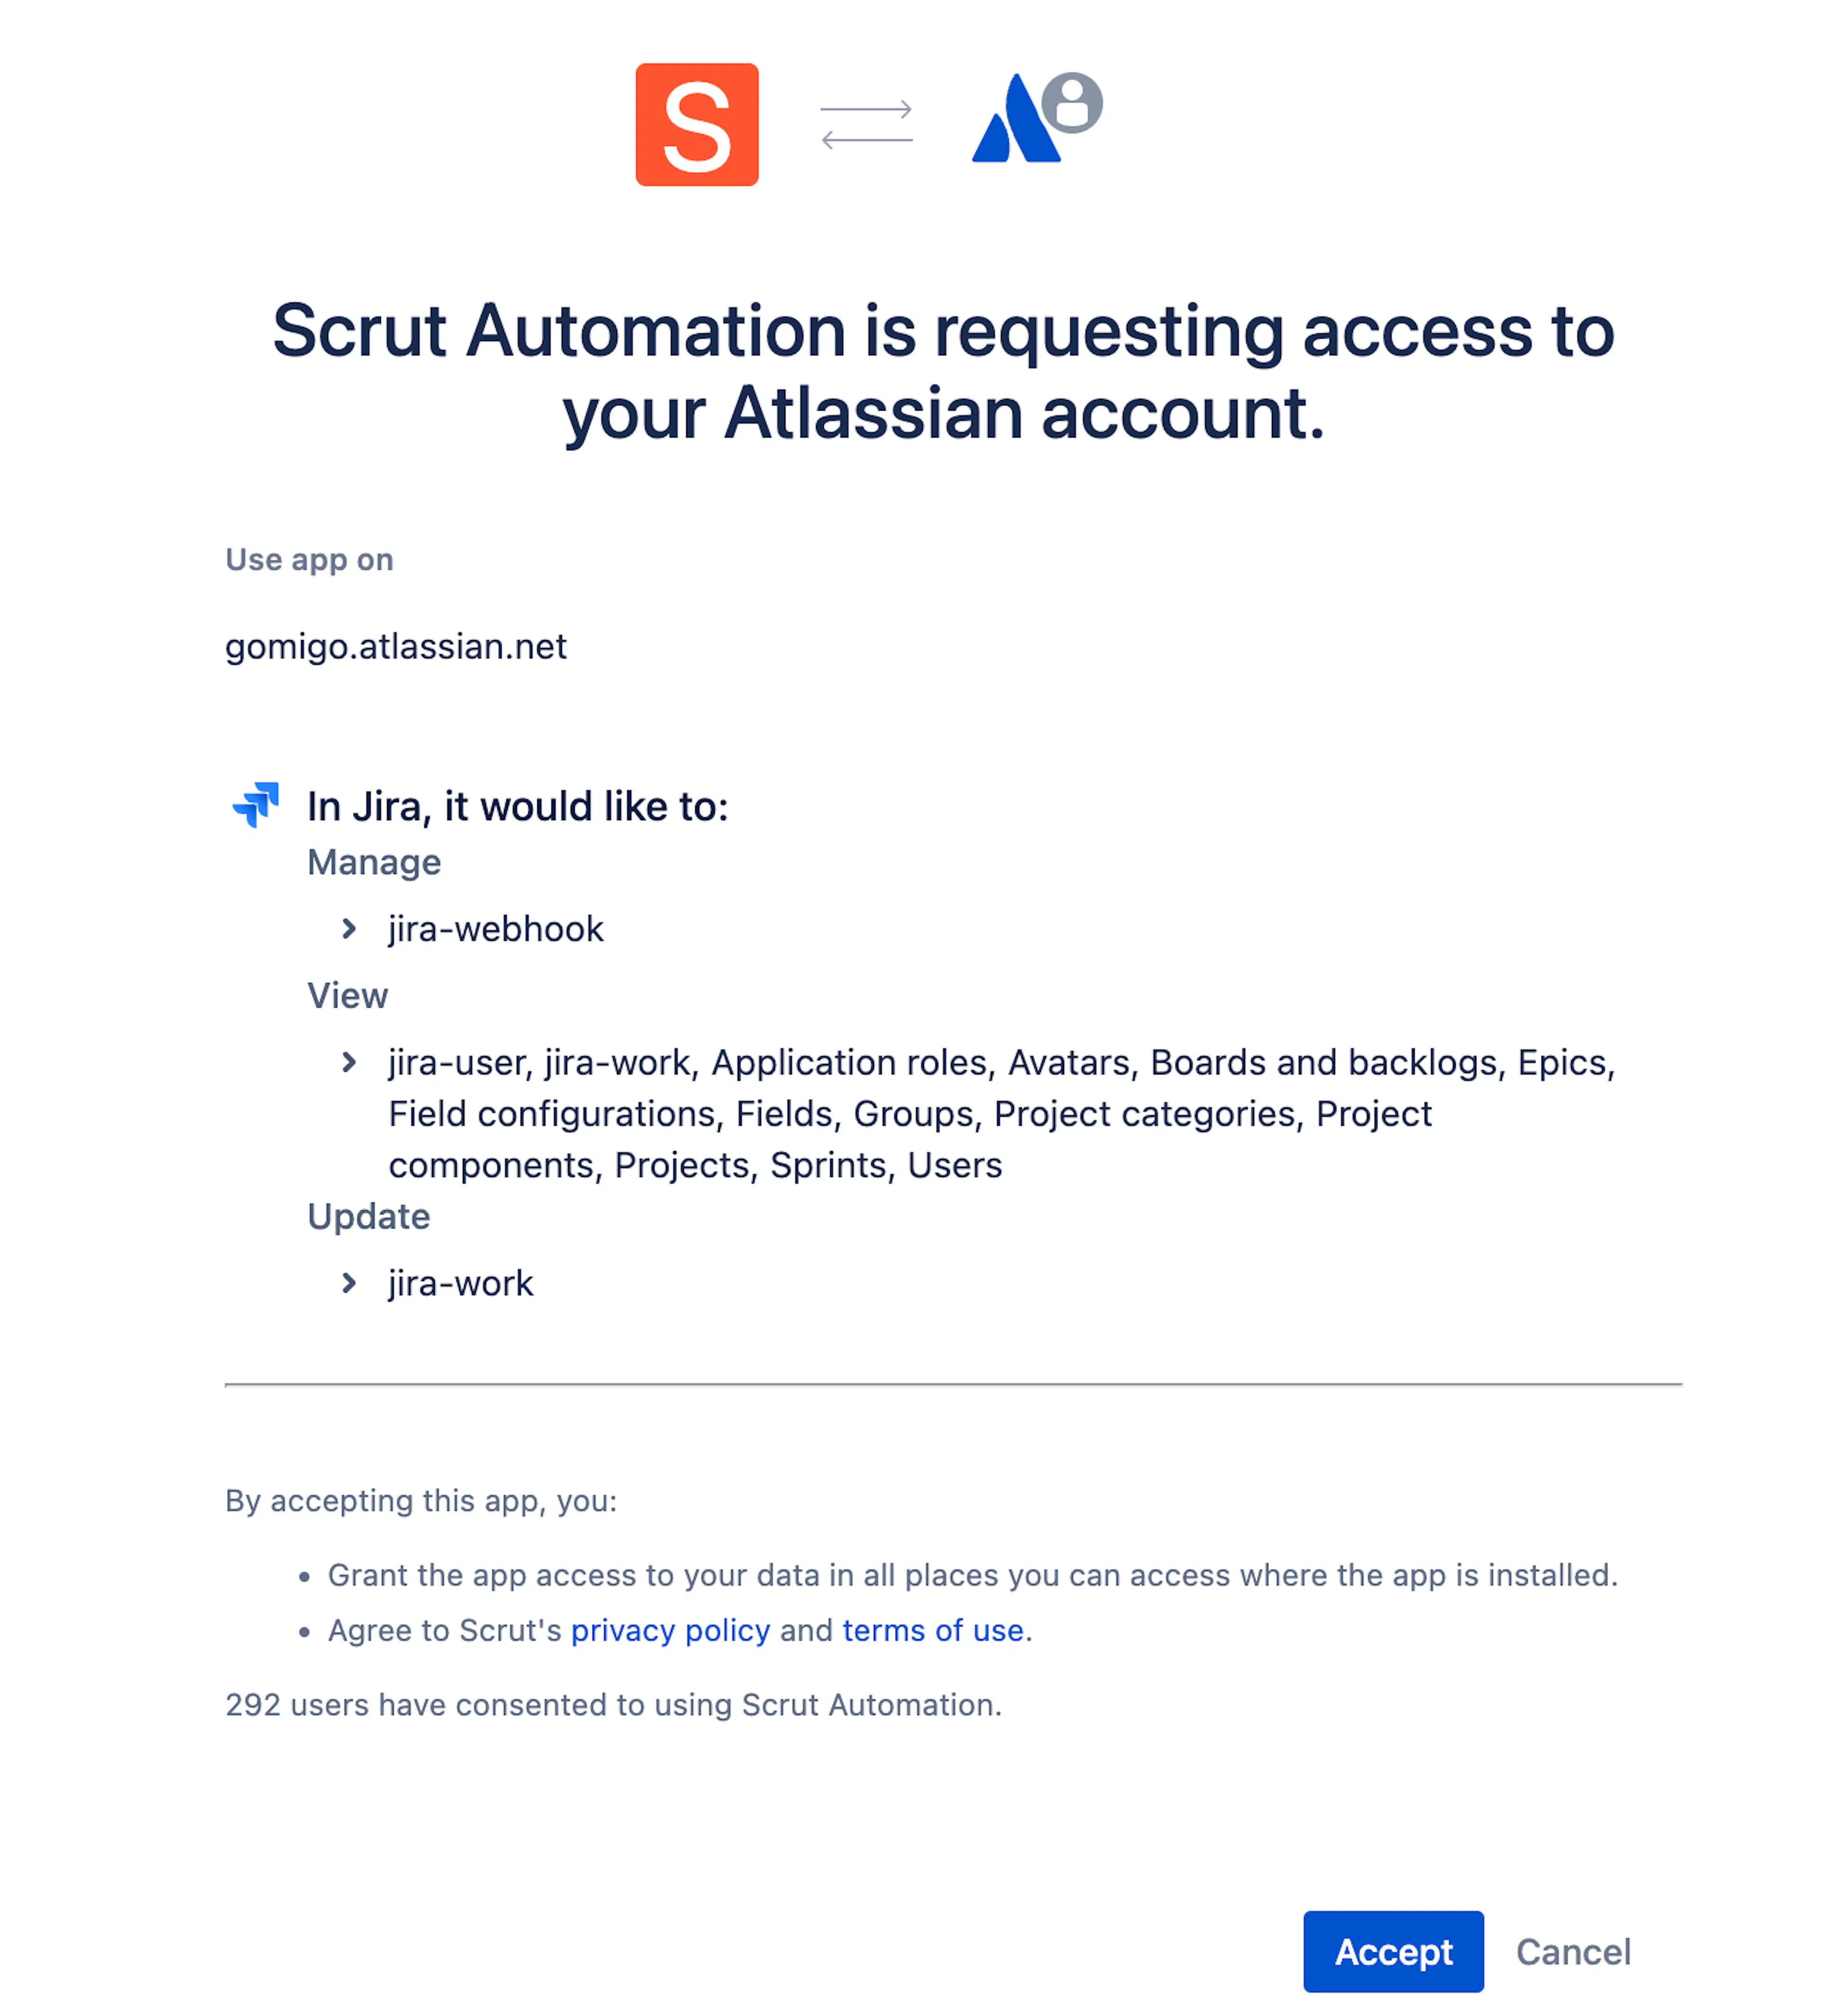
Scrut requests the following OAuth scopes during the authorization flow:
- offline_access
- read:jira-user
- read:jira-work
- write:jira-work
- read:project:jira
- read:project.component:jira
- read:user:jira
- read:application-role:jira
- read:avatar:jira
- read:group:jira
- read:field:jira
- read:project-category:jira
- read:field-configuration:jira
- read:sprint:jira-software
- read:epic:jira-software
- manage:jira-webhook
- read:board-scope:jira-software
These scopes allow Scrut to read and write issues, access user and group data, and manage webhooks that keep the two platforms in sync.
For Scrut
- Admin access to Scrut, or Contributor access with the Integration module enabled.
Data Collected
-
User Name: Jira user profile
-
Email Address: Jira user email
-
Roles and group memberships: Jira groups
-
Issue Title: Jira issue summary
-
Issue Status: Jira issue status
-
Attachments: Files attached to linked Jira tickets
- Imported automatically when the attachment toggle is enabled when creating the Jira ticket
Sync Frequency
Data is synced automatically once every 24 hours. You can also manually trigger a sync from the integration settings page.
Integration Setup
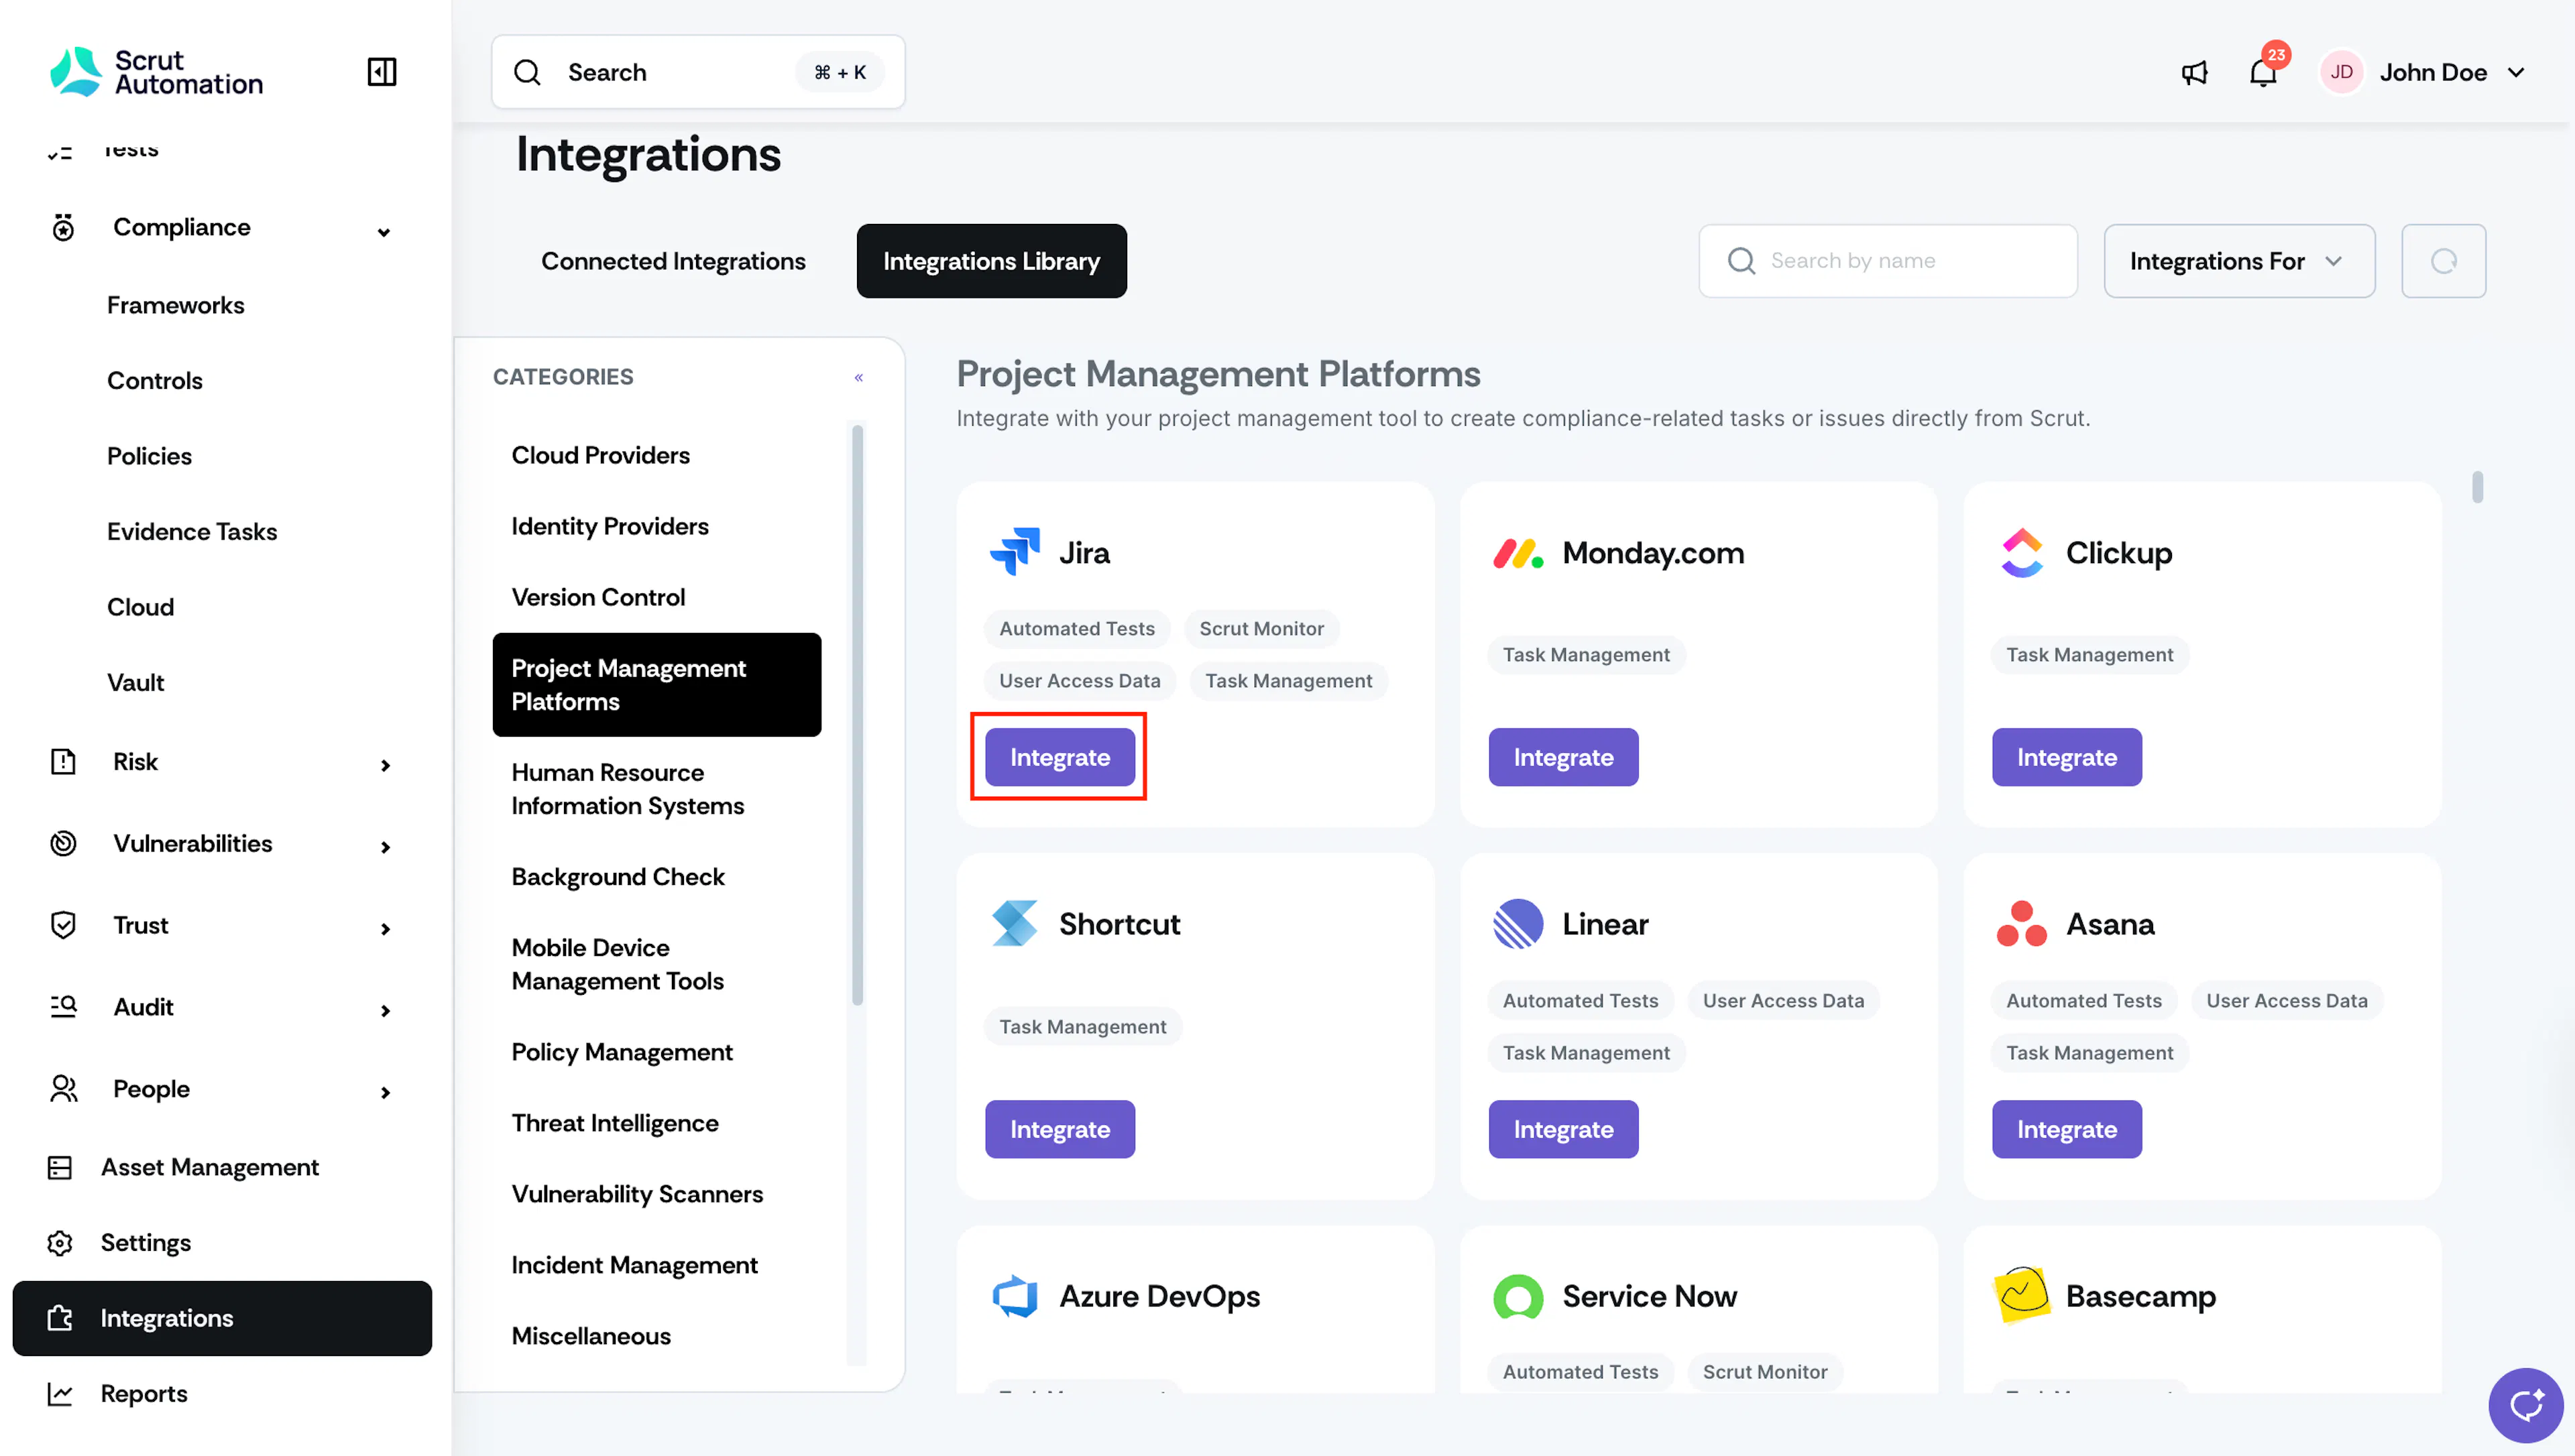
Step 1: Navigate to the Jira Integration in Scrut
-
Log in to Scrut and click Integrations in the left navigation panel.
-
Go to the Integrations Library tab.
-
In the Categories section, click Project Management Platforms.
-
Scroll to find Jira and click Integrate.
-
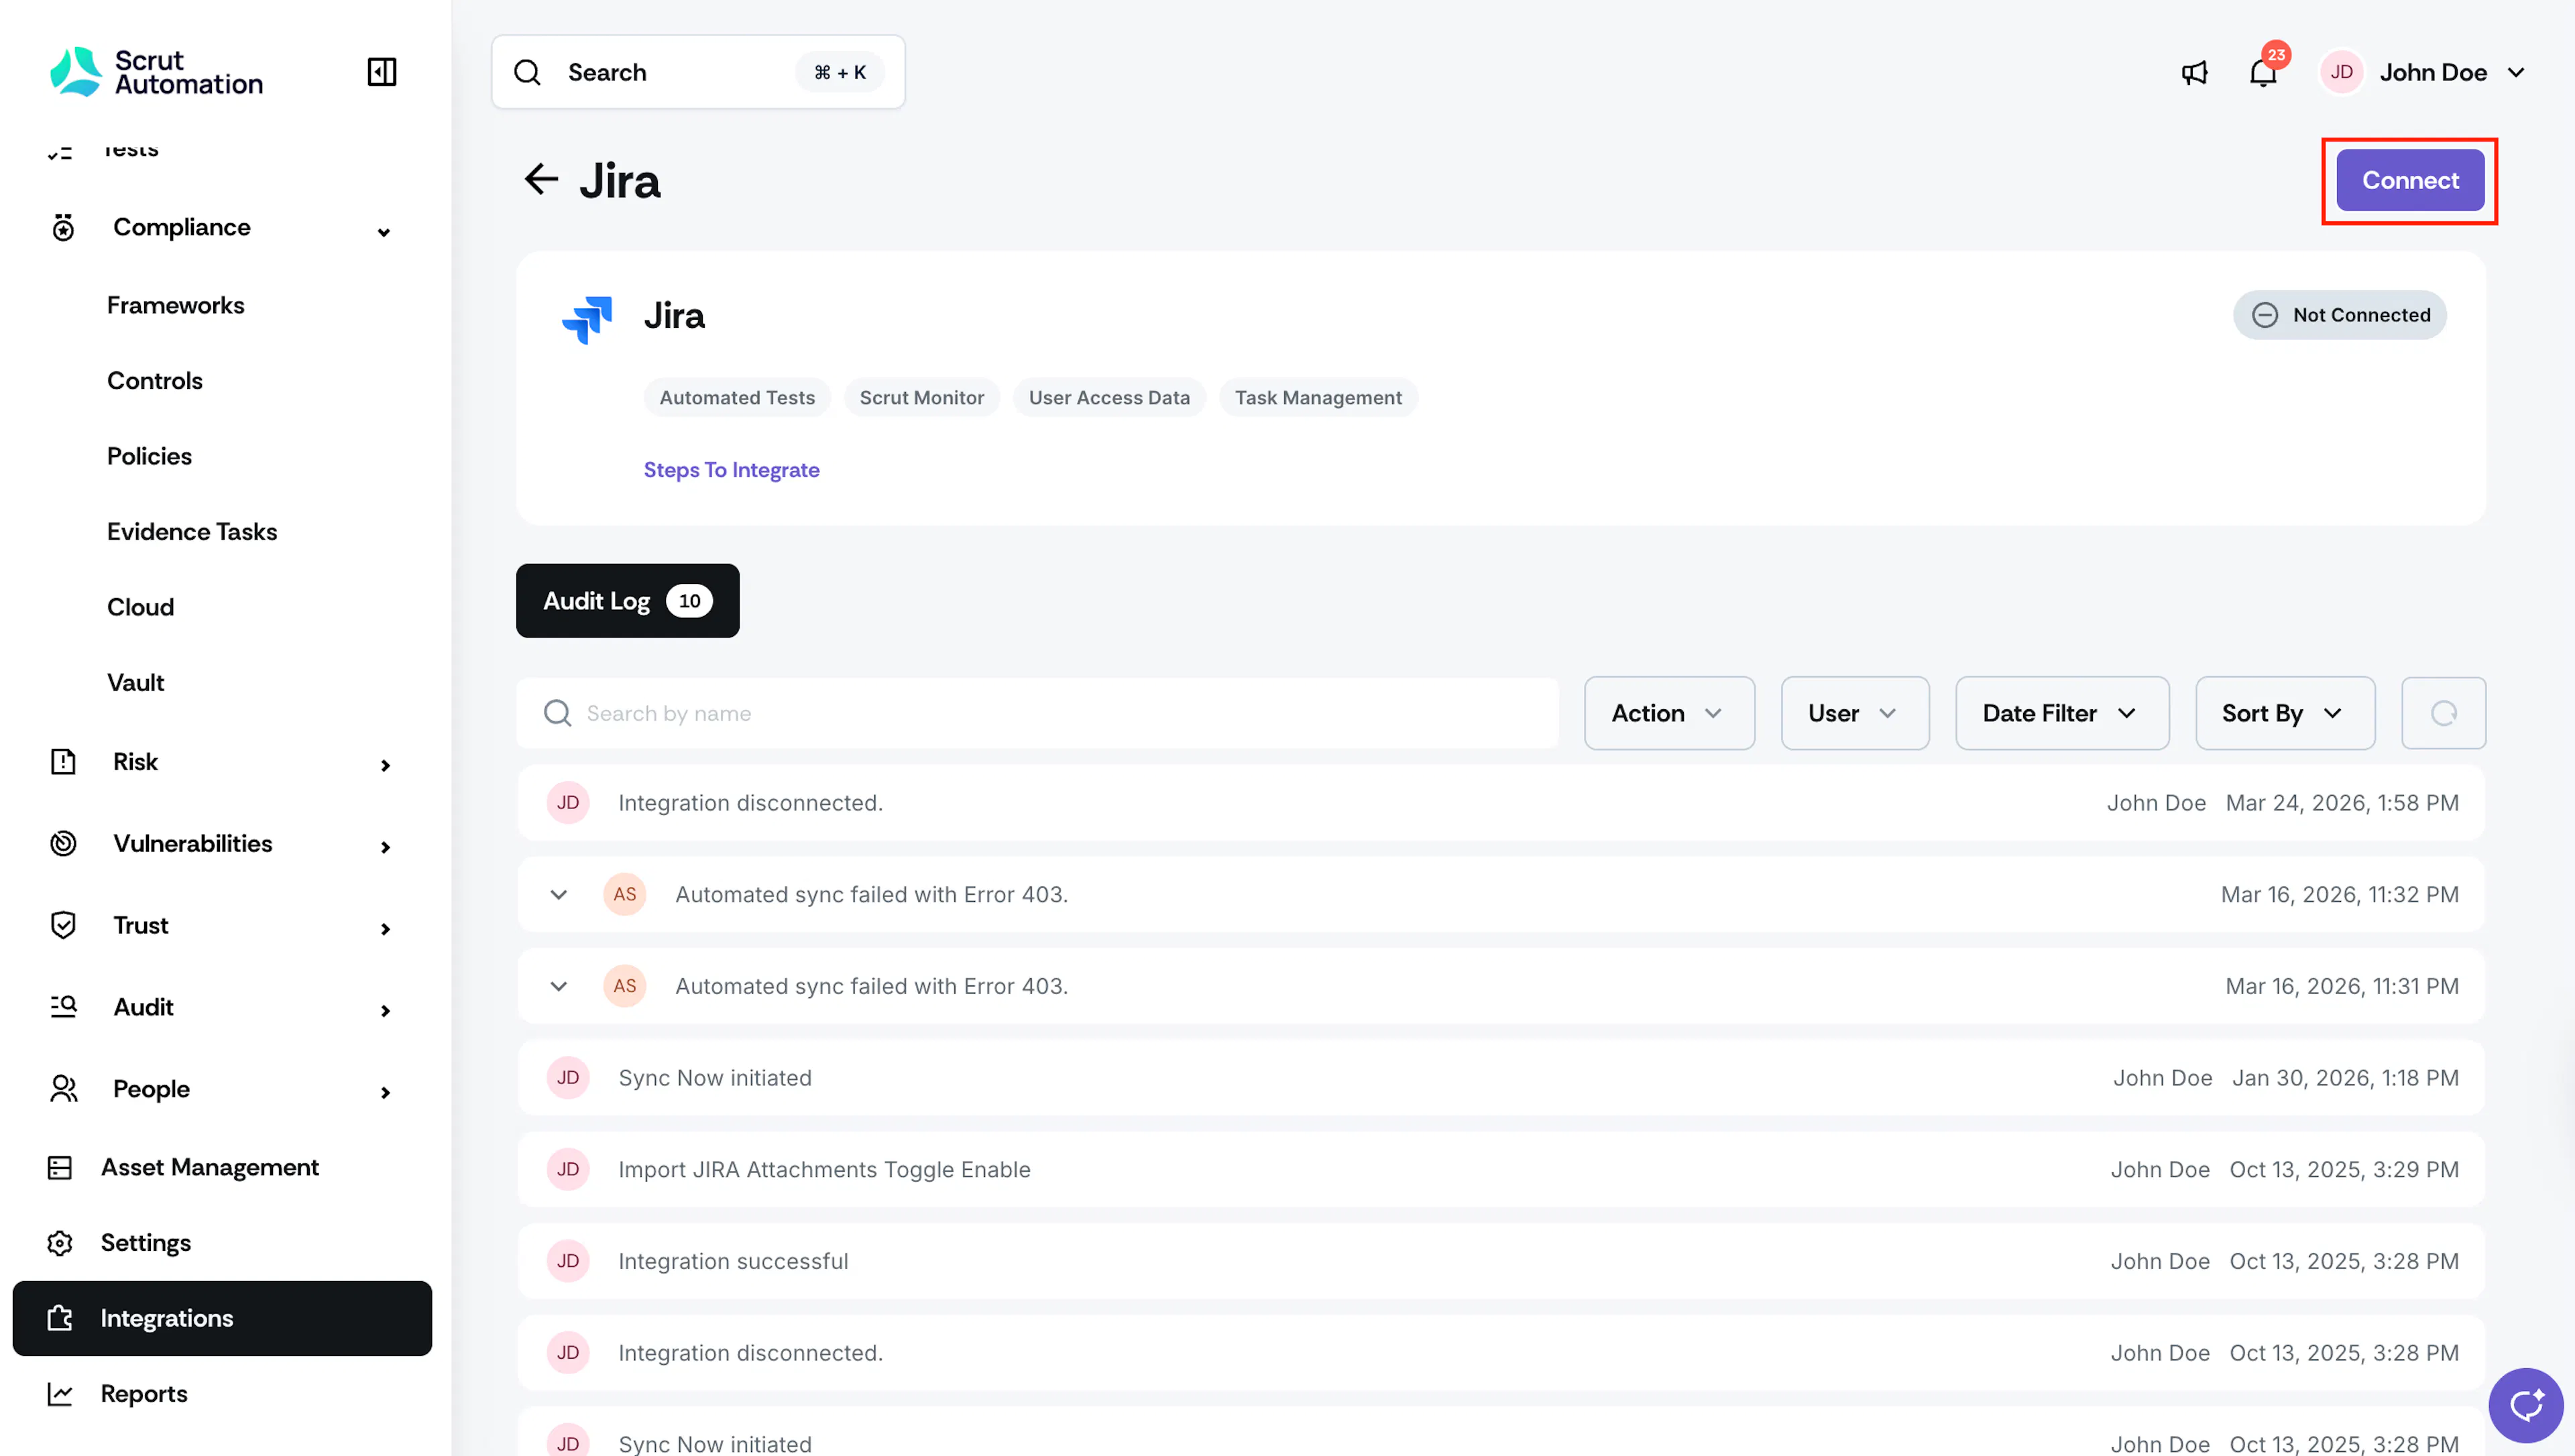
On the Jira integration page, click Connect in the top right corner.
Step 2: Authorize Scrut in Jira
-
If you are not already logged in to Jira, Scrut redirects you to the Atlassian sign-in page. Enter your credentials and sign in.
-
Review the permissions Scrut is requesting and click Accept to grant access.
-
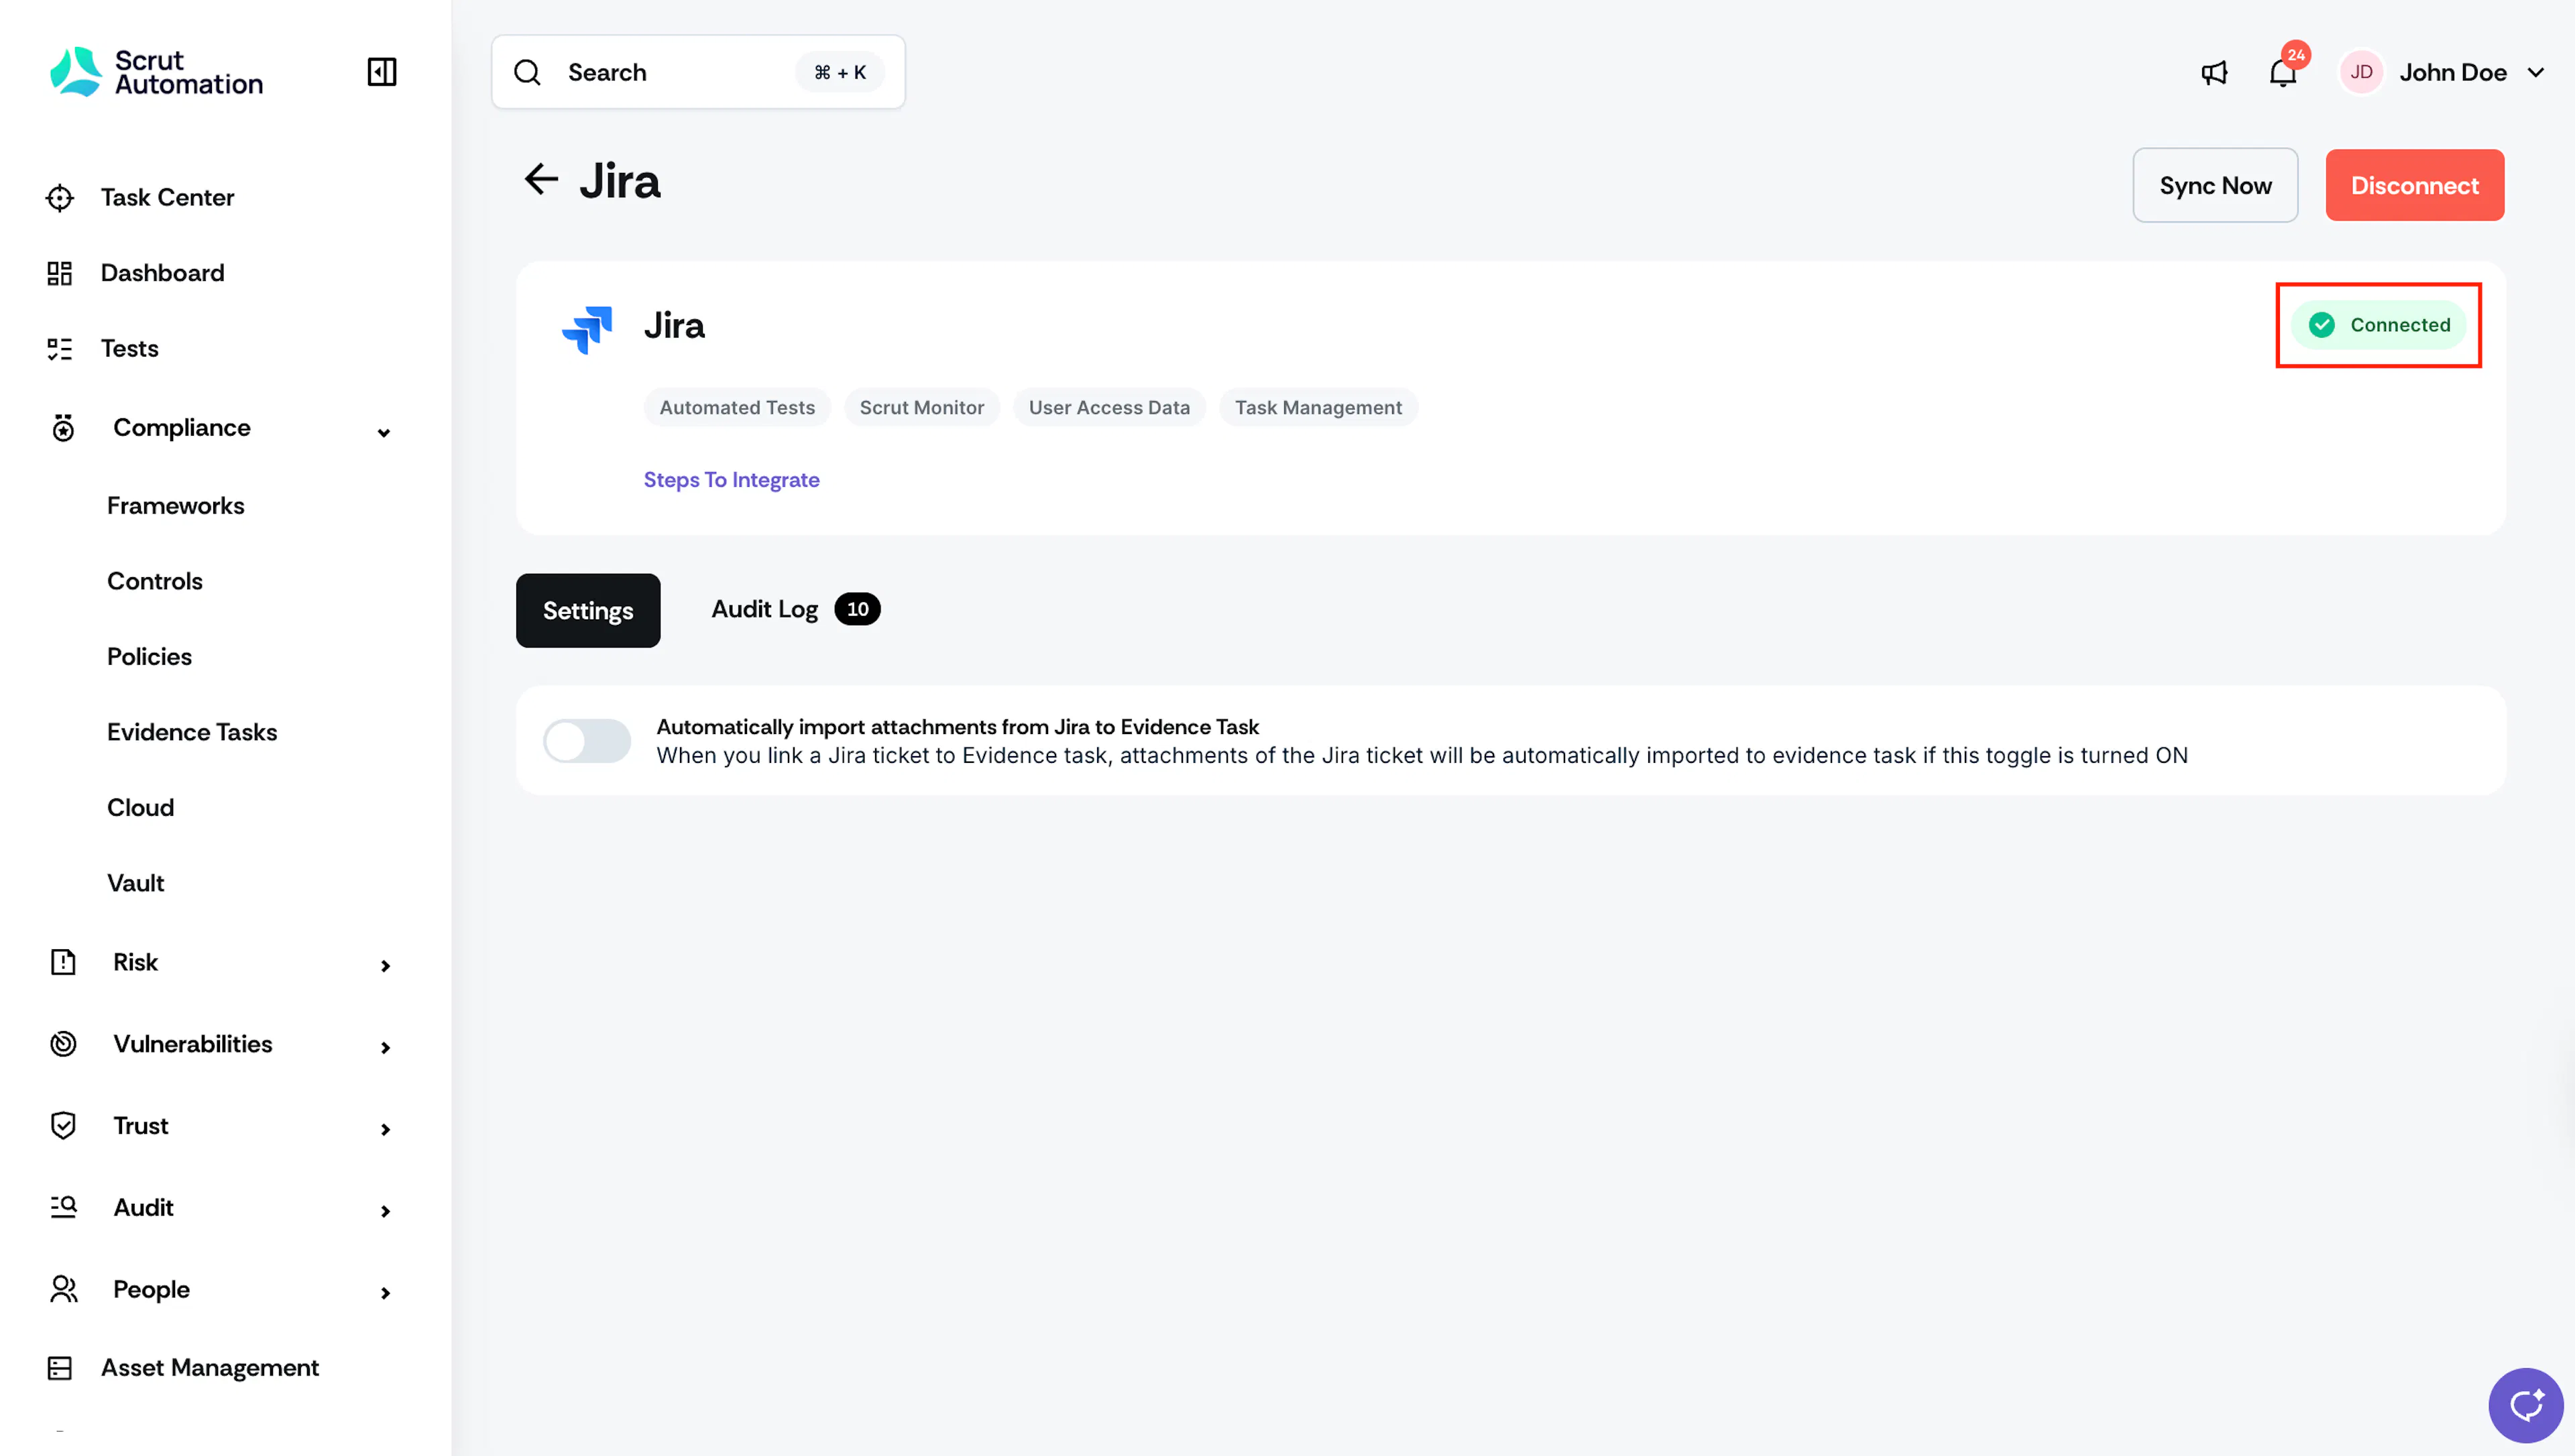
You are redirected back to Scrut. A Connected Successfully message and the Connected status indicator confirm the integration is active.
Step 3: Configure Integration Settings (Optional)
- On the Jira integration page, go to the Settings tab.
- Turn on the Automatically Import Attachments from Jira to Evidence Task toggle. When enabled, this feature automatically fetches attachments from Jira tickets to the corresponding linked evidence tasks.
- A confirmation dialog appears. Review the message and click Proceed.
Note: Enabling this toggle creates a webhook in your Jira account. This webhook is used to pull attachments automatically from Jira tickets linked to evidence tasks in the Evidence Tasks section in Scrut.
What Happens Next?
Initial Data Sync
After the integration is authorized, Scrut begins automatically syncing data from your Jira account. You can monitor sync activity and review connection events in the Audit Log tab on the Jira integration page. To manually trigger a sync, navigate to the Jira integration settings and use the manual sync option.
Review Synced Data
Once the sync completes, verify that data has landed correctly in the following modules:
- Navigate to Tests to view automated test results and flagged misconfigurations. Use the Applications filter set to Jira to view only Jira-specific tests.
- Navigate to Evidence Tasks to set up a Scrut Monitor to automate evidence collection from Jira. See here for step-by-step instructions on setting up a Scrut Monitor for Jira.
- Navigate to People → Access Reviews to create an access review and validate access data pulled from Jira.
- Create or link Jira tickets to track compliance issues. See here for step-by-step instructions to create a Jira ticket.
Common Errors and Troubleshooting
Connection fails during authorization
Possible solutions: Make sure you are logged in to the correct Jira account before clicking Connect in Scrut. Check that your Jira account has administrator-level access. Non-admin accounts may not be able to grant all required scopes. If the error persists, try clearing browser cookies and retrying the OAuth flow in an incognito window.
User data not appearing in Access Reviews
Possible solutions: Confirm the integration status shows Connected on the Jira integration page. Wait for the first sync to complete. Initial data may take up to 24 hours to appear. Trigger a manual sync from the integration settings and check the Audit Log for any errors.
Jira ticket attachments not importing
Possible solutions: Confirm that the "Automatically Import Attachments from Jira to Evidence Task” toggle is turned on in Jira integration settings. Check that the Jira ticket is correctly linked to an evidence task in Scrut. Attachments are only imported for linked tickets. Verify that the file types attached in Jira are supported (screenshots, PDFs, spreadsheets, and documentation files).
Automated Tests not running
Possible solutions: Confirm that all required OAuth scopes were accepted during the authorization step. If in doubt, disconnect and reconnect the integration to re-trigger the permission flow. Check the Audit Log for sync errors that may indicate a scope issue.
FAQs
Reach out to support@scrut.io or contact your CSM for further assistance.