

Integrate Freshservice
Connecting Freshservice to Scrut enables you to create and sync tickets, conduct Access Reviews, collect ticket-based compliance evidence through Scrut Monitor, and automate ticket creation when compliance items require attention. This guide explains how to connect Freshservice with Scrut.
What This Integration Does in Scrut
-
Task Management: Enables you to create tickets in Scrut and sync them to Freshservice.
- Bidirectional status sync: Status changes made to a linked ticket in Freshservice are automatically reflected in Scrut.
- Ticket automation: When a linked compliance item moves to a non-compliant status, Scrut automatically creates a new Freshservice ticket to keep your team notified.
- Fetches attachments for evidence tasks: Scrut automatically pulls attachments from Freshservice for tickets linked to evidence tasks.
-
User Access Data: Fetches user details, roles, and permissions from Freshservice for Access Reviews.
-
Automated Tests: Run automated checks that continuously evaluate Freshservice for security misconfigurations and compliance checks against your applicable compliance frameworks.
-
Scrut Monitor: Collects evidence through Scrut Monitor. This helps automate evidence gathering and significantly speeds up compliance workflows.
Prerequisites
- An active Freshservice account with administrator access and API key enabled
- Your Freshservice subdomain (e.g., for acme.freshservice.com, the subdomain is acme)
Permissions and Access Requirements
For Freshservice
The API key used to connect to Freshservice uses the following read-only scopes:
- freshservice.agents.manage: Required to retrieve agent data for Access Reviews
- freshservice.agents.roles.view: Required to retrieve role data for Access Reviews
- freshservice.tickets.view: Required to fetch tickets for Scrut Monitor
- freshservice.requesters.view: Required to resolve the requester details on tickets
For Scrut
- Admin access to Scrut, or Contributor access to the Integrations module
Data Collected
For Access Reviews
- Agent_ID: Unique identifier for each Freshservice agent
- Email: Agent's email address
- Status (Active): Only active agents are included in Access Reviews because they represent Freshservice system users with privileges
- Role_ID: All roles assigned to the agent
- Role_Name: Human-readable name of the assigned role
For Scrut Monitor (Ticket Evidence Collection)
- Ticket ID: Unique identifier for the ticket
- Ticket URL: Constructed from domain + id (Format: https://<domain>/a/tickets/<ticket_id>)
- Subject: Ticket title
- Category: Ticket category
- Requester Email
- Responder Email
- Priority: Ticket priority level
- Status: Current ticket status
- Created At: Ticket creation timestamp
- Updated At: Timestamp of the last update to the ticket
Sync Frequency
Data is synced automatically once every 24 hours. You can also manually trigger a sync from the integration settings page.
Integration Setup
Step 1: Retrieve Your API Key from Freshservice
-
Log in to your Freshservice account.
-
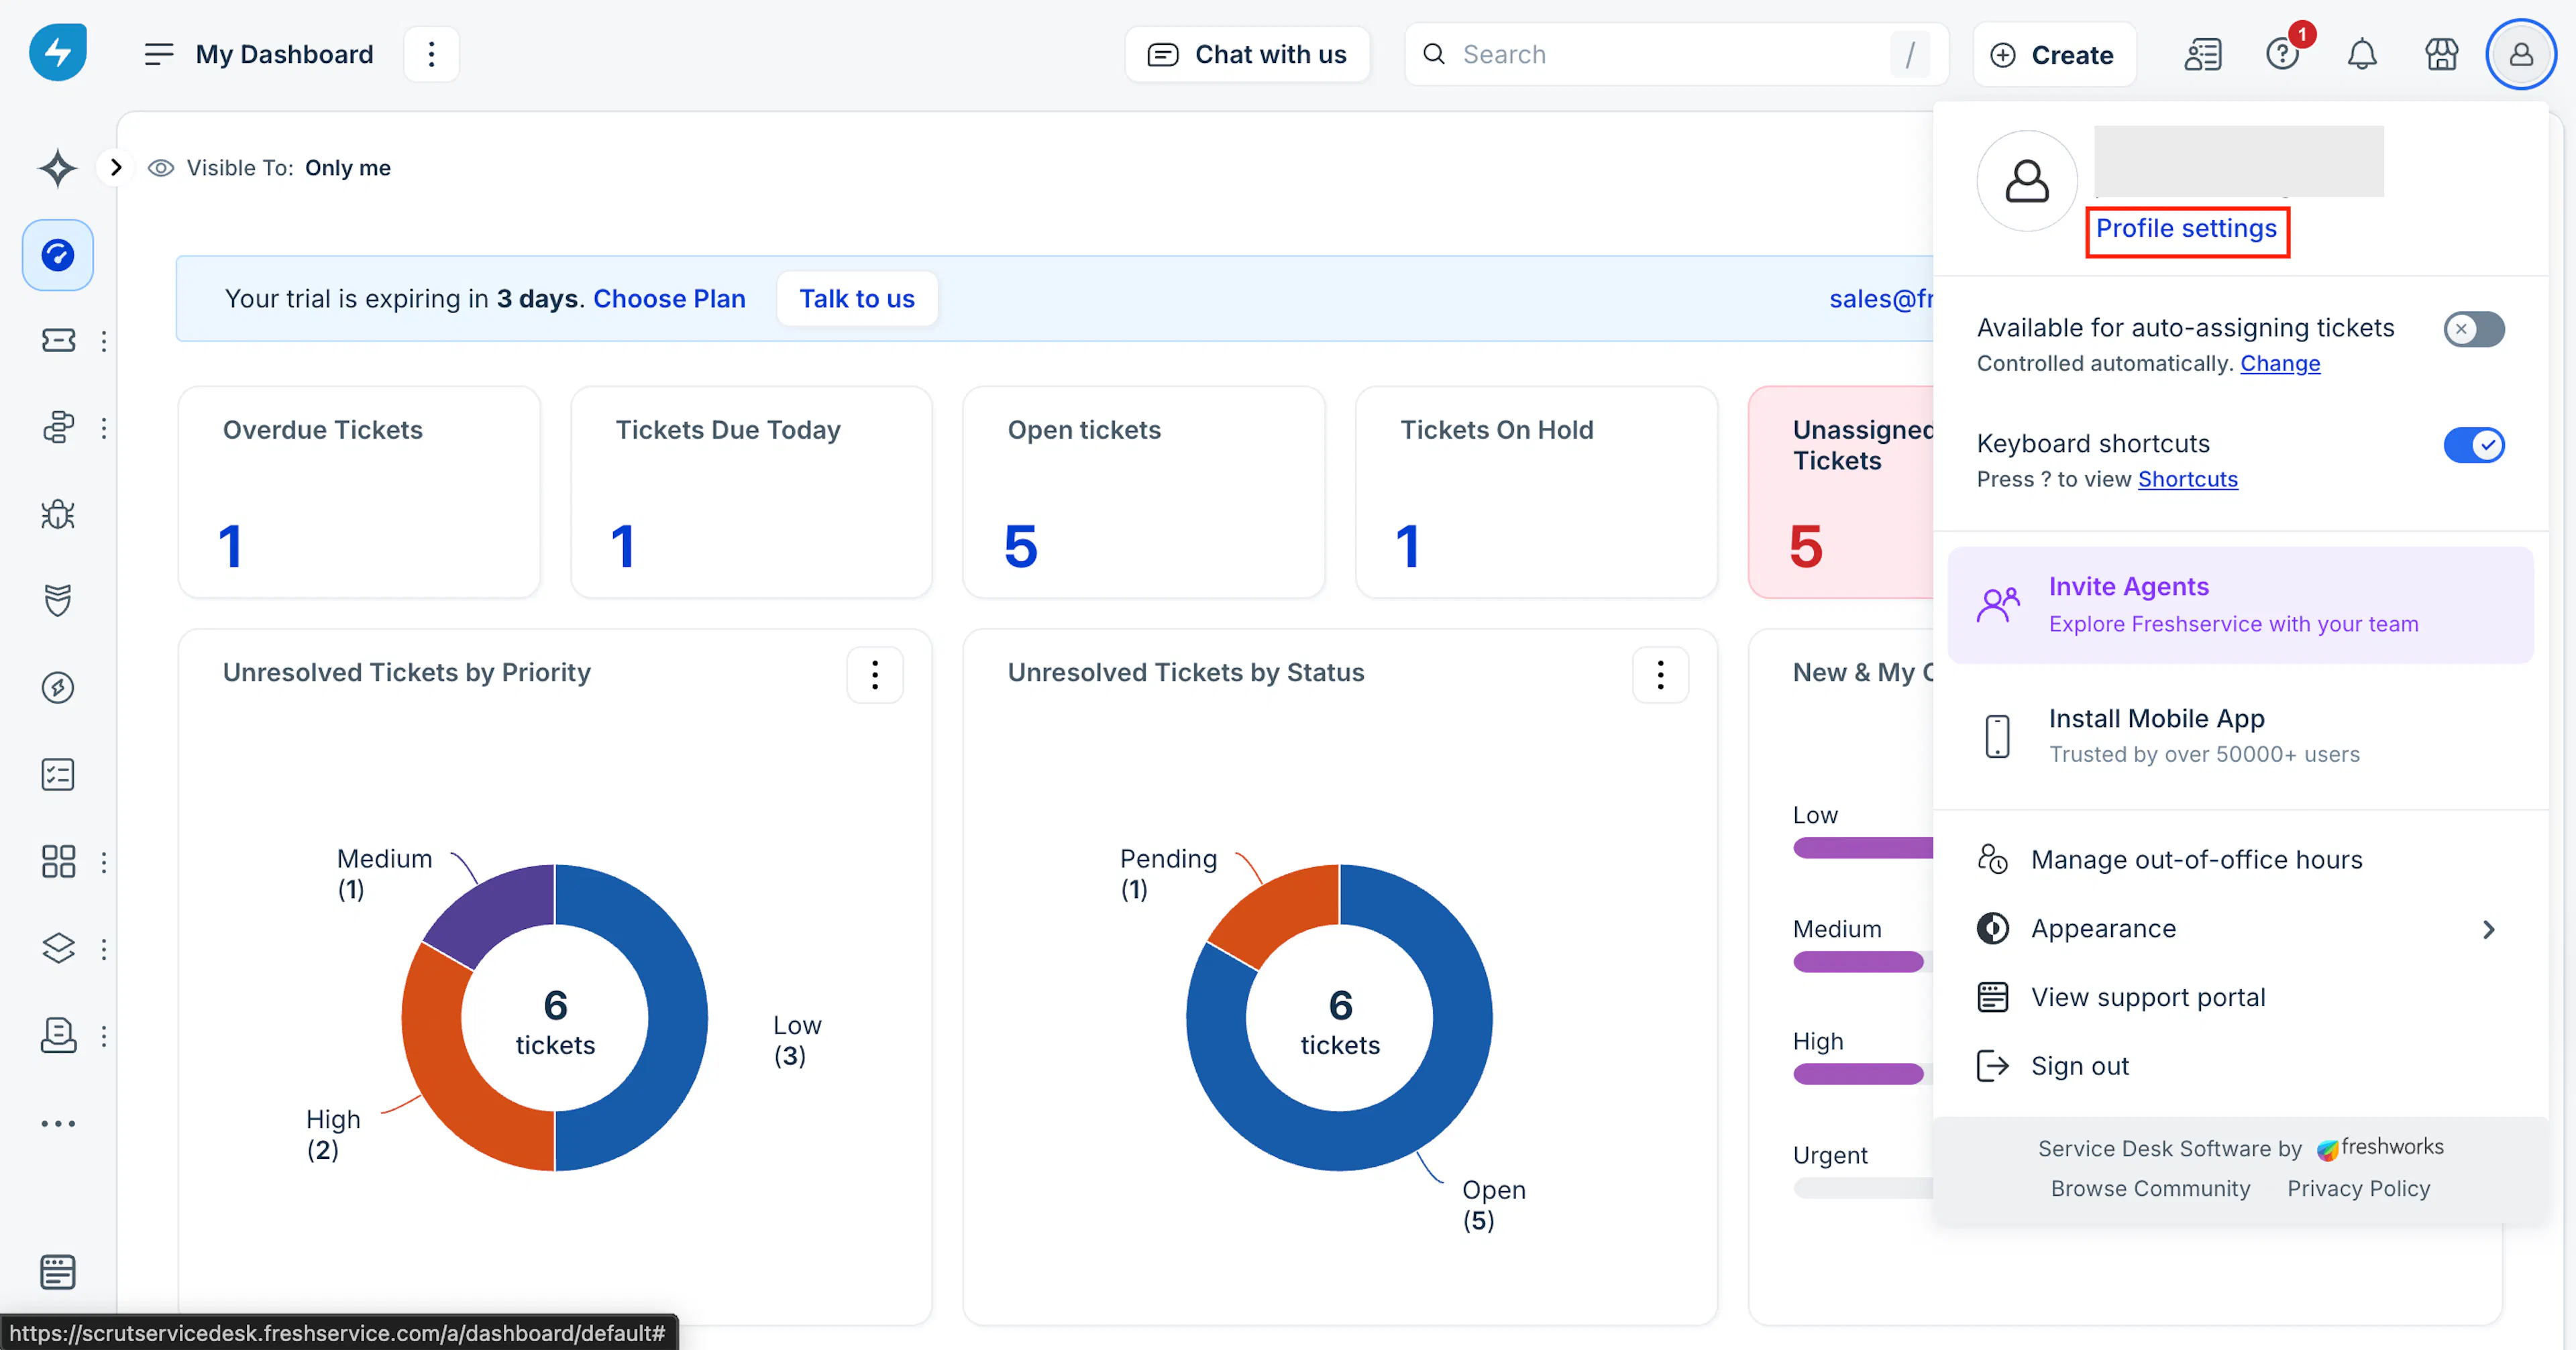
Click the profile icon in the top-right corner of the page.
-
Select Profile Settings.
-
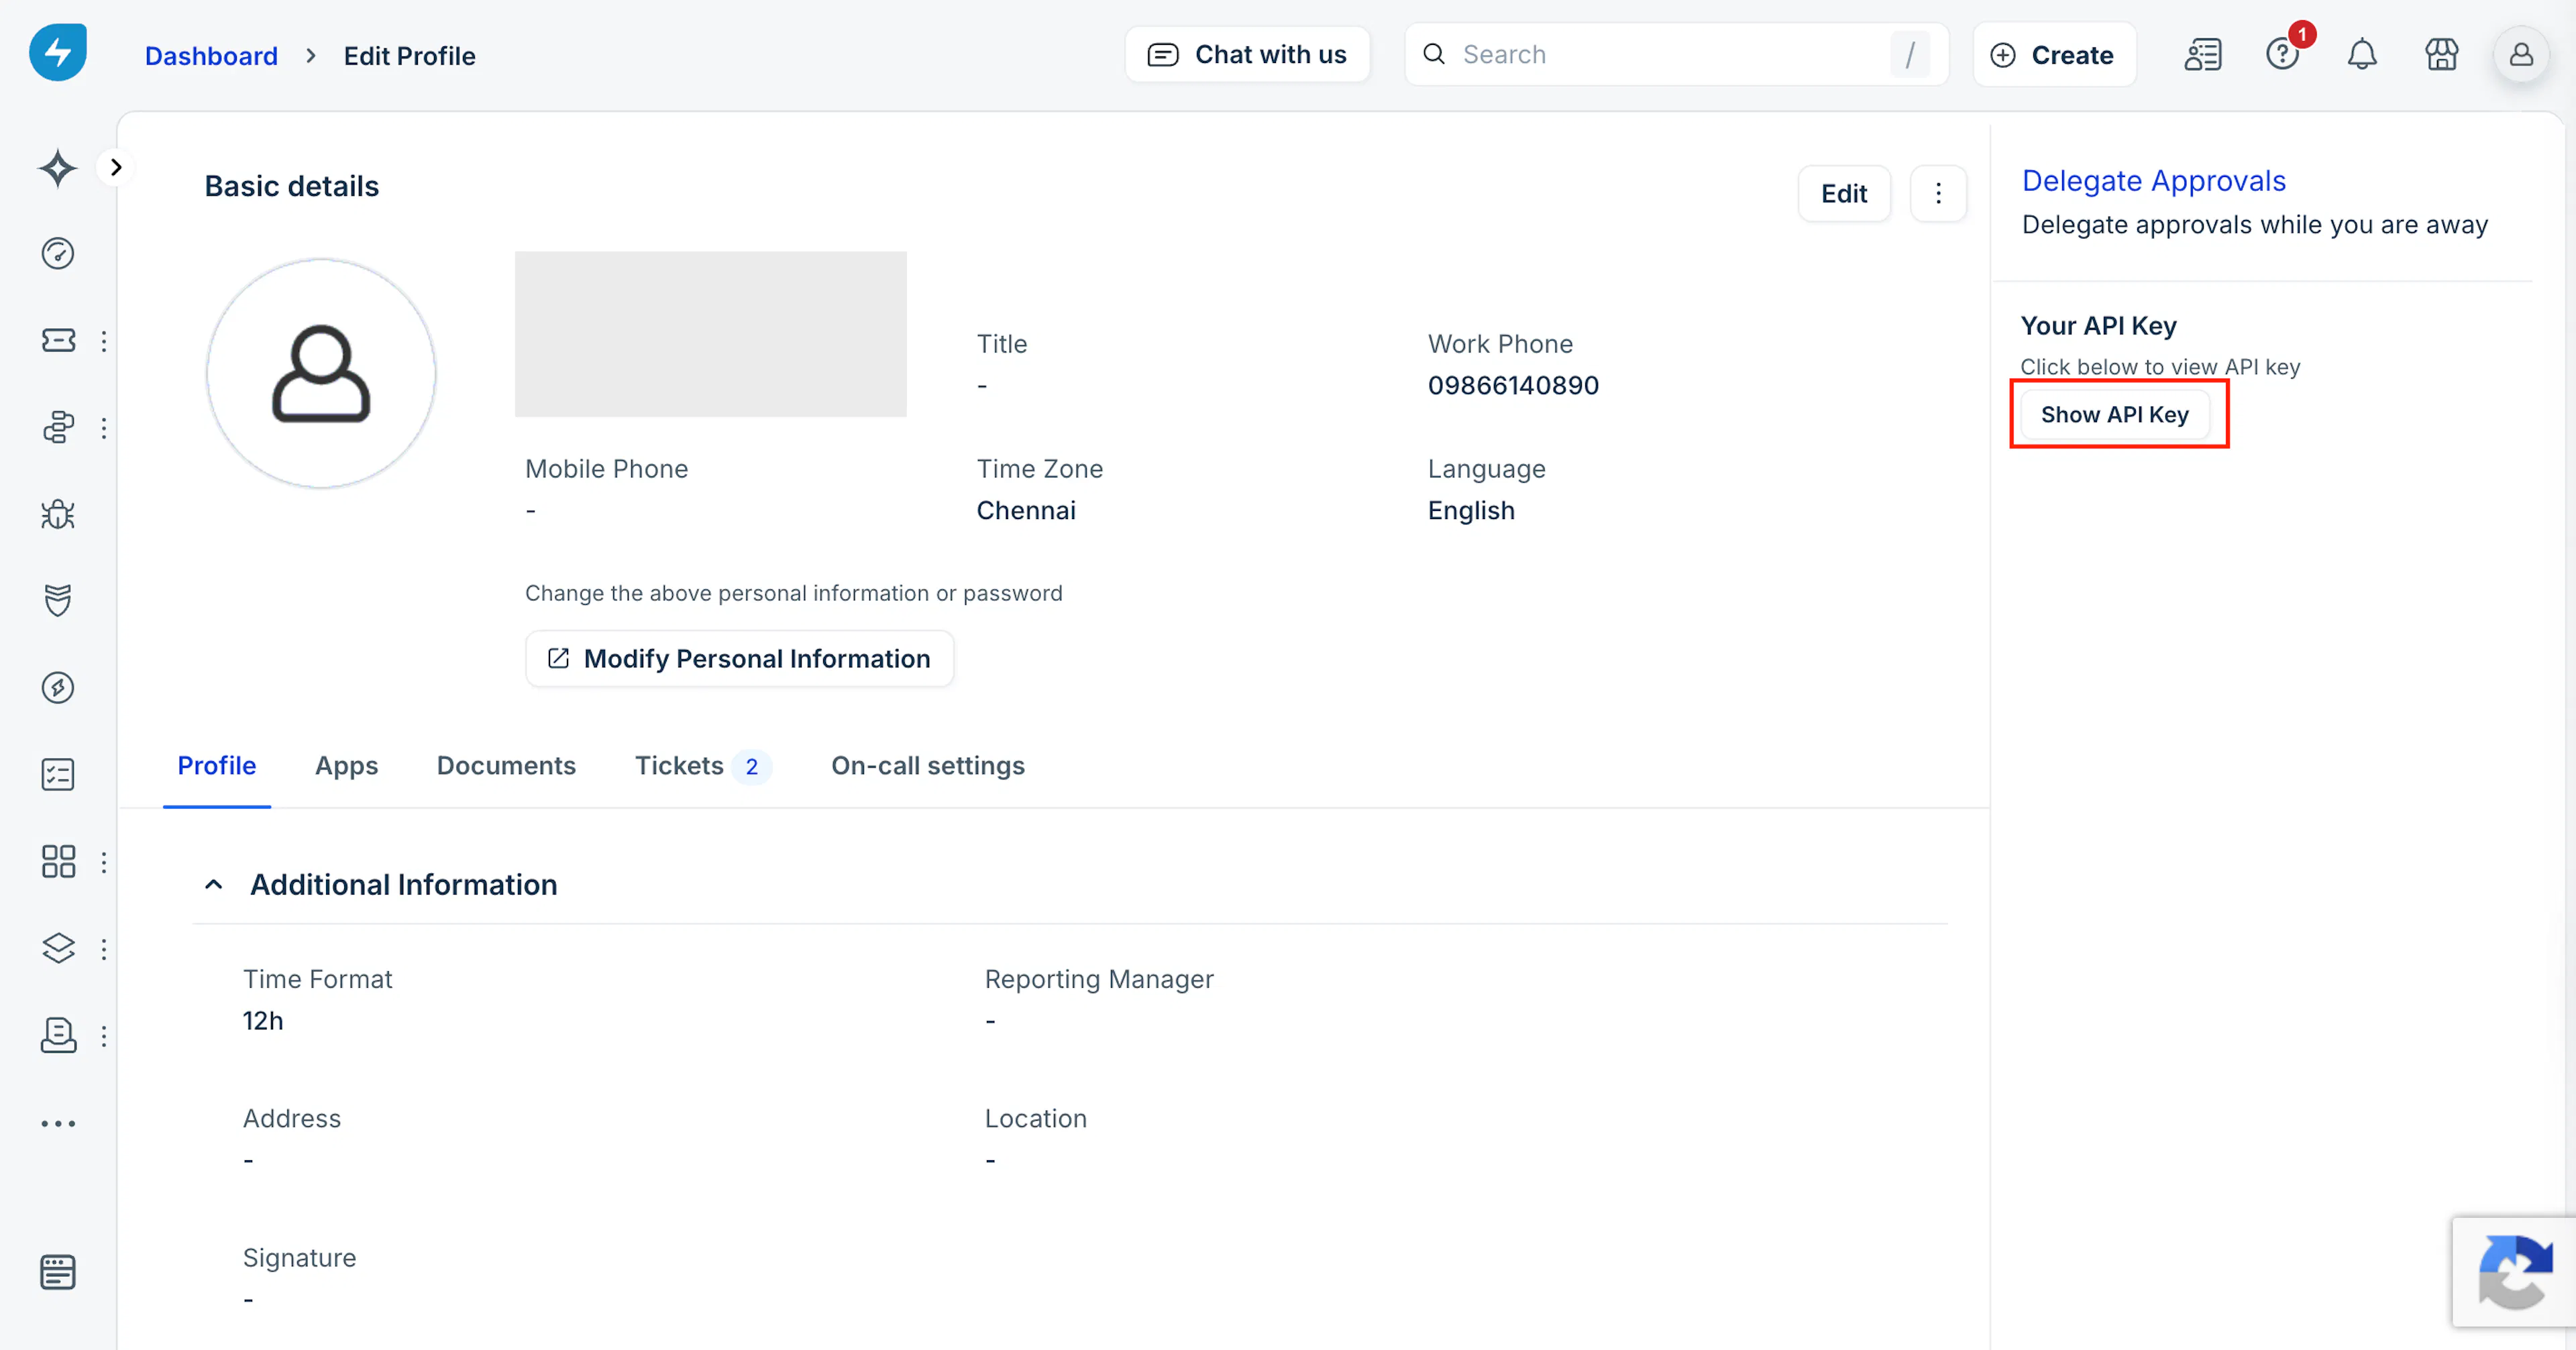
Under Your API Key on the right side of the page, click Show API Key.
-
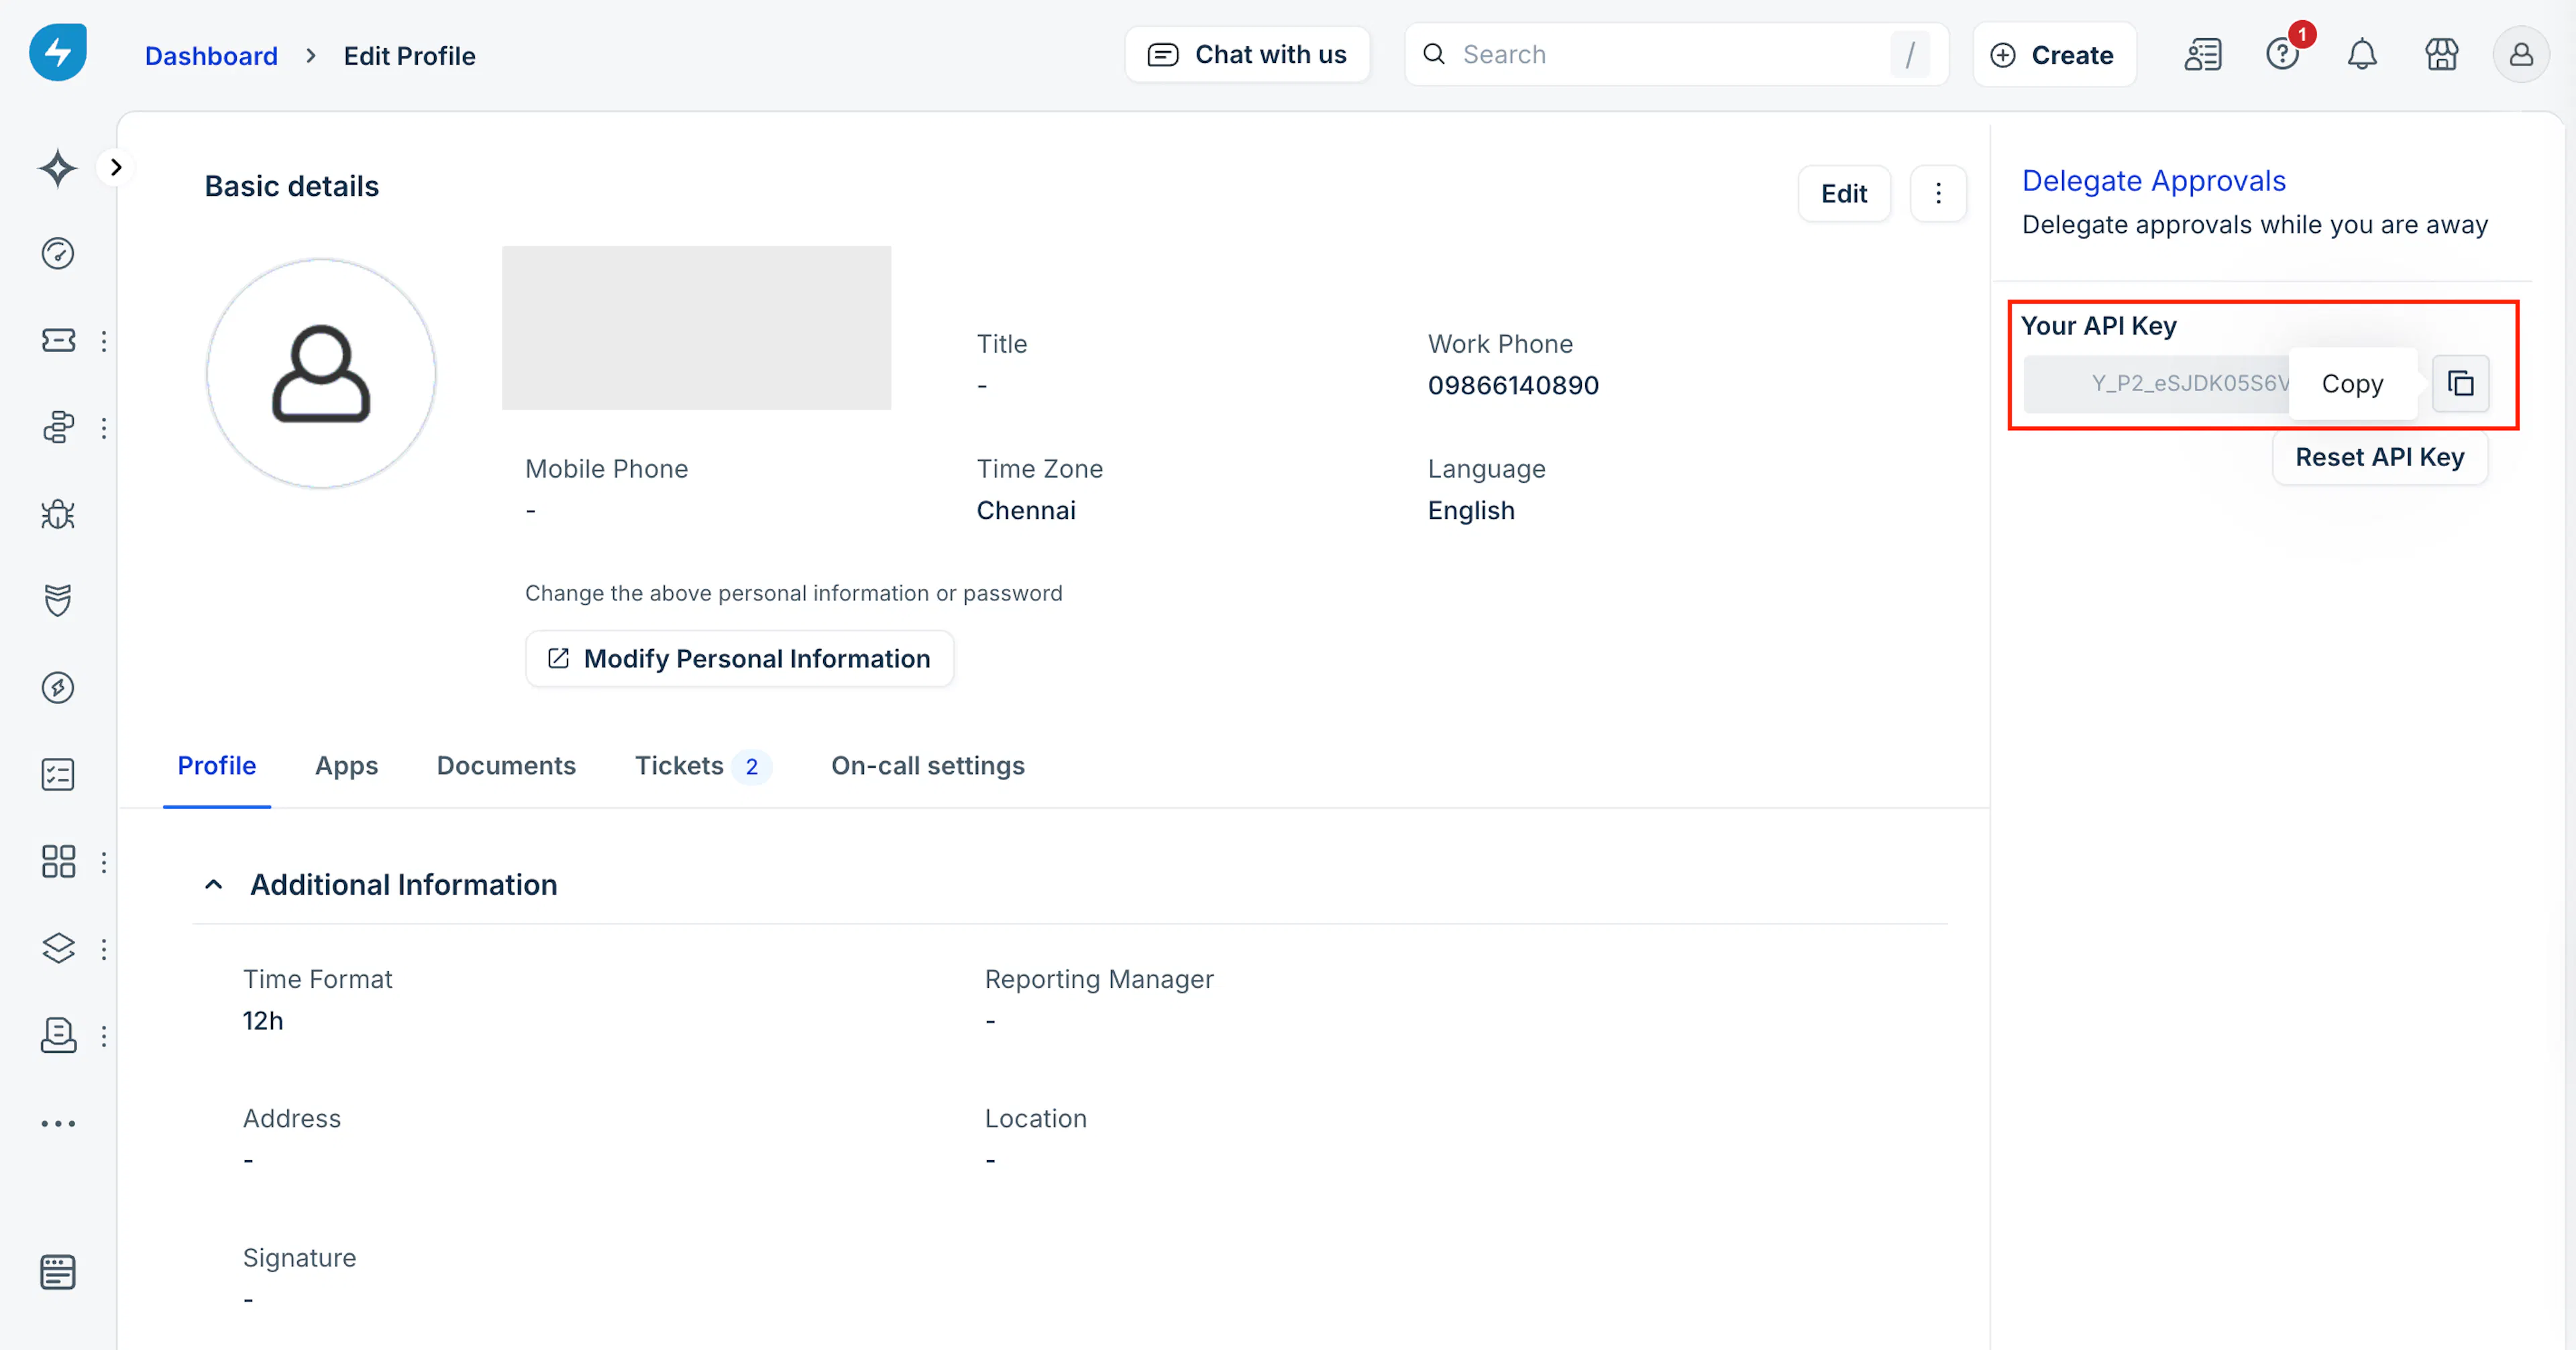
Copy the API key displayed.
Step 2: Connect Freshservice to Scrut
-
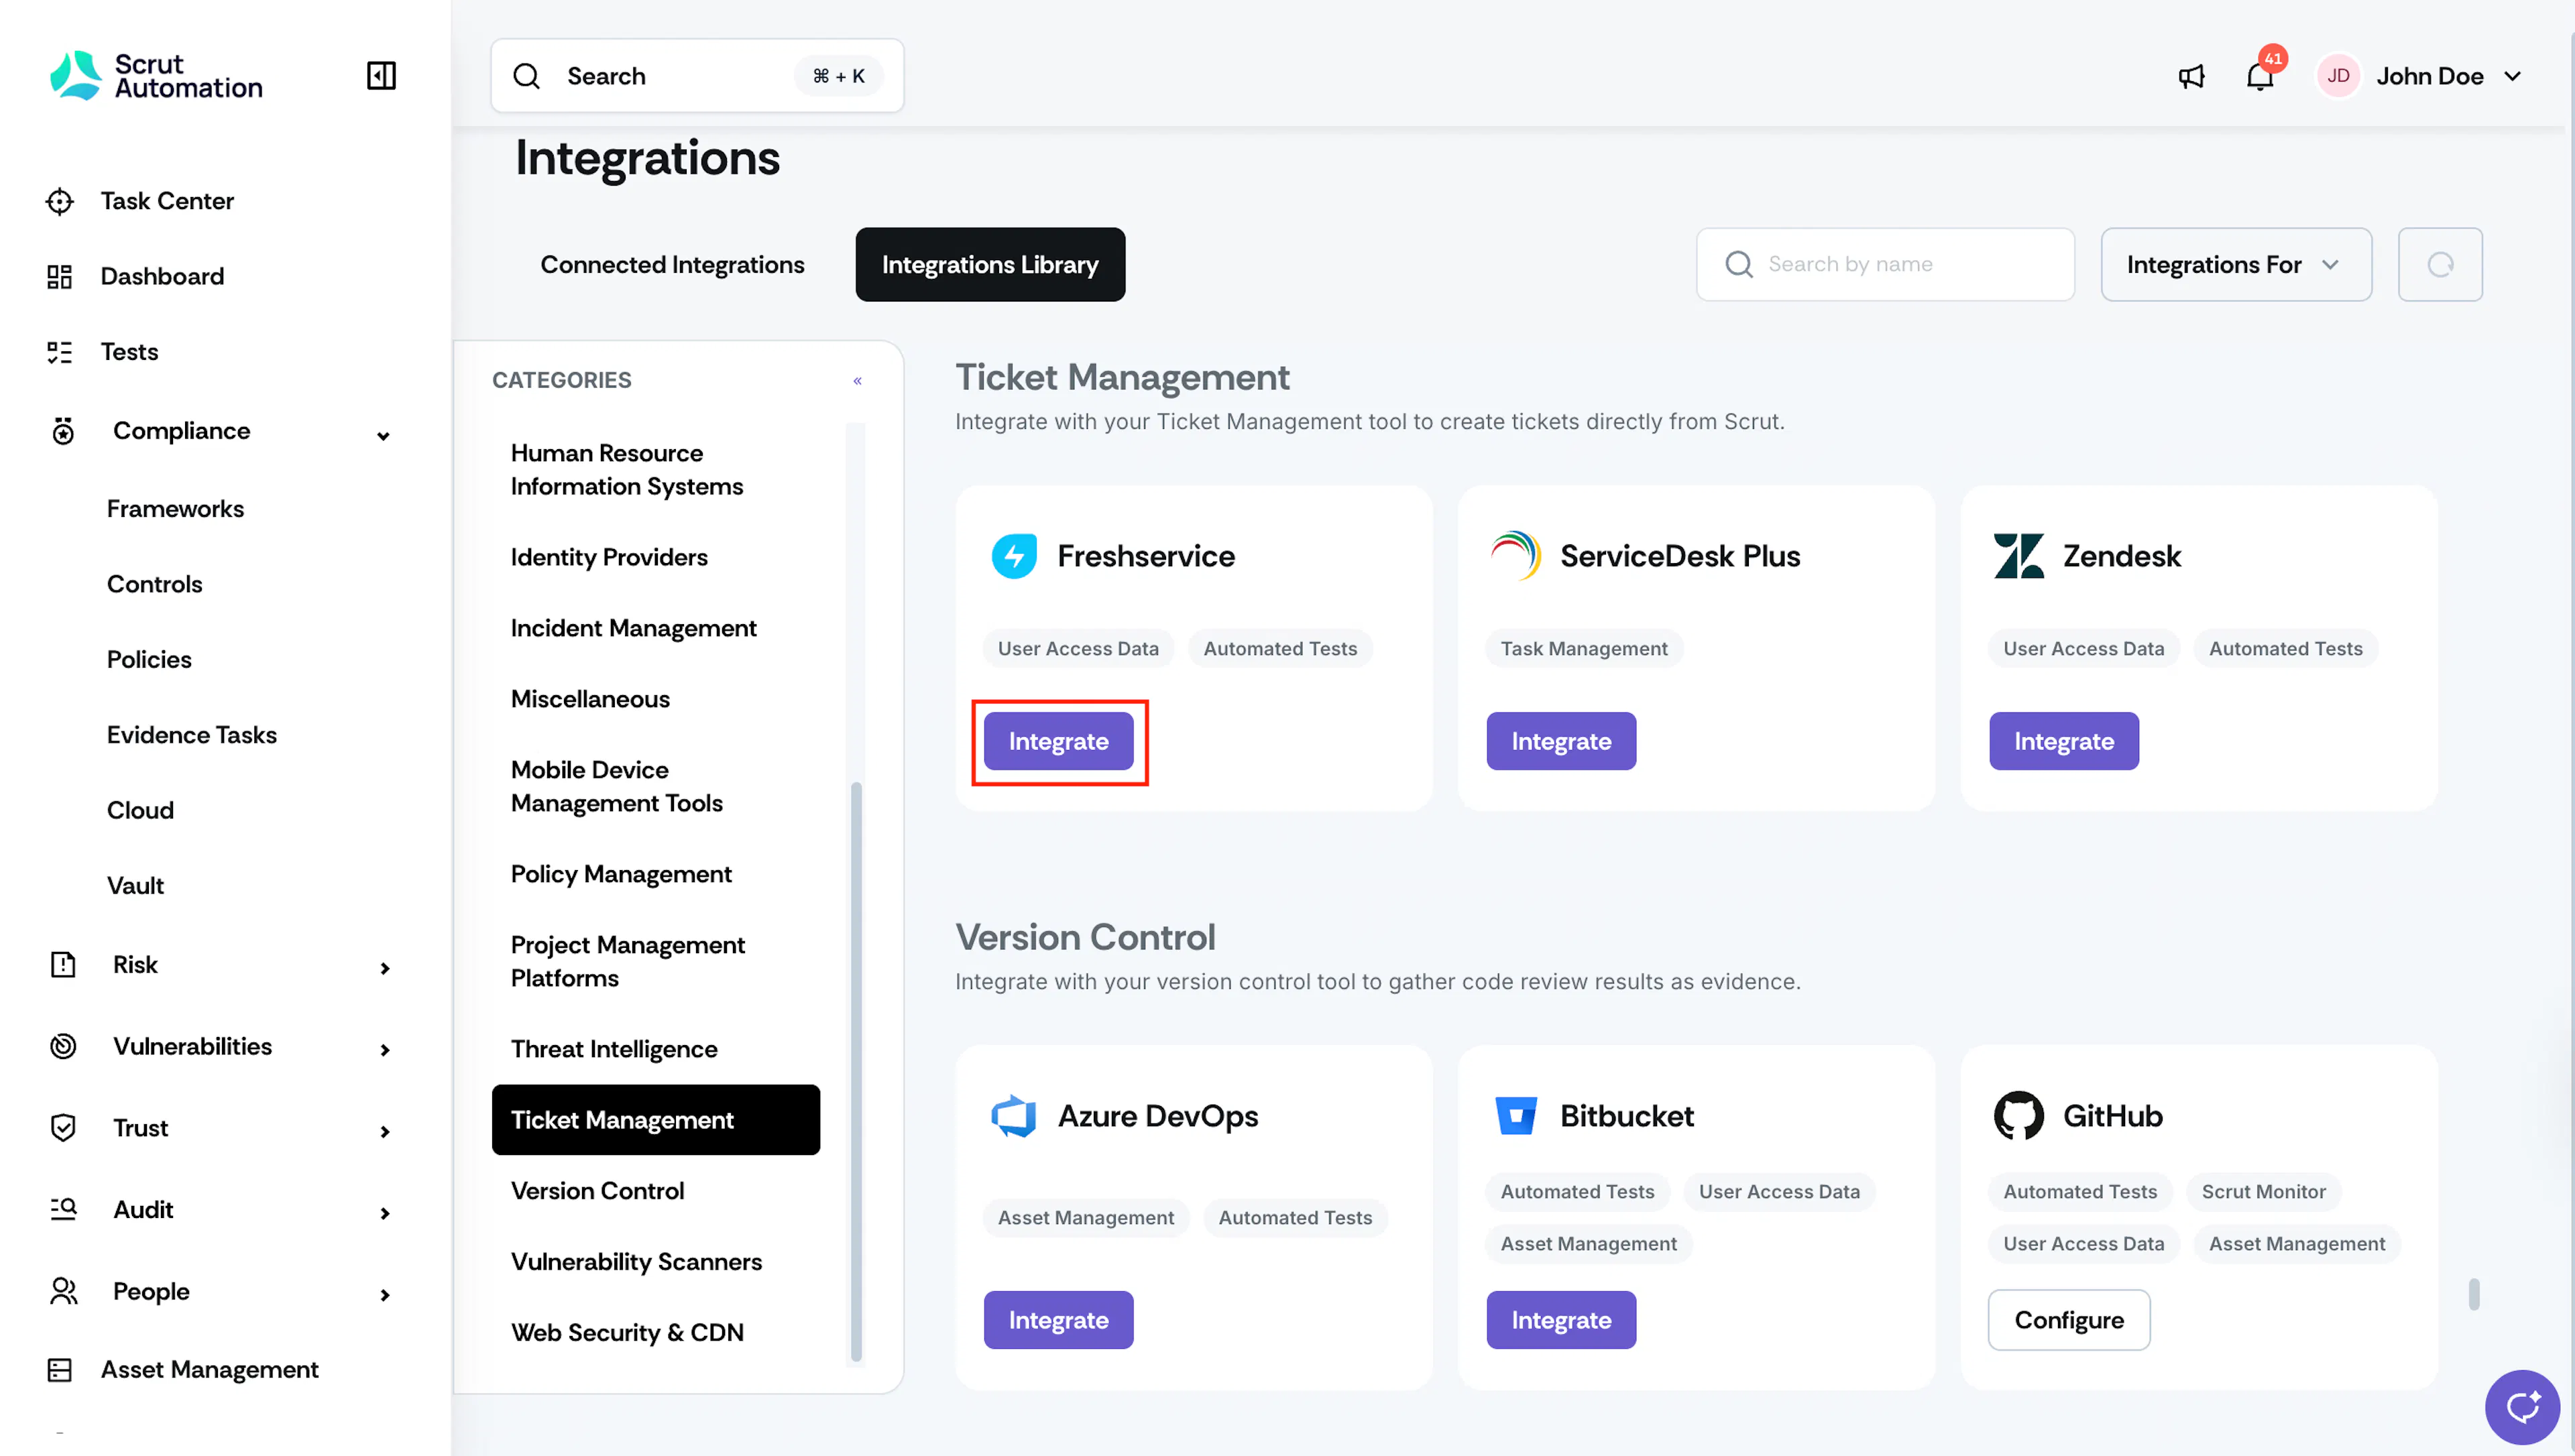
In Scrut, click Integrations in the left navigation panel.
-
Click Integrations Library.
-
Scroll to the Ticket Management section and locate Freshservice.
-
Click Integrate.
-
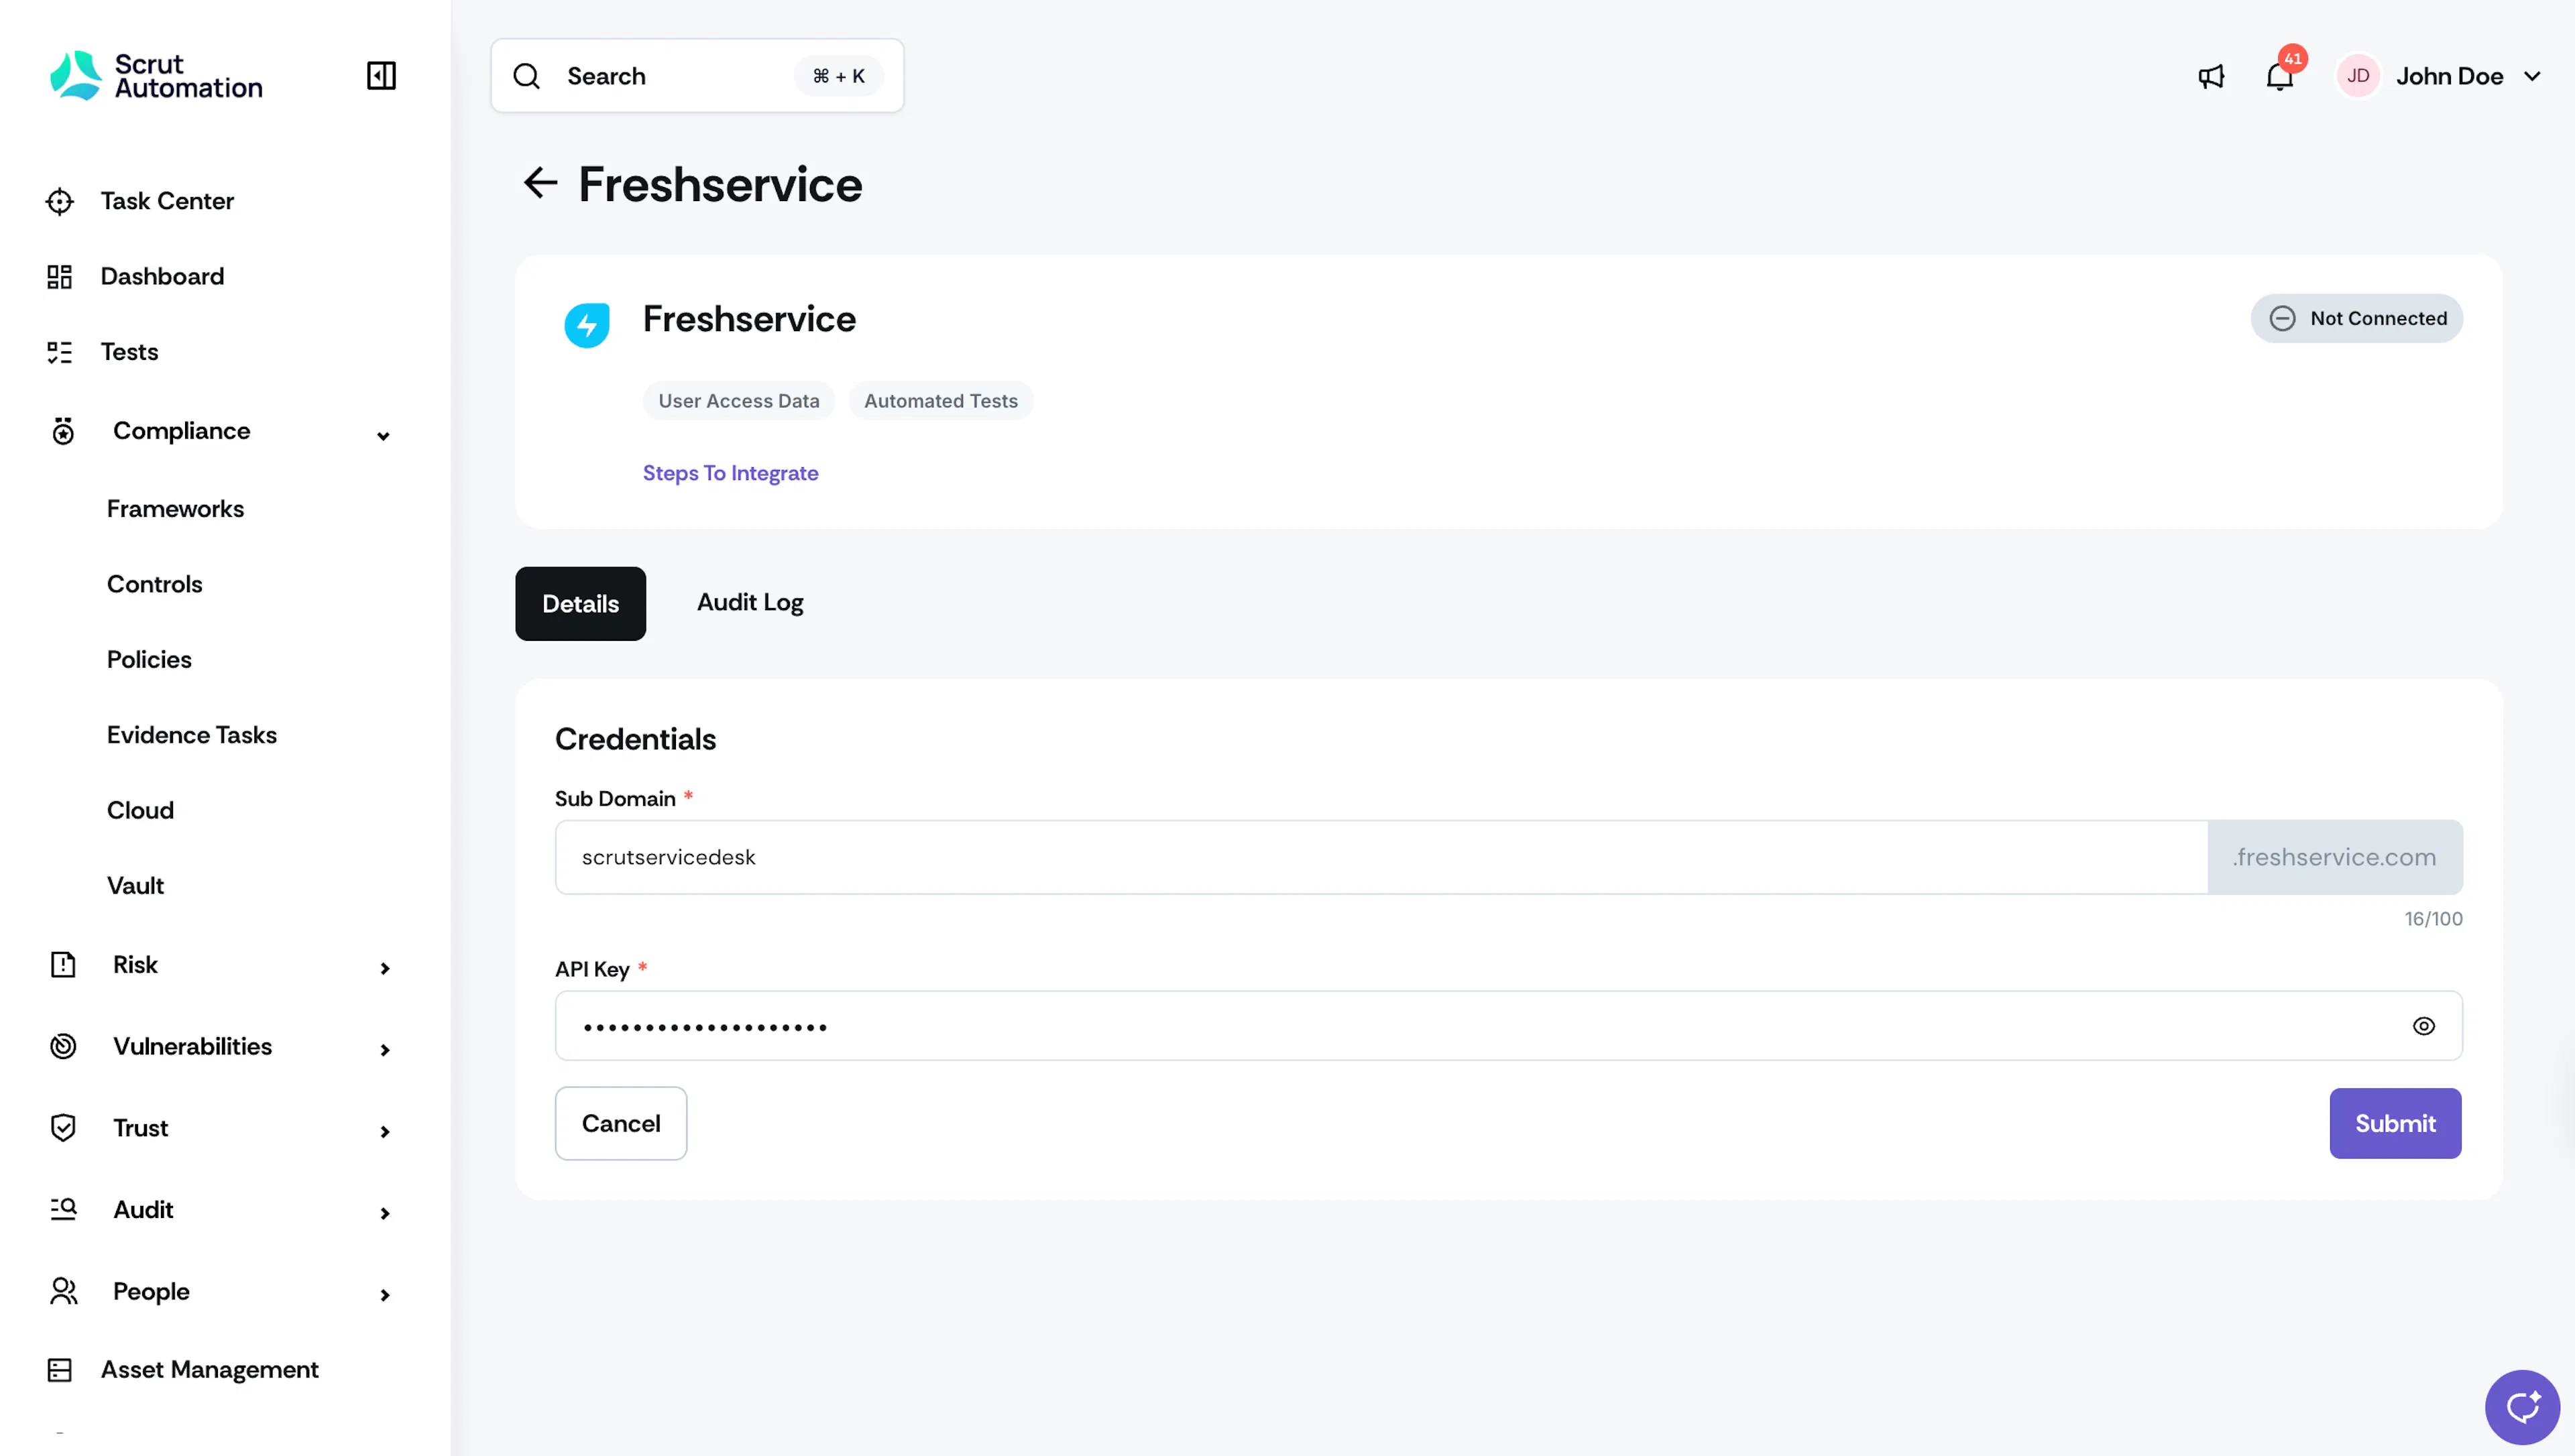
In the Sub Domain field, enter your Freshservice subdomain (e.g., for acme.freshservice.com, the subdomain is acme).
-
In the API Key field, paste the key you copied from Freshservice.
-
Click Submit.
Step 3: Configure Scope
After the integration is connected, select the Freshservice workspaces you want Scrut to pull data from.
-
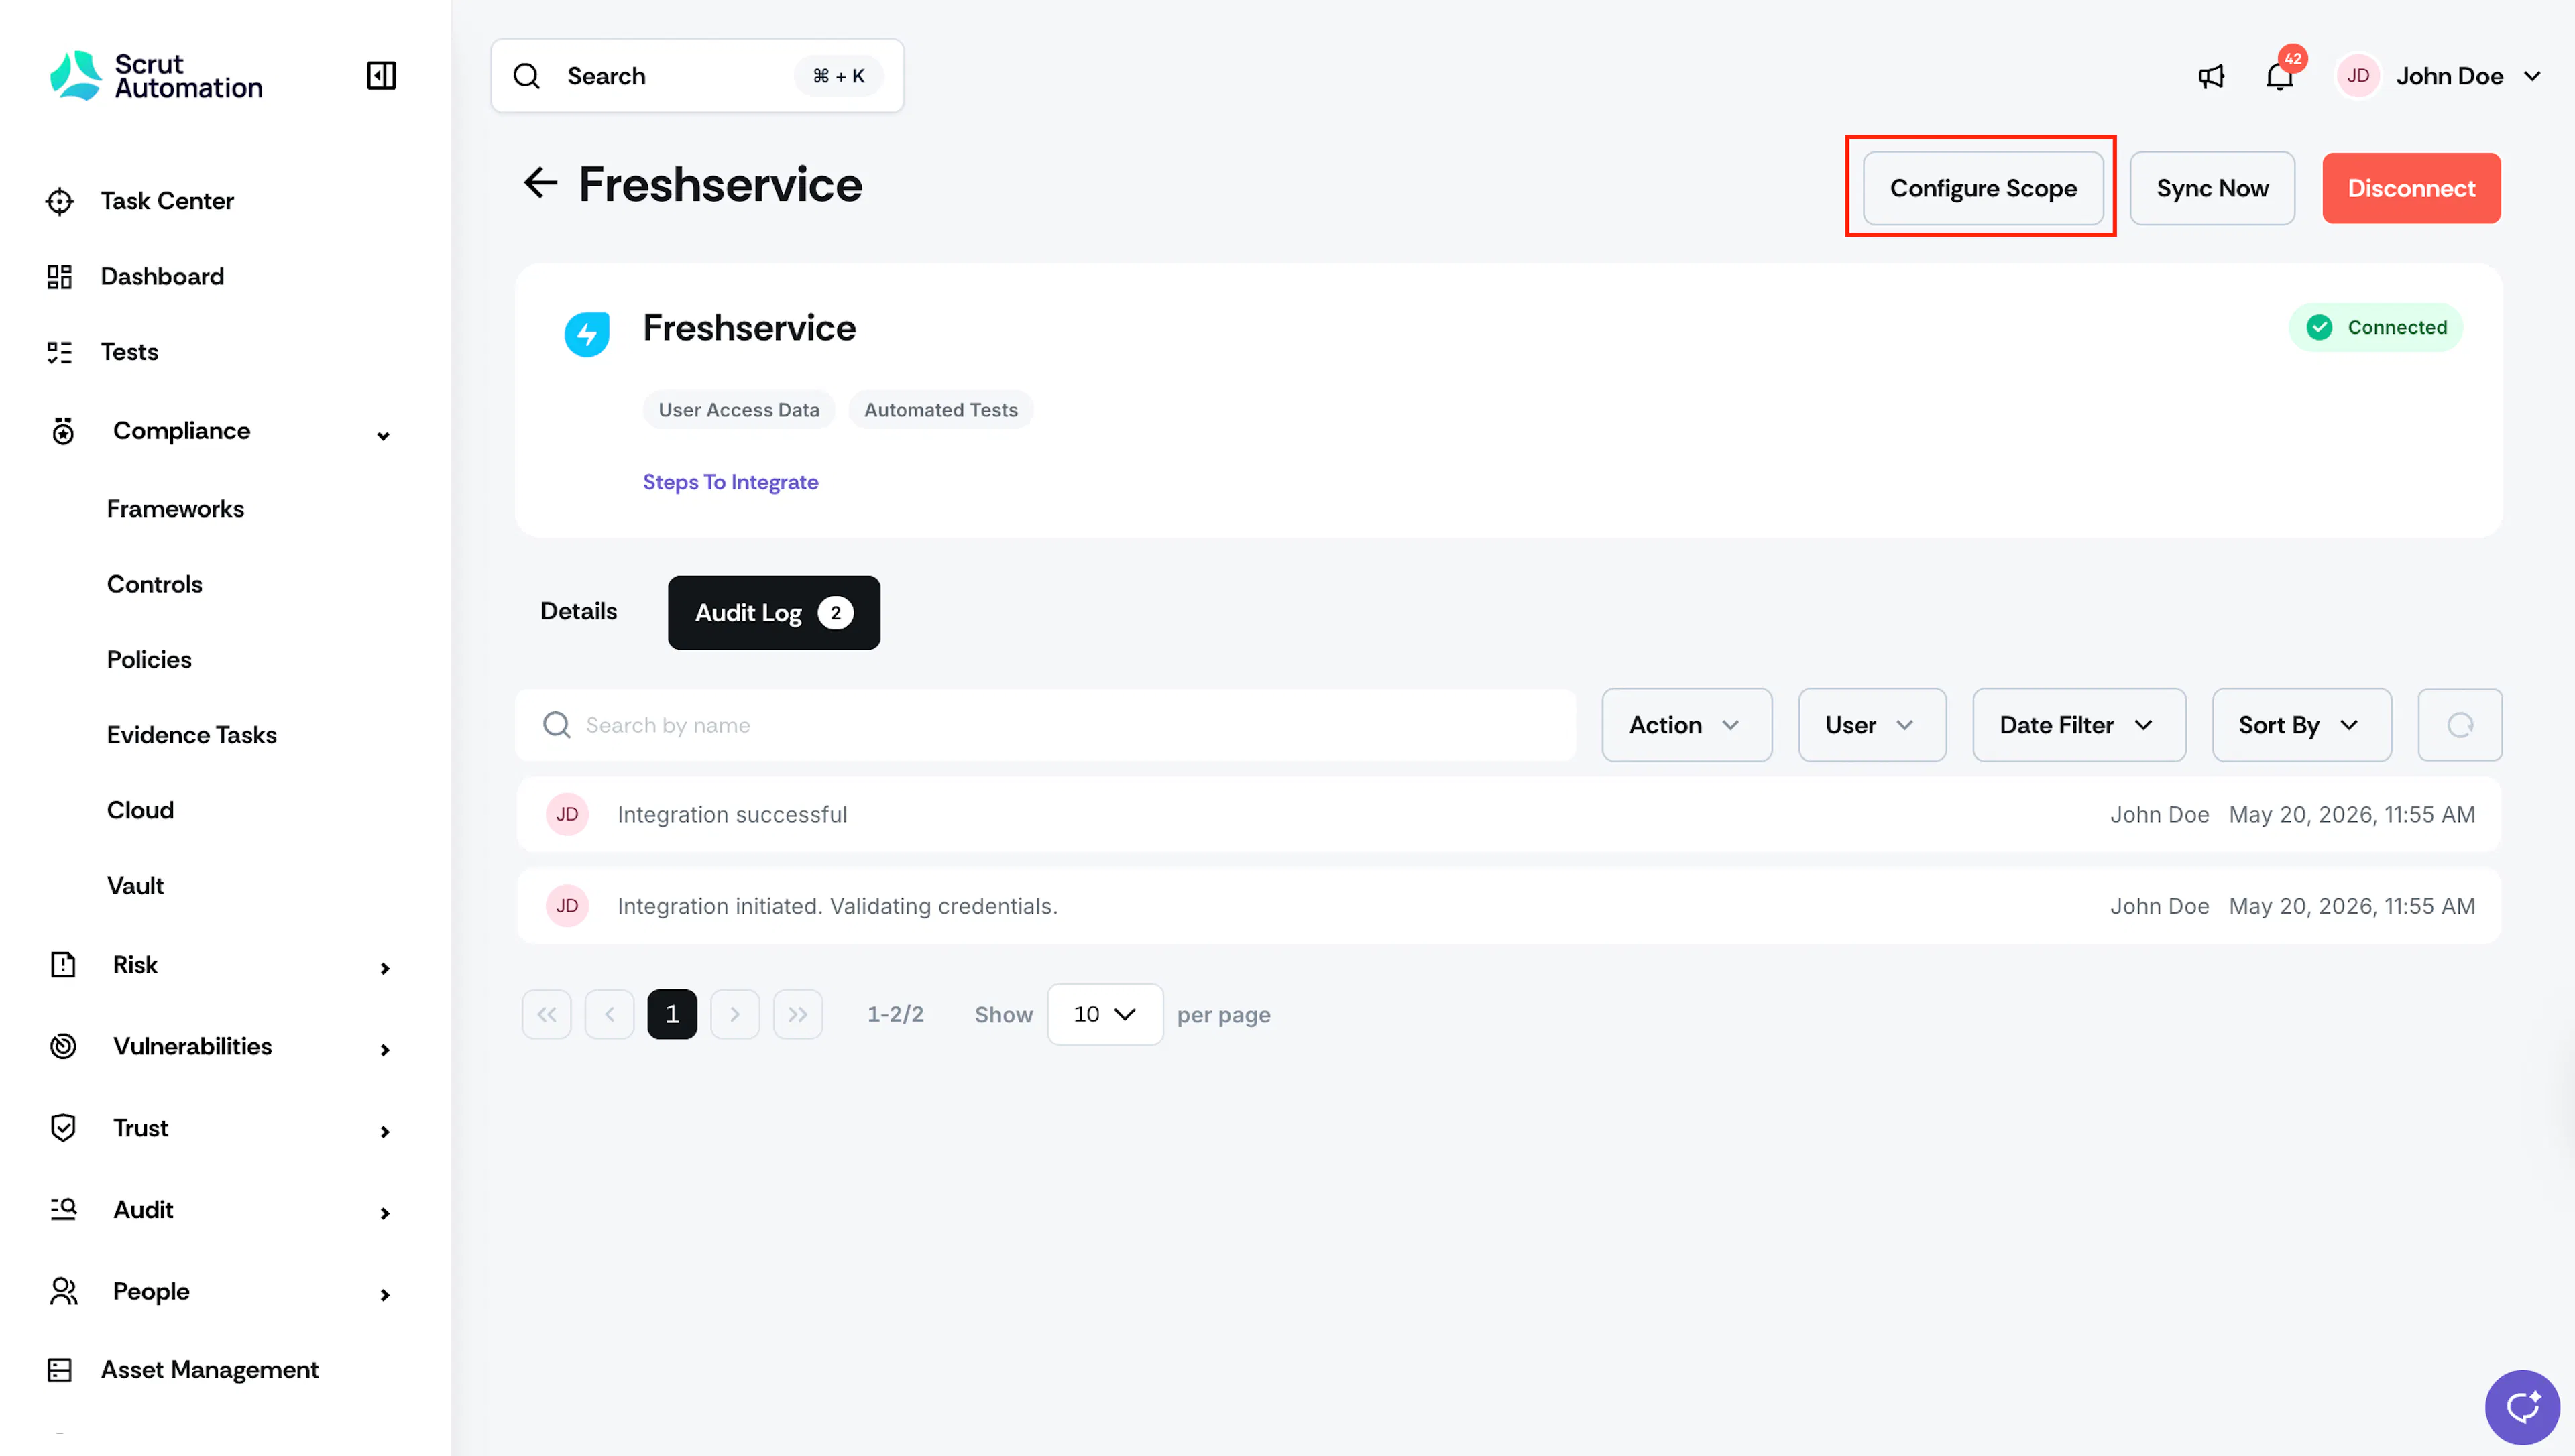
On the Freshservice integration page, click Configure Scope.
-
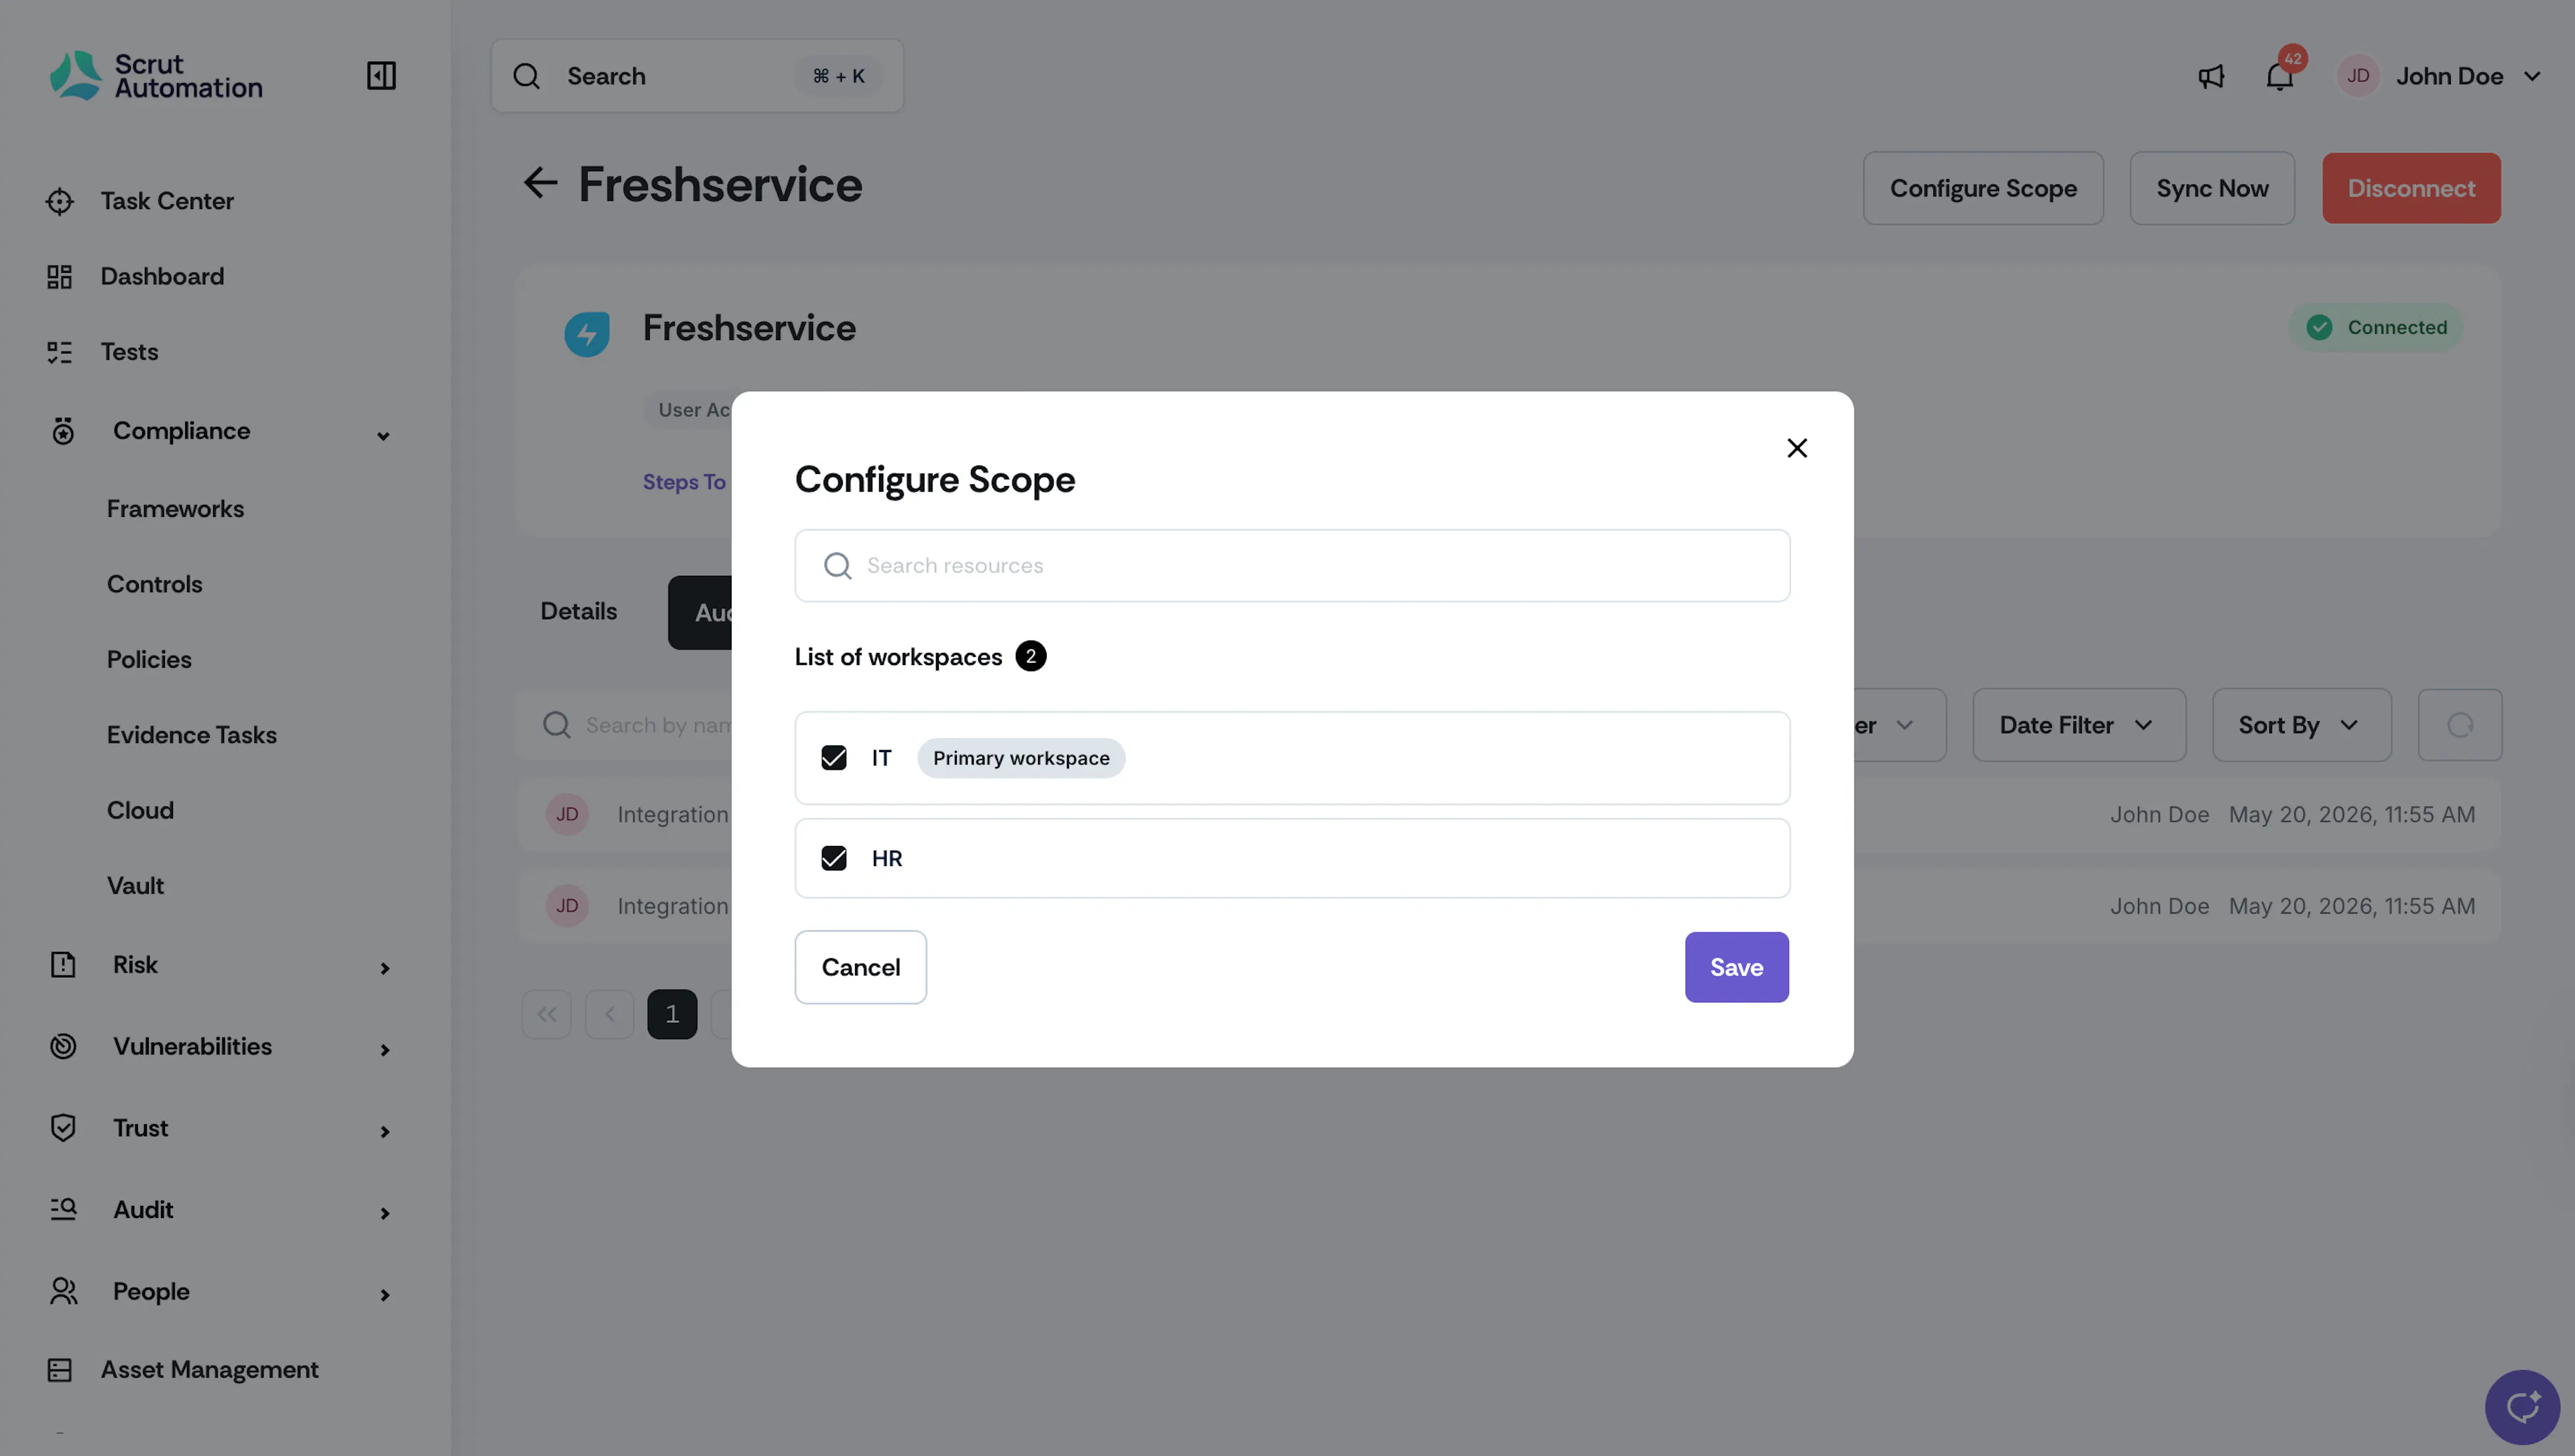
In the Configure Scope dialog, you will see a list of workspaces available in your Freshservice account.
-
Select the workspaces you want to include. You can select multiple workspaces.
-
Click Save.
Scrut begins syncing data from the selected workspaces. To change your workspace selection at any time, click Configure Scope again from the Freshservice integration page.
Step 4: [Optional] Enable Attachments for Evidence Tasks
Initial Data Sync
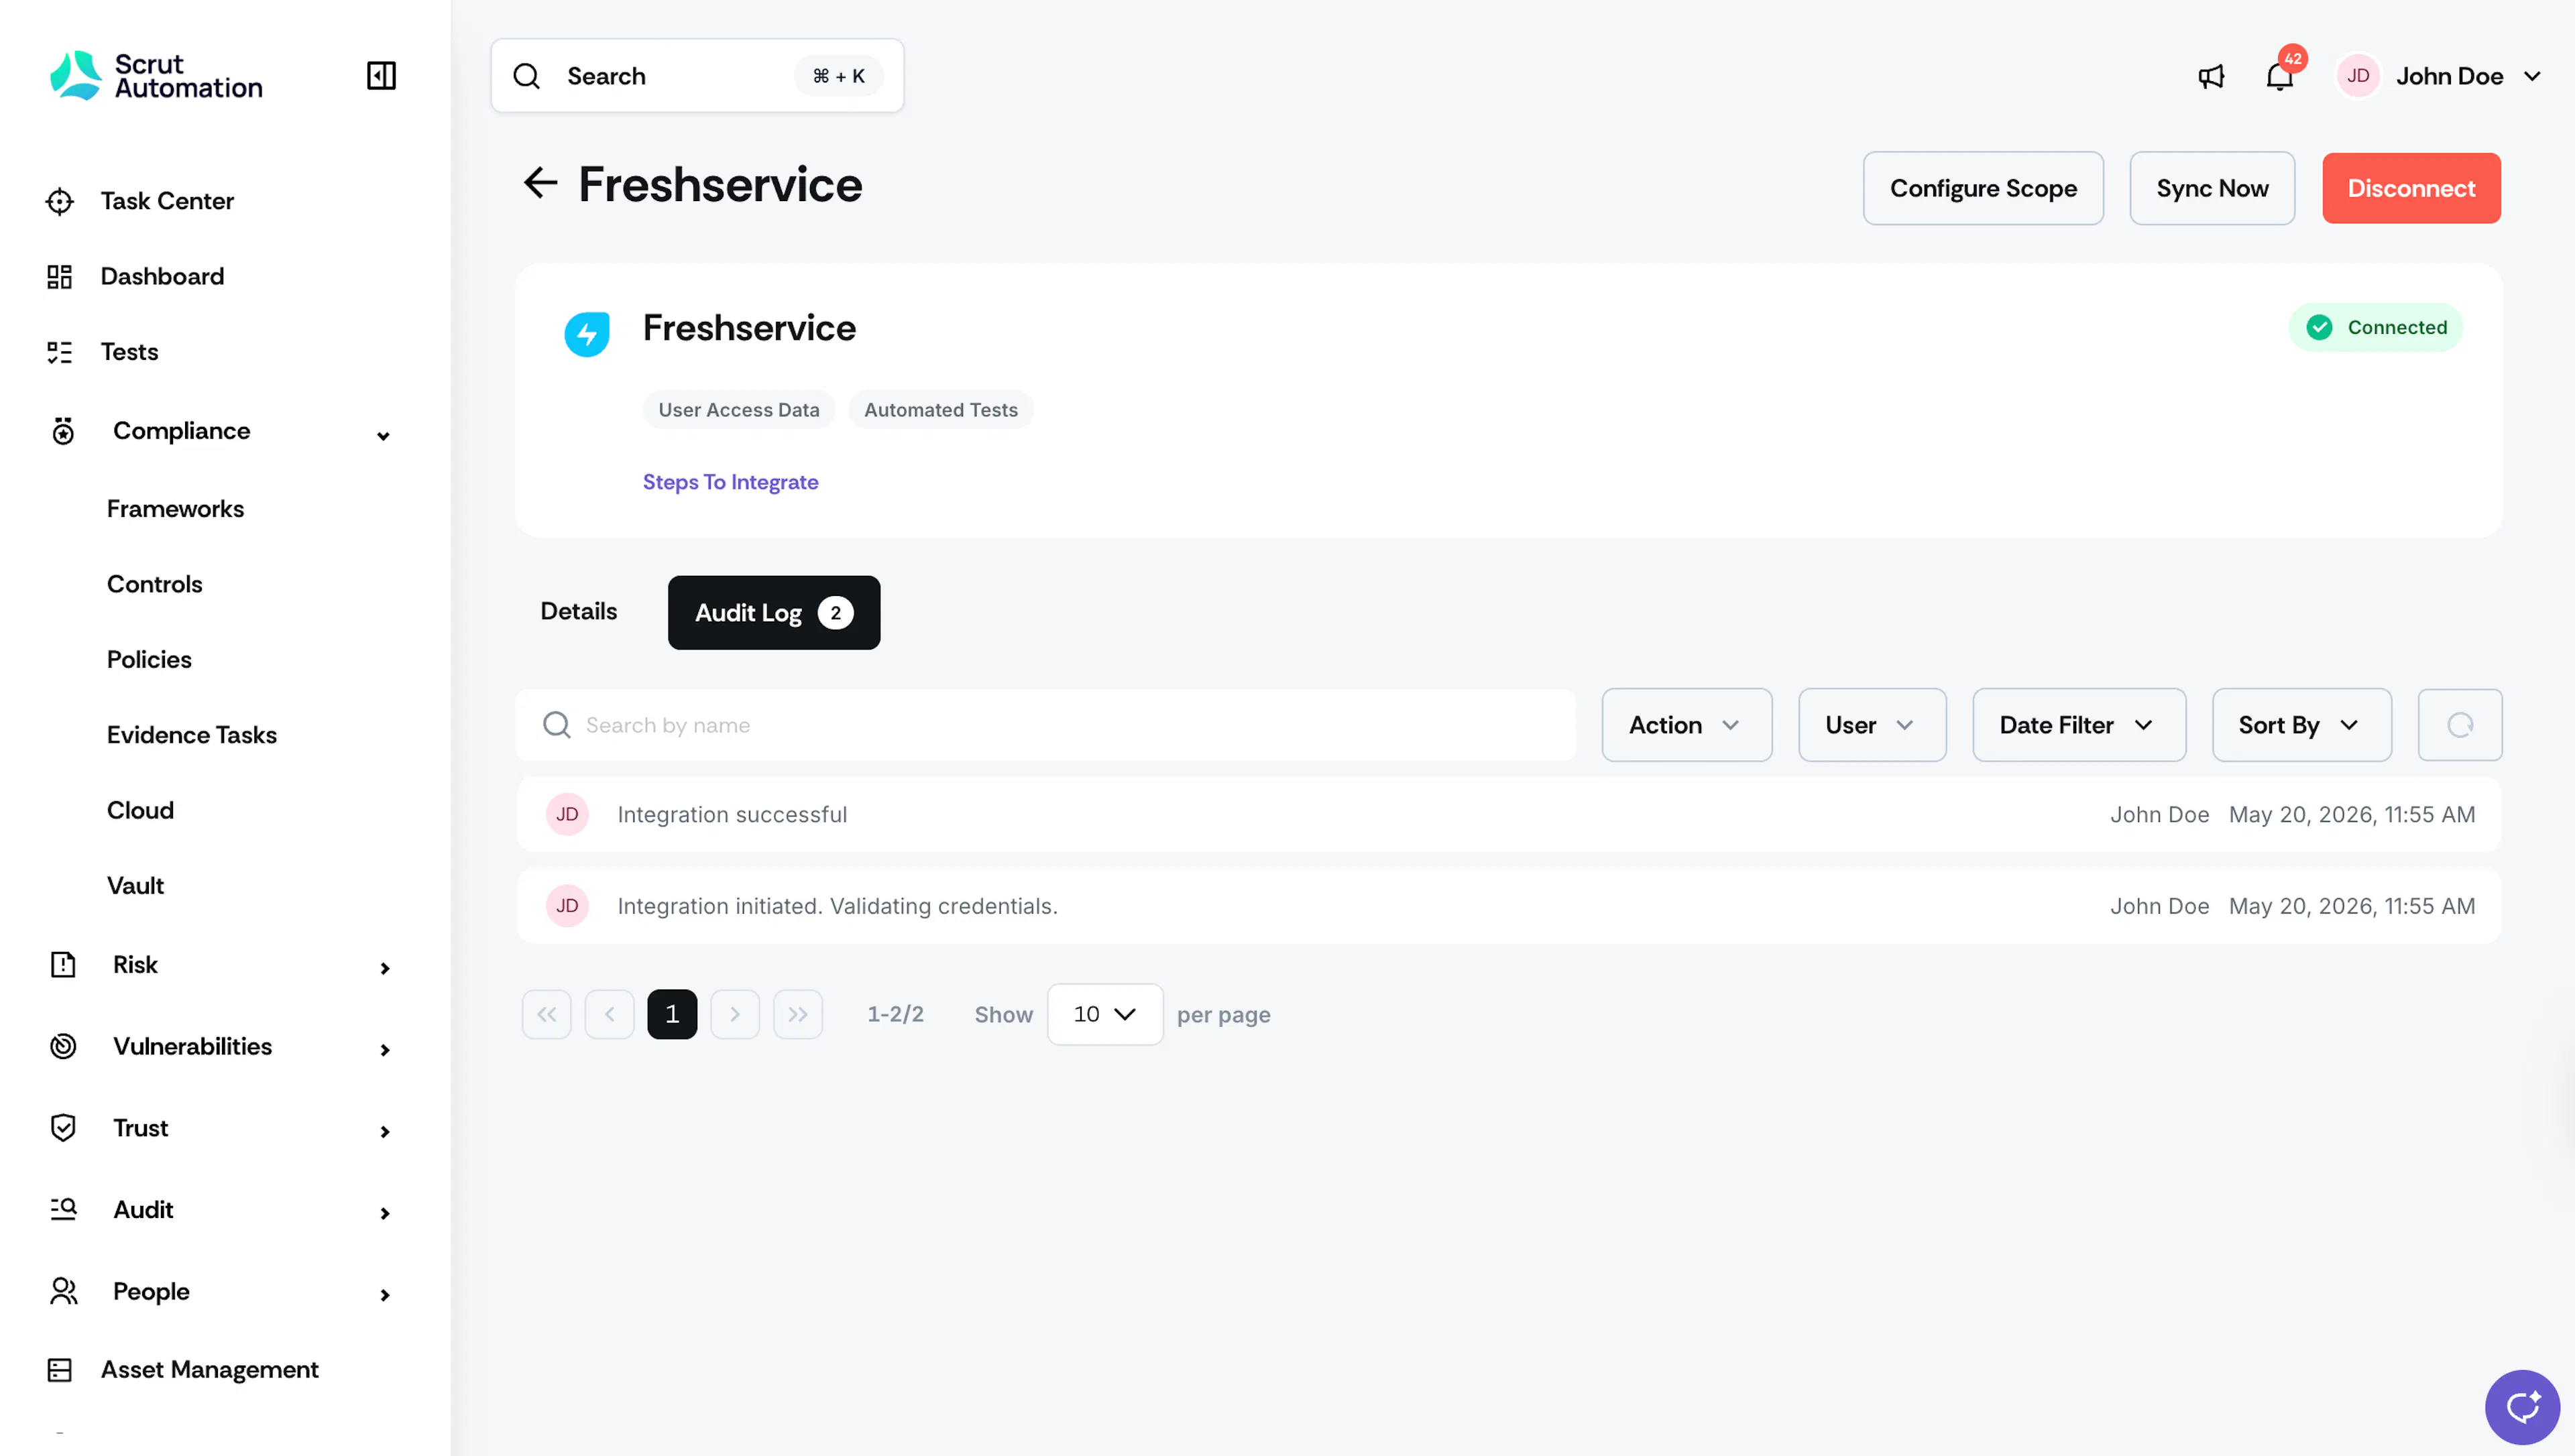
After setup, Scrut automatically starts syncing data from Freshservice. The initial sync may take a few minutes, depending on the volume of agents, roles, and tickets in your account. To monitor sync progress, open the Freshservice integration in Scrut and go to the Audit Log tab.
Review Synced Data
- Navigate to People → Access Reviews → Applications to view agents pulled from Freshservice. Create a new access review and include Freshservice.
- Navigate to Tests → Automated Tests to view compliance test status for Freshservice.
Create a Freshservice Ticket
Once the integration is connected, you can create a Freshservice ticket directly from any of the following modules in Scrut:
- Policies
- Evidence Tasks
- Tests
- Cloud
- Risk Management
- Audit → Audit Center → Requests
- Audit → Audit Center → Findings
- Audit → Audit Center → Corrective Actions
- Vulnerabilities → Findings
-
Navigate to the relevant artifact in any of the modules listed above.
-
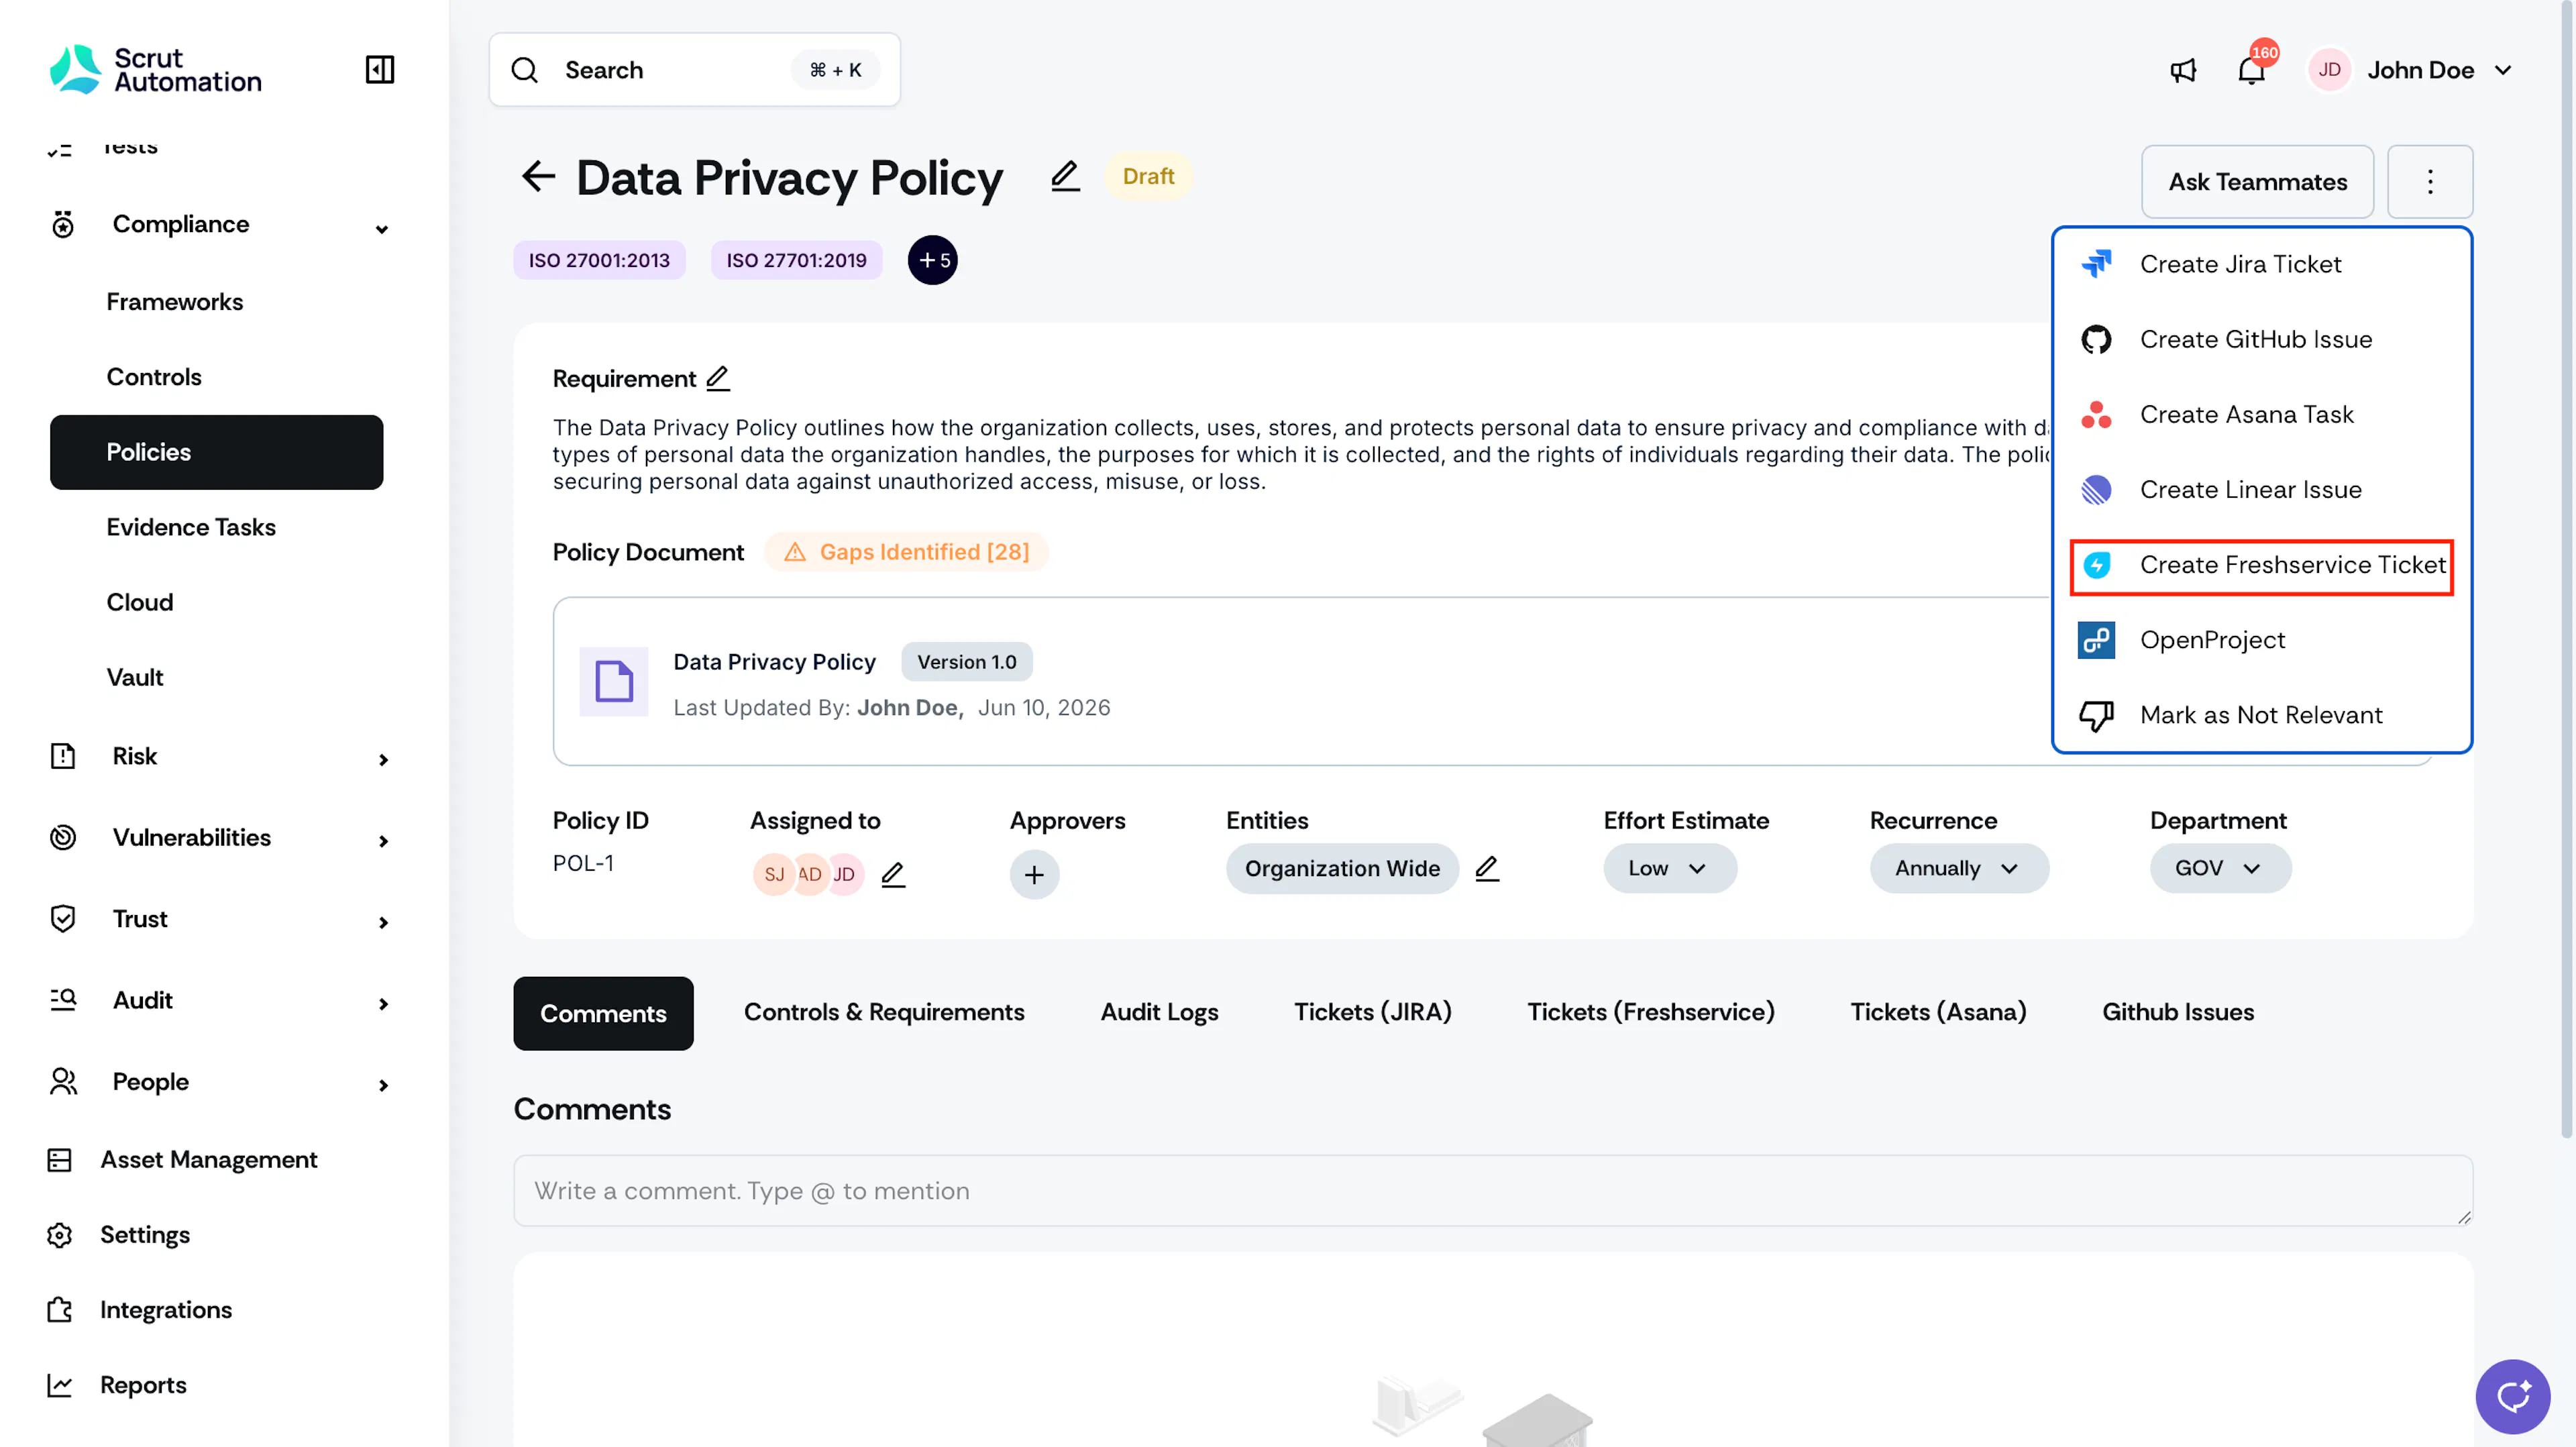
Click the three-dot icon at the top-right of the page and select Create Freshservice Ticket.
-
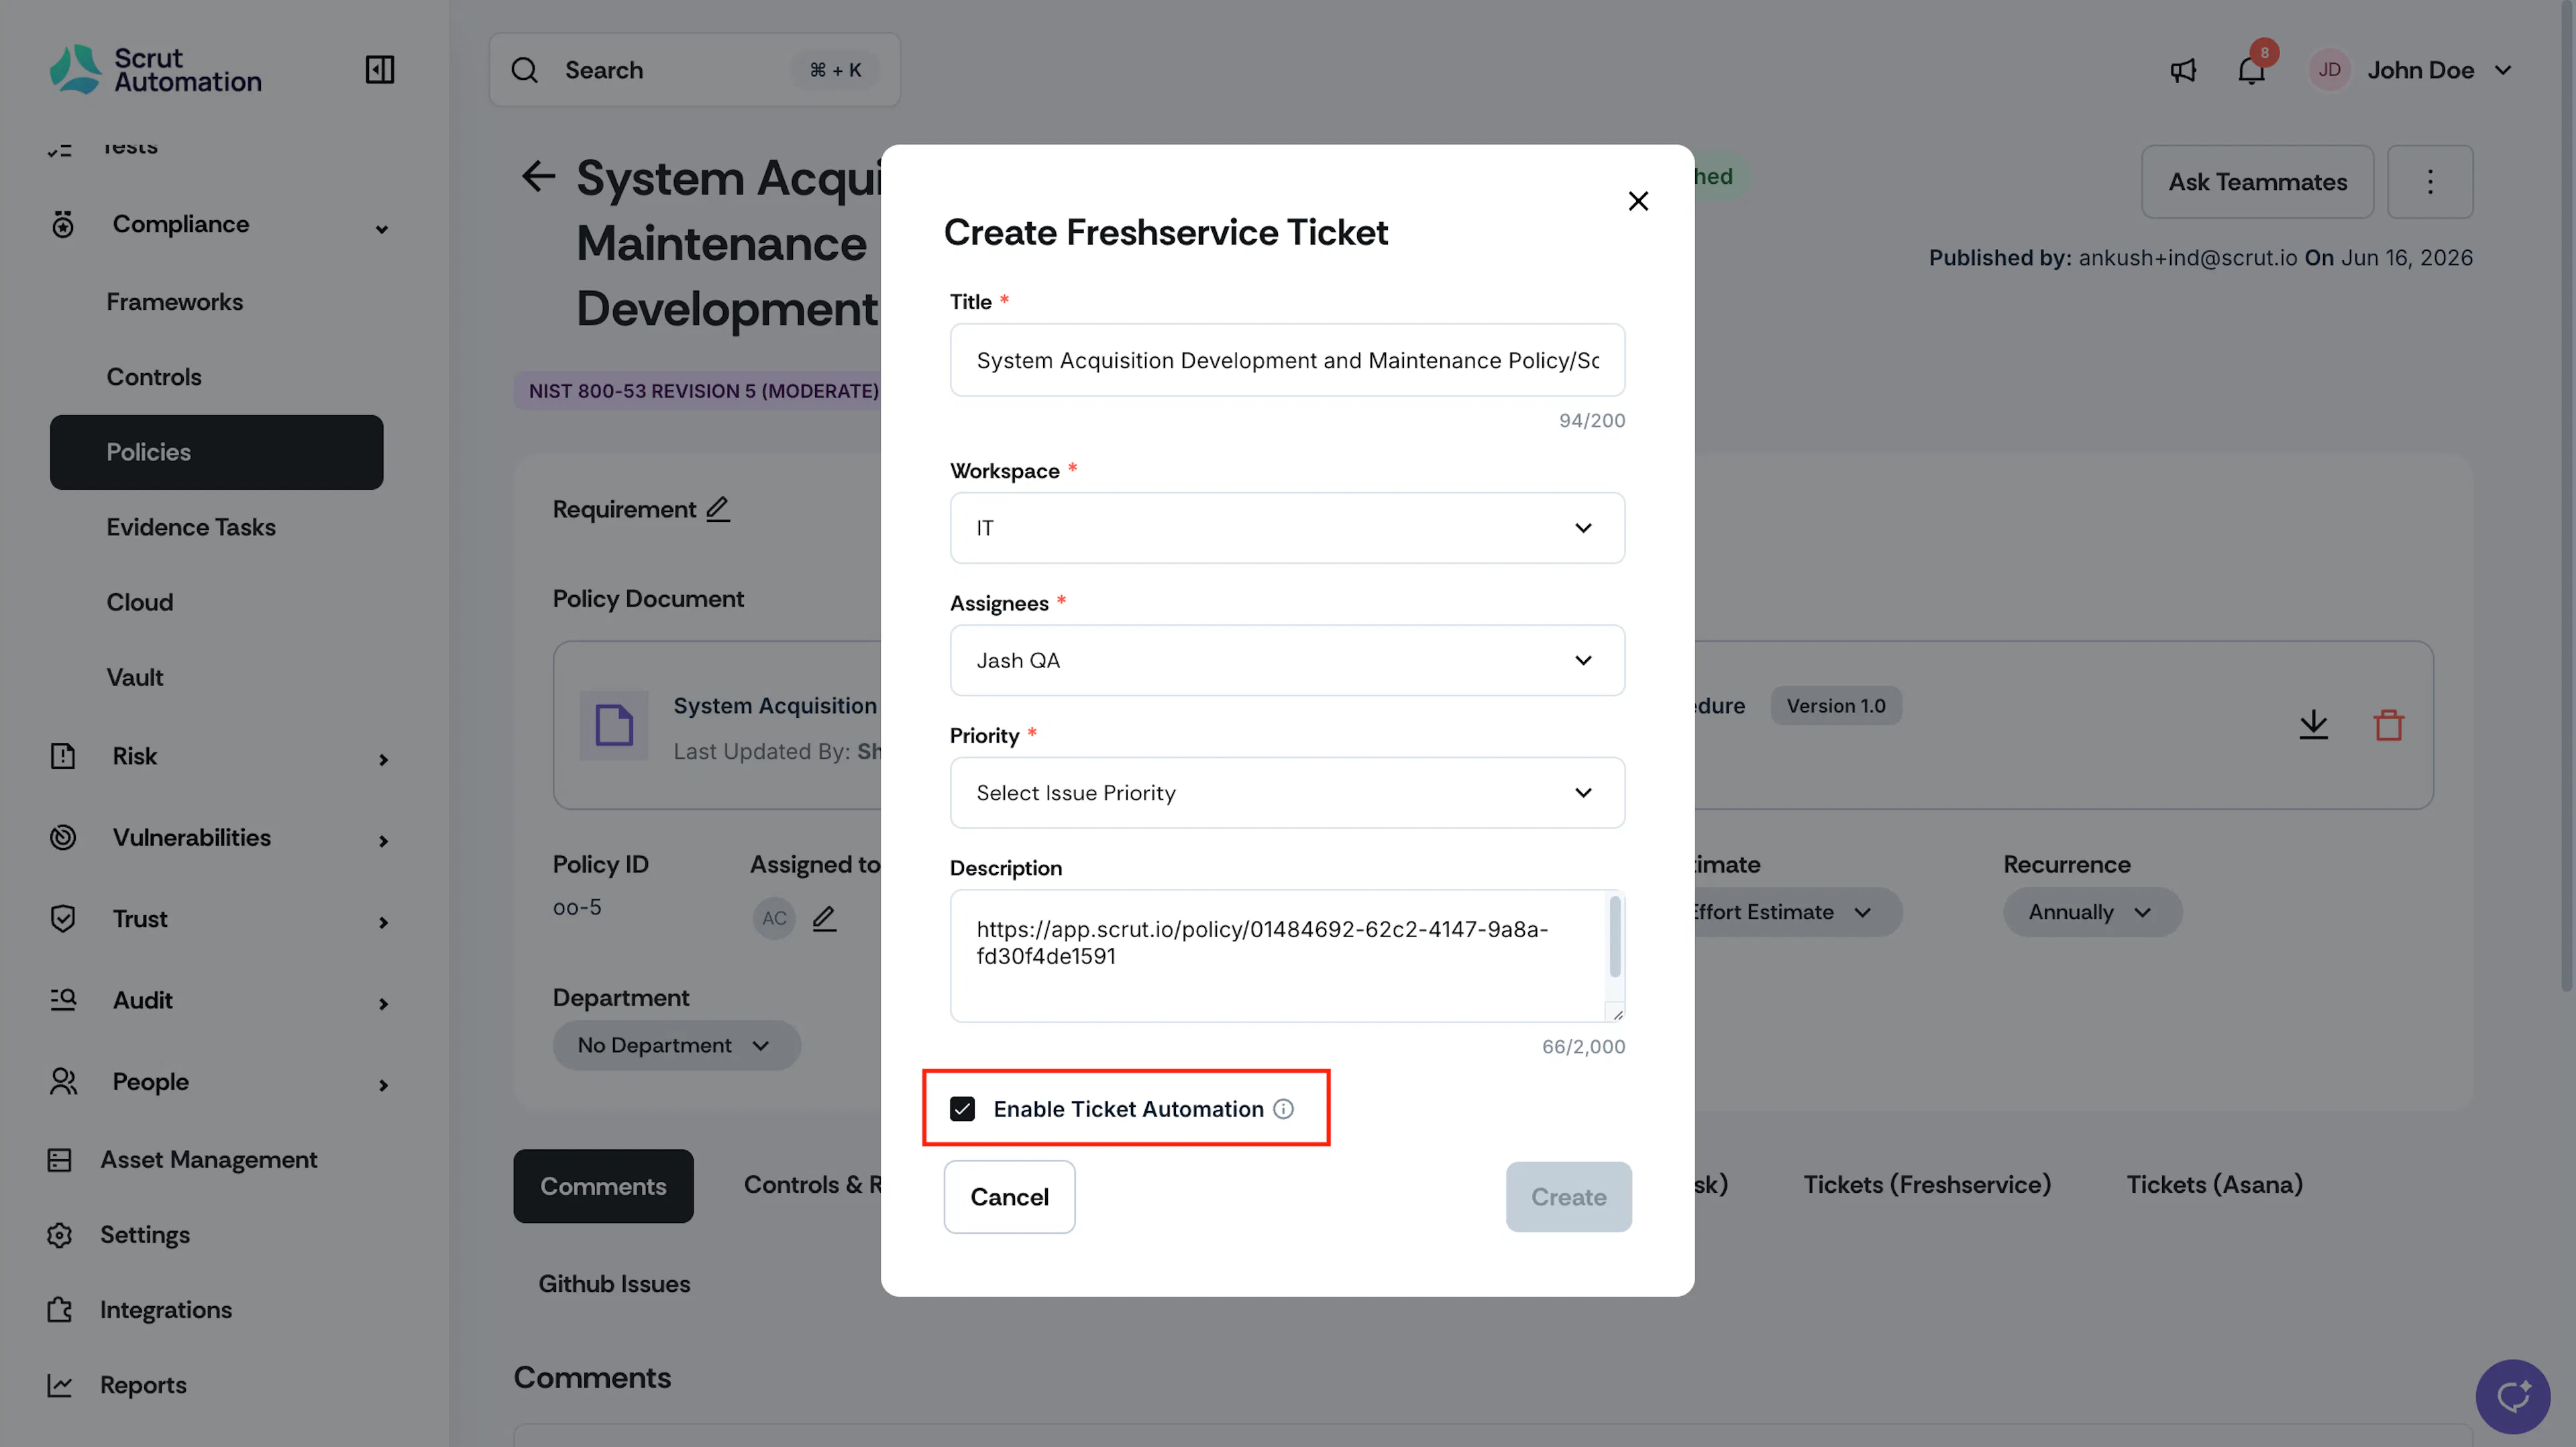
In the Create Freshservice Ticket modal, fill in the required fields.
-
Select the Enable Ticket Automation checkbox to create a new ticket whenever the artifact's status changes to non-compliant. See below for more details.
-
For evidence tasks only: Select the Sync Attachments from Freshservice checkbox to import attachments. See below for more details.
-
Click Create.
The ticket is created in Freshservice. Open it in Freshservice to set the assignee, due date, priority, and take further action.
Link an Existing Freshservice Ticket
Instead of creating a new ticket, you can also link existing Freshservice tickets.
-
Navigate to the artifact you want to link to a ticket.
-
Scroll down to the Tickets (Freshservice) tab.
-
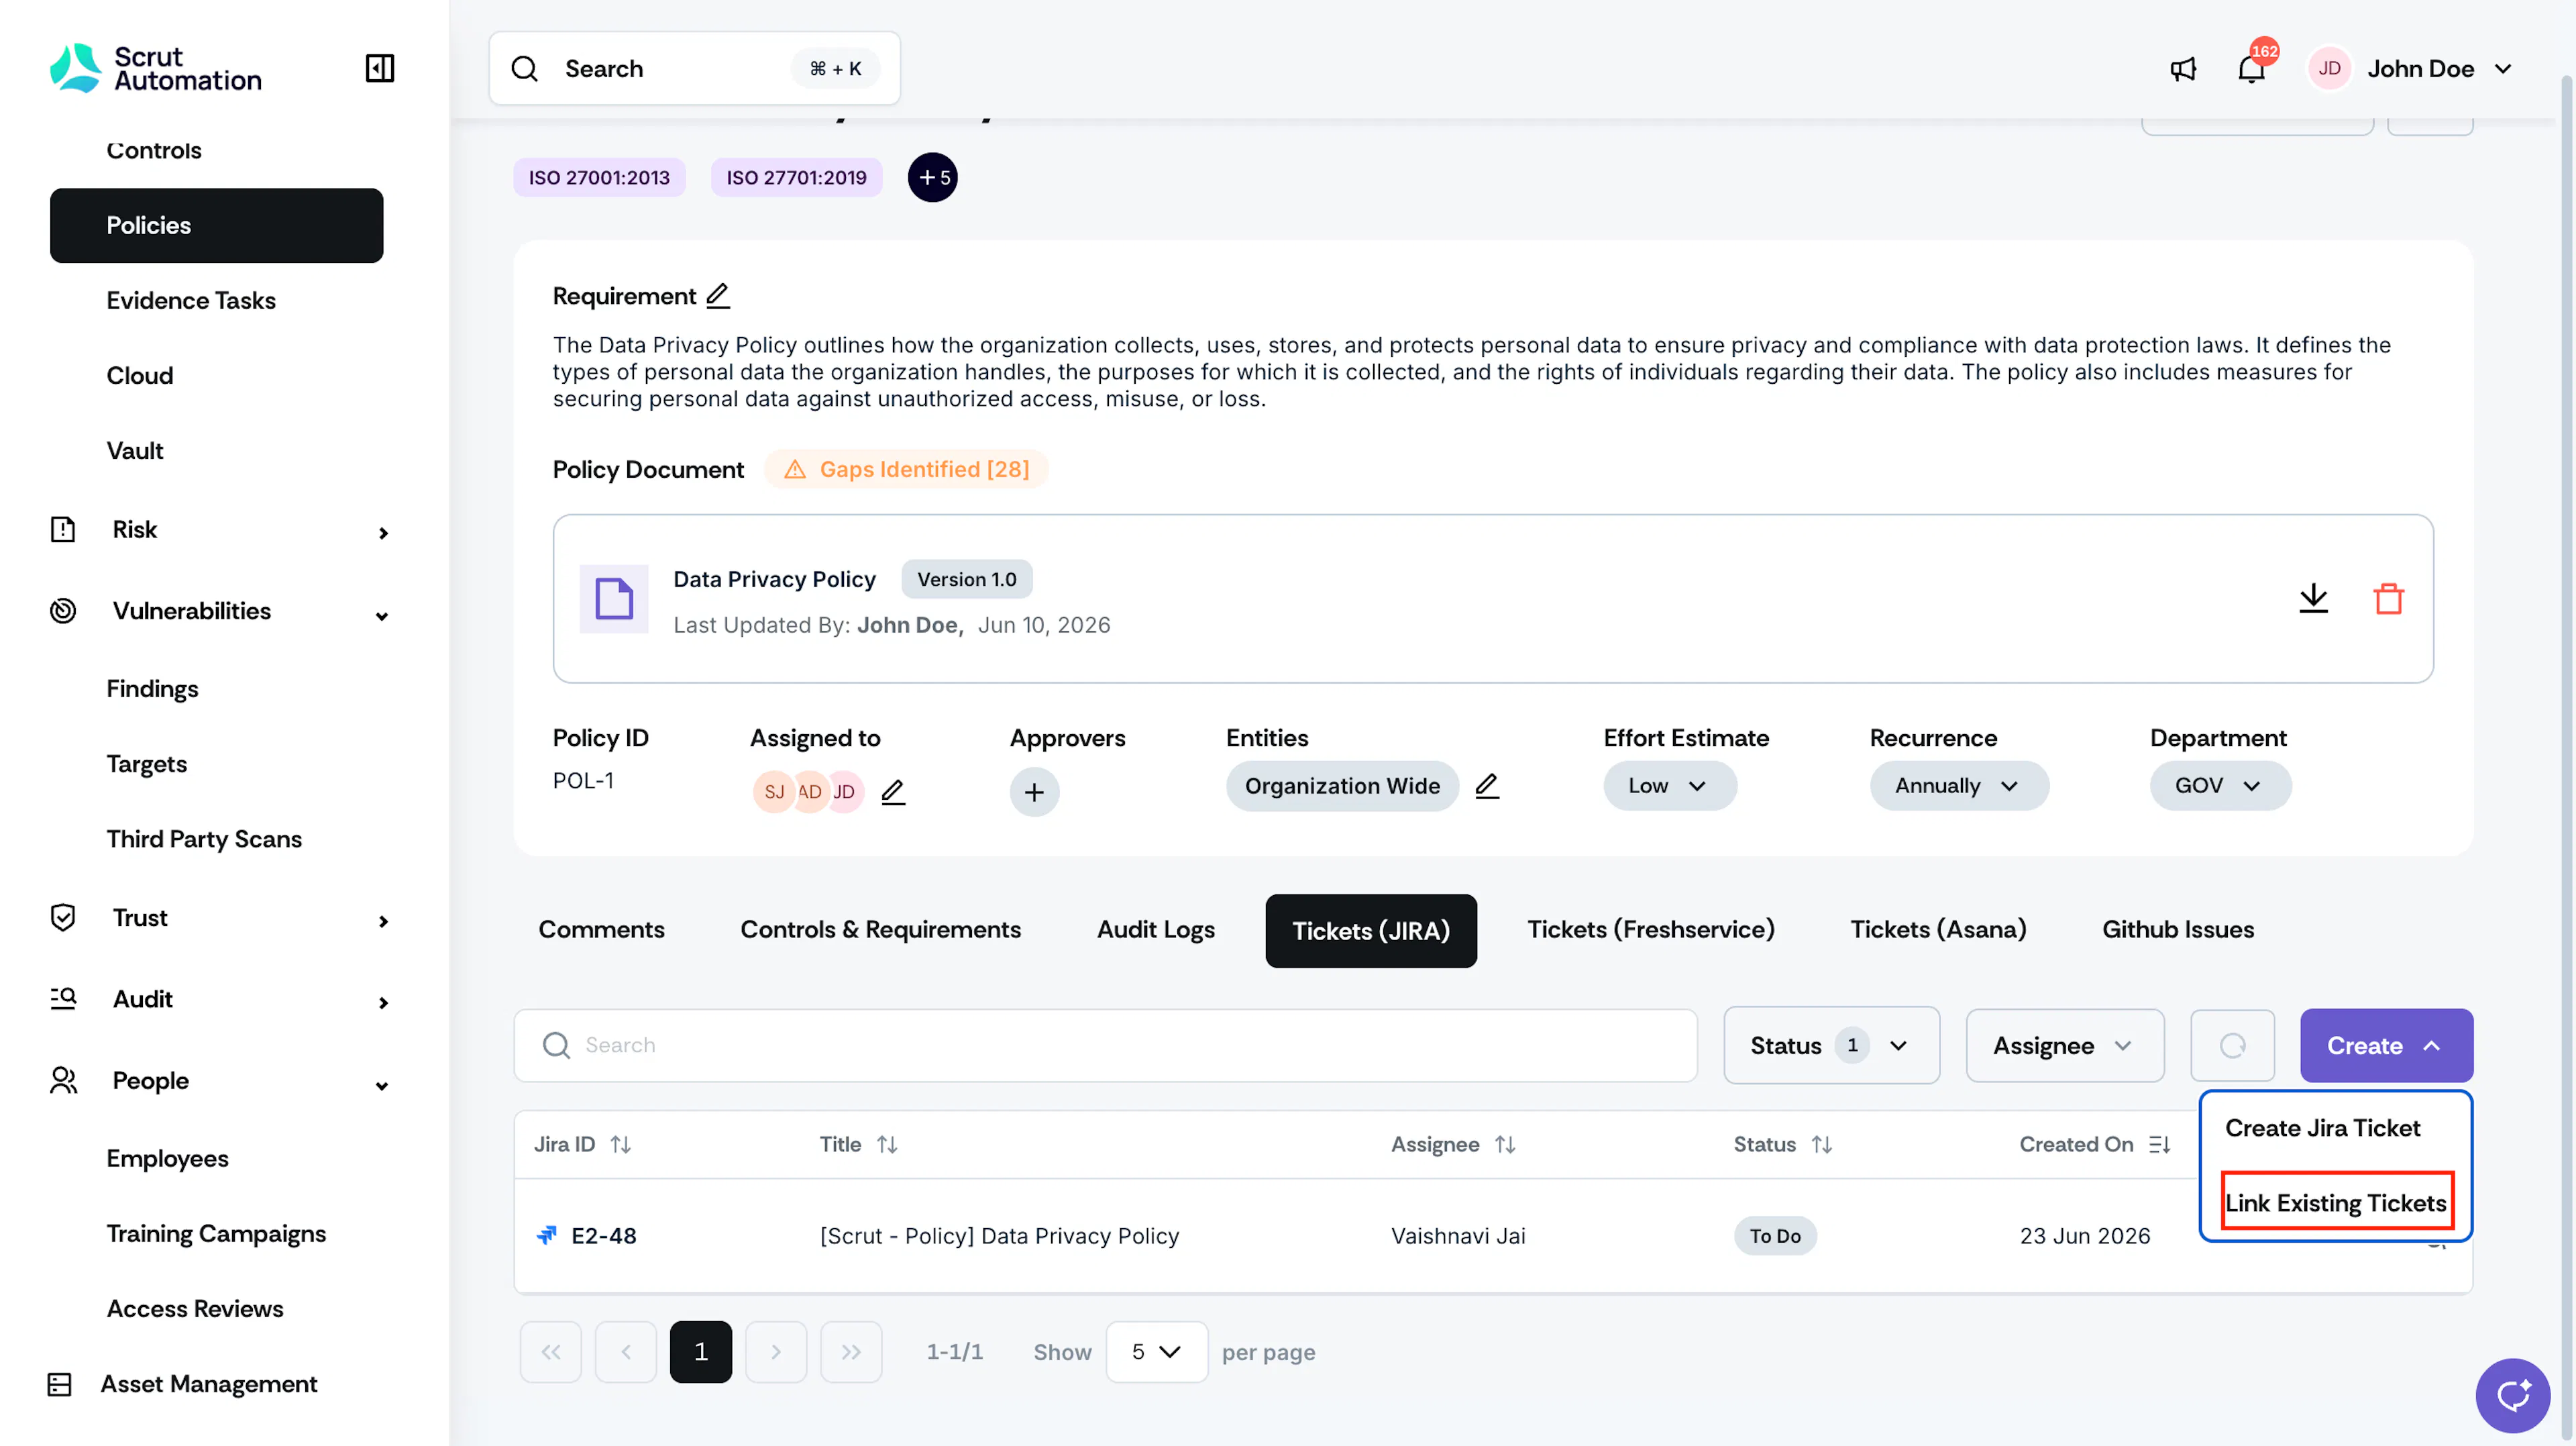
Click Create and select Link Existing Tickets from the dropdown.
-
In the Link Ticket modal, search for the ticket by entering its title or ID.
-
Select the ticket from the results.
-
Select the Enable Ticket Automation checkbox to enable automation for this ticket.
-
Click Link.
The ticket appears in the Tickets (Freshservice) tab and is now linked to the artifact.
Points to note:
- You can link multiple Freshservice tickets to the same artifact.
- You can also link the same Freshservice ticket to multiple artifacts, if required.
- There is no limit on the number of linked tickets.
Ticket Automation
Heads Up!
Ticket Automation is available for Evidence Tasks, Policies, and Tests only.
Ticket Automation enables Scrut to automatically create a new Freshservice ticket each time a linked artifact moves to a non-compliant status:
- Policy status changes to Needs Review
- Evidence Task status changes to Needs Attention
- Test status changes to Fix Required
This keeps your team's task queue updated without any manual effort.
Auto-generated ticket details
Each auto-generated ticket is a copy of the original ticket, with the same assignee, description, and metadata. The only difference is the title, which follows this format:
[MM/YY] Original Ticket Name
For example, if the original ticket is named "Review Quarterly Access Logs" and the status change happens in March 2025, the new ticket is titled "[03/25] Review Quarterly Access Logs."
The new ticket is automatically linked to the same artifact as the original and appears in the Tickets (Freshservice) tab alongside all manually created and previously automated tickets.
How to enable ticket automation
You can turn on automation in two ways:
- When creating a new Freshservice ticket, select the Enable Ticket Automation checkbox before clicking Create. From this point, Scrut creates a new ticket each time the artifact's status changes to non-compliant.
- When linking an existing Freshservice ticket: In the Link Ticket modal, select the Enable Ticket Automation checkbox before clicking Link. Automation applies going forward. The existing ticket is not modified.
Points to note:
#1: A new automated ticket is created only once per day. If an artifact moves to a non-compliant status multiple times in the same day, Scrut creates a single ticket for that day.
Here is an example of how this plays out:
- Day 1 (Test moves to the Fix Required status): The first automated ticket is created
- Day 2 (Test still in the Fix Required status after the scheduled scan): The second automated ticket is created
- This continues until the test returns to the Passing status
#2: If multiple tickets are linked to the same artifact and all have automation turned on, each ticket is duplicated individually when the status changes. Each new ticket retains its own metadata and follows the [MM/YY] naming convention.
#3: Existing auto-generated tickets are not updated or closed automatically. Your team manages the ticket lifecycle in Freshservice as part of their normal workflow.
#4: Scrut creates an audit-log entry every time a new ticket is auto-generated.
#5: If an automated ticket fails to be created, a red warning icon appears next to the original ticket in the Tickets (Freshservice) tab. Hover over the icon to see the reason for the failure.
Stopping ticket automation
To stop automation:
- Unlink the original ticket from the artifact in Scrut
- Delete the ticket in Freshservice
Once the original ticket is removed, Scrut stops generating new tickets. Any previously auto-generated tickets remain linked to the artifact and are not affected. For example, if the original ticket has already triggered two automated tickets, those two remain visible in the Tickets (Freshservice) tab. Only future automated tickets will stop being created.
Sync Attachments to Evidence Tasks
Important
Syncing Freshservice attachments is available for Evidence Tasks only. It has no effect on tickets created for other modules.
Scrut can automatically import attachments from linked Freshservice tickets into the corresponding evidence task. This keeps your evidence collection complete without requiring manual uploads on both sides. This feature works at two levels.
Turn On Automatic Attachment Import
This is a global setting that applies to all Freshservice tickets linked to evidence tasks in your workspace. When turned on, any file explicitly uploaded via the Add Attachment button in a Freshservice ticket is automatically imported into the linked evidence task in Scrut.
- Navigate to Integrations in the left menu.
- Search and locate the Freshservice tile in the Connected Integrations tab.
- Click Configure.
- Navigate to the Settings tab.
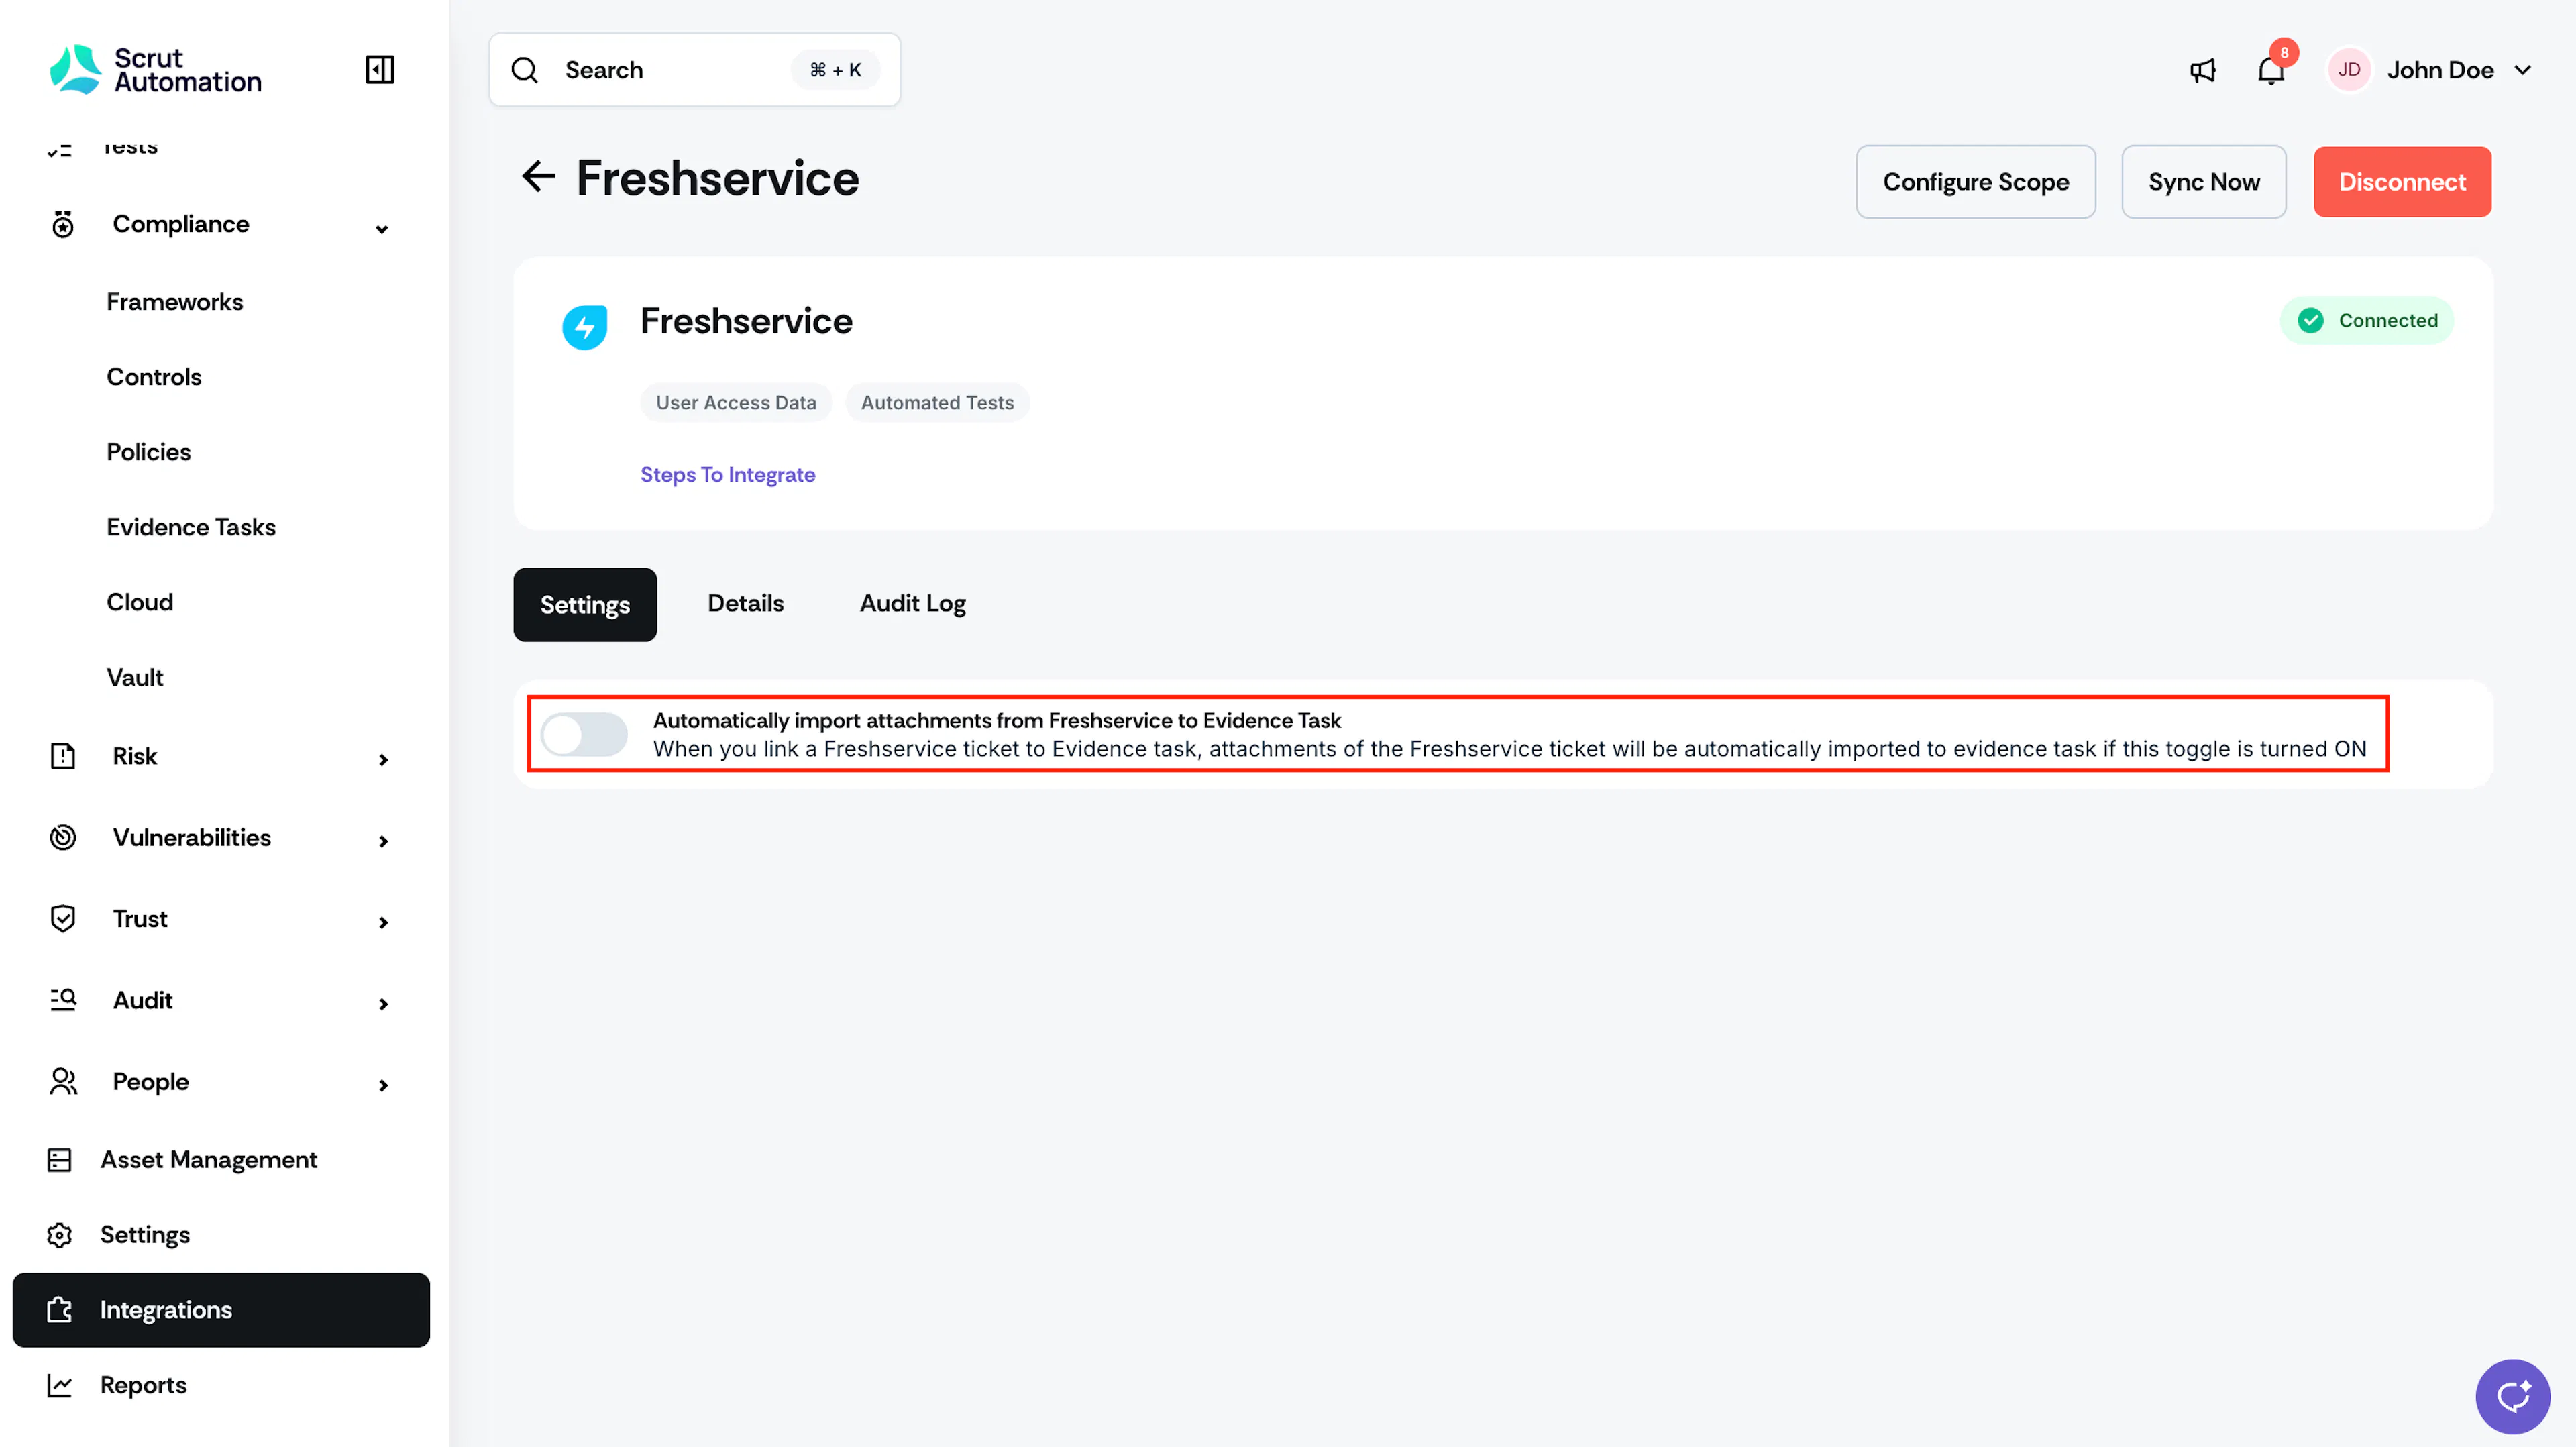
- Turn on the Automatically import attachments from Freshservice to Evidence Task toggle.
Attachments from linked Freshservice tickets will now sync to the corresponding evidence tasks automatically.
Also Sync Embedded Attachments
By default, files embedded inside Freshservice ticket descriptions and comments, such as inline images, are not synced, even when the global toggle is on. To include these, enable this option when creating the ticket.
- In the Create Freshservice Ticket modal, select the Also sync attachments embedded in descriptions and comments checkbox before clicking Create.
Updating Tasks in Freshservice
The integration between Scrut and Freshservice is bidirectional and syncs in real time. When you change any synced fields in your Freshservice tickets, those changes will automatically update in Scrut. For example, if you mark a task as completed in Freshservice, that completion status will immediately appear in Scrut.
Set up a Scrut Monitor
To collect ticket evidence from Freshservice, create a Scrut Monitor:
-
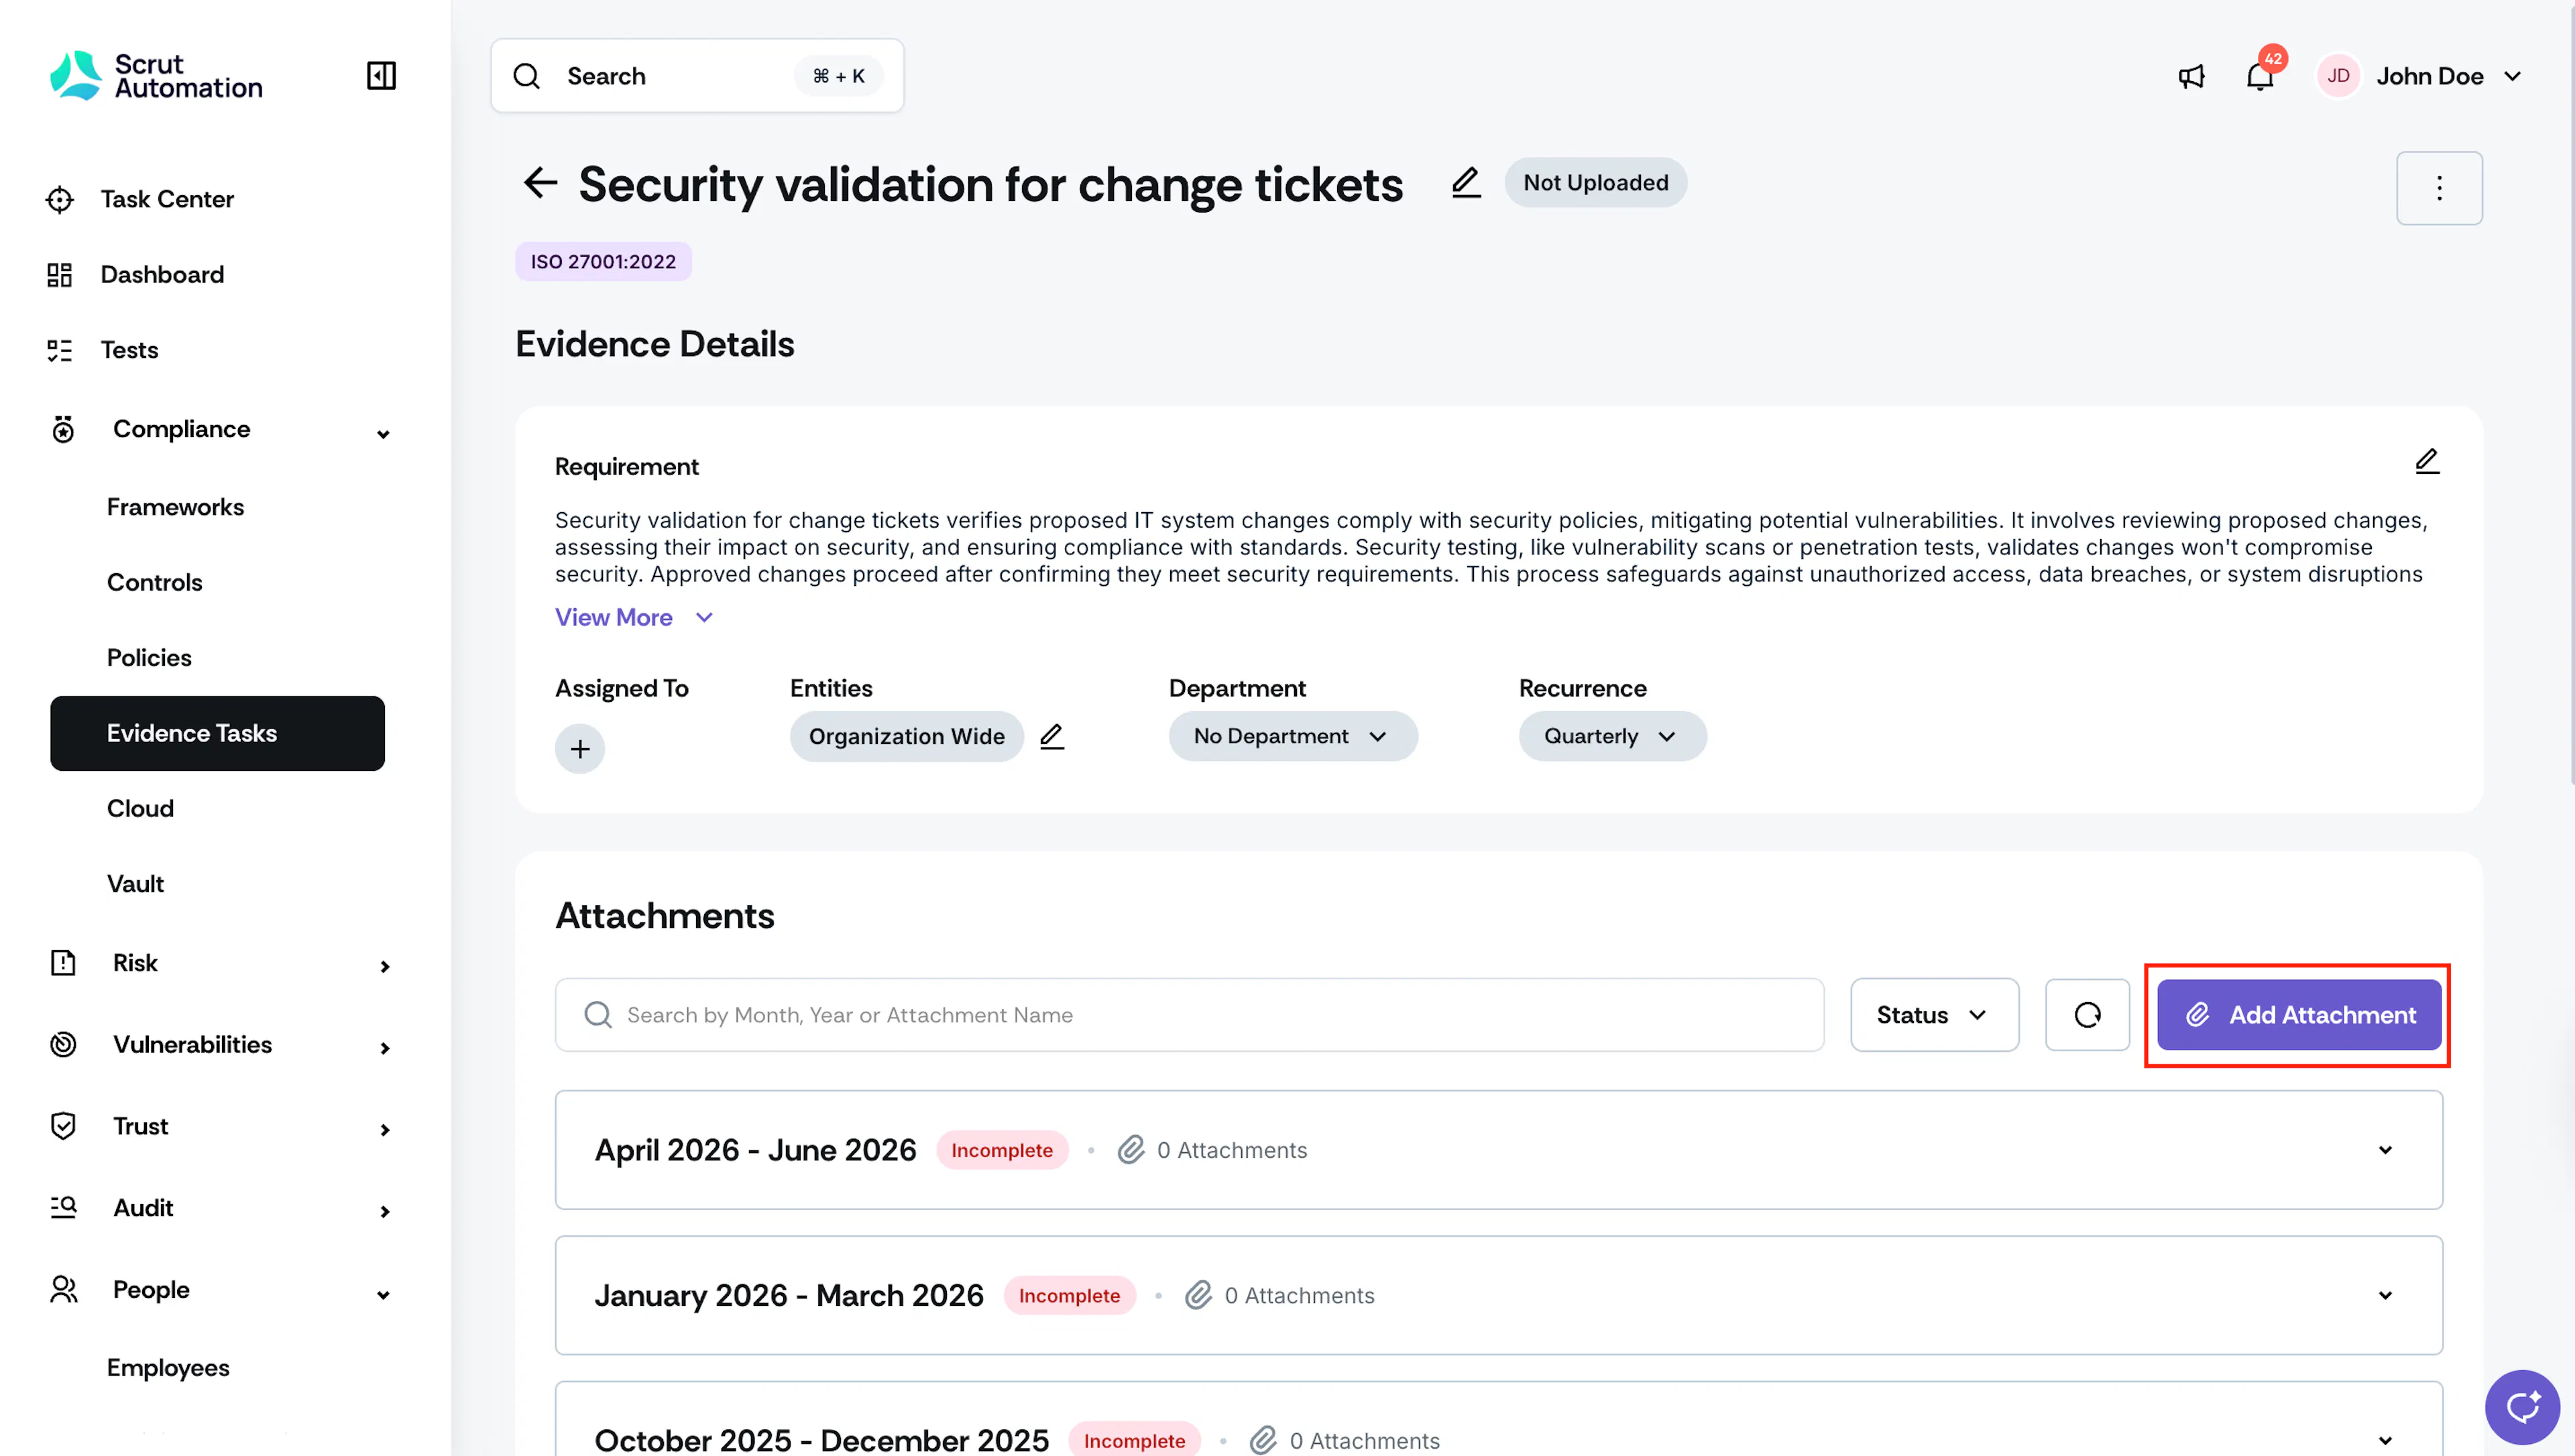
Navigate to Compliance → Evidence Tasks and open your preferred evidence task.
-
Click Add Attachment.
-
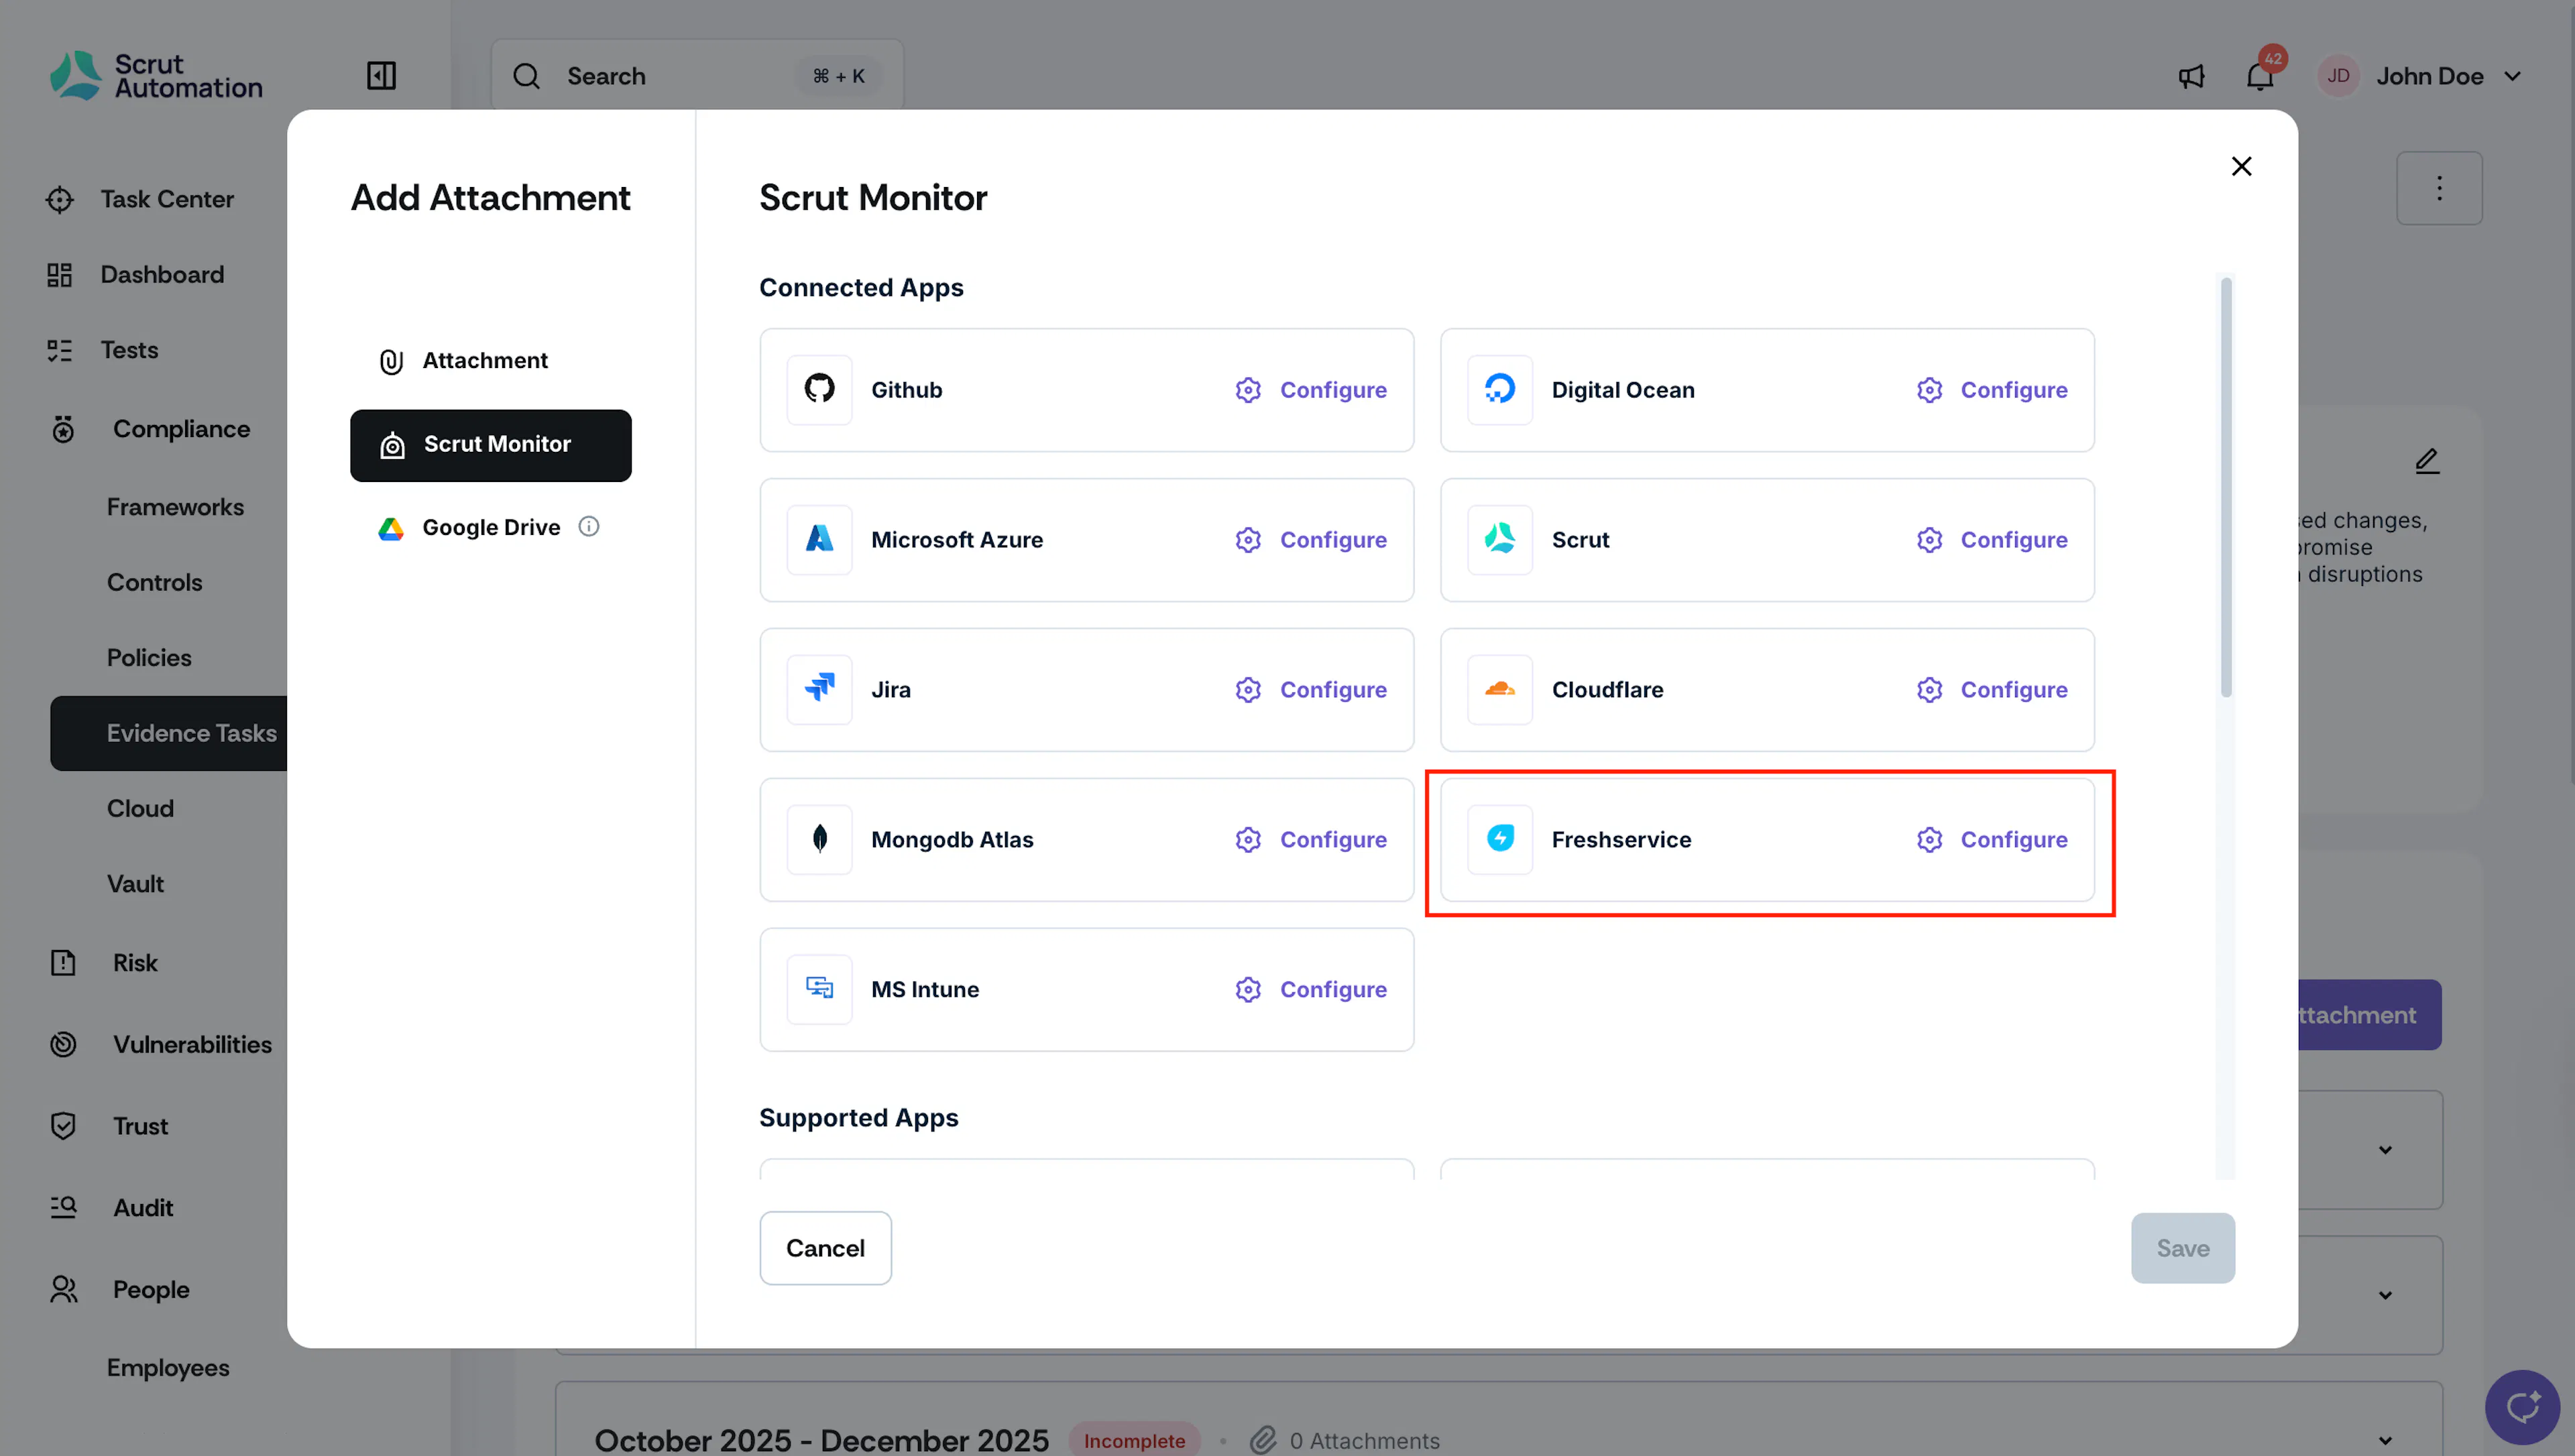
Navigate to the Scrut Monitor tab and click Configure on the Freshservice monitor card.
-
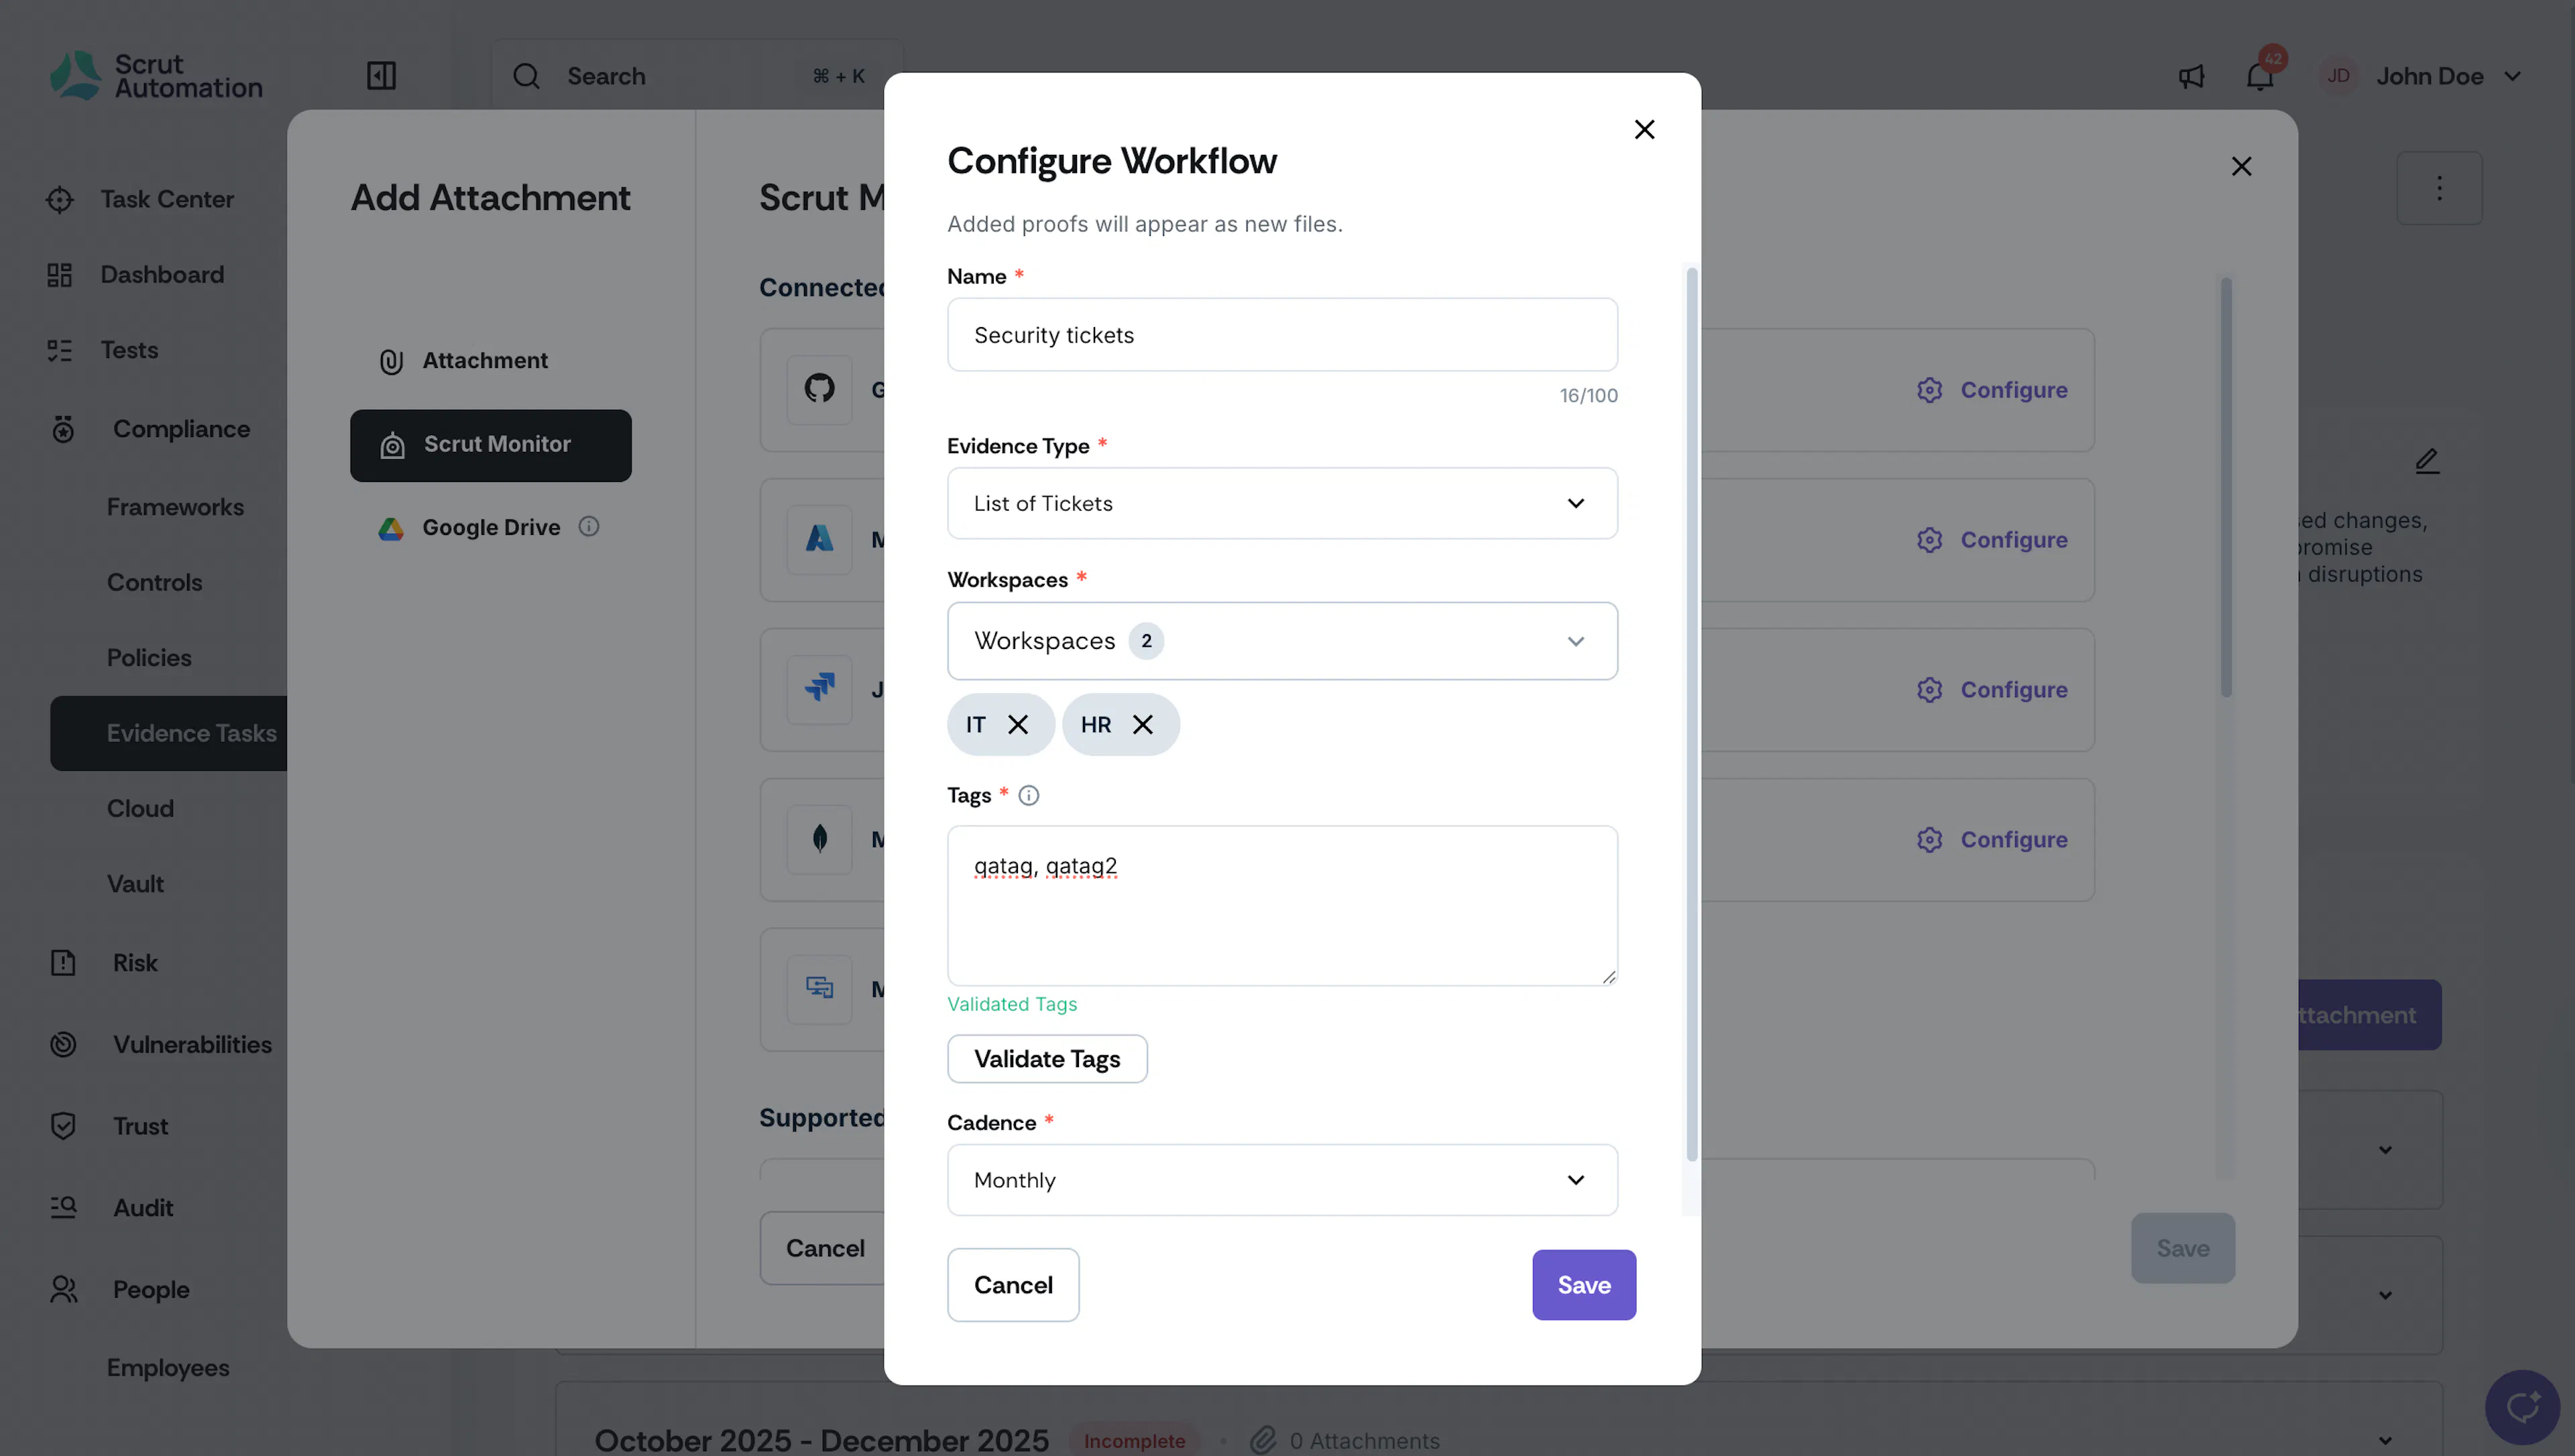
Give the monitor a name, and in the Evidence Type, select List of Tickets.
-
Select the workspaces from which you want Scrut to fetch tickets.
-
In the tag field, enter one or more tags to filter tickets (e.g., security, access-review). Scrut validates each tag by checking for matching tickets in Freshservice. If no tickets match a tag, the following message appears: No tickets found for this tag.
-
Select the cadence, aka the frequency at which you want Scrut to fetch the evidence and attach it to the monitor.
-
Click Save to create the monitor.
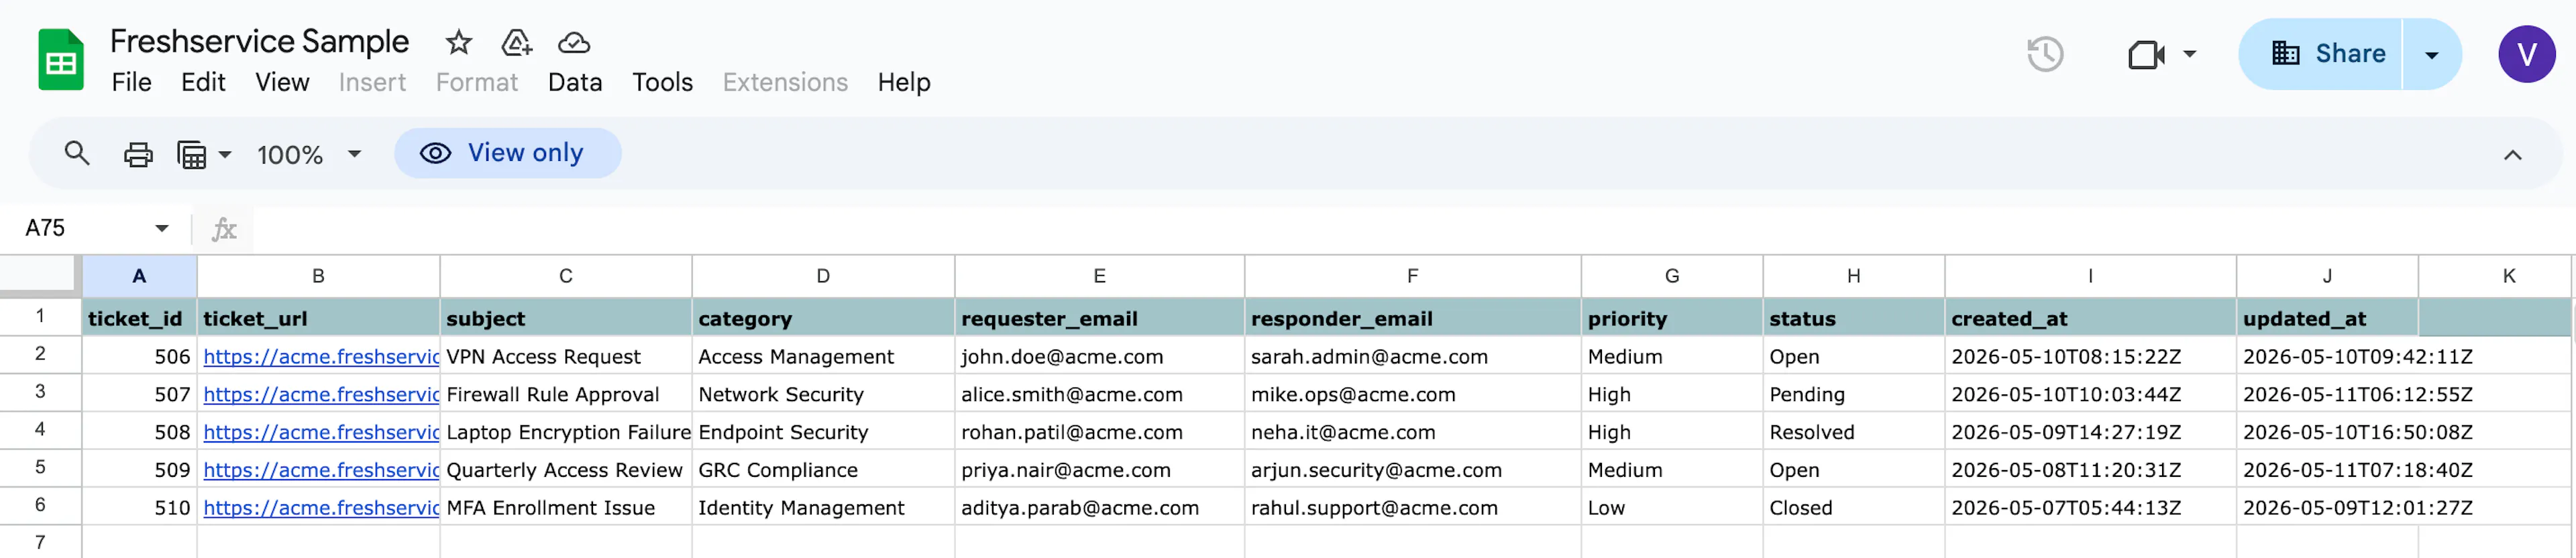
When the monitor runs, Scrut fetches all tickets matching your configured tags and generates a CSV evidence file. The CSV includes: ticket ID, ticket URL, subject, category, requester email, responder email, priority, status, creation date, and last updated date.
Note: You can add multiple tags to a single monitor. Scrut validates each tag before the monitor is saved.
Common Errors and Troubleshooting
Authentication failure
Possible solutions:
- Verify that the API key is copied correctly and has not expired or been rotated.
- Confirm that the API key belongs to an active Freshservice agent with the required scopes.
- Check that the subdomain is entered without https:// or .freshservice.com. Enter only the subdomain itself (e.g., acme).
Data not appearing in Access Reviews
Possible solutions:
- Confirm that the integration is connected and that the last sync completed without errors by checking the Audit Log tab.
- Verify that the agents in Freshservice are marked as active. Only active agents are included in Access Reviews.
- Trigger a manual sync from the Freshservice integration settings page and recheck after a few minutes.
FAQs
Reach out to support@scrut.io or contact your CSM for further assistance.